Motherboards come with a safety feature that detects if a cooler is connected or working properly. If it fails to see a fan working correctly, that is when you see CPU Fan Error displayed on your screen when a computer boots up.
For any user, this can send shivers down your spine, particularly if you just got a new build.
While this can indicate a non-working cooler, you can assess this condition to determine what is causing the error in the first place.
So, let’s start.
Check out our separate post to CPU cooler won’t install.
Why is Your BIOS Showing a CPU Fan Error?
The primary reason your BIOS cannot detect the attached fan is that the fan is not running or dissipating the heat generated by your processor. If you have connected the CPU cooler to a different header other than the one reserved for the CPU fan, you will also get the error.
As you use the computer, the processor executes instructions, and as a result, it generates heat. If this heat is not removed, the electrical components of the processor are damaged permanently.
So, as a safety check, the BIOS monitors the CPU fan to see whether it is running at a decent speed to remove the heat. Even if the fan runs at a lower speed, you can get the same error code.
Another rookie mistake you can do is when you connect the AIO pump to the CPU fan headers on your motherboard. I did the same thing when I installed a Corsair H100 cooler for my computer for the first time and freaked out when I encountered the same error.
So, how did I go through the troubleshooting process?
Let’s take a look.
Also, check out our separate post on can I start a PC without a CPU cooler.
How to Fix CPU Fan Error
To fix the CPU fan error, first, check the fan blades to spin freely. If they are good to go, proceed to observe the connections of the fan to the motherboard. The next step involves lowering the minimum fan speeds allowed in the BIOS.
This is the exact order I followed when troubleshooting this particular issue. So, let’s fix the CPU fan error one step at a time.
Here are the steps to fix the CPU fan error:
Step 1: Check the Fan for Obstruction
When building your computer, you may think of cable management as an aesthetic aspect. But in reality, it is more than that.
If the unrouted cables can come in contact with any of your internal fans, be it CPU or GPU, the fans will stop spinning. A clicking sound is very commonly heard when the fans cannot move. It disrupts the cooling process, and your BIOS will report that the fan is not operational.
SATA cables are notorious for interfering with the CPU cooler; you should look out for this on your rig. 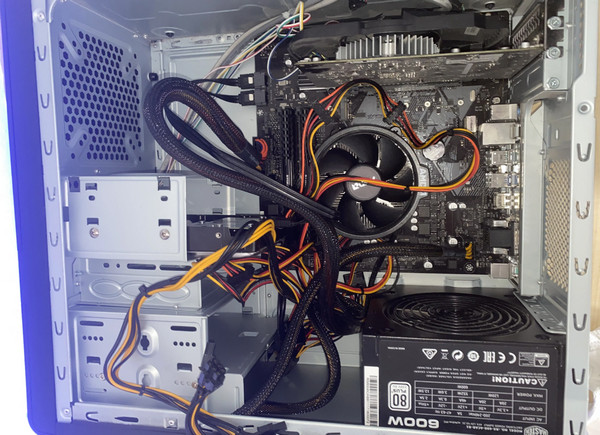
Remove any extra cables and route them to the back. When you are done, you will not only ensure that the fans start working but also gain applause from your peers for such a tidy-looking computer.
Here’s a complete guide on how to know if CPU cooler is compatible with Motherboard.
Step 2: Connect the Fan to the Correct Header
The next thing to look out for after the fans are spinning properly is how the connections between the processors’ fan and the motherboard are done.
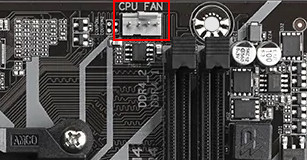
Modern motherboards have different headers to connect different types of fans. To connect the CPU cooler, you need to hook it to a header labeled CPU_FAN.
A CPU fan header, as seen on the Gigabyte B-450 motherboard.
Connecting the cooler to another header will make the fan operational, but the BIOS will throw an error as it does not detect any fans connected to the dedicated CPU header.
For liquid coolers, the connector from the AIO pump should connect to the dedicated AIO_PUMP. The fans on the heatsinks will connect to the SYS_FAN or CHA_FAN, respectively.
Ensure these connections are made correctly and fire up your computer. Does the error remain?
If the answer is yes, proceed to the next step.
Check out our recent article on do you need a CPU cooler.
Step 3: Reduce the Minimum Fan Speed
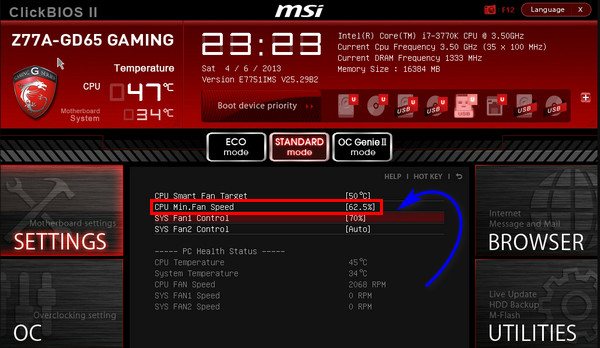
Next, we need to boot to the BIOS and reduce the fan’s minimum speed.
Some fans are PWM controlled and can be set to run on a quiet profile when the CPU is not running at 100%. The downside is that the BIOS can translate this behavior as an inactive fan due to a low fan RPM.
To stop this from happening, reduce the fan’s minimum speed. Go to Monitor > CPU Fan speed lower limit and set the value to 200 RPM. Now the BIOS should detect the fan and will not post the error.
Different motherboards have different proprietary software to control the fan’s speed. Asus has its Q Fan, while Gigabyte has Smart Fan software integrated with the BIOS. All these software serve the same purpose, and you will find the option to reduce the fan’s RPM lower limit here.
For your reference, this is what my MSI motherboard’s fan software looks like:
Also check our exclusive tutorial on why are Motherboards green.
Step 4. Change the Fan Speed Settings
For the final step, we will bypass the BIOS to stop monitoring the fan’s speed.
This is not ideal for your computer, but the error will go away once we disable this setting. You can then monitor the CPU temperatures while running a load against it. It will also determine if you require replacing the CPU cooler.
You can do this by going to Monitor > Fan Speed Monitor > N/A.
These steps should ensure that the BIOS recognizes your CPU cooler and start working again.
Monitoring the processor temperatures using third-party software such as MSI Afterburner is always a good idea. If your processor is getting hot while running games or CPU-intensive tasks, it is time to change your CPU cooler.
If these steps do not help you out, then the CPU cooler may be damaged. If you are running an AIO solution, contact the manufacturer for RMA.
Tips for Cooling Your Computer the Right Way
You may already know some of this, but they are essential to keep the computer running smoothly. A cooler computer will perform at full loads for longer periods and run for a long time before breaking down.
Here are the hacks for keeping your computer cooler:
1. Remove Dust and Debris from the Fans
Dust accumulation hinders the fan’s movement to draw in the maximum possible airflow to your computer. As a result, you will see a higher temperature from the processor.
Use a can of compressed air to remove the dust from the fans and heatsinks. You can also use a blower machine to remove the build-up of dust. Dont forget to remove and re-apply the thermal paste on the processor every few years.
2. Keep Your Computer Well Ventilated
Keep the computer case near a window or on top of a table where there is plenty of airflow. Placing the tower inside cabinets or in the corners of a room is a big no for the movement of air.
Do not keep books or paper on top of the case, as this will block the channels through which air moves out of the case. Imagine the radiator fans working hard to pull the hot air out of your case only to get blocked at the outlet.
3. Place the Fans Correctly For Better Airflow
Modern cases allow you to install 3 or more fans on it. You can choose to draw more air in the case or pull out the hot air using more fans in the outlet. Whichever approach you go for, ensure that airflow inside the case is not hampered.
For example, If you have 3 fans to pull in cold air but only use a single fan to pull out the hot air, the air pressure inside the case will build up. Your computer will report a higher temperature, and you will not get a better performance.
Employing the same or a closer number of fans on either side of the case will ensure better airflow for you.
In Conclusion
Cooling is the most important aspect of computers that we take for granted. CPU fan error is another problem that arises when the cooling remains insufficient.
Going for aesthetics is one thing, but always ensure you are not sacrificing better cooling by opting for eye candy.
I hope this piece adds value to your computing knowledge and fixes the problem with the fan at the same time.
Until next time it’s goodbye.