Do you know there’s a way to check your PC hardware parts without actually building the whole PC? It’s called Breadboarding.
Breadboarding is a technique that many advanced computer users used back in the day. Still, some users use it to determine whether a particular hardware component is defective or not.
If you seek to learn breadboarding a PC, you have come to the right place. This post will help you to know everything about PC breadboarding.
So, let’s begin the journey to know how you can breadboard a PC in a watered-down way.
Follow our guide to fix BIOS is updating LED firmware on Asus Motherboards.
What Is Breadboarding A PC?
Breadboarding for PCs is an advanced technique to troubleshoot computer parts. It uses the minimum number of necessary hardware components to determine whether a specific hardware part is defective by hearing the beeping sound from the motherboard speaker.
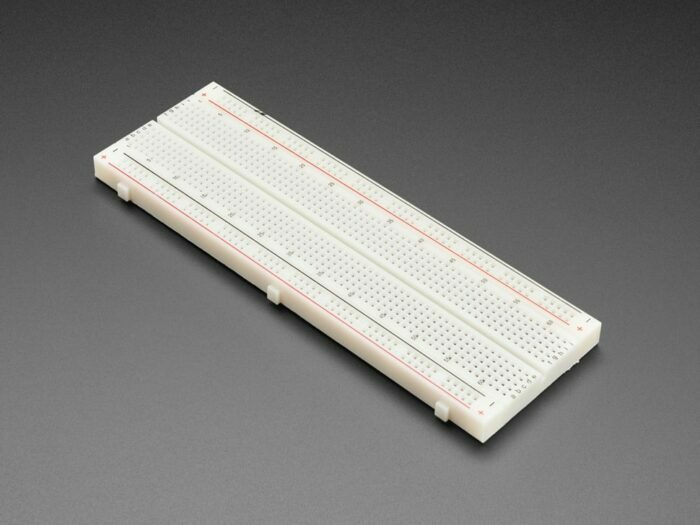
Breadboard usually means the circuit board for Digital Logic Design. The picture shows that breadboards are used to put different types of electronics IC, Parts, LED, and Switches to build digital projects.
However, PC users around the globe use the word Breadboarding differently. They use it as a technique to test their hardware components before putting them in the CPU case.
Breadboarding is done before building a PC or placing them in the CPU case because sometimes building a PC could take more than a couple of hours. For this reason, breadboarding is used to save time and hassle before putting in defective hardwares.
Quickly check our epic post on how to fix a new Graphics Card showing black screen.
How To Breadboard A PC
Breadboarding is done with a minimum amount of necessary computer hardware components. For breadboarding, PC components are laid on the ground, and every part is plugged into the motherboard one by one to determine their condition with the help of the beeping sound from the motherboard.
For breadboarding a PC, you will need the basic hardware, such as a power supply, motherboard, processor, RAM stick and other necessary components.
Breadboarding helps to find faulty components when you can’t be precisely sure what is causing the problem.
Computers, as sophisticated machines, sometimes fall into situations where the users cannot find the root cause of the issues. That time the breadboarding is used to find the root.
For example, Breadboarding helps to determine the problem of a computer that won’t beep at startup, won’t show anything on the screen, and generally won’t move into and past POST.
Note: POST means Power-On-Self-Test. It is a series of tests that verifies that the computer meets the prerequisites to boot up properly. In simple words, After the power button is pressed, the BIOS goes through a series of internal tests to check if every hardware is working.
Follow our easy step-by-step guide to fix Monitor goes black for a second.
With the help of POST and the beeping sound coming from the motherboard, you can find and, if not, eliminate the other possible faulty hardware to fix your issue.
Bear in mind that Breadboarding is not a simple technique. It’s an advanced troubleshooting method that only experienced PC users can do.
I don’t recommend breadboarding your PC if you are not experienced with computer hardware because a mishap can damage your hardware components.
WARNING: I will not be held responsible for any harm that the techniques described in this post may do to your computer, hardware, software, and/or data, including any loss of use, data loss, or financial loss.
If you understand and know the possible damages breadboarding can do to your components, you can carry on to the next phase.
Here’s How To Breadboard A PC:
Prepare Yourself
The first step for breadboarding a PC requires you to prepare yourself, and It is necessary to follow the safety precautions.
Since breadboarding is done outside the CPU case, you have to prepare not to get any electric shocks by touching the motherboard or other parts.
Nowadays, many houses don’t have a grounding line, and for this, when you touch your PC’s metal part, you might get a little bit of electric shock.
Most expert PC users are used to getting these shocks, but in some houses, this electric shock has more power and can be painful if you get hit.
Many would say to use an anti-static wrist strap, but if you don’t have that or the time to buy one, you can use some daily products without an anti-static wrist strap.
For make-shift safety, it’s advised to prepare yourself by wearing some dry shoes or sandals and keep in mind don’t wear any clothes with synthetic fabrics.
Also, get non-conductive dry cardboard to place your hardware on it.
Since breadboarding is done on the floor, there’s a chance to get an electric shock from the ground, so get large cardboard to place your hardware components.
This way, you will not feel electricity shocks from touching the computer parts.
Also, check out our separate post on how to ship RAM safely.
Make A List Of Your Motherboard’s Beep Sounds
Breadboarding is a technique where users determine faulty hardware by hearing the beeping sound of the motherboard.
These beeping sounds are similar to Morse code. At first, you will not be able to differentiate the beep sound, but after hearing closely, you will understand that there are intervals or time delays in those beeps.
To distinguish the beeping sounds and understand them, you will need a chart or a list containing the meanings of those beeping sounds, and you can find the list on the motherboard manufacturer’s website.
But I tried searching using the motherboard model but couldn’t find mine. Instead, I had to search by the type of BIOS.
So to find the meaning of beeping codes, you must find out what kind of BIOS you have in your motherboard, and you can look them up online. After that, use the result to search the list of the meaning of those beeps.
Make a list of those beeping sounds.
I Will Give You Some Example Here:
- One beep during logo display means no errors during POST.
- Long sounds in a never-ending loop mean no RAM is installed or detected in the system.
- Three short beeps followed by one long beep means either a missing video card or a memory issue.
- High-pitched sounds while the system is operating indicate that the CPU is overheating and that the system is operating at a lower pitch.
These are the Award Modular BIOS Post error messages with beeping sounds.
If you cannot find your BIOS beeping sounds list, don’t sweat. I will make a table containing all the beeping sounds at the end of the post.
Go and check our other article on can I use two different brands of RAM.
Prepare All The Components
In this stage, you must prepare all your hardware in one place.
Suppose you just bought new parts, then unpack them one by one and place the motherboard and Power Supply on the cardboard or a dry surface that won’t transfer any static electricity.
If you want to check the remaining part you have, in this case, you have to take them out from your CPU case.
You might wonder why you must take it out of the CPU case. It’s because it would be easier to connect the components when the hardware parts are on a table or the ground.
So, turn off your computer and get a screwdriver to unscrew all the hardware components you need from your CPU case and unhook the cables connected to other hardware, including USB devices, the mouse, keyboard, speakers, etc. Also, take out your RAM.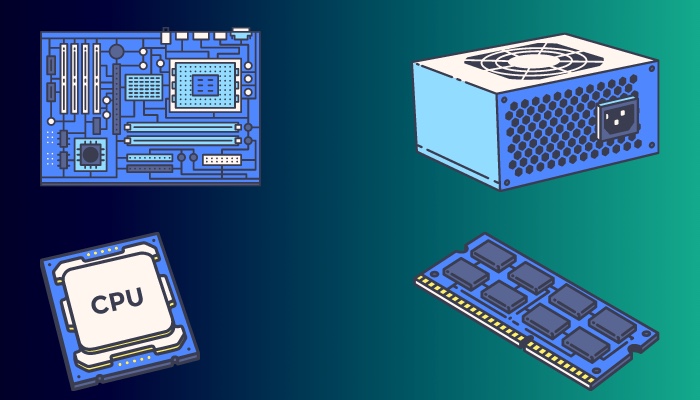
Here Are The Main Components You Will Need:
- Motherboard
- CPU
- PSU
- RAM
Important: Ensure that you have a speaker with your motherboard. You must need a motherboard speaker to perform the breadboarding technique on a PC. If you don’t have one, Get one online or at a retail shop. It will cost less than $3-$5.
Check out our recent article on is ADATA RAM good.
Connect PSU
Now, you have to install the hardware one by one. First, make sure the motherboard is connected to the Power Supply Unit.
Connect the 24-pin Motherboard Power Connector Pinout of the PSU on your motherboard. Ensure it is properly connected and the pins fit well into the connector.
Also, since you have removed all your components from the CPU casing, you cannot use the power button to turn on the Motherboard/PSU/PC.
For that, you have to jump-start the PC whenever you are trying to power the computer by connecting the two power pins from the front panel connector.
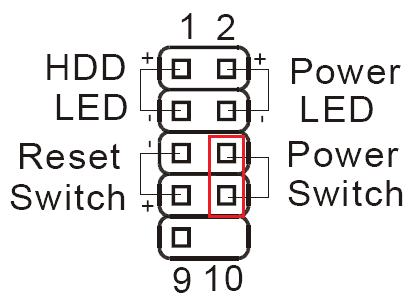
All you have to do is touch them very gently with your screwdriver, and to turn the PC off, you can turn off the switch of the PSU.
Install The CPU
You are done with the power supply. Now it’s time to connect the processor.
The processor is an essential part of breadboarding. Without it, the computer won’t start to perform the boardboard troubleshooting.
To connect the processor, you have to ensure it is appropriately connected to the motherboard with its CPU cooler.
If you use a working processor, then it’s good to go. If not, ensure the processor is in good physical condition and all of the processor sockets and pins of the motherboard are not damaged in any shape or form.
The processor should be installed professionally. If not, the processor might get damaged or unusable. So if you don’t know how to install a processor, follow the steps as I state them.
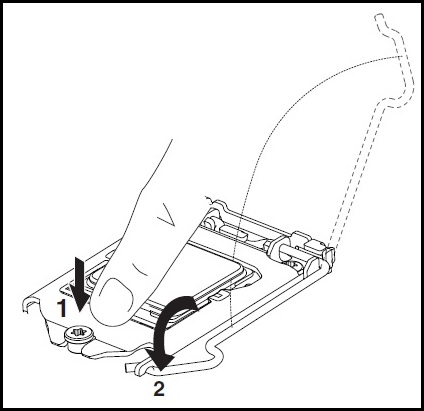
Here Are The Steps To Install A CPU:
- Locate the lever on the side of the processor socket.
- Push the processor clips to the lever down to un-clip and lift it slightly to the right side.
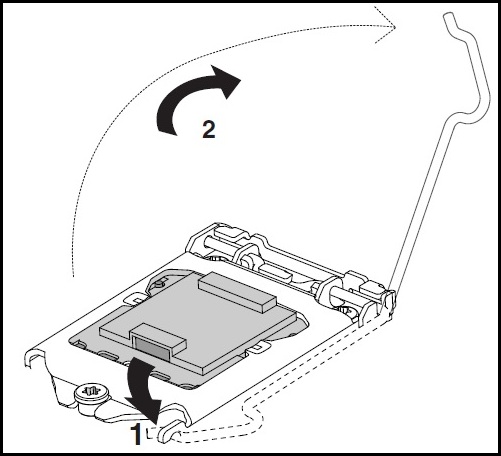
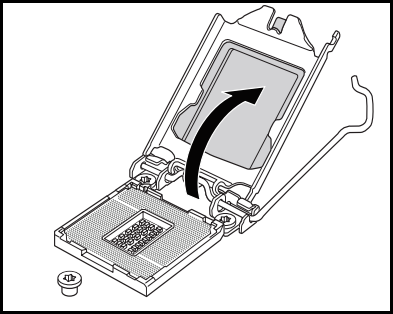
- Open the load plate with your hands, and do not touch the sockets with your fingers.
- Get the processor, and make sure the processor is aligned correctly with the notches (your motherboard should have a triangle in the bottom-left corner that you should align if done correctly, the CPU will fit right into the socket without any pressure.)
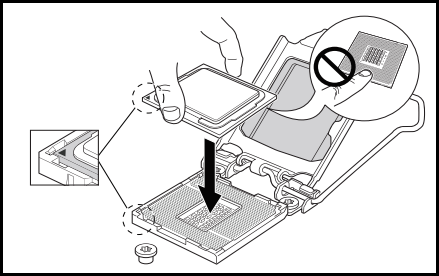
- OPTIONAL: Remove the plastic load plate if you have any.
- Press down on the load plate to close and engage the socket lever.
Apply the thermal paste on the top of the processor and put the heatsink in the right place.
Here Are The Steps To Install A CPU Fan:
- Take the CPU Fan with the heatsink and carefully align it with the fasteners through the holes.
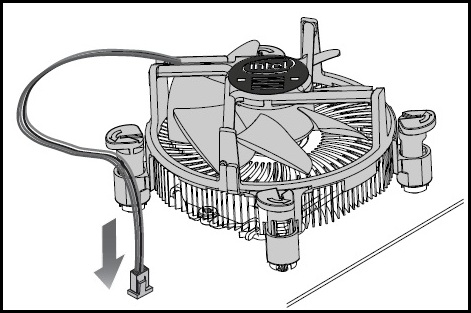
- Push down on the top of each of the fasteners in an alternate pattern, and You should hear a click sound while pushing down the fasteners.
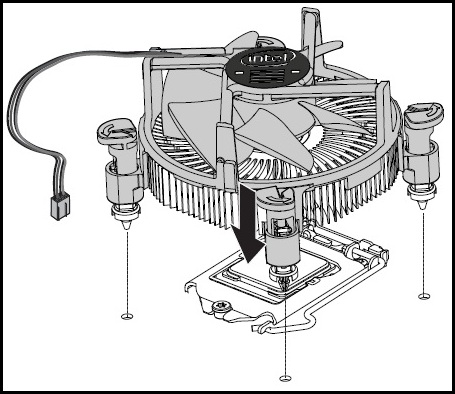
- Twist the fasteners to lock them in the direction marked on the body.
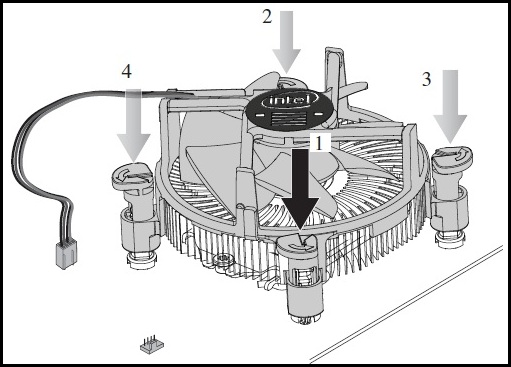
- Connect the processor’s 4-wire fan cable connector to the motherboard 4-pin CPU fan socket.
You can turn on the computer by jump-starting. If the motherboard has AMI BIOS and starts beeping with 5 Short Beeps, it means the processor has an error which means the CPU needs replacement, but there is also a possibility of a CPU Socket problem.
If the motherboard beeps continuously, it means the processor is fine, but no RAM is detected in the system.
Install The RAM
You have to install the RAM right now.
Installing RAM is pretty easy, and anyone can do it without help from others.
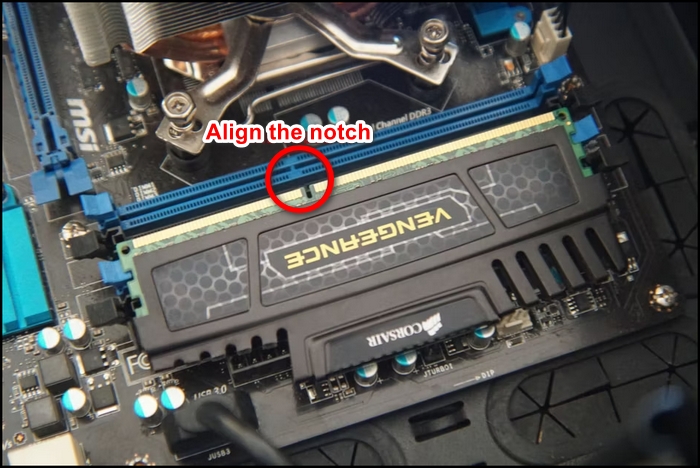
Get the RAM stick on your hand and find the notch on its body.
If you look closely at the motherboard’s RAM slot, you will see that it has the same notch as the RAM. You have to align them properly and put them into the right place to install RAM.
Here Are The Steps To Install A RAM:
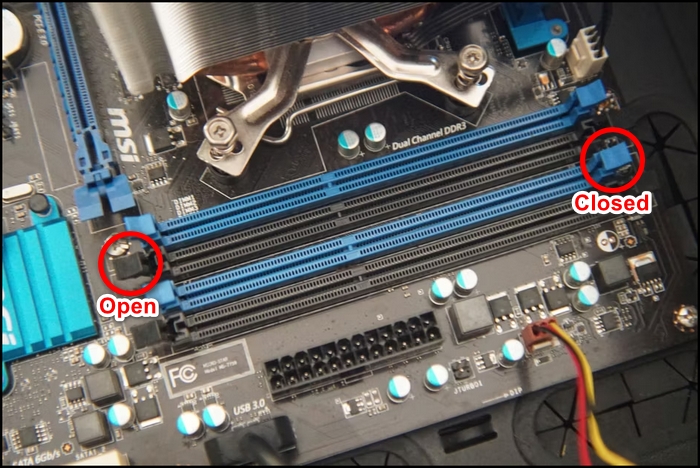
- Press down on both clips on the sides of the module to unlock the clip.
- Take the RAM and align it correctly with the notch.
- Place the RAM and press it until the clip is fastened.
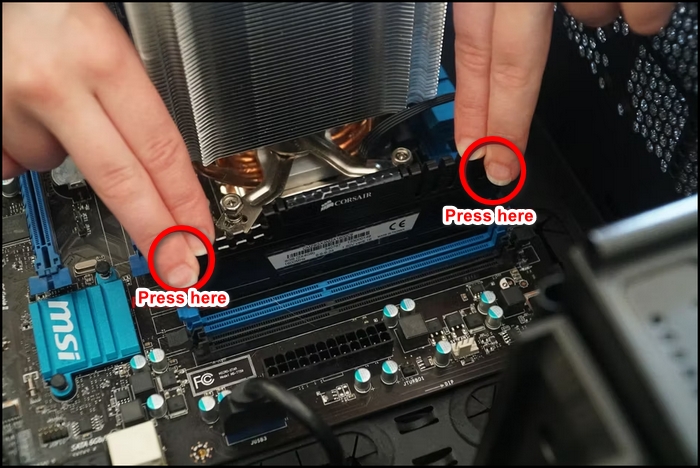
You are done with installing the RAM. If you start your computer now, then you will not hear the constant beeping of undetected RAM, Indicating the RAM does not have any fault.
Install The GPU (Optional)
This step is optional, If you have any extra dedicated graphics card, you can follow this step, and if you don’t have any, you can skip this one.
Here Are The Steps To Install A The Video Card:
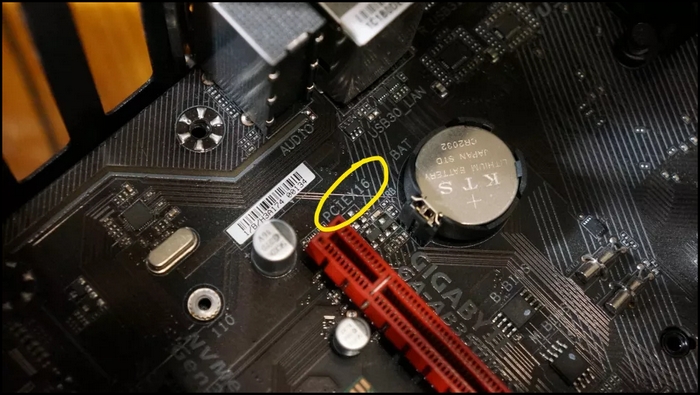
- Locate the PCIe X16 slot on the motherboard.
- Open your PCIe slot lock by pulling down a bit.
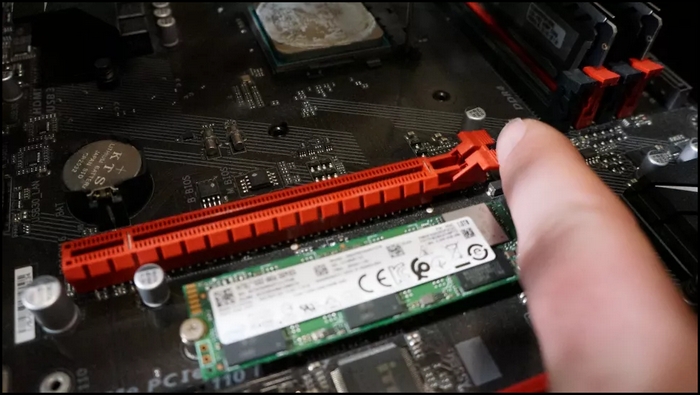
- Align the GPU with the slot.
- Install the Graphics Card by pushing it down.
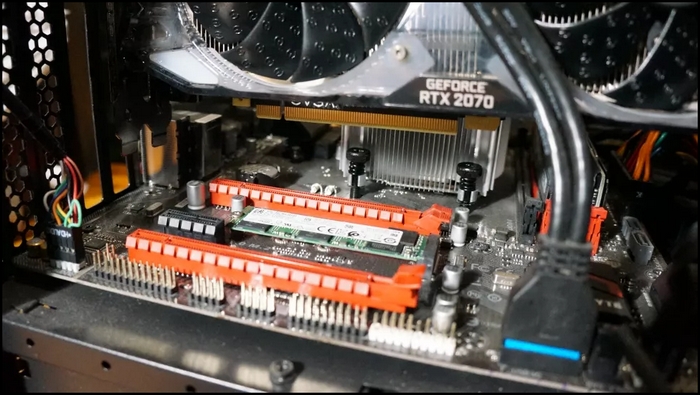
- Connect the power supply with the GPU.
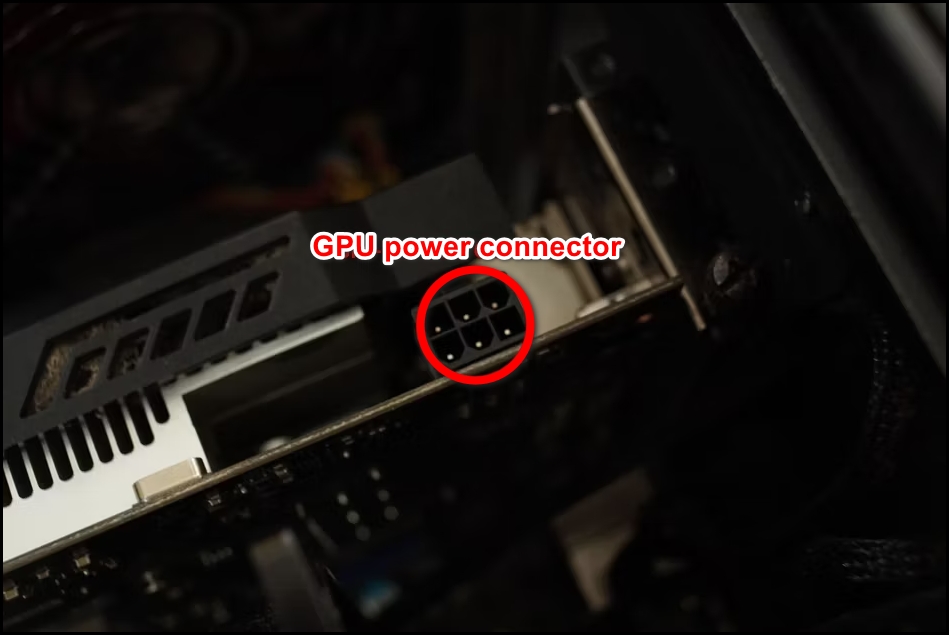
Note: Some of the GPUs need extra power connectors to power them, and some older GPU models don’t.
Turn the PC by jump-starting and hear the beeping sound to determine if the video card is OK or it’s defective.
If the GPU turns out to be defective, you will hear the beeps depending on the BIOS.
Install Other Hardware
Install the other hardware individually to determine whether the hardware component is OK.
By hearing the beeping sound, you can find any defective hardware in your computer, so observe the beeps closely and go through the list of beep noises for what those beeps mean.
Here Is Table Containing The Beeping Code Of Different BIOS:
| AMI BIOS Beep Codes | ||
|---|---|---|
| Beep Code | Description | Solution |
| 1 Short Beep | DRAM Refresh Failure | RAM is most probably damaged and Needs Replacement |
| 2 Short Beeps | Parity Error | Disable the Memory ECC in CMOS Setting. Also, It is not recommended as the ECC Check ensures the stability of the computer |
| 3 Short Beeps | Base 64K (First Bank) Memory Failure | RAM Module needs Replacement |
| 4 Short Beeps | System Timer Failure | Repair or replace the motherboard |
| 5 Short Beeps | Processor Error | CPU Needs Replacement but there is also a possibility of CPU Socket Problem. Further, the motherboard can also be faulty. |
| 6 Short Beeps | Keyboard Controller Gate A20 Failure | Plug the Keyboard. If still error occurs then try a good keyboard otherwise there is a problem with Keyboard Control Chip or related parts. |
| 7 Short Beeps | Virtual Mode Processor Exception Interrupt Error | Most probably, it is the motherboard’s fault so go for its repair or replacement. |
| 8 Short Beeps | Display Memory Read/Write Error | GPU’s Memory Chip is damaged. If it is pluggable, then finding and replacing the bad chip will remove the problem. Otherwise, the GPU needs to be repaired or replaced. |
| 9 Short Beeps | Beeps ROM Checksum Error | Try to change to a good BIOS of the same type. If the problem is with BIOS, then recovering it by rewriting or even hot swapping will also work. |
| 10 Short Beeps | CMOS Shutdown Register Read/Write Error | Replace CMOS battery, or repair motherboard |
| 11 Short Beeps | Cache Error/L2 Cache Bad | Enter the BIOS settings, disable the Cache Memory option, and finally save and restart the computer |
| 1 Long and 3 Short Beeps | Conventional/Extended Memory Failure | The motherboard memory is faulty and needs to be repaired. |
| 1 Long and 8 Short Beeps | Display/Retrace Test Failed | The Video Card is faulty. Reseating or Moving it to another slot can help. |
| Award BIOS Beep Codes | ||
| 1 Short Beep | Normal System Boot | Doesn’t require any solution as everything is fine. |
| 2 Short Beeps | General Error | Enter CMOS Setup and reset all the incorrect options. |
| 1 Long and 1 Short Beep | RAM or Motherboard Error | Try another RAM module. Still not working? Then replace or repair the motherboard. |
| 1 Long and 2 Short Beeps | Wrong Display or Video Card | Try plugging the compatible Display or Video Card |
| 1 Long and 3 Short Beeps | Keyboard Controller Error | Check the Keyboard Control Chip on the motherboard |
| 1 Long and 9 Short Beeps | Motherboard’s Flash RAM or EPROM is Wrong and BIOS is also damaged. | Changing the RAM can help with this problem. |
| Continuous Beep (Long Beep) | The RAM Module isn’t detected as it is not inserted tightly or is damaged. | Re-inserting the RAM can help but if this trick doesn’t work then replace the RAM module. |
| Constantly Beep | Power Supply, Monitor, or GPU isn’t properly connected. | Re-plug all of them properly. If still facing the same problem then check all the plugs are functioning. |
| Repeated Short Beep | Power Supply Problem | Replace the Power Supply |
| No Sound and Display | Power Supply Problem | Replace the Power Supply |
| IBM Beep Codes | ||
| 1 Short Beep | Normal Boot | During the Self-Test, Everything was fine |
| 2 Short Beeps | Error Detected During POST | Details would be displayed on Screen, follow the error, and find its solution. |
| No Beep | Power Supply, System Board, or Processor’s Error | Most probably, it would be Power Supply’s error so try a new Power Supply. If the problem still resists then try replacing the Motherboard and Processor. |
| Continuous Beep | Power Supply, System Board, or Keyboard Problem | Trying to change these components will solve the problem. |
| Repeated Short Beeps | Power Supply or System Board Problem | Again, trying to replace these components can help in solving the problem. |
| 1 Long and 1 Short Beep | System Board Problem | Motherboard has a problem; repairing it or replacing is the solution. |
| 1 Long and 2 Short Beeps | GPU Problem (Mono/CGA Video Error) | Replacing or Repairing the GPU. |
| 1 Long and 3 Short Beeps | GPU Problem (EGA Video Error) | Again, replacing or repairing the GPU. |
| 3 Long Beeps | Keyboard Problem | Try changing the Keyboard device, if still facing the same problem, then check the Keyboard Control Chip on Motherboard. |
| HP Beep Codes | ||
| 1 Short Beep | Legacy Floppy Drive or CD/DVD ROM Not Detected | Try resetting the BIOS. If it does not work then, reconnect or replace these components. |
| 2 Short Beeps | Floppy Diskette or CD not detected | Try resetting the BIOS. If not work, then it is possible that the problem is with the component or CD/Floppy Disk you trying to insert |
| 3 Short Beeps | Unable to Start Flashing (usually when a utility or BIOS Image is missing) | Disconnect input devices (like mouse and keyboard) and then reboot the computer. If still facing the same issue, then repair or replace those input devices. |
| 4 Short Beeps | Flashing Failed (checksum error, corrupted image, etc.) | Clean the RAM and its slots. If the problem still resists then reseat the memory. |
| 5 Short Beeps | BIOS Recovery Successful | Reboot the System |
| 1 Short and 1 Long Beep | Memory Problem | Reseat the RAM modules on slots. If the problem isn’t solved then go for a RAM replacement. |
| 2 Short and 1 Long Beep | Video Card Required (not installed) or Unable to Initialize Video | Try reconnecting the GPU if installed. Otherwise, the fault is in the motherboard so go for its repair or replacement. |
| 3 Short and 1 Long Beep | Incompatible CPU type or CPU configuration error | Make sure that the RAM capacity installed is compatible with the CPU. Replace or Repair the CPU (Processor) if the problem doesn’t solve. |
| 2 Short and 2 Long Beeps | BIOS Recovery Successful | Reboot the System |
| Lenovo ThinkCentre Beep Codes | ||
| 3 Short and 1 Long Beep | RAM not detected | Check out the memory subsystem, and ensure the RAM is accurately seated in the slots. |
| 2 Long and 3 Short Beeps | Video Card or On-Board Video not detected | Make sure that all the external connected GPUs are compatible or working properly. |
| 4 Long Beeps and Error 8998/8999 on Screen | Not enough shadow RAM resources or PCIe/PCI MMIO resources available | Remove the external (add-in) PCIe Cards to free up necessary resources or change the BIOS to UEFI mode to support these external resources. |
| 2 Short Beeps | POST Error | Check out the displayed POST error on the screen and take correct according to that specific POST |
| Dell Beep Codes | ||
| 1 Beep | Motherboard: BIOS ROM Failure | Execute the Dell Diagnostics Program to find the solution. |
| 2 Beeps | No Memory (RAM) Detected | Try reseating the RAM sticks otherwise replace them. Still facing the issue, then check the RAM slots. |
| 3 Beeps | Chipset Error (North and South bridge error), Time-Of-Day Clock test failure, Gate A20 failure, Super I/O chip failure, Keyboard controller failure | Run the Dell Diagnostics Application to solve the issue. |
| 4 Beeps | Memory (RAM) Failure | Same solution as mentioned in 2 Beeps section. |
| 5 Beeps | CMOS Battery Failure | Try reseating the CMOS battery. If the issue is not gone, then run the Dell Diagnostics. |
| 6 Beeps | Video Card/Chip Failure | Run the Dell Diagnostics to find the solution to this problem. |
| 7 Beeps | Central Processing Unit (CPU) Failure | Same solution as in 6 Beeps Section |
| 8 Beeps | LCD Failure | Same solution as in 6 Beeps Section |
| ThinkPad Beep Codes | ||
| 1 Beep with Blank Display | LCD Issue (LCD Connector, LCD Backlight Inverter, Video Adapter, or LCD Assembly Failure) | Replace the whole display assembly or repair it (requires professional repairing experience) |
| Continuous Beeping | Motherboard Failure | Repairing or Replacing it will solve the problem. |
| 1 Beep with Display Message (Unable to access boot source) | Boot Device Failure or Bad Motherboard | Try to repair or replace the motherboard. |
| 1 Long and 2 Short Beeps | System Board, Video Adapter, or LCD Assembly Failure | Try replacing or repairing these components will solve the problem |
| 1 Long and 4 Short Beep | Low Battery Voltage | Reinsert or replace the CMOS battery otherwise, reset the BIOS settings |
| 1 Beep Continuously | Low Battery Voltage | Same solution as mentioned above. |
| 2 Short Beeps with Display Message | Follow the Display Message | Take an appropriate action according to the display message. |
| 2 Short Beeps with Blank Display | System Board Failure | Replace or Repair the Motherboard |
| ASUS Beep Codes | ||
| 1 Short Beep | VGA Detected, Quick Boot is Disabled or No Keyboard Detected | The computer will boot normally. However, must check for the components working (mentioned in the description) |
| 2 Short Beep | When using Crashfree to recover BIOS, the new BIOS is successfully recognized. | Reboot the CPU and everything will be normal. |
| 1 Long and 2 Short Beeps | No Memory Detected | Try reseating the RAM. If it does not work, then replace the RAM sticks. If it is still not working, then the slots have a problem. |
| 1 Long and 3 Short Beeps | No VGA Detected | Make sure that enough (required) power is being supplied to the GPU. If the problem resists, then reseat the GPU, CPU, and RAM, and also check out the GPU’s cables. |
| 1 Long and 4 Short Beeps | Hardware Component Failure | Possibly, the problem is with the CPU Fan, the Temperature gets high, or the CPU has Over Voltage Error. Make sure that both the CPU and its Fan are properly installed. Otherwise, try to reset the BIOS setting and clear CMOS settings. |
| No Beeps | Blank Display | Please check for the CPU and RAM and ensure that they are properly connected or not. Also, check for Oxidation on the connection parts. If it is there, then try to wipe it with an eraser. If the problem still persists, then take it to the technician for proper cleaning. |
Phoenix BIOS Beep Codes:
| Beep Code | Description |
|---|---|
| 1-1-1-1 | Unconfirmed beep code. Reseat RAM chips or replace RAM chips as possible solutions. |
| 1-1-1-3 | Verify real mode. |
| 1-1-2-1 | Get CPU type. |
| 1-1-2-3 | Initialize system hardware. |
| 1-1-3-1 | Initialize chipset registers with initial POST values. |
| 1-1-3-2 | Set in the POST flag. |
| 1-1-3-3 | Initialize CPU registers. |
| 1-1-4-1 | Initialize cache to initial POST values. |
| 1-1-4-3 | Initialize I/O. |
| 1-2-1-1 | Initialize power management. |
| 1-2-1-2 | Load alternate registers with initial POST values. |
| 1-2-1-3 | Jump to UserPatch0. |
| 1-2-2-1 | Initialize keyboard controller. |
| 1-2-2-3 | BIOS ROM checksum. |
| 1-2-3-1 | 8254 timer initialization. |
| 1-2-3-3 | 8237 DMA controller initialization. |
| 1-2-4-1 | Reset programmable interrupt controller. |
| 1-3-1-1 | Test DRAM refresh. |
| 1-3-1-3 | Test 8742 keyboard controller. |
| 1-3-2-1 | Set ES segment to register to 4 GB. |
| 1-3-3-1 | Autosize DRAM. |
| 1-3-3-3 | Clear 512 K base RAM. |
| 1-3-4-1 | Test 512 base address lines. |
| 1-3-4-3 | Test 512 K base memory |
| 1-4-1-3 | Test CPU bus clock frequency. |
| 1-4-2-4 | Reinitialize the chipset. |
| 1-4-3-1 | Shadow system BIOS ROM. |
| 1-4-3-2 | Reinitialize the cache. |
| 1-4-3-3 | Autosize cache. |
| 1-4-4-1 | Configure advanced chipset registers. |
| 1-4-4-2 | Load alternate registers with CMOS values. |
| 2-1-1-1 | Set initial CPU speed. |
| 2-1-1-3 | Initialize interrupt vectors. |
| 2-1-2-1 | Initialize BIOS interrupts. |
| 2-1-2-3 | Check ROM Copyright notice. |
| 2-1-2-4 | Initialize manager for PCI options ROMs. |
| 2-1-3-1 | Check video configuration against CMOS. |
| 2-1-3-2 | Initialize PCI bus and devices. |
| 2-1-3-3 | Initialize all video adapters in the system. |
| 2-1-4-1 | Shadow video BIOS ROM. |
| 2-1-4-3 | Display Copyright notice. |
| 2-2-1-1 | Display CPU type and speed. |
| 2-2-1-3 | Test keyboard. |
| 2-2-2-1 | Set key click if enabled. |
| 2-2-2-3 | Enable keyboard. |
| 2-2-3-1 | Test for unexpected interrupts. |
| 2-2-3-3 | Display prompt Press F2 to enter SETUP. |
| 2-2-4-1 | Test RAM between 512 and 640 k. |
| 2-3-1-1 | Test expanded memory. |
| 2-3-1-3 | Test extended memory address lines. |
| 2-3-2-1 | Jump to UserPatch1. |
| 2-3-2-3 | Configure advanced cache registers. |
| 2-3-3-1 | Enable external and CPU caches. |
| 2-3-3-3 | Display external cache size. |
| 2-3-4-1 | Display shadow message. |
| 2-3-4-3 | Display non-disposable segments. |
| 2-4-1-1 | Display error messages. |
| 2-4-1-3 | Check for configuration errors. |
| 2-4-2-1 | Test real-time clock. |
| 2-4-2-3 | Check for keyboard errors. |
| 2-4-4-1 | Set up hardware interrupts vectors. |
| 2-4-4-3 | Test coprocessor if present. |
| 3-1-1-1 | Disable onboard I/O ports. |
| 3-1-1-3 | Detects and installs external RS232 ports. |
| 3-1-2-1 | Detects and installs external parallel ports. |
| 3-1-2-3 | Re-initialize onboard I/O ports. |
| 3-1-3-1 | Initialize BIOS data area. |
| 3-1-3-3 | Initialize extended BIOS data area. |
| 3-1-4-1 | Initialize floppy controller. |
| 3-2-1-1 | Initialize the hard disk controller. |
| 3-2-1-2 | Initialize local bus hard disk controller. |
| 3-2-1-3 | Jump to UserPatch2. |
| 3-2-2-1 | Disable A20 address line. |
| 3-2-2-3 | Clear huge ES segment register. |
| 3-2-3-1 | Search for option ROMs. |
| 3-2-3-3 | Shadow option ROMs. |
| 3-2-4-1 | Set up Power Management. |
| 3-2-4-3 | Enable hardware interrupts. |
| 3-3-1-1 | Set time of day. |
| 3-3-1-3 | Check key lock. |
| 3-3-3-1 | Erase F2 prompt. |
| 3-3-3-3 | Scan for F2 keystroke. |
| 3-3-4-1 | Enter CMOS setup. |
| 3-3-4-3 | Clear in the POST flag. |
| 3-4-1-1 | Check for errors |
| 3-4-1-3 | POST done, prepare to boot the operating system. |
| 3-4-2-1 | One beep. |
| 3-4-2-3 | Check password (optional). |
| 3-4-3-1 | Clear global descriptor table. |
| 3-4-4-1 | Clear parity checkers. |
| 3-4-4-3 | Clear screen (optional). |
| 3-4-4-4 | Check virus and backup reminders. |
| 4-1-1-1 | Try to boot with INT 19. |
| 4-2-1-1 | Interrupt handler error. |
| 4-2-1-3 | Unknown interrupt error. |
| 4-2-2-1 | Pending interrupt error. |
| 4-2-2-3 | Initialize option ROM error. |
| 4-2-3-1 | Shutdown error. |
| 4-2-3-3 | Extended block move. |
| 4-2-4-1 | Shutdown 10 error. |
| 4-3-1-3 | Initialize the chipset. |
| 4-3-1-4 | Initialize refresh counter. |
| 4-3-2-1 | Check for forced flash. |
| 4-3-2-2 | Check HW status of ROM. |
| 4-3-2-3 | BIOS ROM is OK. |
| 4-3-2-4 | Do a complete RAM test. |
| 4-3-3-1 | Do OEM initialization. |
| 4-3-3-2 | Initialize interrupt controller. |
| 4-3-3-3 | Read in bootstrap code. |
| 4-3-3-4 | Initialize all vectors. |
| 4-3-4-1 | Boot the flash program. |
| 4-3-4-2 | Initialize the boot device. |
| 4-3-4-3 | The Boot code was read OK. |
| Two-tone siren | Low CPU fan speed, voltage level issue. |
You can use these beeping codes to determine the defects in hardware components.
For that, you must know which BIOS is installed on your computer
Wrapping Up
Breadboarding is an advanced troubleshooting technique that helps to determine faulty hardware without swapping them with newer ones, and Breadboarding a PC should not be taken lightly.
In this post, I have tried to explain the method to breadboard a PC using bare minimum hardware components.
If you have any more questions about the Breadboard, feel free to let me know in the comment box.