Imagine a situation where you have gotten a new CPU cooler for your PC. You are about to install it on your motherboard when you realize that the cooler does not fit properly. Maybe you aren’t able to screw it in, or the cooler isn’t sitting properly on your processor.
If this situation is a reality for you, you must be quite worried about your new cooler not installing on your PC’s motherboard. In this guide, you will find out why a cooler does not fit properly on your motherboard, their solutions, and how to install a CPU cooler in your computer properly. So, go through the content of this guide and learn what to do if a CPU cooler isn’t installed as it was supposed to be.
Why Doesn’t CPU Cooler Install On Motherboard?
When you try installing a new cooling fan on your motherboard, you may realize that it does not fit in properly or the screws are not going in. If you come across these issues, know that they are caused by compatibility issues, CPU backplate placement, or incorrect component installation.
Admittedly, CPU coolers can be a bit tricky to install. Doing it is not that easy, and specific instructions from the cooler manual must be followed to fit it securely on top of your processor.
If you get an aftermarket cooler to replace your stock cooler, you should make sure to check out the installation guide first for the correct instructions.
You may want to install the liquid cooling system on your PC but it will be even trickier to do. AIO coolers or liquid coolers are more complicated to install than air coolers. They have some extra parts like the radiator, and pipes for coolant liquid to be installed inside the case. If you got a new AIO liquid cooler, you must refer to its instructions for installing it properly.
As you go through the process, you may notice that your CPU cooler isn’t properly positioned. Moreover, the screws may not enter the designated holes on the board due to the cooler being disoriented or incompatible. These issues do have some probable reasons.
You can check out the reasons to figure out why this problem is occurring for you before you solve it. If you know the reason for your problem, it will be easier to fix it. Here are the reasons why your CPU cooler doesn’t install on the motherboard:
1. Incompatibility of screws or the cooler: Currently, most coolers have the screws provided with them, but sometimes, wrong measurements of the screws can cause impediments when trying to use a screwdriver to tighten the screws in your new cooler.
Moreover, the cooler you just got might not be compatible with your motherboard. For this, you won’t be able to use it with your current motherboard.
Also, check out our separate post on can I start a PC without a CPU cooler.
2. Wrong backplate placement: Your cooler is held in place by a backplate that is to be placed on the back of the motherboard. Its function is to hold the CPU cooler’s weight and prevent the PCB from bending by reinforcing it. The cooler is to be screwed into the four screw holes of the backplate.
If the backplate is placed incorrectly, your CPU cooler won’t be installed properly. It may remain inclined or fall off due to the wrong position of the backplate.
This happens if the backplate doesn’t have the right orientation, is placed away from the screw holes, or loosens during installation.
3. Faulty installation of other components: If you have installed any other part of your computer incorrectly on the motherboard, it may hinder the installation of your CPU cooler.
A wrongly installed component in the vicinity of your air cooler will physically interfere with it when you try to lodge it over your CPU
Your problem with the CPU cooler not installing correctly is possibly caused due to one or more of these reasons. If you can figure it out, you can easily fix the problem.
In the next section, you can know about how to fix the causes of your cooler not installing on your motherboard. You can go through them and apply the instructions so that you can fit in your cooler in the right way.
Here’s a complete guide on how to know if CPU cooler is compatible with Motherboard.
How To Fix CPU Cooler Not Installing
Having your CPU cooler not fit in can be concerning since you cannot turn on your computer without it. To fix this problem, there are some instructions that you can follow that include verifying its compatibility, using the right screws, and placing the backplate and other components correctly.
The processes of fixing an incorrectly fitted CPU cooler are simply explained here.
If you know the specific reason why it is happening to you, you can fix it from here. Even if you don’t know the reason, you can still apply these directives and see if your problem gets solved.
Follow these steps to fix your CPU cooler that won’t install:
1. Make Sure Your Cooler Is Compatible
Although most CPU coolers have compatibility with the Intel or AMD Ryzen sockets in motherboards, there might be a slim chance that your cooler might not be compatible with your motherboard. In this case, you cannot use it on your computer.
Making sure the CPU cooler is compatible with your motherboard is the first thing you need to consider BEFORE buying it.
There are some motherboards that have a different form factor than most others. If you try to fit a cooler meant for normal motherboards onto one of the less common ones, it won’t be installed properly.
To sway out of this situation, you have to get your model of CPU cooler changed with one that is actually suitable for your motherboard.
Check out our recent article on do you need a CPU cooler.
2. Use The Correct Screws
Checking the measurement of the screws to see if it is appropriate for the CPU socket on your motherboard is crucial if you find that your cooler is not being adjusted properly. Otherwise, you won’t be able to secure the heatsink to the motherboard.
 Mismatching screws can lead to your CPU cooler being disoriented when you try installing it.
A lot of CPU coolers come with screws, but sometimes their measurements are off due to mistakes by the manufacturers. Moreover, if you use your own screws, you must measure their diameters first to see if they match the screw holes
3. Install The Backplate Correctly
It is common to face trouble regarding the connection with the backplate of your motherboard’s CPU socket while screwing in your new CPU cooler. The backplate is fixed on the opposite side of the motherboard where the cooler is to be placed.
The backplate must be held in place on the other side as you place the cooler on it and then screw it. 
The backplate can get displaced or even fall off while screwing your cooler to fix it over your processor. It can also get displaced, causing misalignment and making it tough to put the screws in.
A simple trick to correctly hold your backplate in place is to:
- Put the backplate turned upwards on a table.
- Place the motherboard on the backplate.
- Apply a moderate amount of thermal paste.
- Position the CPU cooler correctly in place on top of the CPU and screw it in.
- Check if the CPU cooler is properly installed.
4. Install Your Components Properly
Other components on your motherboard also take up space, and if installed incorrectly, they will physically interfere with the space around the CPU and the cooler. So, suppose you notice that your cooler isn’t accommodating itself correctly or something is hindering you from putting it in place. In that case, it is probably an incorrectly placed RAM, GPU, case fan, or any other component.
To solve this, you must check the vicinity of your cooler by touch or vision to find the obstructing component and fit it properly.
After your cooler is installed, you can start your PC to check if the cooler works. Set the fan speed accordingly and notice the fan to see if the speed changes. Otherwise, it won’t cool the CPU effectively.
Quickly check our epic post on how to find out what CPU cooler I have.
What happens if you use too much thermal paste?
If you use too much thermal paste when applying it to the CPU, it can cause your computer to overheat. This is because too much of the thermal paste can block the heat from leaving the CPU and cause an increase in its temperature.
To avoid over-applying, you need to apply the thermal compound over your processing chip’s lid very carefully.
While applying thermal paste, you should be careful not to apply too much. A safe amount is to use enough paste that is the size of a pea.
You should spread it across the surface of the CPU lid or IHS (Integrated Heat Spreader) and make sure that there aren’t any large clumps or excess paste in any one place. You can use a flat piece of metal or plastic as it will help spread the thermal paste evenly.
If you find that you have used too much, then you will need to clean the thermal paste before reapplying a smaller amount. This will help cool down your CPU temperature optimally.
How Tight Should Motherboard Screws Be?
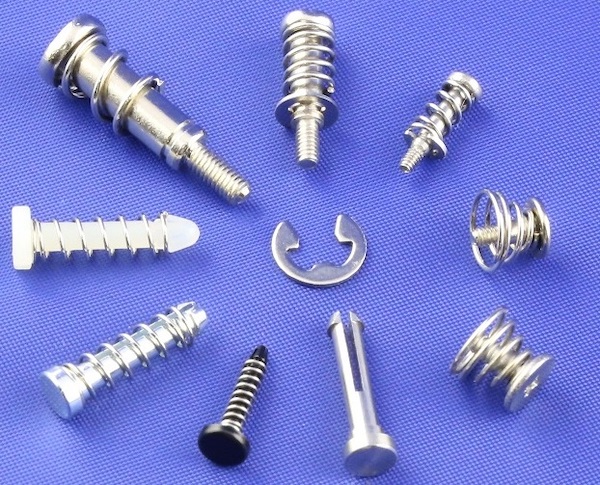
When you install the fans, it is important to pay attention to how tight the screws should be. Generally speaking, spring screws or spring-loaded screws are used for fan installation and should be tightened with moderate force. Long screws should be used when installing multiple fans.
Long screws are used because they provide your fans with extra support, in case there is more than one fan on your cooler.
Before installing the CPU fan header on the motherboard, it is important to make sure that the heatsink aligns with the CPU correctly and that all of the fan screws are tightened properly in a clockwise direction. The number of fans installed can also have an impact on the tightness of each screw so it is important to notice each fan and make sure that all of them are properly secured.
Conclusion
The CPU in your computer is the core of all the functions, and it can’t run without properly fitting in a cooler to remove the heat it produces. So, when you buy and fit in a new cooler, you should always check if it is placed correctly on your CPU before turning it on. Otherwise, the heat can cause permanent damage to your CPU.
After checking, if you find out that your fresh cooler is in a disoriented or unsuitable position, do not turn on the system. Instead, learn how to fix it if a CPU cooler is not installed in an acceptable manner on your motherboard.