Typically, a CPU produces heat when it performs any heavy tasks. But it becomes a matter of concern if it somehow exceeds the boiling point temperature.
CPU overheating triggers thermal throttle that can cause performance slowdown, random down, and eventually, damaging critical components of your PC. So, It should be strictly dealt with.
Is your CPU also reaching 100° celsius temperature? Looking for its right causes and ways to eliminate the issue? Read this article to get your desired answer, plus everything you should know about CPU overheating.
So, let’s begin.
Why is my CPU at 100 Degrees?
Generally, your CPU will reach 100 degrees temperature because of improper ventilation for airflow and dried-out CPU thermal pastes. Additionally, when you use poor-quality Case fans or CPU coolers and wrongly overclock your CPU, it can heat up very fast, even up to 100° celsius.
CPU works as the core of your PC and performs every task within it. So, it tends to heat up quickly. That’s why a proper cooling system is a must to ensure a suitable temperature for your CPU to work consistently.
However, various reasons can cause your CPU temperature to hit the roof. It’s primarily due to faulty hardware configuration issues, though some software issues can also be held accountable.
Let’s discuss each cause for CPU overheating for a clear understanding.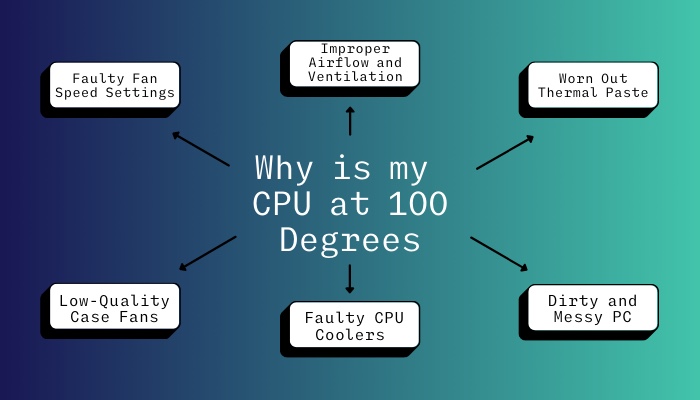
Here are the reasons for CPU temperature reaching 100 degrees:
Improper Airflow and Ventilation
Whether you are using a Desktop PC or a laptop, proper ventilation is necessary to ensure airflow inside your system.
Usually, desktops inhale cool air from the front side of the PC casing and release hot air through the back side fans. For laptops, air enters from the bottom of your laptop and goes out through fans.
If something prevents this airflow process, your system fails to exhaust the hot air outside; hence, CPU temperature rises rapidly.
Worn Out Thermal Paste
Thermal paste, commonly known as Heat Sink, is an essential ointment to transfer heat released from the CPU. It is used between your CPU and CPU cooler, allowing it to absorb generated heat to keep your CPU cool.
Over the years, the Heat sink dries out and becomes hard as solid. Thus, it can not draw extra released heat from the CPU anymore.
Furthermore, some even apply too much thermal paste on their CPU unknowingly. Excessive thermal paste somehow works like an insulator and traps the heat inside the CPU itself.
Therefore, your system can cross the ideal CPU temperature limit.
Dirty and Messy PC
While your PC draws cool air from outside, dust also enters your system with it. As time passes, this dust gathers up, making the inside of your PC casing dirty.
This dirt inside your PC blocks the proper airflow path. Also, when dirt builds up on your casing fan, it can not rotate to its usual speed and fail to release the hot air outside.
Messy cable management in your casing can also cause the same issue. Too many unorganized wires inside your PC can prevent airflow. Furthermore, if any loose wires fall into the CPU cooler or case fans, it can cause the fan to spin slowly.
So, your CPU heat does not go out, eventually increasing the whole system temperature.
Faulty CPU Coolers
Usually, every PC comes with a stock CPU cooler. These coolers are best suited for cooling down a CPU performing light tasks. But, it fails miserably when you attach it to a higher usage CPU and can not release adequate heat from your PC.
To avoid such situations, many users now use liquid CPU coolers. But heat problem still occurs when they don’t set the cooler system correctly.
If the pump of the liquid cooler is not set to run at full speed, it can not fully absorb the heat generated from your CPU. Plus, the liquid AIO inside the cooler tube can be poor quality or defective.
All of this can be responsible for CPU to reach 100° heat.
Low-Quality Case Fans
Every PC case fan can only exhaust a fixed amount of hot air outside. Low-quality fans have very little power to push out hot air.
If the heat level inside your PC crosses these limits, your case fans struggle to push out the extra heat.
Faulty Fan Speed Settings
You can adjust fan speed settings from your bios. Some PC also has built-in software to alter fan settings directly from the operating system.
In case you have inaccurate fan speed settings, your CPU fan will not rotate to its full potential. Therefore, it will fail to exhaust enough hot air outside your PC.
Aggressive Overclocking
People overclock their CPU to extract some extra performance out of their system. Once you increase the clock speed of your CPU, it will require additional voltage to execute tasks without difficulties.
Due to this rise in clock speed and voltage, your CPU will start generating more heat, reaching even 100-degree celsius.
Worried about how you will fix this terrible issue? Continue reading below to learn some excellent methods to fix CPU overheating issues.
How to Fix CPU Overheat Issue
You can quickly fix your CPU overheating issue by improving airflow and ventilation, cleaning your PC case and re-applying thermal paste. Moreover, you can install better quality CPU cooler, Case fans and configure proper fan speed settings to reduce CPU temperature.
You should never ignore any CPU overheating issue as it will slowly damage your entire PC components as time goes on. Fortunately, the methods to fix CPU overheating issue is pretty straightforward.
Sometimes, simply placing your PC clutter-free space away from room windows can work like a charm. For laptops, you can use a cooler pad to mitigate a significant amount of heat from their CPU.
Let’s discuss every working method to get rid of the CPU excessive temperature problem once and for all.
Here are the methods to fix CPU overheating:
1. Allow Better Airflow and Ventilation
Your PC needs a proper ventilation system to release the hot air generated inside the casing. To ensure this, you should place your PC in such a way that the outside fan does not get blocked by walls or any objects.
Next, open your PC case and make room for proper airflow. Check whether all the fans inside the case are moving freely. If not, move any cables from the front of the moving fans and make sure they do not get stuck inside the fans.
In case you are a laptop user, you should position it on a hard and flat surface. Using a cooling pad is also beneficial in reducing CPU temperature.
You can also buy a new computer case that offers better airflow. Congested cases are not suitable for airflow. So, try to find a bigger case with a front and top ventilation panel and additional space to install more fans.
2. Clean your PC
Dust inside your computer can hinder the rational speed of air-flowing fans. So, it’s important to clean up the inside of your PC from time to time.
To clean your PC, get an air compressor tool if possible. It will help you to deliver more pressure while cleaning the components of your computer.
Open your computer case and use the air compressor carefully to clean out dust from the PSU fan, exhaust fans, CPU cooler, motherboard, and other internal components.
For laptops, if you can’t remove the bottom shell, aim the air compressor directly through it’s ventilation fans.
Once you are done with cleaning, check whether the CPU temperate declines. If not, try the following method.
3. Re-apply Thermal Paste
When the thermal paste on your CPU gets too old, it can absorb as much heat as it should. In such situations, you must re-apply the thermal paste.
Usually, a thermal paste lasts for two-three years of heavy usage. But I recommend changing your thermal paste every one and a half years for steady CPU temperature.
First, open the CPU cooler and check the condition of the thermal paste on your CPU. If you find it dried and solid, wipe it out from your CPU and the contact point on the CPU cooler.
I suggest you use a wet cloth with 90% isopropyl alcohol for better cleansing, but a dry lint-free cloth should work just fine. 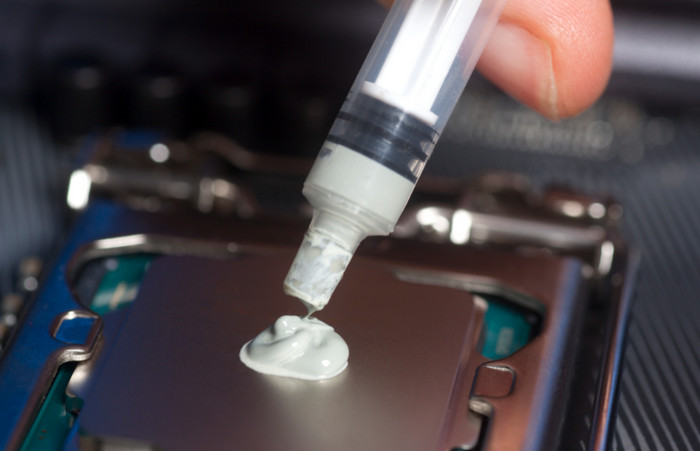
Don’t use any local thermal paste. Use good quality thermal pastes for better heat absorption and long time durability.
4. Organise Cables
Organizing your computer cable helps reduce your system’s CPU heat and overall temperature. Too many cables here and there can prevent proper airflow inside your PC. So, you should manage cables in an elegant and tidy way.
To do so, zip-tie every loose cable inside your computer, especially the wires that come out from the PSU. Make sure the wires don’t come in the way of the CPU cooler or exhaust fans. Finally, cut the excess part of the zip tie.
5. Better CPU Cooler
Stock CPU coolers can barely decrease CPU heat when you are a heavy software user or gamer. Upgrading to a decent CPU cooler can greatly lower CPU temperature.
Alternatively, you can use an AIO liquid cooler to cool down your CPU. Just make sure to use good AIO liquid and pump it at full speed. 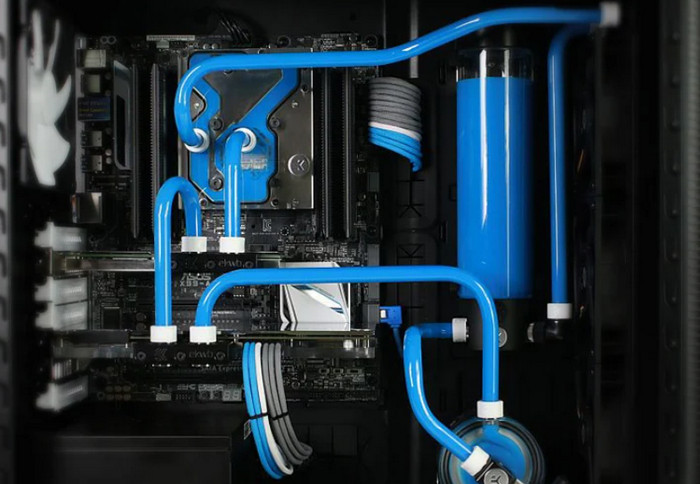
Once you install any qualitiful aftermarket CPU cooler, you are sure to see an impressive change in the CPU temperature.
6. Add Better Case Fans
Your case fans only push out a limited amount of hot air outside the PC casing. So, you should upgrade to better case fans that have more power to exhaust air.
Before buying any random fans, be sure of your requirements. Case fans now come in different sizes, and some fans spin so fast to exhaust more air that they create annoying noises.
So, choose a fan size that suits your computer casing and avoid too much loud fans. Never go for any cheap and local fans as they will not help you to reduce CPU heat at all.
Moreover, if you have space to install extra case fans to your system, definitely go for it. The more fans you install, the better air is get released from the computer case.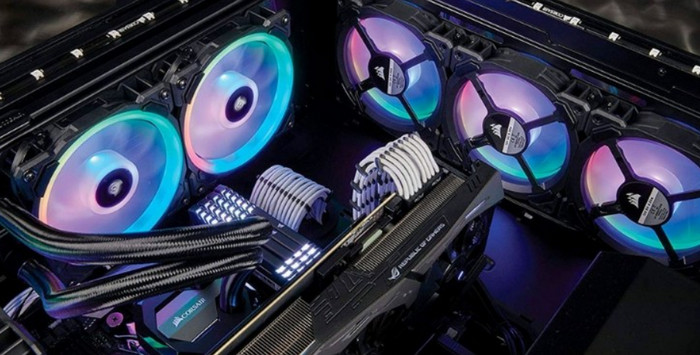
7. Configure Accurate Fan Speed Settings
It’s necessary to set the accurate fan speed so that every fan of your system can spin to its full power. You can do so from your bios.
The option names differ from motherboard to motherboard, but each functions more or less the same way. In my case, I used an AORUS motherboard.
Here are the steps to set accurate fan speed from bios:
- Access the BIOS on your system according to your manufacturer’s documentation. Usually, you need to press F10, F2, F12, F1, or DEL during the boot-up process to enter BIOS.
- Enter Fan Control Software.
- Set the CPU fan speed control to manual. You will now see a curve graph.
- Move each node on the curve to adjust it.
- Hit the ESC button on your Keyboard once you finish adjusting your curve,
- Click on Save and exit.
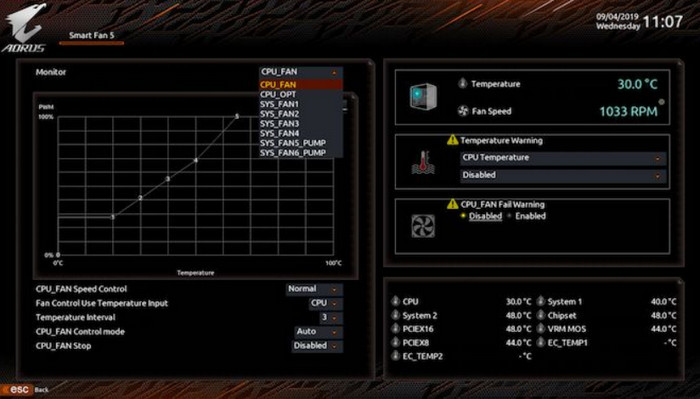
After you complete the settings, your CPU fans will start moving with full force and exhaust excess heat outside.
8. Fix Wrong Overclocking
Many users overclock their CPU in the hope of enhancing system performance. But doing so increases the heat released from the CPU.
Every CPU is overclockable, but there’s a certain limitation to it. First, check the internet how much clock speed you can increase from your running CPU.
Then, overclock your CPU to just that specific amount. However, if you see overclocking is terribly causing CPU overheating, you should entirely avoid it.
Sometimes, undervolting your CPU can also help to reduce excess CPU temperature.
You can undervolt your CPU using many third-party apps. In my case, I used the Throttle Stop software.
Here are the steps to undervolt your CPU:
- Download Throttle Stop tool and open it.
- Mark the Speed Shift EPP under Settings. This will allow Intel’s Speedshift technology to give smoother performance and better battery life.
- Click on FIVR to open undervolt CPU menu.
- Mark Unlock Adjustable Voltage box in the new window.
- Decrease the Offset Voltage slider. Recommended value is -100mV.
- Click on CPU Cache in the FIVR Control area and set the Offset Voltage to the same voltage as above.
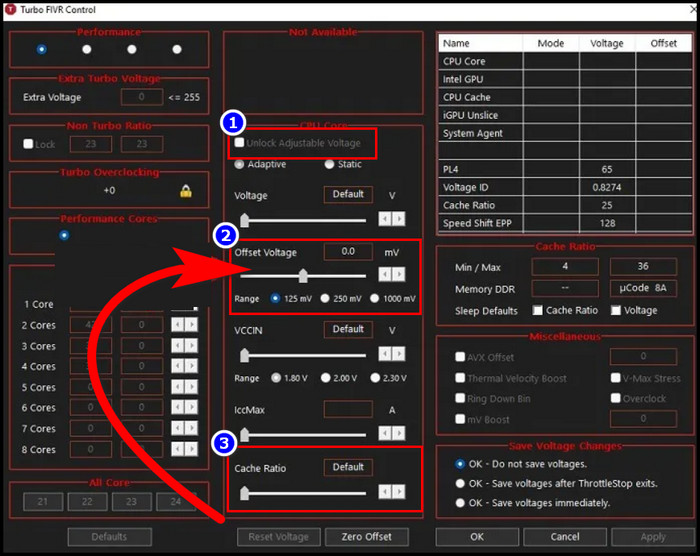
- Hit on Apply to save the changes.
- Check whether your system crashes or not. If not, you can decrease the CPU Cache and Core voltage with increments of -10mV to reduce your CPU temperature further.
- Select OK once you are done with the adjustments and choose Turn On in the main Throttlestop window.
Now, you can see a significant drop in your CPU temperature.
What Happens when CPU Temperature Reaches 100 Degrees?
When your CPU crosses 100° Celsius temperature, a safety feature known as Thermal Throttle is triggered automatically. Due to CPU overheating, this feature forces processor usage to go low so that your PC can generate as little heat as possible.
More specifically, your CPU runs at a slower rate once thermal throttle is activated. But this sudden slowdown hampers the overall performance of your PC.
For example, if you play highly CPU & GPU-hungry games, the CPU gets heated without limits. At that moment, you will see that the game starts to stutter, and even the whole system may crash.
You will often see a Blue Screen of Death, and your computer will shut down randomly. In case this happens for a long time, your PC equipment will sustain inevitable damages and can ignite a fire inside your PC case also.
FAQs
What is the Ideal Temperature for CPU?
An average CPU should maintain an ideal temperature of 75 degrees at max while under heavy CPU load. The lowest should be 20 degrees. However, a proper cooling system can decrease the heat level.
Is 90 degrees Celsius hot for a CPU while gaming?
Yes, 90° celsius is too while gaming. Normally your CPU should remain at 70-80 degrees temperature during playing heavy graphical games.
How do I fix my CPU overheating issue?
To fix your CPU overheating, you should clean your PC, apply new thermal paste and install a better CPU cooler and more case fans.
Why does my CPU get so hot?
Your CPU can exceed normal heat level due to improper ventilation system, worn-out heat sink, poor quality CPU cooler and too much CPU overclocking.
Conclusion
If you find your CPU reaching the boiling temperature, dude! you are in serious trouble. You should at once fix the CPU excessive heat issue to ensure the longevity of your valuable pc components.
Hopefully, this article has been helpful for you, and now you know the exact causes and best fixes to your CPU overheating problem.
For further queries, feel free to comment below.