Any error message can be a massive obstacle in your daily PC usage, especially if the error message stays on the screen for hours when you try to power on the PC.
In a situation like this, getting rid of the error is pretty urgent, especially if the PC is a work computer.
This post will discuss the possible fixes to the error and also explain the causes so you can avoid it.
Keep reading the post till the end.
What Is The “BIOS Is Updating LED Firmware” Error?
ROG motherboards are some of the best options for gamers and enthusiasts. They have an excellent build quality, robust features, and decent RGB lighting.
However, some issues arise from time to time that haunts the Zenbook, VivoBook and ROG motherboard users for a while.
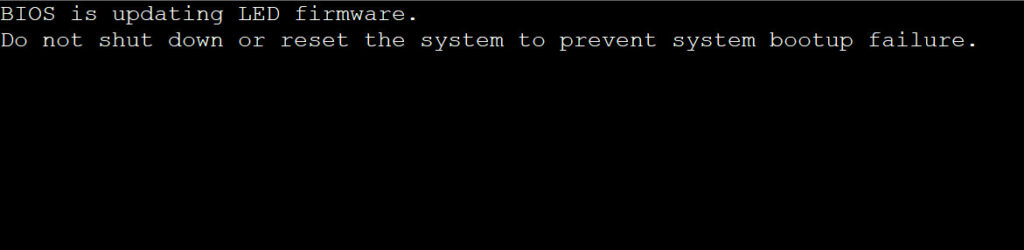
When you try to power on the PC, instead of loading the operating system, the screen will go black with a white message containing these words
“Do not shut down or reset the system to prevent system bootup failure.”
You might think there is an update in the background regarding the BIOS or RGB lighting, but that’s not the case.
It’ll stay in this state for 30 minutes or longer before it goes away, and you see the PC initializing the OS.
What’s frustrating is that the error will occur every time you power on the PC. It means you have to wait 30 minutes or more every time you turn on the PC.
Using the PC for work or other essential purposes will severely hamper your workflow and work time. Besides, you are constantly getting an error message, which is pretty concerning.
So, let’s discuss the possible fixes to the error in the following section.
How To Fix BIOS Is Updating LED Firmware on ASUS Motherboard?
There is no specific fix for the “BIOS is updating LED” since there are multiple possible causes.
But you can go through the different solutions which have fixed the issue for people.
Before that, you need to make sure your PC is able to boot into BIOS. If it cannot do that, read this quick guide to understand and fix the issue.
Follow the methods below to fix “BIOS is updating LED firmware”:
1. Reset BIOS
The very first thing you should try is to reset the BIOS.
I know the error message says not to interrupt; otherwise, it’ll result in system failure. But a bug is causing the issue, so there’s no harm if you interrupt it.
So, you can safely shut the system down by pulling out the power cord. Then you can reset the BIOS by taking out the CMOS for some moments.
The CMOS (Complementary metal-oxide-semiconductor) is a small memory storing BIOS settings and date-time configuration. If you take out the CMOS for a while, the BIOS will reset to its default state.
Here are the steps:
- Pull out the power cord and turn off the PSU (the PSU switch is at the back of the PC case).
- Take out the side panel of the PC case. Some side panel screws are tool-free, while others require a screwdriver.
- Locate the CMOS memory in the motherboard. CMOS looks like a disk-shaped watch battery the size of a penny. It’ll be somewhere around the CPU socket and VRM.
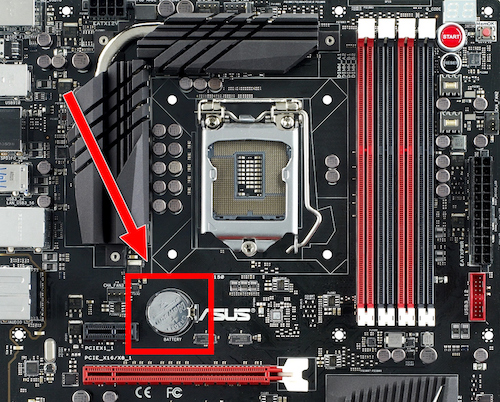
- Use a screwdriver to bring out the CMOS. Be gentle with it and pull the CMOS from a specific side as indicated on the board.
- Keep the CMOS out of the motherboard for around 5 minutes.
- Put the CMOS back into the motherboard.
- Turn on the PSU and plug in the power cord.
- Power on the PC. If OS loads up, put the side panels back into the PC case.
Now check if the error message re-appears. If it does, next, we’ll try to downgrade the BIOS.
2. Try to downgrade the BIOS
Not all motherboards support downgrading. You have to check your motherboard support page and the currently installed BIOS details to check if you’re allowed to downgrade BIOS.
If you’re allowed to, downgrading the BIOS can remove the error. It’s especially true if you’ve recently upgraded the BIOS and facing the issue.
However, downgrading the BIOS is only possible if your motherboard has the BIOS flashback feature. This shouldn’t be a major issue as all new motherboards support it by default.
The process for downgrading the BIOS is very similar to the steps for updating it, so it shouldn’t be a major issue.
If your motherboard supports BIOS downgrading, here’s what you’d do:
- Go to the support page of your motherboard model.
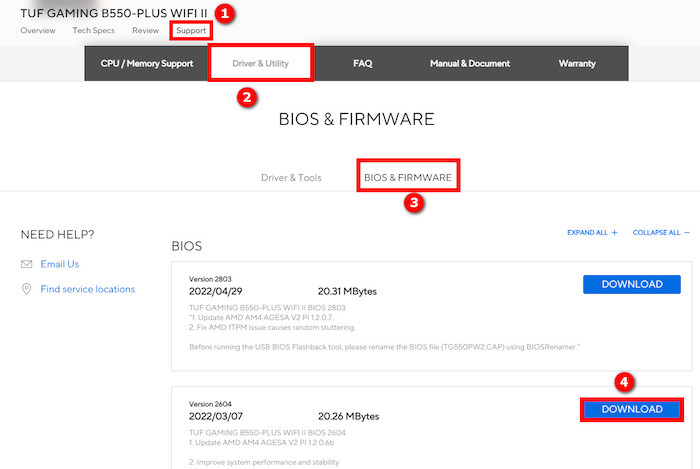
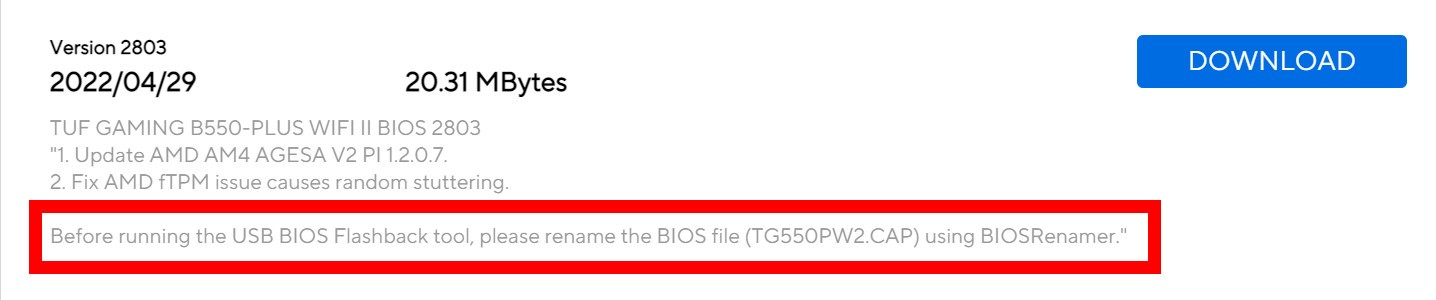
- Find an older but compatible BIOS version. If you remember the previous BIOS version that was stable, go ahead and download it. Otherwise, research or ask in the forums to see which BIOS version was the stable one. Read the instructions to ensure its compatible with your system.
- Download the BIOS file. It’s usually a ZIP file.
- Extract the contents of the ZIP file. You might need to rename the extracted file using a BIOS renamer tool present on the ZIP file. Refer to the instructions.
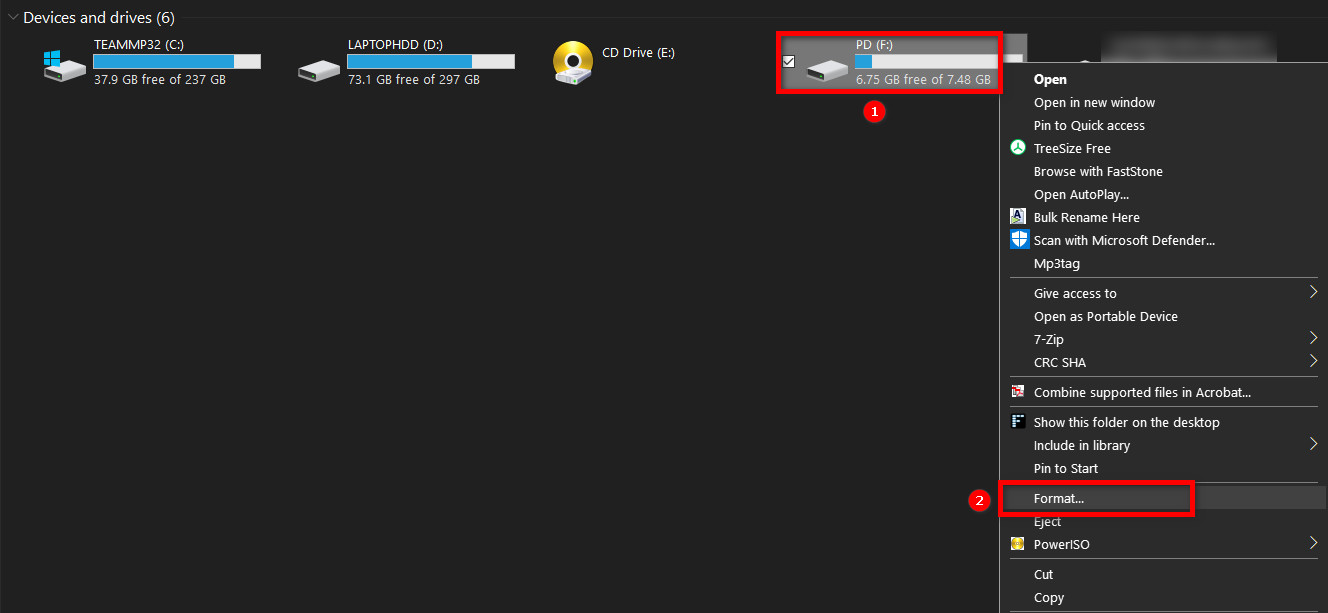
- Format a USB drive as FAT32. You can do this by right-clicking the USB drive in File Explorer, then choosing the Format option.
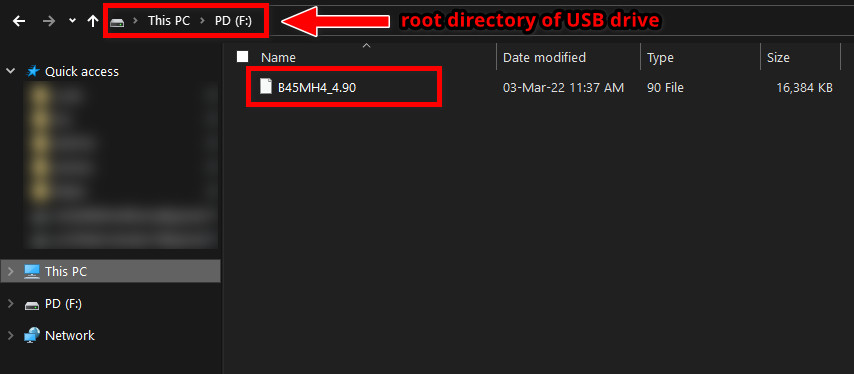
- Copy the renamed BIOS file into the root of the USB drive (not inside any folder).
- Turn off the PC.
- Turn the power switch on the PC (i.e., give power to the PC), but don’t turn on the PC by pressing the power button on the PC case.
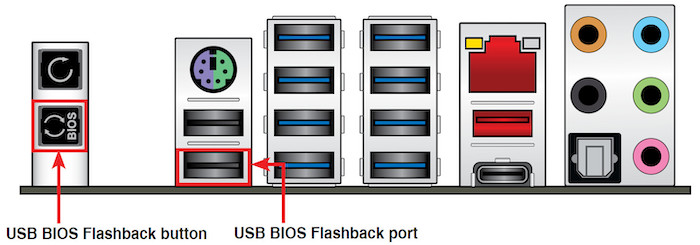
- Plug the USB drive into the USB flashback port at the back of the motherboard. Refer to the motherboard manual to find the USB flashback port.
- Ensure you have a constant power supply and no power outage before downgrading the BIOS. Your motherboard will brick itself if there’s a disruption in the power supply in the middle of flashing.
- Press the BIOS flashback button to start flashing the downgraded BIOS. The flashback LED will start blinking.
- Wait for around 10 minutes or until the LED stops blinking.
- Press the PC power button to turn on the computer.
You shouldn’t see the error message if the BIOS downgrade is successful if the updated BIOS was the cause.
But if you still see the error, the company-exclusive Aura Sync software might be the culprit.
Having trouble getting your BIOS to recognize the USB device? Simply go through our epic guide to find a fix.
3. Uninstall Asus Aura Sync
Aura Sync is an RGB control software for RGB components like GPU and motherboard. If there’s a bug in the Aura Sync software, it can lead to this issue.
You have to remove the Aura Sync software entirely from the system. We’ll use an uninstaller software like Revo Uninstaller Free to clear temp files and registry keys associated with Aura Sync to remove all traces of if from the system.
Do as follows:
- Download and install Revo Uninstaller Free from the official website.
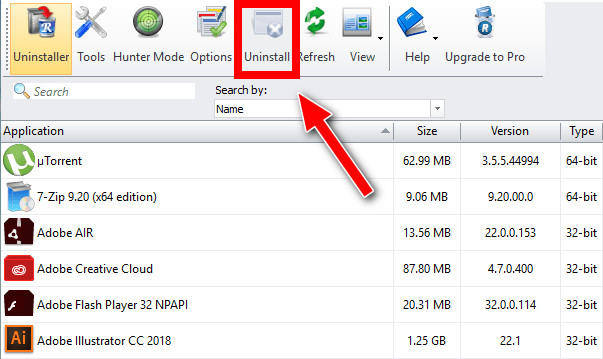
- Launch Revo Uninstaller Free.
- Select Aura Sync and other RGB software/lighting add-ons (if present) from the app list.
- Select Uninstall from the top.
- Go through the uninstall process.
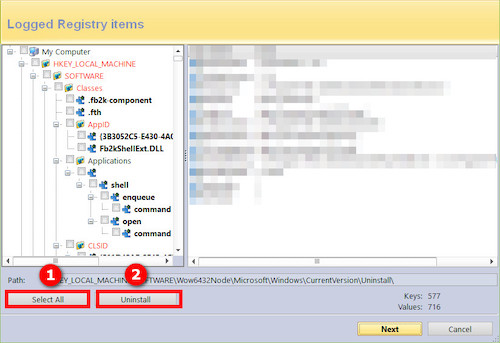
- Let Revo Uninstaller do a moderate scan to find the leftover files and registry keys.
- Click on the Select All button and then the Delete button to delete all leftover Aura Sync registry keys.
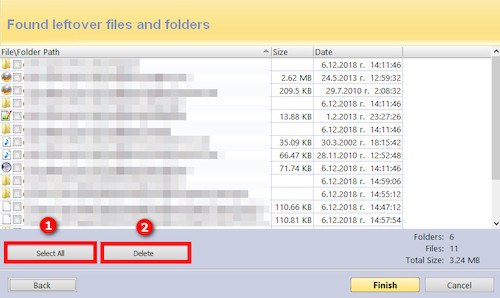
- Repeat the same for leftover files and temp files.
- Restart the PC.
If Aura Sync caused the issue, you should be able to power on your PC without facing the error.
4. Disconnect newly added RGB lights
If you’ve recently added any RGB lights or LED strips, they might conflict with the Aura Sync LED’s functionality, causing the issue.
Some users have reported that removing the newly added LED strip solved the problem. So, you might as well do the same.
5. Shorten CMOS jumper
Shortening the CMOS jumper is another trick that works for some users.
The CMOS jumper is also known as the dedicated CMOS reset button.
All motherboards have a CMOS jumper, also known as the dedicated CMOS reset button. Sometimes taking out the CMOS is not enough for resetting the CMOS, and you need to shorten the CMOS jumper.
Here are the steps:
- Turn off the PC and pull out the power cord from the wall.
- Turn off the PSU button at the back of the PC.
- Take out the PC case side panel.
- Look for two pins close to each other with the label “CLR_CMOS” or “CLRTC” or something similar.
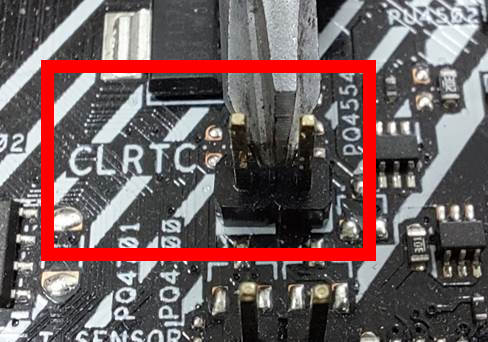
- Touch the two pins with a screwdriver such that both pins remain in contact with the screwdriver.
- Hold the screwdriver steadily for about 20 seconds. Then remove the screwdriver.
- Put the PC case side panel back.
- Turn on the PSU button and plug in the power cord.
- Turn on the PC and boot into BIOS by pressing the BIOS key repeatedly.
- Check if the BIOS settings are reset to default.
Follow the next method if this didn’t fix the problem.
6. Disconnect the PC to reset the circuit
Resetting the PC’s power circuit proved helpful for some users facing the issue. Resetting the power circuit means discharging all the electricity from the circuit inside the PC, which delivers power.
If you disconnect all the cables of the PC, then let it sit for some hours, the circuit will reset. All cables mean the power cord, all wires coming from the PSU, and all cables to external devices like keyboards, mice, etc.
Disconnect all the cables, and wait for 3-4 hours. Then connect everything and boot up the PC.
7. Reseat the RAM
Reseating the RAM also fixed the issue for a handful of users. To reseat the RAM, you have to do as follows:
- Disconnect the power cord.
- Open the side panel.
- Push the clips at the end of each RAM outwards (towards the motherboard).
- Take out the RAM.
- Let it sit for a moment.
- Put the RAM sticks back on by pressing each RAM stick into its slot. Notice the notch on the bottom of the RAM stick matching the gap on the RAM slot.
- Plug in the power cord and power on the PC.
- Repeatedly press the BIOS key to boot into BIOS.
If you can boot into BIOS and see all RAM sticks recognized, the RAM is installed correctly. You can put the side panel back into the case.
8. Update BIOS
Your BIOS firmware may be outdated if you disabled auto-update or your PC was devoid of internet connection for a long time. This could seriously hamper the performance capabilities of your system, which is why you need to update the BIOS as soon as possible.
However, once you check your BIOS version, you should be able to initiate the BIOS update process and improve the overall performance.
There are two BIOS update methods, and I am going to discuss them both.
Method 1: Update BIOS From Within Windows
You can override the older version of BIOS by booting to Windows and running the executable installer for the latest version for your motherboard.
This can be done by launching a browser and navigating to your motherboard manufacturer’s website. This is typically the ASUS website for users facing this error. Compare the BIOS versions with your current BIOS version and if you locate a new version, you can download the BIOS update manually by selecting it.
Once the download process is complete, all you need to do is double-click on the file to update and replace the old BIOS with the new BIOS. After that, simply reboot your PC to apply the changes.
Method 2: Update BIOS Using A USB Flash Drive
Another method to upgrade your motherboard’s BIOS firmware version is to download the BIOS update in a cap file format, which is specifically made for ASUS PC or motherboard.
Normally, you have to convert your pen drive to a bootable USB, but you can use the official EZ flash utility instead for better reliability. All you need to do is transfer the file to the flash drive.
When you boot up your PC the next time, access the BIOS interface using the dedicated key combination and choose EZ Flash 3 utility from the Advanced options displayed on the screen.
Unsure about how to access the Advanced options? Read this quick guide to find detailed step-by-step instructions to access it.
This way you can update your motherboard BIOS using the file from USB instantly.
Now let’s discuss why the error occurs.
Why Does The Update BIOS Error Occur?
For example, some users faced the error message after updating the BIOS. So, a bug in the latest firmware update can cause the issue.
Are you facing other issues like a black screen after a BIOS update? Go through this guide to find the solution.
Most modern computers from the Taiwanese multinational company come with a UEFI BIOS, but they are still vulnerable to this issue, just like legacy systems.
The issue arose when users installed the Aura Sync software in most cases. Aura Sync is an RGB control software for PC components like motherboard, GPU, etc.
If there’s a bug in the latest Aura Sync software, and you install it, you’d see the error message.
It’s also possible that the latest Aura Sync software update doesn’t support the lighting hardware installed on your PC. Hence, you see the error message.
However, the error can occur the other way around. If you don’t update the Aura Sync software and install a new RGB component on the PC, there’s the possibility of facing the error.
In extreme cases, a corrupted BIOS can also cause this issue.
It’s hard to determine the exact cause, as the error popped out of nowhere for many users. Some users haven’t gone through all the possible reasons mentioned above and still got the issue.
When Should You Update Your BIOS?
When it comes to when you should update your BIOS, the answer is really based on your needs. You should make sure to check your BIOS periodically for updates whenever you are experiencing any issues with your device, or if new hardware has been installed.
You also may want to update it if you need to upgrade certain features, such as power management or memory settings. It is recommended that you always have the latest version of your BIOS in order to ensure that all components are functioning properly and securely.
Before beginning the update process, make sure to check whether the latest bios update file is available for download from the manufacturer’s website and obtain a copy.
To begin the update process, you will need to enter either a BIOS or UEFI setup utility. Once inside this utility, follow the instructions provided by the manufacturer in order to complete the bios update successfully.
If at any time you feel uncomfortable performing this task, do not hesitate to seek out professional help from a qualified technician.
If you are wondering whether a CPU is required or not when flashing a BIOS update, read this curated article to clear your doubts.
Is Asus BIOS update safe?
Yes, ASUS BIOS update can be a safe and secure process when done correctly. There are three different ways to enter the BIOS of your ASUS computer; you can press a specific key during startup, enter the setup menu through Windows, or access it via a bootable USB drive.
The USB drive method works best if your PC supports USB BIOS flashback.
Before attempting an update, make sure that all other programs are closed and that your device is connected to a reliable power source.
Additionally, double check the version of BIOS that you’re trying to install and make sure that you have all necessary files with you before you go to BIOS. It’s also highly recommended that you create a backup in case anything goes wrong during the update process.
Overall, updating your ASUS BIOS can be done safely by following instructions carefully and being mindful of any potential risks.
Final Thoughts
This persistent error can be a major headache as it stays on the screen for a long time.
While the exact reason behind the error message is unknown, ASUSTek computers are known to be more prone to this issue. Its Aura Sync software is also behind the issue.
You must go through all the solutions as there’s no exact fix to the solution.