Sometimes you might come across the daunting task of flashing BIOS.
Some guidelines ask to remove the CPU, while some BIOS flash won’t work without the CPU. So what should you do?

This post will clear all such doubts and give you a direct answer and an explanation.
You’d also learn about BIOS flash and things to remember.
So keep reading the post till the end.
Can You Flash BIOS With The CPU Installed?
Before I get to whether you need CPU during BIOS flash, let me give a brief overview of BIOS and the flashing process.
BIOS stands for basic input output system. It is firmware on the motherboard chipset and is the first program that runs when you turn on the PC.
BIOS goes through a series of checks and functions before it handles the control to the OS.
For example, BIOS does the POST (power on self-test) to check the system’s integrity. It then checks the bootloader to determine the various boot partitions and boot devices and boots depending on the boot order.
BIOS also detects the connected devices and loads the drivers. Drivers are softwares which are essential for communication between different hardware.
BIOS flashing means updating the BIOS to a newer version.
As BIOS is present on the motherboard chipset, it doesn’t depend on the CPU to update itself. You only need to power the motherboard to run BIOS flash (the step-by-step guide is below).
In fact, most motherboard manufacturers recommend this process for newer motherboards. Modern motherboards (except the budget ones) have a BIOS flash button on the rear IO to flash BIOS directly using only a USB drive and power supply.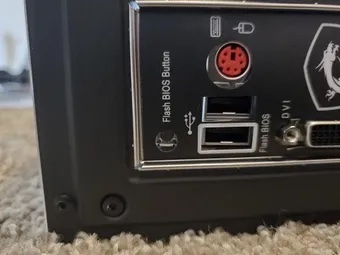
However, as most PC users and system builders have experienced, there is no disadvantage or error if the CPU is installed. Many have flashed BIOS on a fully built PC with all the components connected.
Modern motherboards and, subsequently, the BIOS have enough protection to not interfere with the other components without need.
But it’s always best to follow the guidelines when you can. So if removing the CPU is not a formidable job and the manual says to do so, go ahead.
This is especially true if the CPU is needed to verify the compatibility of the BIOS version. If the CPU is incompatible, the BIOS won’t flash, and you won’t end up with the wrong BIOS that won’t POST.
So, there’s a slim chance of error if you don’t have the CPU installed when you’re supposed to. But if the manual says not to have the CPU installed, but you’ve already done it, you can flash BIOS without issue.
However, this scenario doesn’t apply to older motherboards (5 or more years old). They don’t have enough protection against interfering with other components during BIOS flash.
For example, BIOS flash might wipe out the hard drive entirely if it’s connected during BIOS flash.
So, old systems are sensitive to BIOS flash, so you must strictly follow the guidelines.
Now let’s talk about the exception. Sometimes you’d come across specific motherboard and CPU series which require the CPU to be installed to flash BIOS.
The most recent example is the AMD Ryzen B450 motherboards and AMD Ryzen CPUs. AMD kept supporting the B450 motherboard series for such a long time that it wasn’t possible to run a newer generation CPU without a BIOS flash (as newer generation CPUs contain newer technology that wasn’t thought of during B450 series development).
As such, any newer generation CPU requires the BIOS to be updated. And the BIOS update only works when the older compatible CPU is installed.
Hence anyone buying the newer CPU and trying to use it on the B450 motherboard would be out of luck. They’d need to install an older generation compatible CPU and make the BIOS flash. Only then the newer CPU would run on the B450 motherboard.
AMD sent upgrade kits of old CPUs to help users make the BIOS flash. It might sound like a hassle, but AMD was out of options when supporting the old motherboard platform B450 for a long time.
So, to summarize:
- Most modern motherboards don’t need a CPU installed while flashing BIOS because of the BIOS flashback feature. Some motherboards don’t even suggest having the CPU installed, but there’s no harm if the CPU is installed.
- If your motherboard doesn’t have a BIOS flashback feature, you’d need to go to BIOS to update it. And CPU is required to boot into BIOS.
- If the motherboard manual requires you to have the CPU installed, you should do so. Otherwise, you might end up with an incompatible BIOS version that won’t POST with the CPU.
- Older motherboards don’t offer much flexibility and protection, and there’s a chance of damage (like the hard drive being wiped out). So strictly following the motherboard manual is necessary.
- There are some exceptions where particular motherboard series require a compatible CPU to flash the BIOS and make the motherboard compatible with newer CPUs.
Depending on your scenario, you’d take any of the above paths.
How To Flash BIOS With Or Without CPU Installed
Most modern midrange or high-end motherboards have a BIOS flashback feature, allowing you to flash BIOS without CPU or other components installed.
It is helpful if you’re making the motherboard compatible with newer CPUs or you want to update the BIOS before building the PC.
But if you’ve already built the PC or don’t have the BIOS flashback feature, you can flash the BIOS with the CPU installed.
This applies to all modern motherboards. For older systems, you should strictly stick to the rules.
Follow the steps below to flash BIOS:
1. Find the PC/motherboard model and current BIOS version
First, you need to know the PC model name if it’s a pre-built PC or the motherboard model name if it’s a custom-built PC.
Next, you need to know the current BIOS version to ensure you’re not downgrading the BIOS.
Here are the steps:
- Go to Windows Search and type “msinfo.”
- Select System Information.
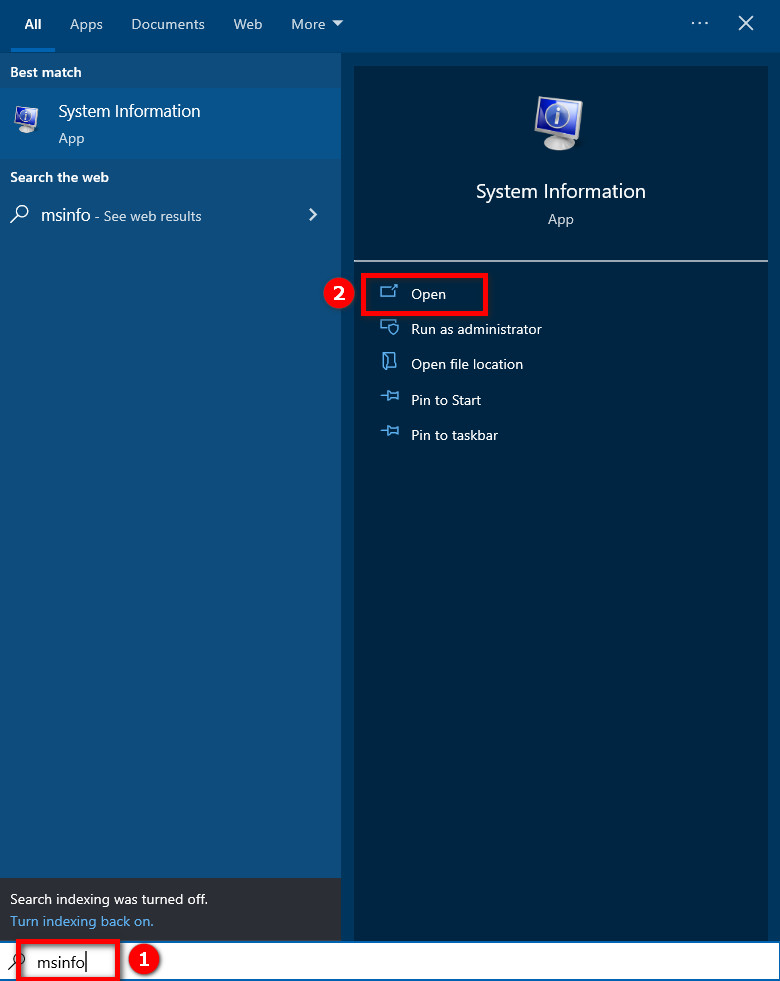
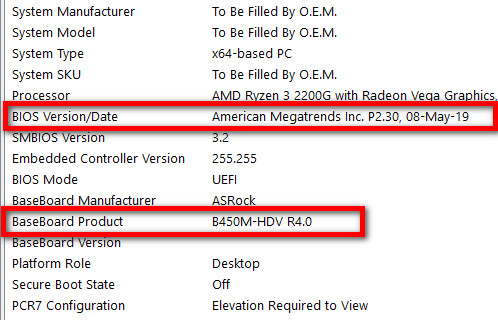
- Note the “BIOS Version/Date” to know the current BIOS version.
- Note the “System Model” to know the exact model of your prebuilt PC.
- Note the “Baseboard Product” to know the precise motherboard model of your custom PC.
If Baseboard Product doesn’t give you the motherboard model, right-click on the Windows Start logo and select Windows PowerShell. Type “Get-WmiObject win32_baseboard | Format-List Product,Manufacturer” without quotes and press Enter. This will show the motherboard model and is needed for custom builds. 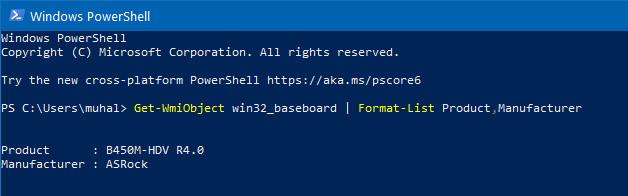
Now that you know the PC/motherboard model and BIOS version, it’s time to download the correct BIOS update file.
2. Download the BIOS update file
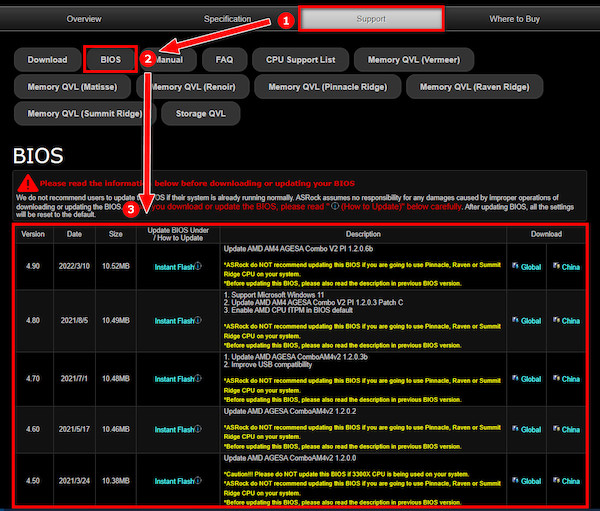
You will go to the support and driver download webpage for your motherboard/PC model and download the updated and compatible BIOS.
Here are the steps:
- Go to the support website of your PC model. If it’s a custom build, go to the support website for the motherboard model. Ensure you look at the support page of the same model/make as your PC or motherboard.
- Check the downloads or drivers section of the support page. It should contain BIOS update files for your motherboard or PC model.
- Read the instructions and get a clear idea about which BIOS version to get, if it’s compatible, and the consequences. Compare the BIOS version of the file you’re about to download with the current BIOS version you have. It’ll ensure the BIOS you’re about to download is an updated one.
- Download the BIOS update file to your PC. In most cases, it’s a ZIP file.
There would be instructions on how to put it into a USB disk. But usually, you’d do as stated in the next step.
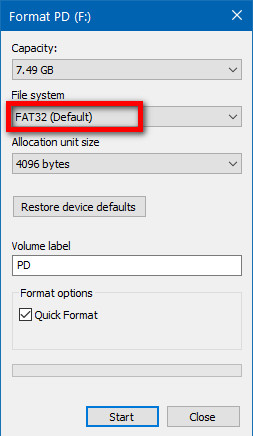
3. Prepare the BIOS file and USB drive
Now you’ll format a USB drive (preferably a USB 2.0 drive) and put the BIOS file into it in the appropriate format.
You can also use a USB 3.0 stick, but there might be issues, as many users have faced.
Do as follows:
- Extract the content of the downloaded ZIP file into a folder.
- Rename the extracted content of the ZIP file following the website instructions. For example, the BIOS update file for the MSI motherboard is usually renamed as “msi.rom”.
- Connect a USB 2.0 drive to your PC.
- Go to File Explorer > This PC.
- Right-click on the USB drive and select “Format.”

- Format the USB as FAT32.
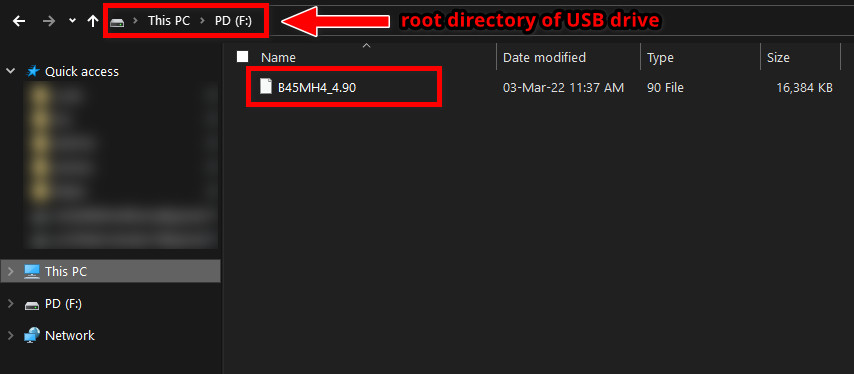
- Put the renamed BIOS file into the root directory of the USB. It means that paste the BIOS file directly into the USB drive and not inside any folders.
Now it’s time to flash the BIOS.
4. Flash BIOS
To flash BIOS, you’d either use the flash option inside the BIOS menu or use the BIOS flashback button (found on midrange and high-end motherboards) at the rear IO.
The benefit of using the BIOS flashback is that it works without a CPU. So if you’re trying to flash BIOS without CPU, you need to go for BIOS flashback.
Otherwise, with the CPU installed, you can use either method depending on the availability of the BIOS flashback feature.
So follow any one of the below methods that apply to your motherboard:
Use BIOS flashback
The BIOS flashback feature allows you to flash BIOS without going to BIOS or installing a CPU.
Usually, modern midrange and high-end motherboards have the BIOS flashback feature.
If your motherboard supports BIOS flashback, it’ll have a dedicated button at the rear IO. You can use the button to flash BIOS. 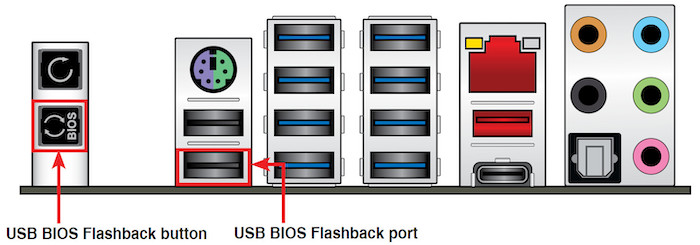
If you’re trying to flash BIOS without a CPU, you must connect the 24-pin main motherboard and 8-pin CPU connector to the PSU.
This way, the motherboard will get power and can flash BIOS without a CPU.
Here are the steps:
- Plug the USB stick with the BIOS file in the correct USB port. Your motherboard model’s BIOS flashback feature page should mention which port to plug it in. If that’s not the case, plug the USB drive into the primary USB port (usually the topmost and leftmost USB port in motherboard rear IO) or any USB 2.0 port.
- Power on the PSU so that it can power the motherboard. No need to turn on the PC.
- Press the BIOS flashback button from the motherboard rear IO.
- Ensure the LED for BIOS flashback is blinking.
- Wait for 10 minutes to complete flashing BIOS. The LED will stop blinking.
Now turn on the PC, go to BIOS and check the BIOS version. Also, boot into the operating system and see if everything works as expected.
Use the flash option inside BIOS
Almost all BIOS have the flash option, which updates the BIOS.
Depending on the motherboard manufacturer, model, and BIOS version, the exact location of the flash option will vary, but usually, it’s located in the Boot or Advanced tab.
Here are the steps:
- Plug in the USB stick containing the BIOS file in the appropriate USB port. The BIOS download page should mention which port to plug it in. If that’s not the case, plug the USB drive into the primary USB port (usually the topmost and leftmost USB port in motherboard rear IO) or any USB 2.0 port.
- Power on the PC and repeatedly press the BIOS key until the BIOS shows up.
- Go to the Boot tab and ensure the USB drive appears in the bootable drive list.
- Find the BIOS flash option. Depending on the motherboard manufacturer, it might be labeled in different terms (Q Flash, Mflash, Instant Flash, etc.).
- Select the BIOS flash option.
- Select the USB disk and the BIOS update file. The flashing process will start. Do not interrupt the PC in any way during the flash.
- Select to reboot the system or follow the on-screen instructions when the BIOS flash is completed.
- Check if the PC boots and runs fine.
Congratulations. You have successfully flashed BIOS.
Things To Consider Before Flashing BIOS
Before flashing BIOS, you should consider some things, as it’s not the same as updating software. BIOS and updating it are both sensitive, so you must be cautious.
Only update BIOS to fix errors or make the PC compatible with the new CPU. BIOS update contains bug fixes or compatibility layers for newer CPUs.
Your PC performance won’t improve through BIOS updates. So you shouldn’t update BIOS just because there exists a newer version.
But if there’s any bug in the new update, it’ll cause more issues. So if you’re system runs fine, don’t bother updating the BIOS.
However, you should definitely update the BIOS if there’s a mandatory bug fix or security fix.
FAQ
Question: Can you flash BIOS without OS installed?
Answer: Yes, you can flash BIOS without OS installed. You only need the BIOS file on the USB drive and either the BIOS flashback feature or access to BIOS to flash BIOS. The operating system doesn’t play a role here.
Question: Can you use BIOS Flashback without CPU installed?
Answer: Yes, you can use BIOS Flashback without the CPU installed. In fact, most motherboard manufacturers recommend only powering the motherboard with a 24-pin and 8-pin connector and not attaching other components to it (including the CPU).
Question: Can you update BIOS without supported CPU?
Answer: You can update BIOS without a supported CPU if it has the BIOS flashback feature, as BIOS flashback works without a CPU. But if you need to boot into BIOS or if CPU is a must to check compatibility, you cannot update BIOS without a supported CPU.
Final Thoughts
BIOS flashing is a sensitive task. You should be very careful while updating the BIOS.
Modern motherboards with BIOS flashback features can flash BIOS with or without a CPU. If your motherboard doesn’t have the BIOS flashback feature or has a compatibility issue, you must install the CPU to flash BIOS.
As flashing the BIOS is sensitive, you should read the manual carefully and follow every step cautiously.