You must have heard that TPM and Secure Boot are required to install Windows 11. But what if you can’t boot into BIOS to turn on Secure Boot?
Don’t worry. Though enabling the feature through BIOS is a piece of cake, there are alternative methods to enable Secure Boot without BIOS.
This article will guide you with step-by-step instructions to enable secure boot on your computer without accessing the BIOS settings.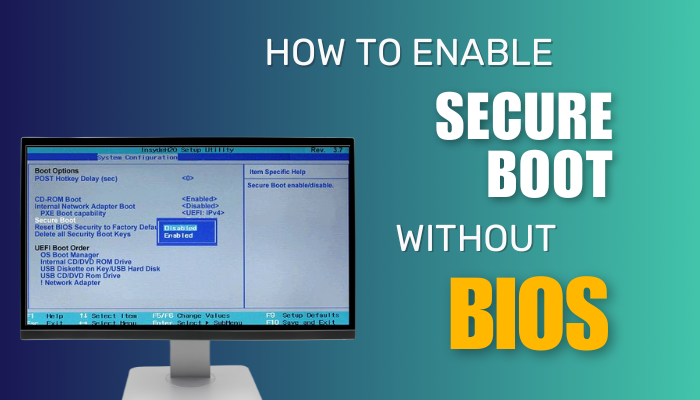
Let’s dive in.
What is Secure Boot and Why Enable it?
Secure Boot is a feature that prevents security threats during the Windows boot process. Most modern motherboards with UEFI firmware have this feature to provide a safe environment to prevent unauthorized access to the computer.
The security feature relies on the UEFI Firmware and lets the PC boot with trusted software from the OEM (Original Equipment Manufacturer).
Here’s why you need to enable Secure Boot:
- This security feature is a must-have to install Windows 11.
- It prevents the system from malicious or non-certified bootloaders, bootkits, and rootkits.
- The feature secures the system at ground level.
- It prevents hijacking of the system and prevents piracy.
- This protects against threats that try to bypass or modify the Windows bootloader.
- Secure Boot is necessary for some anti-cheat softwares for games like Valorant or Fifa 23.
So, now you know the benefits of Secure Boot, which ensures that your computer initiates using exclusively trustworthy software, it’s time to enable the feature. Keep reading to learn the process if your PC won’t boot to BIOS.
Know These Before Enabling the Secure Boot Without Entering BIOS
Before jumping into the process of enabling the Secure Boot, ensure that your hardware is compatible with the feature. Moreover, it is always an upper hand to check its status on Windows before enabling it. Who knows, it is enabled in the first place!
To check if Secure Boot is enabled or not on your PC:
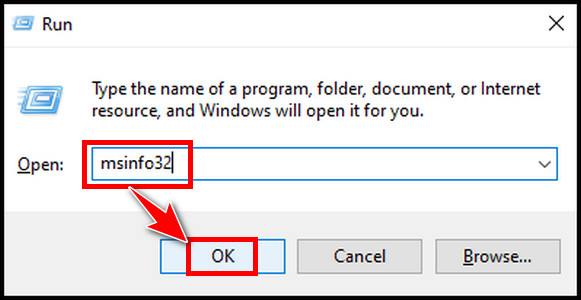
- Press Win+R to open the run command.
- Type msinfo32 and hit OK.
- Find Secure Boot State from the right side of the System Summary section.
If it shows On, you have nothing to worry about, as it is already activated on your system. Off means the system supports the feature, but Secure Boot is not enabled on this machine.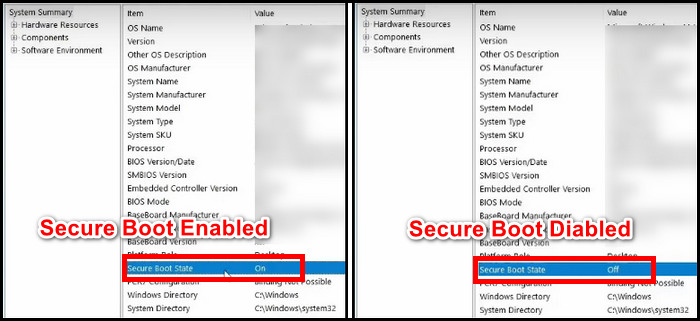
However, if it displays Unsupported, you are out of luck, as the system is too old, running on Legacy BIOS mode, and incompatible with the feature.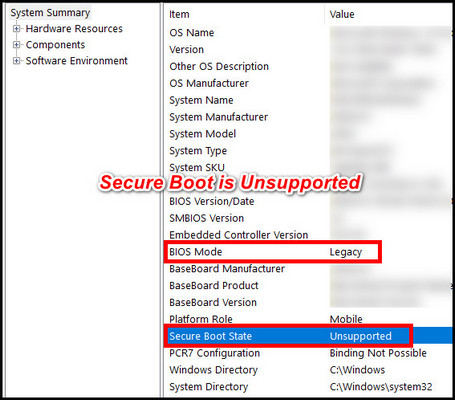
If it is Off, it’s time to check other things before enabling the feature.
Here are the factors to do before enabling Secure Boot:
- Disable CSM in BIOS.
- Install a recent Windows version. (Preferably Windows 10 & 11)
- Flash the latest BIOS.
- Set the boot mode to UEFI instead of Legacy.
How to Turn On Secure Boot Without Accessing BIOS
To enable the Secure Boot feature without entering BIOS, you can use the Windows Advanced Startup option. In addition, you can use the Registry Editor, PowerShell command, or Group Policy Editor to enable Secure Boot from Windows 10 or Windows 11 if it is not activated.
Here are the methods to enable Secure Boot Without accessing BIOS:
1. Enable Secure Boot with Windows Advanced Startup
From Windows advanced startup, you can enable the Secure Boot option easily.
Here’s the process to enable Secure Boot from Windows Advanced Startup:
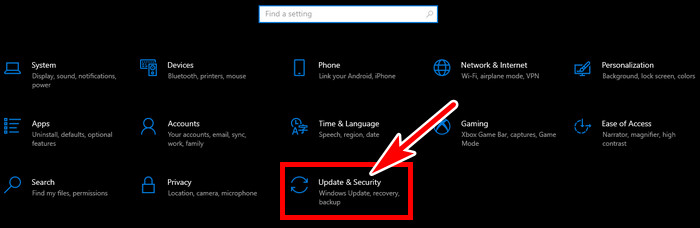
- Press Win+I to open Windows Settings and click Update & Security.
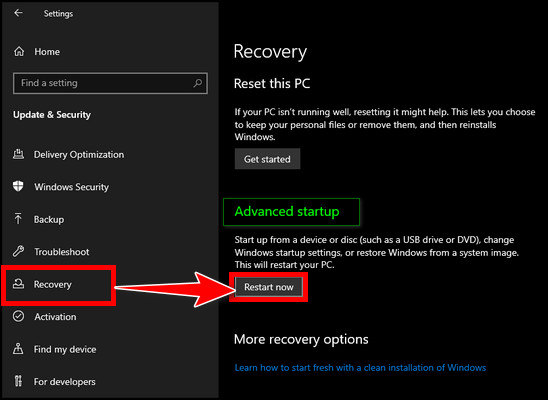
- Select Recovery from the left and click Restart now under Advanced startup.
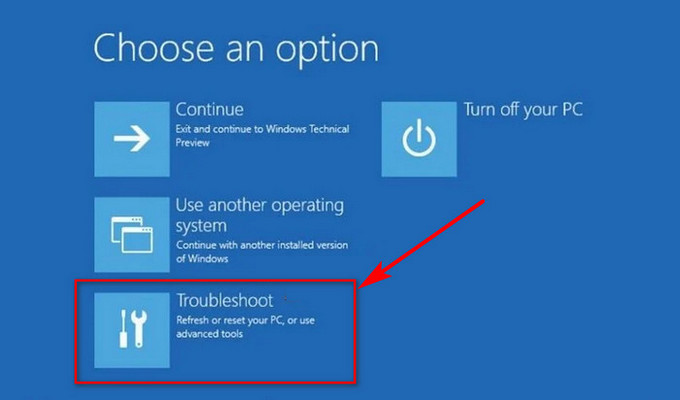
- Wait until a blue screen appears after restarting with advanced menus.
- Select Troubleshoot.
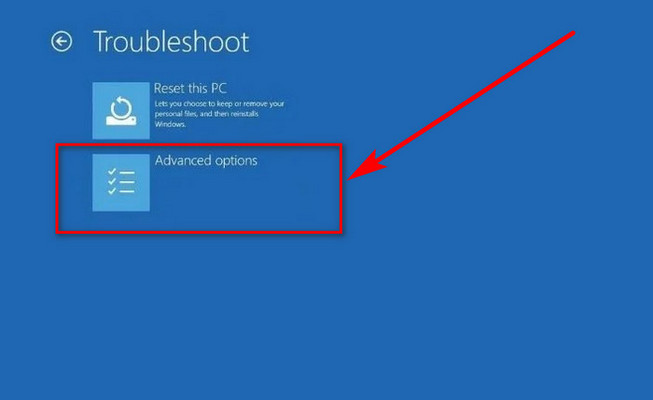
- Click Advanced options.
- Choose UEFI Firmware Settings.
- Find Secure Boot under the Security, Boot, or Authentication menu. Depending on the manufacturer, the name varies.
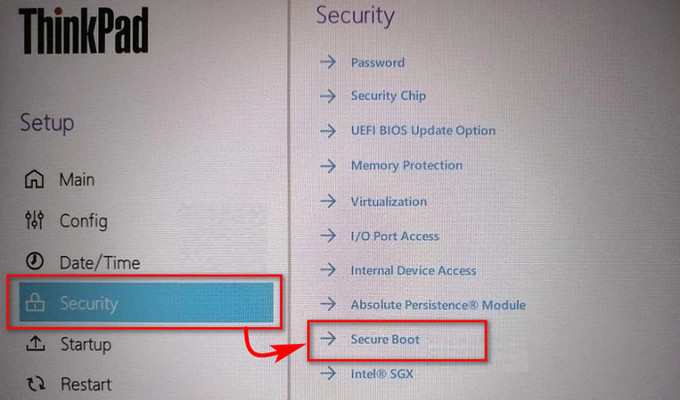
- Toggle on the Secure Boot.
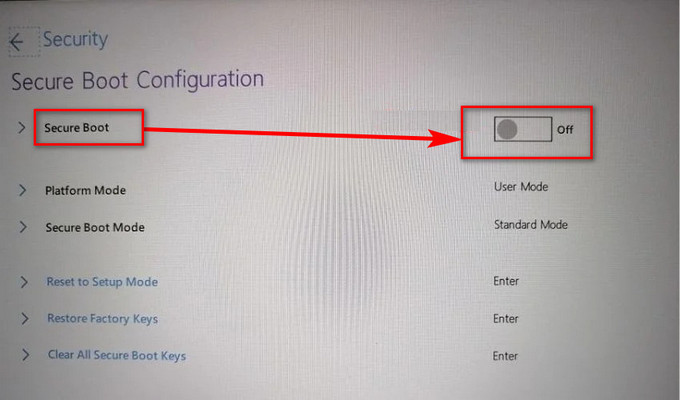
- Save the change and reboot the computer.
You will see that the Secure Boot is now enabled without reinstalling Windows.
2. Turn On Secure Boot with Group Policy Editor
You can enable Virtualization Based Security in Windows Group Policy Editor to enable Secure Boot within Windows.
Here are the steps to enable Secure Boot using the group policy editor:
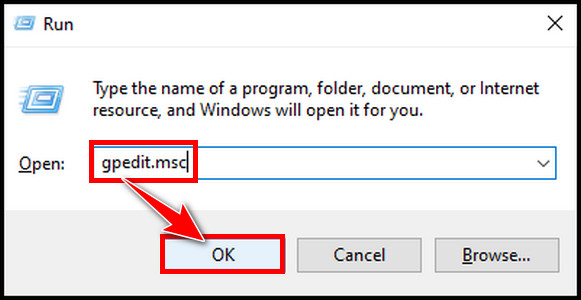
- Open the run command, type gpedit.msc, and hit OK.
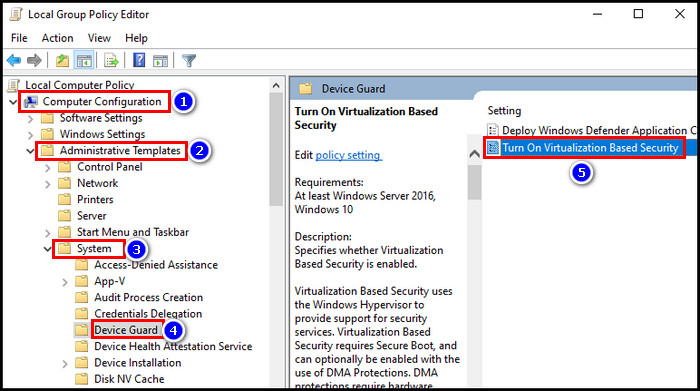
- Expand Administrative Templates under Computer Configuration.
- Click twice on the System folder and choose Device Guard.
- Double-click Turn On Virtualization Based Security from the right side.
- Select Enabled > Apply and then OK.
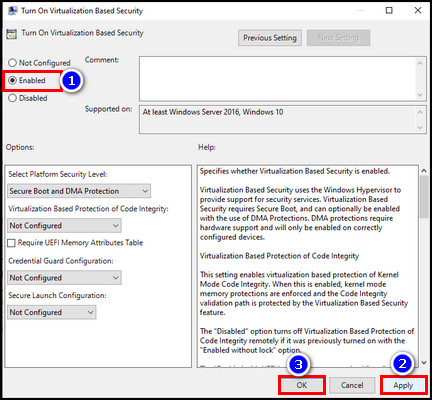
- Reboot the system.
Your system now has Secure Boot enabled.
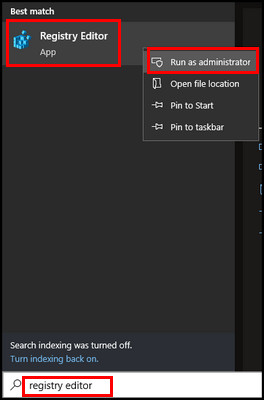
3. Activate Secure Boot from Registry Editor
There is a registry key to handle Secure Boot in Windows. You can set the Windows registry value to activate Secure Boot in Windows 10 or 11.
Follow the steps below to enable Secure Boot with Registry Editor:
- Search registry editor in Windows search and run it as an administrator.
- Navigate to Computer\HKEY_LOCAL_MACHINE\SYSTEM\CurrentControlSet\Control\SecureBoot\State
- Double-click on UEFISecureBootEnabled from the right side.
- Set the Value data to 1 and hit OK.
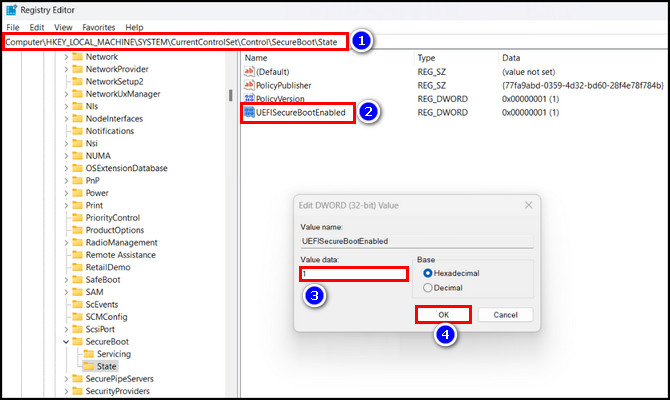
- Restart the PC.
Now check that the Secure Boot should be enabled on your system.
4. Use PowerShell to Turn On Secure Boot
It is also possible to set secure boot status as enabled with Windows PowerShell. You can use a command to enable Secure Boot through it.
Follow the steps below to enable Secure Boot with PowerShell:
- Search Windows PowerShell and run with admin privilege.
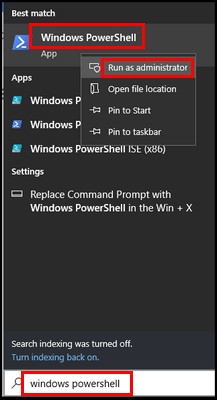
- Type Set-SecureBootUEFI -Enable in the PowerShell command.
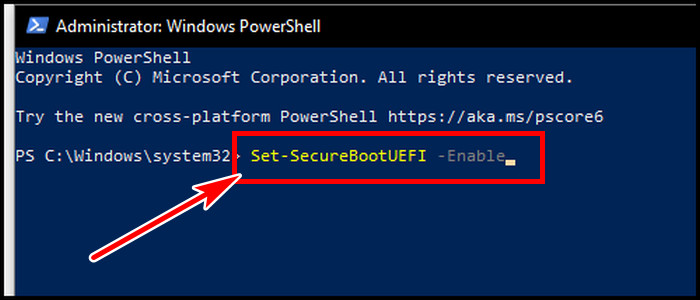
- Hit Enter.
- Reboot the computer to save the changes.
Final Thought
Having Secure Boot enabled will provide a more secure experience. Microsoft made it a compulsory requirement to install Windows 11. Some games even require the feature to work with the anti-cheat.
You can enable the feature from BIOS, and if you can’t boot into BIOS, this guide describes the alternative ways to enable Secure Boot without BIOS. So, which one worked for you? Let us know in the comment section.
Have a nice day!