“Loose to gain”— perfectly exemplifies the instance when you install a dedicated sound card that conflicts with the motherboard’s audio chip and also the drivers of two devices.
So, deactivating the onboard sound chip from the BIOS is the best solution to that problem.
In this article, I’m going to walk you through the process of switching off the onboard audio in BIOS.
Let’s begin, shall we?
You may also like to read about 4 tested fixes for black screen after BIOS update.
Disable Onboard Audio in BIOS
Getting into the BIOS may feel a bit intimidating at first. But it is rather streamlined once you get the hang of it. Typically you will find the onboard audio option under the System or Advanced tab, depending on the manufacturer.
Related guide on why your PC won’t boot to BIOS?
Here are the steps to disable onboard audio in BIOS:
- Keep mashing the BIOS switch on your keyboard while booting up your computer.
- Switch to Advanced BIOS mode by pressing the allocated keyboard button, such as F6 or F7 etc.
- Navigate to the System (MSI, Gigabyte) or Advanced (ASUS, AsRock) tab.
- Find and select the onboard audio option, such as HD Audio (ASUS, AsRock), HD Audio Controller (MSI) and Audio Controller (Gigabyte).
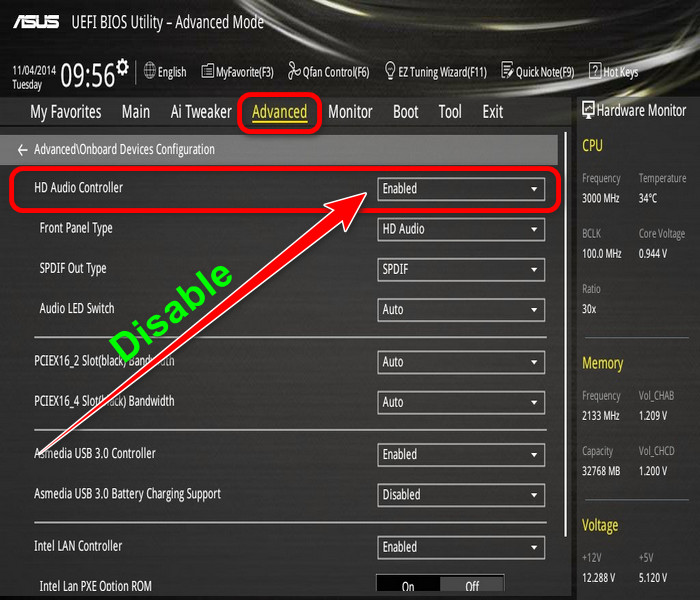
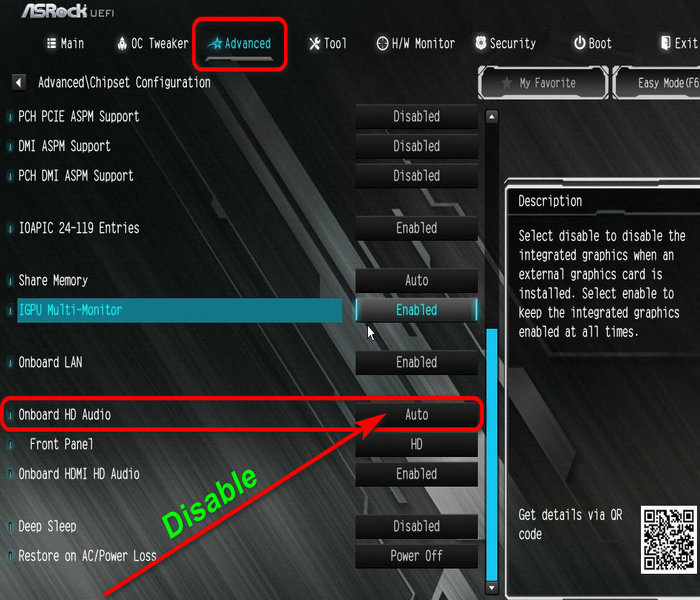
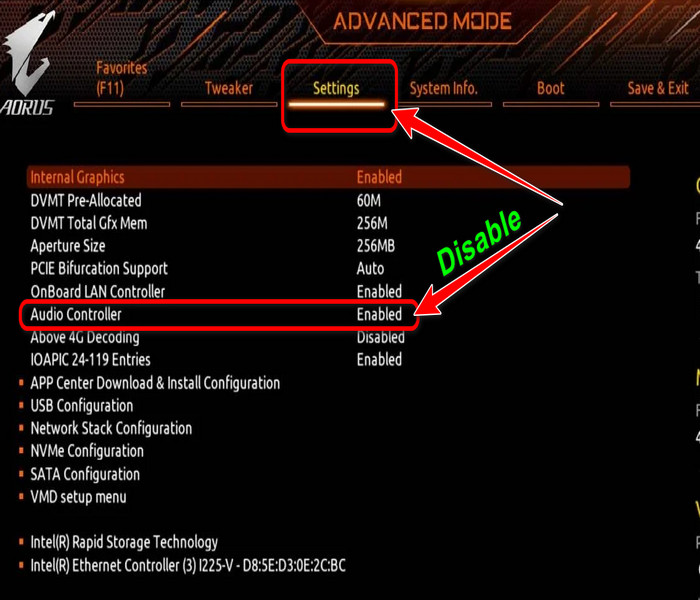
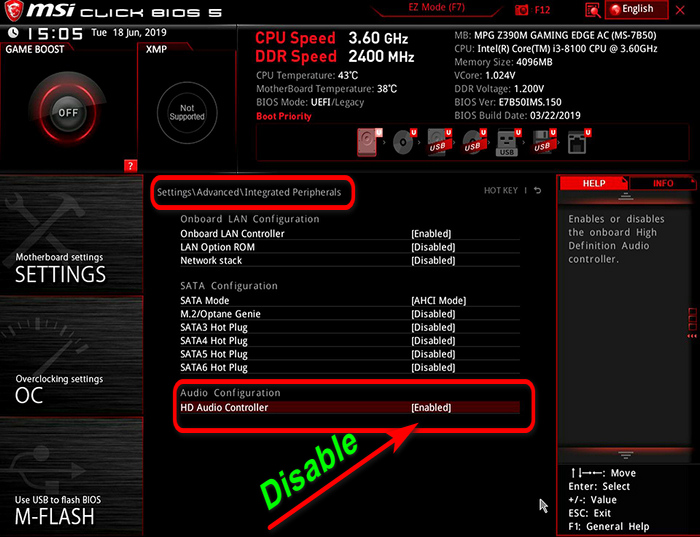 Note: This option may sometime reside in other sub-menu, such as Integrated Peripherals (MSI), Chipset (AsRock), Onboard Devices Controller (ASUS), and I/O Ports (Gigabyte). The general thumb rule is to explore the BIOS until you find the right option.
- Select the option by pressing Enter and choose Disabled.
- Save and Exit.
Reboot your PC and boot into Windows normally. Now, you’ll only see the dedicated sound card if you check audio devices.
However, if you want to switch the integrated audio on again, simply follow the same steps and choose Enable from the audio controller option.
On an additional note, if you find it dreadful tweaking the motherboard BIOS, you can always switch off the onboard audio device from the operating system.
Related content you should read about PC keeps restarting before BIOS.
Turn Off the Integrated Audio in Windows
You can easily disable the integrated audio from Windows. The approach is quite similar, whether it’s Windows 11 or 10.
However, turning the onboard sound chip off in this manner may still cause issues, and it’s not a permanent solution. BIOS is always the best bet when it comes to integrated peripherals.
Here’s how you can turn off integrated audio in Windows:
- Press Windows + R key and type devmgmt.msc in the run command box.
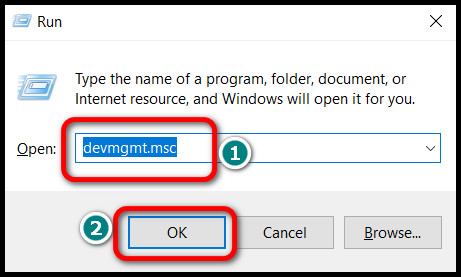
- Hit OK, and the Device Manager Window will come up.
- Scroll down and find the Sound, video and game controllers option.
- Click on the arrow (>) or plus (+) sign to expand it.
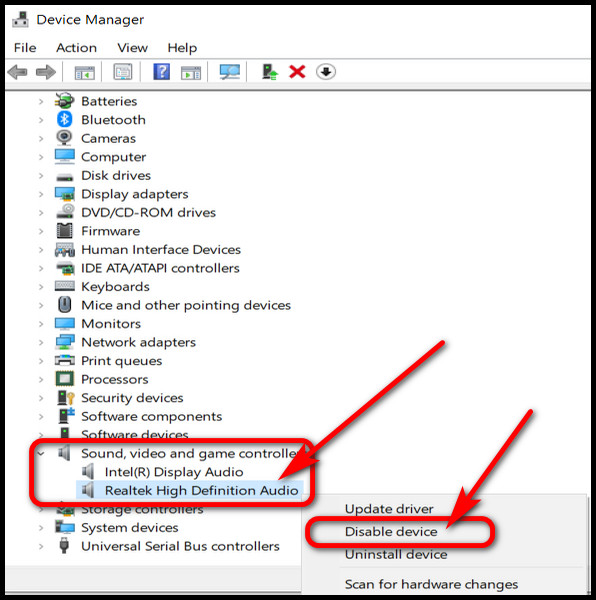
- Right-click on the onboard audio device, such as Realtek High Definition Audio and choose Disable device.
Once done, restart your computer. And now you can install the new sound card without any driver conflict.
Some more guides on enable SLI in BIOS, fix GPU not detected in BIOS issue.
FAQs
Do Motherboards Have Built-in Sound Cards?
Yes, all motherboards have a built-in sound card. But due to the form factor, these chips can not deliver audio output like a dedicated sound card.
Which BIOS Setting Should You Disable If You Need to Install a Sound Card?
To install a sound card, you should disable the HD Audio Controller setting, which typically refers to the integrated sound chip.
Should I Disable the Onboard Sound Card?
Yes, only if you want to install a dedicated sound card on your PC. As multiple sound cards sometimes conflict with each other, switching off the onboard audio is always recommended.
Ending Remarks
Integrated audio works just fine until a dedicated sound card replaces it. When a new audio-producing chip is introduced to the system, drivers start to freak out and cause sound issues.
Disabling the onboard audio from the BIOS worked like a charm for me and other users. And it will surely sort out sound issues for you as well.
Let me know your opinion in the comment box.
Take care.