You probably need lots of GPU power if you are a hardcore gamer or VFX animation maker. Maybe one GPU isn’t enough for you because you need more rendering power.
But you don’t need to sell the current GPU and buy a more powerful one because SLI can solve the problem.
You can buy another GPU and install it along with the current one. Using both GPU cards at once is possible through Nvidia’s SLI technology.
To do this, you must enable SLI. If you don’t know how to enable SLI in BIOS, read this article until the end. I have given all the required information and steps in this article regarding SLI.
So, don’t wait a bit and begin reading.
What is SLI & SLI Bridge?
Scalable Link Interface, or SLI, is a multi-GPU configuration that offers boosted rendering performance by dividing the workload throughout multiple GPUs. With SLI, you can perform real-time graphics rendering and generate a single output from multiple Video cards.
The initialism SLI was first introduced to the consumer market in 1998 by a company named 3dfx. Later, Nvidia bought that company and reintroduced SLI in 2004. The SLI technology used in the modern computer is based on the PCI Express bus.
SLI allows two to four graphics cards to share the workload for rendering 3D computer graphics. But you will need a motherboard that has more PCI Express slots. SLI is based on a parallel algorithm to achieve work simultaneously.
SLI bridge is a physical connector that links graphics cards together and communicates with each other without using bandwidth on the PCIe slots. It’s a small circuit board with SLI-ready motherboards, or you can buy them separately.
There are two-way, three-way and four-way SLI bridges available now. You can connect at least four graphics cards in a single motherboard that supports four-way SLI. So, you need an SLI bridge to enable SLI.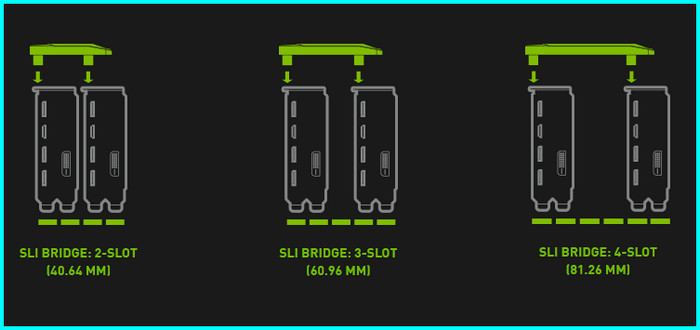
You may also like does Fortnite support SLI technology.
How Does SLI Work on a PC?
The SLI technology works mainly on a master-slave basis. Simply put, one card functions as the master and the others work as slaves. The master card collects all the data from the slave card and acts as the final port of call by transferring finalized 3D rendered graphics to the display.
You need an SLI bridge to enable the SLI and keep the data connection between multiple GPUs. After enabling SLI, all the cards will do rendering and send the finalized version to the master card. The Master card then sends the output.
In this process, the master GPU works on the top, and the slave works on the bottom. The output comes from the combination of all the card’s processing power.
As I have said, you will need an SLI bridge to connect multiple cards. There are three types of SLI bridges right now.
Here are the three types of SLI bridges and their characteristics:
- Standard Bridge is a traditional GPU linker for less-powerful graphics cards and is compatible with 1920×1080 and 2560×1440 resolution-based monitors with 60Hz. It can provide 1GB/s bandwidth and a 400MHz pixel clock.
You can find a standard bridge in the motherboard package that supports two-way SLI.
- LED Bridge is available in the market and is the most used SLI bridge. You will find LED bridges from multiple brands like Nvidia, EVGA, MSI, ASUS, etc. It supports up to 2560×1440 at 120Hz and 3840×2160 at 60Hz. This card delivers a 540 MHz Pixel Clock.
- High-Bandwidth Bridge can pass more bandwidth than the other two and is sold exclusively by Nvidia. It can deliver 2GB/s bandwidth and has a 650MHz pixel clock with 5k monitor supportability. But it only supports a two-way SLI configuration.
So, the three bridges available right now are performing SLI connectivity. Moreover, the SLI maintains two methods for passing data within the GPUs.
Here are the methods used by SLI for sending data:
1. Split Frame Rendering (SFR)
In this SFR method, the GPUs split the workload among themselves. After separating all the workloads, each GPU works on the specific portion of the frames in parallel mode. Simply put, one GPU renders the top half of each video frame, whereas the other does the bottom part.
2. Alternate Frame Rendering (AFR)
One GPU computes all the odd video frames in this working method, and the other renders the even frames. It’s like when the master GPU works on frames 1,3,5, and the slave GPUs work on 2,4,6.
So, SLI works on the above procedures. But you will need certain things to enable SLI.
What are the Requirements to Enable SLI?
You need some components like identical graphics cards, SLI compatible motherboard and an SLI bridge connector. You can’t just pick up any graphics card and turn on SLI, and not all motherboards support SLI. So, you must ensure some factors before going for an SLI.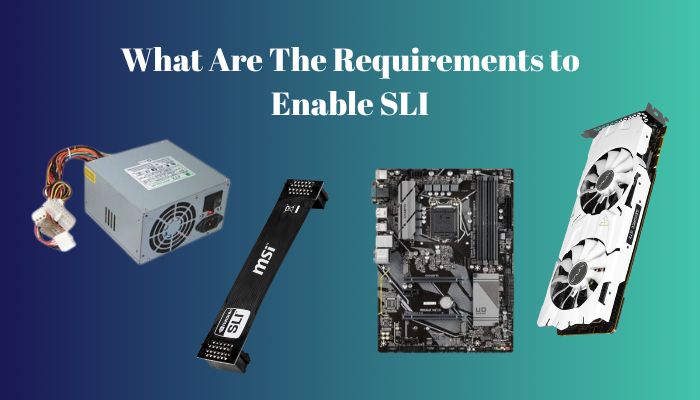
Let’s look at the components that are a must for performing an SLI connection between GPUs.
Here are the components you will need to enable SLI:
1. Identical Graphics Card
The first thing you will need is more than one identical graphics card. You can’t pick any GPU, install it in the mobo and can’t enable SLI. SLI only works on two similar graphics cards from Nvidia.
You can’t SLI between RTX 2060 and RTX 3060. All the cards need to be RTX 2060 or RTX 3060, and you can’t mix up two chipset-based cards to enable SLI.
2. Compatible Motherboard
You could have two identical graphics cards, but with that, you must need an SLI-supported motherboard. An SLI-supported motherboard should have more than one PCI Express slot for GPUs.
But you must ensure that it supports SLI because some motherboards only support AMD Crossfire. Some motherboards support both SLI and Crossfire. So, before buying one, make sure the motherboard supports SLI.
3. SLI Bridge Connectors
The SLI bridge connector is the most important thing you will need to establish an SLI connection. It’s a small circuit board configured for a two-way, three-way or even four-way SLI connection.
There are three SLI bridges available: Standard, LED and High-Bandwidth bridges. You can buy one from the market. Different manufacturers like Nvidia, ASUS, MSI, and EVGA sell SLI bridges to consumers.
4. Capable Power Supply
You will need a capable power supply to deliver the power to the multiple graphics cards. Multiple GPUs need lots of energy to work simultaneously. Make sure to buy a powerful power supply.
You will need to calculate the power those GPUs require and buy PSU according to the wattage level. Suppose the minimum PSU requirement is 750watt; you should buy at least 800watt or more.
5. Ensure Master-Slave configuration
Make sure to set the SLI in a master-slave configuration. The primary purpose of this configuration is to make one of the cards play the master role and the others in the slave. In this process, the workloads equally distribute among the GPUs, and only the master card sends output to the monitor.
Only the master starts the rendering process, and the slave cards do the rest.
Also read how to fix BIOS corruption has been detected.
How to Enable SLI in BIOS
You don’t need to go to the BIOS to enable SLI for modern computers. You can turn on SLI from the Nvidia control panel. All you need to do is insert the secondary GPU in the motherboard PCIe slot and restart the PC. After the restart, the system will detect the GPU.
If you don’t have the latest GPU driver, go to Nvidia’s official website and download the latest driver. After installing the driver, you must turn on SLI from Nvidia’s control panel.
Here are the steps to enable SLI:
- Go to the desktop and right-click anywhere.
- Select NVIDIA Control Panel.
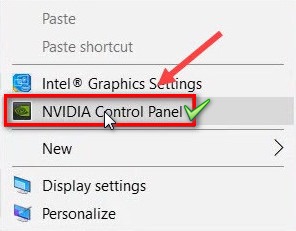
- Select Configure SLI, Surround, PhysX from the left pane under 3D Settings.
- Choose Maximize 3D performance and hit the Apply button.
After that, the screen will flash several times, and you will need to keep these settings if the system asks. SLI is enabled now. From now on, you can enjoy a better GPU performance after enabling SLI on the PC.
You can also choose how the GPU will perform in SLI mode by applying the below steps.
Here are the steps to choose SLI performing mode:
- Click on the Manage 3D settings from the left pane.
- Find the Global Settings and scroll for the SLI performance mode option.
- Change the Settings from SLI to Alternate Frame Rendering 2 to turn on SLI for all the programs.
- Click on the Program Settings tab and choose the SLI performance mode to make adjustments for each program.
I hope you find it an easy process to enable the SLI on your system. You can change or modify every setting once you turn on SLI on your computer.
Should You Enable SLI in BIOS?
Enabling SLI from the BIOS is a misconception because you don’t need to go to the BIOS to turn on SLI. You don’t need to head over to the BIOS settings if you use a system with modern hardware that supports SLI and SLI bridges. You can enable SLI from Nvidia’s control panel.
The main fact is the GPU communicates through the SLI bridge, not from the PCIe slots. Well, some users still believe that there used to be an SLI option in the BIOS. Moreover, if you are using an old hardware-based system, you can go to the BIOS and look for the SLI option.
Look for the terms like PCI Express or PCI-e related settings or options in the BIOS. Your system might use different naming depending on the motherboard model. You can also read the motherboard manual to find out whether the SLI option is available in the BIOS or not.
How to Test the SLI Performance
You can test whether the SLI performance is working fine or not by running the frames per second test. This FPS (Frame per second) test is best for testing computing power and graphics-related works. Just choose a game that supports SLI and tweak the FPS from the game settings.
After launching the SLI-supported game, go to the game settings. Set the number to 60 fps or higher with a higher supported resolution. You must ensure the fps number and resolution are supported by the graphics card and SLI bridge model you use.
Moreover, there is a feature named SLI Visual Indicator in the Nvidia control panel.
Here are the steps to test the SLI performance:
- Go to the desktop and right-click anywhere.
- Select Nvidia Control Panel from the options.
- Click on the 3D Settings option and enable the Show SLI Visual Indicators menu.
After enabling the feature, a bar will appear on the left side of the screen. Next, run the game that supports SLI and notice the bar size.
If the bar size increases, the SLI scaling increases too. That means graphics cards are working well in the SLI mode, and visual performance is improving. But remember, SLI doesn’t boost every game or program equally.
How to Fix SLI Not Working Issue
If the configure SLI option doesn’t show in the Nvidia Control Panel, you should look for some factors. You should check all the GPUs are detected, PSU is supplying enough power to the GPUs, check motherboard compatibility, and both BIOS and chipset drivers of the mobo are updated.
To fix the SLI not working issue, follow the below methods.
Here are the methods to fix SLI not working perfectly:
1. Check If All the GPUs are Detected
Checking whether all the GPUs are detected or not is the first thing you should look for. To check this, you should go to the Device Manager and expand the Display adapters section.
According to your SLI setup, you should find two or more identical GPU cards in this section. Shut down the computer and open the case if you don’t see them. Eject all the GPUs and reinstall them in the PCIe slot perfectly.
You can also swap the slots if needed. After that, close the case and turn on the PC. You will find those GPUs in the Device Manager if they are not damaged.
2. Check If The Power Supply is Capable
If the power supply isn’t providing enough power to the GPUs, you may not find GPUs in the hardware device manager section. Make sure the PSU meets the required wattage needed for the GPUs. Don’t use less than 450 Watts for an SLI configuration.
Change the PSU if it fails to supply enough power to run all the graphics cards in the SLI mode. Most high-class GPUs have built-in 6-pin auxiliary power connectors. So, check whether the PSU cables are plugged into the GPUs perfectly or not.
You can also check for faulty power supply.
3. Check The Motherboard for Compatibility
Check the motherboard for compatibility issues. You will fail if you try to make an SLI connection in an AMD crossfire-supported motherboard. Make sure the motherboard you are using supports SLI.
Moreover, the mobo should have more than one PCIe slot for the graphics card. Some motherboards do have lots of PCIe slots but lack SLI compatibility.
Also, check whether or not the motherboard chipset driver is up to date. Many users find that Nvidia’s latest driver has a syncing issue with the backdated motherboard chipset driver. So, when SLI is not working perfectly, check the motherboard’s supportability and ensure the chipset driver is up to date.
4. Check The BIOS version
Many users find that backdated BIOS is the main culprit behind SLI not working perfectly. So, check the BIOS version and update it if necessary.
To update the BIOS, you must go to your motherboard’s website and search all the drivers of your motherboard’s specific model. Download the latest BIOS. Next, update the BIOS by double-clicking on the downloaded file. Your PC will restart to update the BIOS.
You can also download the specific software for updating the BIOS. Asus, MSI, Gigabyte, etc., all have a particular app for updating the BIOS. I hope after updating the BIOS, SLI will work fine.
So, above are the methods to fix SLI when it does not work perfectly or you can’t find the secondary GPU after connecting both GPUs with the SLI bridge.
FAQs
How do I enable SLI in BIOS?
Right-click anywhere on the desktop and select the Nvidia Control panel option. Select Configure SLI, Surround, PhysX from the left pane under 3D Settings. Click on the radio button of Maximize 3D performance and click on the Apply button. SLI is enabled now.
How do I know if SLI is enabled?
Go to the Nvidia Control Panel and navigate to 3D Settings > SLI configuration. Click on the 3D Settings from the menu bar and then enable the Show SLI Visual Indicators. A bar will appear on the left side of the screen, and the bar size will increase according to the performance if SLI is enabled.
How to turn off SLI?
Launch the Nvidia Control Panel and click on the Set SLI configuration link under the 3D settings menu. To turn off SLI, select the Do not use SLI technology option.
Final Words
Those who need lots of graphics rendering power buy multiple GPUs. They run multiple GPUs in a single machine by connecting them using the SLI technology.
Some might not know how to enable or turn on SLI in BIOS. It’s better to know you won’t find any option in the BIOS to enable SLI. To allow the SLI, you will need the Nvidia Control Panel.
You could quickly turn on SLI by following the steps I have given in this article. I hope you have read this article till the end and have already enabled SLI.
For further assistance regarding SLI, knock me in the comment box. See you at the next one.