Excel is a useful tool if you want to work with data. Something Excel users frequently have to do while working is manipulating the name of an individual.
You can combine the first name and last name stored in two different columns into a single cell in a different column. You can even do so in the same column, but that is not what we usually want to do.
If you are new to Excel, you might want to know how you can combine the first names and last names of individuals in Excel.
As someone who frequently uses Excel, I can help you out with this.
So, keep reading this article until the end to learn how to combine first and last names in Excel.
How Do You Combine Two Names in a Cell in Excel?
Combining the first name and last name of an individual in Excel is a fairly easy task. You can do it in many ways, such as using the CONCATENATE function, the CONCAT function, the & operator, the TEXTJOIN function, and using the Flash Fill feature.
You can go through them all and pick whatever method you like the most to apply to your work.
Here are the methods you can apply to combine the first name and last name of an individual in Excel:
1. Merge a First Name and Last Name in Excel With a Comma
CONCAT is a built-in Excel formula that exists to merge the data of two different cells into one cell. A list or a range of text strings is combined using the CONCAT function.
It is an Excel formula to combine the first name and last name of an individual. We can use this function because it is a good fit for the task.
Open an Excel worksheet where you have columns for the first names and last names of individuals who are in a particular way relevant to your work.
Let’s say you have the first name of an individual stored in cell A1, and you have the last name of the same individual stored in column B1. Now you want to merge the 2 cells so that the 2 names appear together in a different cell, C1.
Here’s a complete guide on how to Lock a Cell in Excel
You can use the following formula on the C1 cell:
| =CONCAT(A1,” ”,B1) |
The CONCAT function merges all of the strings inside its arguments. So if you run this function on the C1 cell according to how it is shown above, it will first take the data stored in the A1 cell.
Then it will add a space in between because of the string argument added in the middle. Finally, it will add the value stored in the B1 cell at the end of the resulting string.
If you do not put the string with one space in it in between the other two cells containing the first and last name, then the two names will appear together without any space in between them.
The CONCAT function accepts ranges. 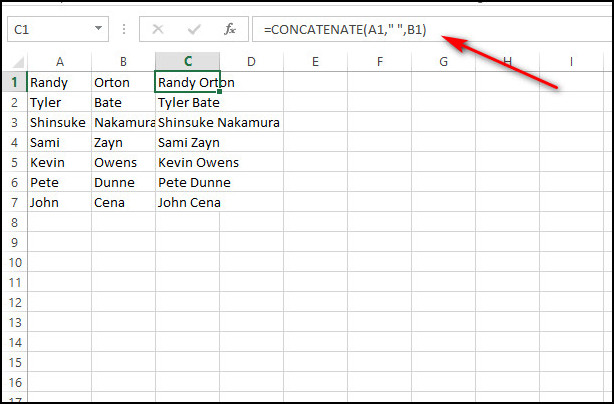
Note:If the same person’s middle name appears in a different cell, you can also add that to a new cell that along with the person’s first and last name.
You can increase the number of arguments inside the CONCAT function and add a string containing a single space in between every cell containing some part of the full name in the list of input arguments.
CONCATENATE is a built-in Excel formula that exists to merge the data of two different cells into one cell. A list of text strings is combined using the CONCATENATE function.
If you are using an earlier version of Excel, you should use the CONCATENATE function instead of the CONCAT Function. The two functions do the same thing and have pretty much the same syntax.
Before CONCAT was introduced in Excel 2016, people used to use the CONCATENATE function. Now, Microsoft advises the use of CONCAT instead. The reasons include the name of the function being shorter and CONCAT being able to accept ranges.
If your version of Excel was released before the CONCAT function was introduced; you can use the CONCATENATE function to complete the job.
As mentioned above, CONCAT accepts a range of text strings but CONCATENATE does not. The input arguments are pretty similar if you want to merge the two cells as you did with CONCAT.
You can use the following formula on the C1 cell:
| =CONCATENATE(A1,” ”,B1) |
The use of a string with a single space in between cells containing the first name and last name is just like the CONCAT function. 
Note: If the same person’s middle name appears in a different cell, you can add that to a new cell along with the person’s first and last name, just like how you can with CONCAT.
You can increase the number of arguments inside the CONCATENATE function and add a string containing a single space in between every cell containing some part of the full name in the list of input arguments.
Here’s a complete guide on how to Highlight Duplicates In Excel.
2. Use the Ampersand Operator
The Ampersand operator, also known as the & operator, is another method for merging text strings in two different cells into another cell.
If I use the example I have previously used in this article, then the goal is to combine the first name stored in cell A1 and the last name stored in cell B1 into a single cell in cell C1.
Here is the formula you can use with the ampersand operator included in the C1 cell:
| =A1&” ”&B1 |
Let us compare this with the CONCAT and CONCATENATE functions. In the previous section, I used two built-in functions. This time, I’m using a built-in operator. There is no function with input arguments here.
The A1 cell contains the first name, and the B1 cell contains the last name. I am concatenating the two text strings with a text string with a single space positioned in the middle.
All the strings are connected and merged with the & symbol. This is why this operator is also called the & operator. 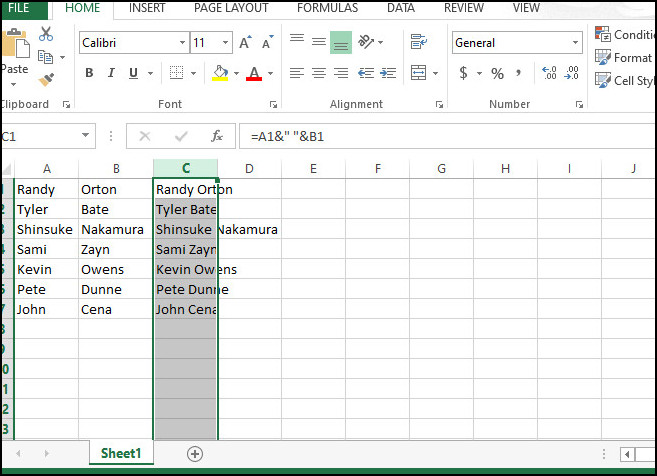
As you can see, the result came out right.
Note: If the individual has a middle name in a different cell, we can concatenate that cell between the 2 cells A1 and B1. Do not forget to add two strings on either side of it with a single space character inside the strings.
3. Use the TEXTJOIN Function
Using a delimiter, the TEXTJOIN function joins a list or a range of text strings. A delimiter serves as a divider between the texts. It is similar to the CONCAT function but with the delimiter taken into account as an argument.
The delimiter could be tabs, a single space, or even a comma. I will once again use the example I have been using in this article. I want to merge text string values stored in cells A1 and B1, add a space in between, and store the value in cell C1.
I will use the following formula containing the TEXTJOIN Function to get the desired result:
| =TEXTJOIN(“ ”,TRUE,A1,B1) |
The first argument of the function is the delimiter. In this case, we would want to separate the first and last name of an individual with a space character in between. So that is what I will use as the delimiter.
The second argument being TRUE means empty cells will be ignored by TEXTJOIN. This makes TEXTJOIN possibly the best option when dealing with middle names as well.
It is because you can apply the same formula to all cells in a column. If someone does not have a middle name, the empty cell will be ignored without adding an additional space.
The final arguments are just the cells where the text strings are stored.
4. Use the Flash Fill Feature
The flash fill feature is a pretty cool feature in Excel that helps Excel understand the patterns in a column. If Excel notices a pattern in the manually entered data through Flash Fill, it will automatically fill the data.
By the second time the data is entered, this copycat function recognizes a pattern.
Let’s use our example to illustrate how it works. If the A column contains the first names of a few individuals and the B column contains their last names, I will fill the C1 cell by merging the cells A1 and B1 manually.
Then I will start doing the same in the C1 cell by trying to merge the A2 and B2 cells. If Excel can guess the result you want, hover over the guess and press Enter. You should be able to see the full names of all the individuals in column C.
If it did not go as planned for Cell C2, do not worry. You can apply flash fill manually.
Follow these steps to apply the flash fill feature:
- Type the desired outcome in cell C1.

- Click on cell C2.
- Click on the Home tab.
- Click the Fill icon in the Editing section.
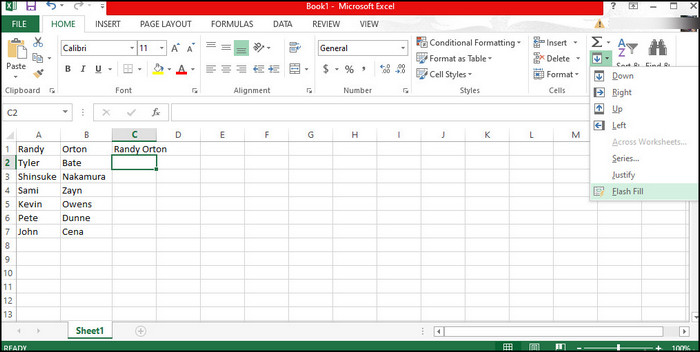
- Select Flash Fill.
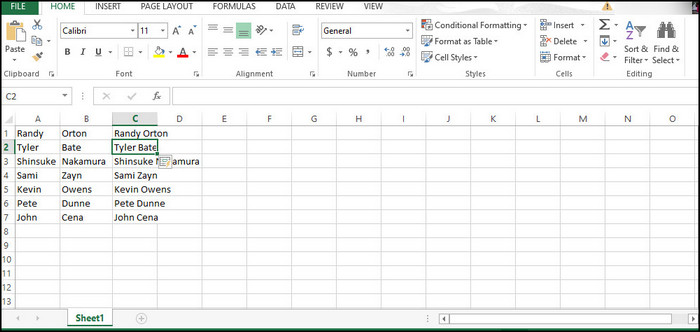
You should get your desired result.
You can also do it similarly if you want to merge middle names as well.
You may also like to read: how to Shade Every Other Row in Excel.
How to Apply a Formula to the Full Column in Microsoft Excel?
While using functions such as CONCAT, CONCATENATE, TEXTJOIN, or the ampersand operator, we use the formula on a single cell. But when you are working on an entire column, applying the formula to each cell would be tedious.
This is why it is important to understand how to apply a formula to the full column. I have already applied these techniques in the images provided in the article. I will now tell you how to do it.
Apply the formula to the first cell of the column and select the entire column by clicking on the column icon. Then press CTRL+D to finish the process.
As easy as that, you have applied the formula to the entire column.
Read more on how to Randomize a List in Excel.
FAQ
Can you merge first and last names in Excel?
Yes, you can merge first names and last names in Excel in a variety of ways, as already shown in the article.
How to combine first and last names in Google Sheets?
You can apply the CONCATENATE function in Google Sheets as an example of a method you can use to combine the first and last names of people.
Conclusion
You can combine first names and last names easily in Excel using the methods mentioned in the article. You can even easily add a middle name to the combination. The method I would personally recommend if you have to deal with middle names is using the TEXTJOIN function.
Do let me know which method you like the best by commenting below. Make sure to ask questions if you have any queries. Your comments can also help other readers.