Excel is one of the best and most used software from the Microsoft Corporation to manage a large amount of data. Nowadays, people use Excel for Data management, Financial analysis, Charting and graphing, Programming, and so on.
 Excel offers mobility and flexibility to handle large files effortlessly. The row and column in Excel help to precise the data more accurately. Sometimes, you may need to change your row height or column weight to show all the text in a cell.
You can quickly change the row height or column weight in different ways. To learn how to change row height in Excel, keep reading this well-written guide till the end without skipping any part.
Let’s get started!
How to Change Row Height in Excel with Mouse Click & Drag
After learning about the row height, now it’s time to change the height of the row with a simple click & drag method. This method is the most popular and easy to follow. You can select any row and modify the height according to your need.
When you have various datasets, some may not fit in the default cells. In that case, changing the row height can be handy. Go through the below procedures to change row height using click & drag.
Here are the steps to change row height using the mouse click & drag:
- Open your document in Excel.
- Place your mouse cursor at the bottom of the row. That will change your mouse cursor to a plus icon.

- Press the left mouse key and hold it.
- Drag down the mouse to increase the size of the selected row height or drag up to decrease the row height.

- Release the mouse once you are done changing the row height.
This method primarily applies when you need to change row height for one or two rows or columns.
You can also use this method for multiple rows. You need to select the rows you want to change, then click & drag the mouse cursor using the above process.
You may also like to read how to make a histogram in excel?
How to Change Row Height Using Mouse Double-Click in Excel
You can use this method to adjust the row size according to your text size automatically. This method is suitable when you need to change the row height so that the text content fits nicely on a cell.
Go through the steps below to change the row height using a mouse double-click.
Here are the methods to change the row height using a mouse double-click:
- Open your Excel document.
- Keep your mouse cursor at the bottom of the row. Wait until the cursor changes into a plus icon.
- Double-click using the right button of your mouse.
- Release the mouse button when you are done with changing row height.
Once you double-click on the row header, it will change the row height to a suitable size that can easily show all the text inside the cells.
Additionally, you can use this method to increase multiple row heights. Select the rows you want to change the height and double-click on the bottom of any selected row header. That will change the row height instantly.
Some more guide on how to lock or unlock cells in excel?
How to Change Row Height Manually in Microsoft Excel
Sometimes, using the mouse cursor is not enough to resize row height. If you need a more precise measurement for your row, you can manually set the height for any or multiple rows.
You can efficiently change the row heights by following the subsequent procedures.
Here are the ways to change row height manually:
- Open your Excel file.
- Select the rows that you want to change the height.
- Go to the Home tab from the ribbon.
- Click on the Format option in the Cells group.
- Select Row Height from the drop-down menu.
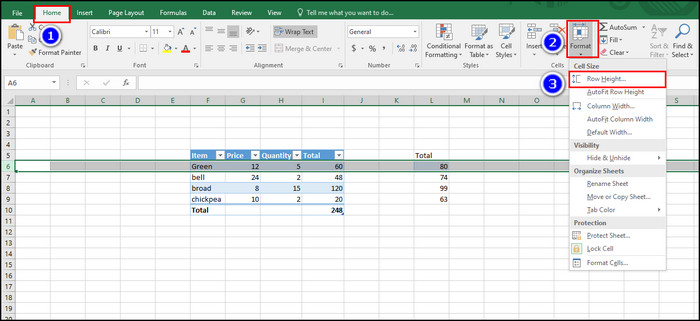
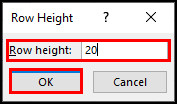
- Enter the height for your rows.
- Click OK to save the changes.
You have successfully changed the row height to a specific number according to your need. For multiple rows, select the desired rows and follow the above steps to change the row height.
Read more on how to autofill dates in ms excel?
How to Change Row Height Using Keyboard Shortcuts in Excel
Using keyboard shortcuts helps to perform actions more efficiently and boosts work productivity. You can use the keyboard shortcuts in Excel to perform most of the tasks quickly.
It is possible to use shortcuts to change the row height. To learn more, go through the below procedures.
Here are the steps to change row height using keyboard shortcuts:
- Open your document in Excel.
- Select the rows in which you want to change the height.
- Press the keyboard buttons ALT + H + O + H. Remember to press the buttons one by one.
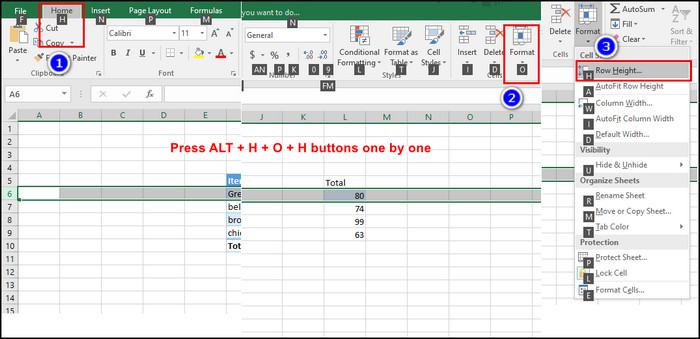
- Enter your preferred height in the Row Height dialog box.
- Click OK to save the changes.
You can use the above method if you are more comfortable using your keyboard than the software’s functions.
You can change any or multiple row heights using the keyboard shortcuts. Select all the preferred rows to change multiple row heights at once, then follow the above steps.
Check out the easiest way how to add a trendline in microsoft excel.
How to Change Row Height Using Autofit Rows in MS Excel
All the above methods are dependent on the user specifying the row height. Either you click & drag to adjust the row height or enter the value manually to change the height of the rows.
However, Excel offers a feature known as Autofit Rows. This feature can help to adjust the row heights depending on the text of the cells.
To automatically visible all your text in any cells, you can use the Autofit Rows options by following the below processes.
Here are the methods to change row height using the Autofit Rows feature:
- Open your document in MS Excel.
- Select any or multiple rows that you want to autofit.
- Click on the Home tab in the ribbon.
- Click on the Format option in the Cells group.
- Select the Autofit Row Height option from the drop-down menu.
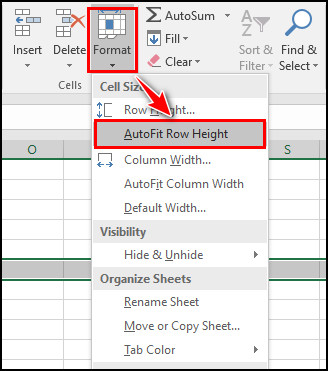
The above steps will adjust all the rows and fit your text in the cells so that all text will now be visible.
Follow our guide on how to copy and paste objects in excel?
How to Change Row Height in Inches in Microsoft Excel
If you need to print your Excel document, you may want to set the row height in inches, centimeters, or millimeters. You can change the row height in inches by using rulers from the Page Layout option.
Go through the methods below to change row height in inches by enabling the Page Layout feature.
Here are the ways to change row height in inches:
- Open your Excel file.
- Navigate to View tab > Workbook Views group.
- Click on the Page Layout That will change the measurement unit to inches.
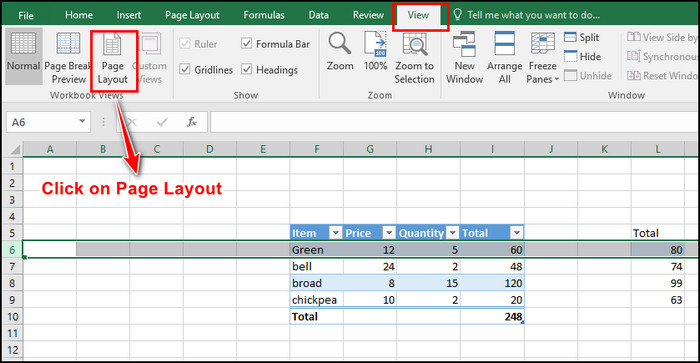
- Select any or multiple rows that you want to change the height.
- Place your mouse cursor at any row bottom. It will change your cursor to a plus icon.
- Press the left mouse key and hold it.
- Drag down the mouse to increase the size of the selected row height or drag up to decrease the row height in inches.
- Release the button when you are done.
Following the above method will change your default measurement to inches. You can change the measurement unit to centimeters or millimeters if needed.
Pro Tips: You can change the default measurement from inches to centimeters or millimeters. To do that, navigate to File > Options > Advanced and scroll down to the Display section. Next to the Ruler Units, click on the drop-down list and set your default unit.
Frequently Asked Questions
What is the default row height in Excel?
The default row height in Excel is 15, around 20 pixels, or one-fifth of an inch.
What is the shortcut key to change row height?
To change row heights using shortcut keys in Excel, press the ALT + H + O + H buttons one by one and set your desired height in the Row Height dialog box. To save the changes, click on the OK button.
How is Excel row height measured?
Microsoft Excel row height is measured in points. Seventy-two points make 1 inch. The default size of a row is 15 points which is enough to show any text size under 15pts.
A Final Thought
You can change the heights for single or multiple rows. To do that, select the row or rows and navigate to the Home tab > Format > Row Height. The Row Height box will appear. Set your row height value in the Row Height box and click on the OK button to save the changes.
Additionally, there are other methods you can apply to change the height of a row or multiple rows. In this article, I have covered all the possible ways to set row heights automatically or manually.
I have also covered the procedures to change the measuring unit to Inches, centimeters or millimeters. Do you need any suggestions or queries regarding this issue? Let us know in the below comment section.