The Autofill feature in Microsoft Excel is an amazing attribute. The users can easily compose their data sheet in a short time using this fantastic feature.
With the help of the Autofill option, you can efficiently process dates and times on your Excel sheet. It saves a lot of work hours and increases work proficiency. Although for some users, the autofill dates option in Excel can be tricky.
Therefore in this article, I displayed some easy steps with which you can autofill dates quickly. Also, I included some pictures and gifs for your understanding.

Additionally, this content will teach you how to autofill weekly, monthly, and yearly dates on Excel.
So don’t skip any parts, and let’s head toward the main topic.
How to Autofill Dates in Microsoft Excel
Auto-filling the dates in MS Excel is an easy process. There are two methods you can use to complete this action. The first and the quickest one is the Fill Handle option, and the second one is the Series option.
Also, check out our separate post on 4 ways to group rows In Excel.
Now I will describe those two options to autofill dates for your assistance.
Here are the steps to autofill dates in Microsoft Excel:
1. Use the Fill Handle Feature 
When you move your cursor to the edge of an Excel cell, you can see a Black Plus(+) icon. You can drag this (+) icon according to your need, and this icon is called the Fill Handle.
Let’s find out how you can use this Handle to autofill dates.
Here are the steps to use the fill Handle feature to autofill dates:
- Open the Excel spreadsheet.
- Select the desired cell.
- Type CTRL+ ( ; ) keys to insert recent dates, or you can type dates manually, like 9/5/2022.
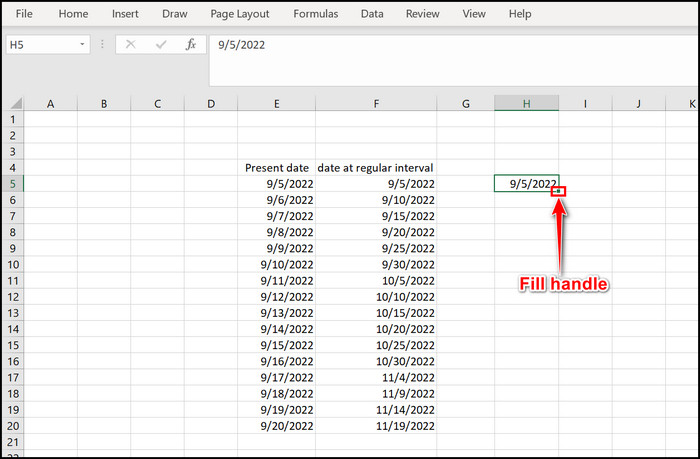
- Place the mouse cursor at the edge of that cell and drag that Fill Handle to your specific position.
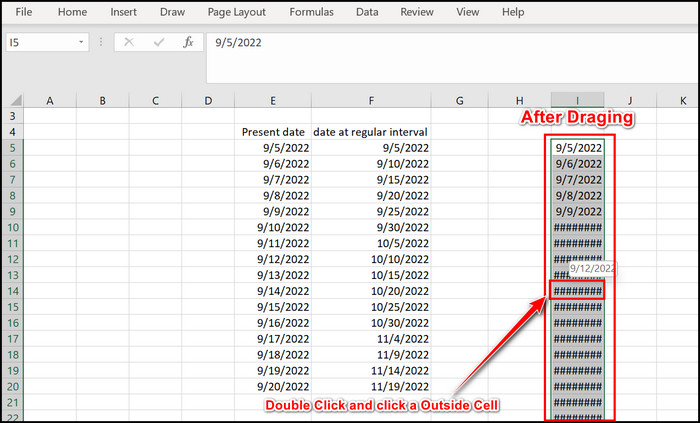
- Select and double-click on a (#####) cell and click an outside cell if it appears on your sheet.
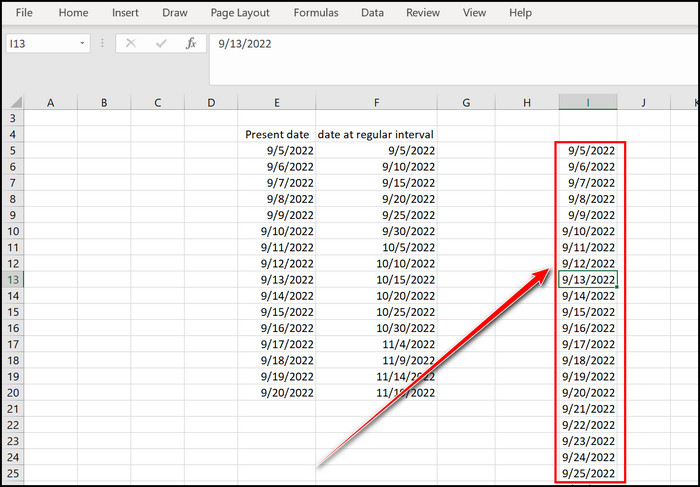
Immediately you will see that your desired cells are filled with dates.
2. Apply the Series Option 
With the help of the Series option in MS Excel, you can use the autofill dates feature. Let’s head out and see how to apply the Series option to complete the autofill process.
Here are the steps to apply the series option to autofill dates:
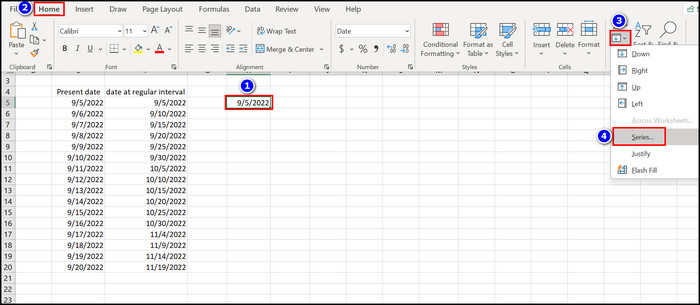
- Select a Cell from the MS Excel sheet.
- Type desired Date on it, click an outside cell, and then click back on the date cell.
- Move to the Home section.
- Click on the Fill option.
- Choose the Series option.
- Click on the Rows or Columns box from the Series in section.
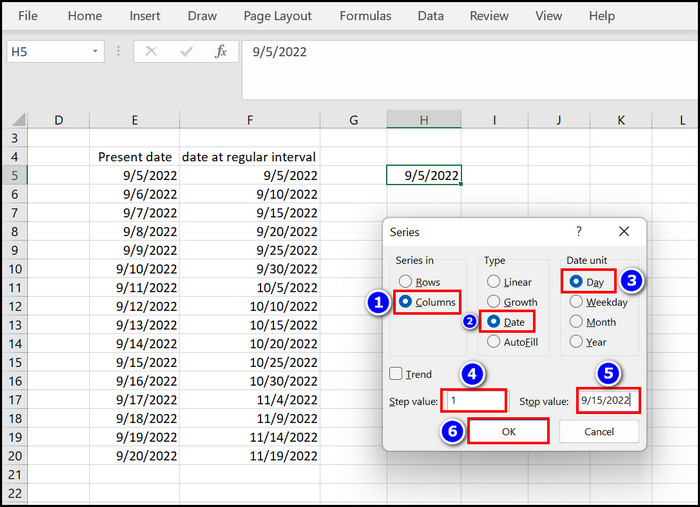
- Select the Date checkbox from the Type section.
- Set Step value to 1 when you want the chronological date; if you set it to value 2, you will see dates from 2 days apart.
- Input your desired stopping date in the Stop value box; for me, it is 9/15/2022.
- Press the OK button.
Instantly your desired autofill dates will emerge before your eyes.
How to Autofill Dates in Microsoft Excel Without Dragging
You must use the formula if you don’t want to drag the handle to autofill dates. The SEQUENCE formula can help you to autofill dates. But before jumping into the steps, you should know about the formula.
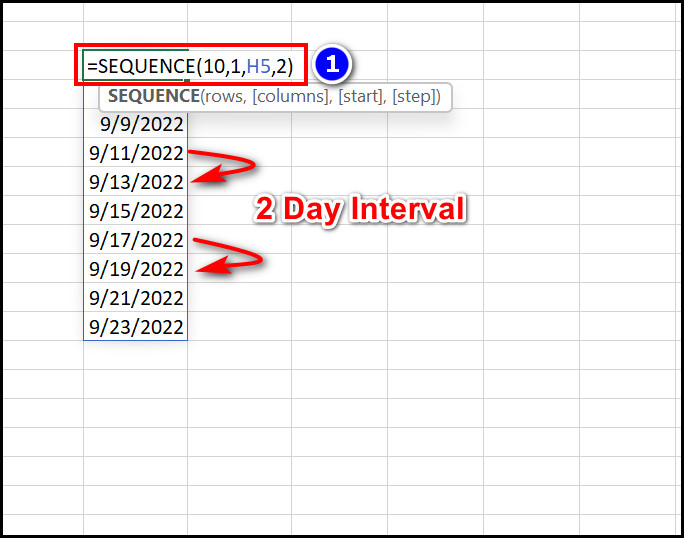
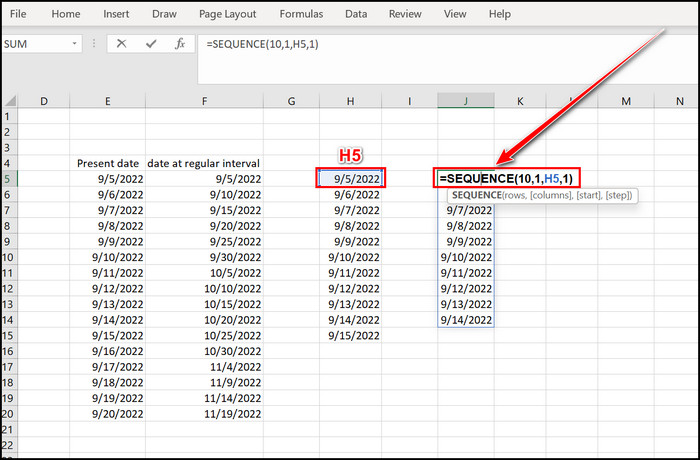
Formula: =SEQUENCE(rows,[columns],[start],[step])
Rows: The number of rows you want to appear on your Excel worksheet. I want to display 10 rows.
Columns: The needed columns; in my case, I needed 1 column.
Start: From the date you want to start the autofill, I selected 9/5/2022, which is at the H5 cell.
Step: In the chronological order in which you want to see the dates, I choose 1 for that operation.
My final formula: =SEQUENCE(10,1,H5,1)
Here are the steps to use the SEQUENCE formula to autofill dates without dragging:
- Launch the MS Excel sheet.
- Select a cell where you want to write the formula.
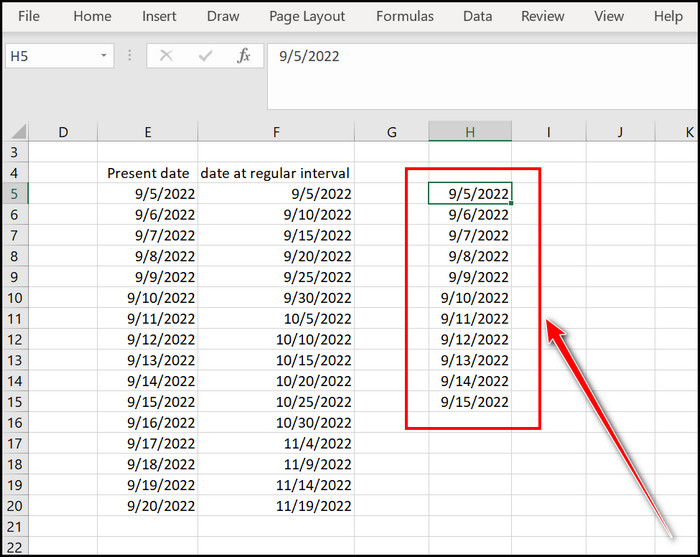
- Type the SEQUENCE formula such as =SEQUENCE(10,1,H5,1).
- Hit the Enter key.
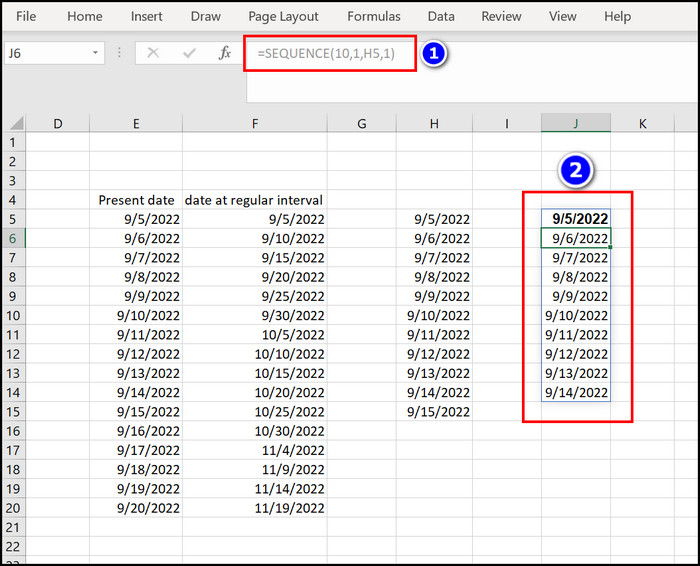
You can see that your desired Excel autofill dates are in front of you. These autofill dates are based on another cell, in my case, the H5 cell.
You may also like to read how to freeze a row on Excel easily.
How to Autofill Weekly Dates in MS Excel 
Suppose you want to autofill weekly dates in Microsoft Excel. If that’s the case with you, then follow the stated instructions.
Here are the steps to autofill weekly dates in MS Excel:
- Open the Microsoft Excel program.
- Click on a cell and type the date.
- Select the Fill Handle and drag it according to your need.
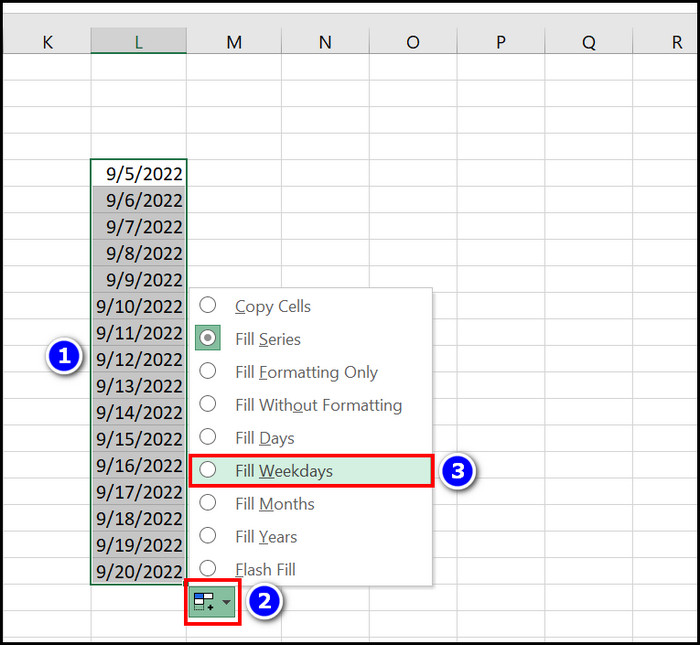
- Click on the Auto Fill Options from the bottom side of the row.
- Choose the Fill Weekdays from there.
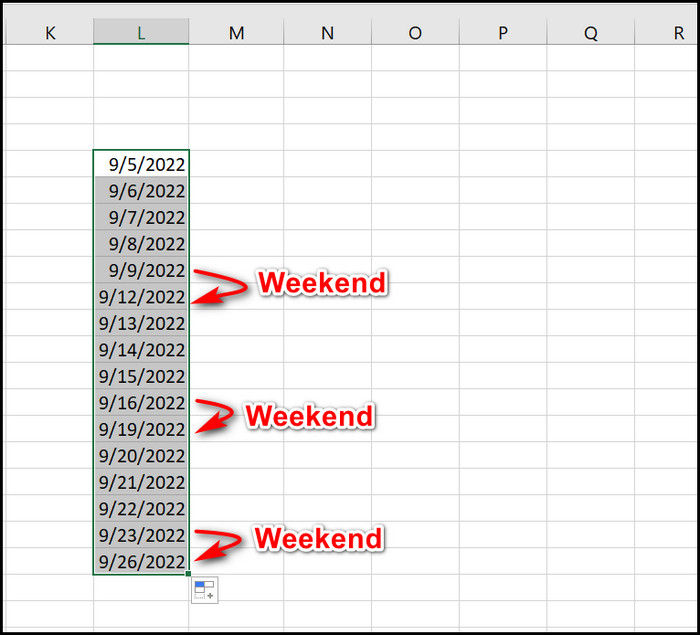
You will notice that your autofill dates are now in the Weekday format. The above picture shows that the dates jump from 9/9/2022 to 9/12/2022 because of the weekend.
Read the next heading to learn how you can autofill monthly dates in Microsoft Excel.
How to Autofill Monthly Dates on MS Excel 
If you want to autofill monthly dates in a Microsoft Excel sheet, select a cell and insert the current date. After that, drag the Fill Handle and choose the Fill Months option. To get a complete understanding read the process stated below.
Here are the steps to autofill monthly dates in an Excel sheet:
- Select a cell from the Excel Workbook.
- Type the current date.
- Move your cursor to the edge of that cell, and when you see the Fill Handle(+), drag it to your necessary place.
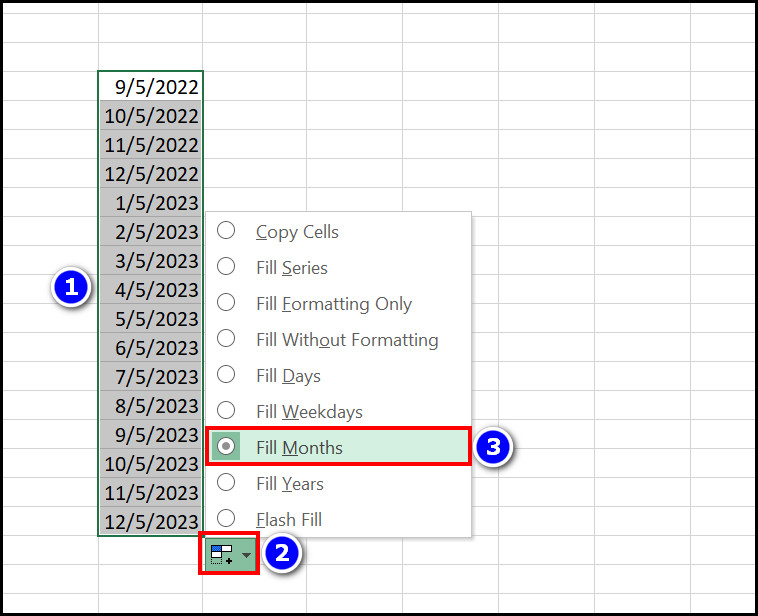
- Click on the Auto Fill Options box.
- Select the Fill Months option.
Accordingly, you will see new formatted monthly dates on your Excel spreadsheet. Follow the next segment to learn how to autofill yearly dates on Excel.
How to Autofill Yearly Dates in Microsoft Excel 
Sometimes you need to format the Excel sheet on a yearly basis, so the yearly dates are essential. But if you know how to autofill those yearly dates, your job will become very easy; also, it can save you a lot of time. So let’s sort out the process.
Here are the steps to autofill yearly dates in Excel:
- Open the Microsoft Excel application.
- Click on a specific cell from the workbook.
- Type the date into that cell.
- Click the Fill Handle(+) and pull it to your required place.
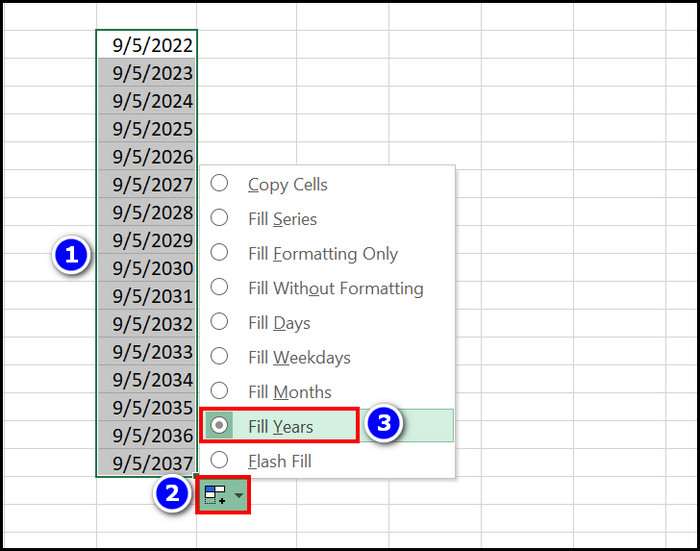
- Click on the Auto Fill Options.
- Select the Fill Years checkbox.
Your desired Dates are now in the Yearly date format. If you don’t want to use the Fill handle, you can read the next heading where I demonstrated the Series option. With this function, you can quickly autofill week, month or year dates on your Excel sheet.
How to Autofill Week, Month or Year Dates Using the Series Option on MS Excel 
Auto filling the week, month and year date with the help of the Series window is very straightforward. From this function alone, you can quickly sort out many formats. Let’s find out how to use this Series option to autofill different types of date formats.
Here are the steps to use different autofill formats using the Series function:
- Launch the Excel app.
- Choose a cell and type the date on that cell.
- Click outside of that cell and again select the cell.
- Navigate to the Home menu.
- Click on the Fill option.
- Select the Series tab.
- Choose Rows or Columns from the Series in segment.
- Select the Date checkbox from the Type section.
- Choose your desired Date unit, such as Day, Weekday, Month or Year options.
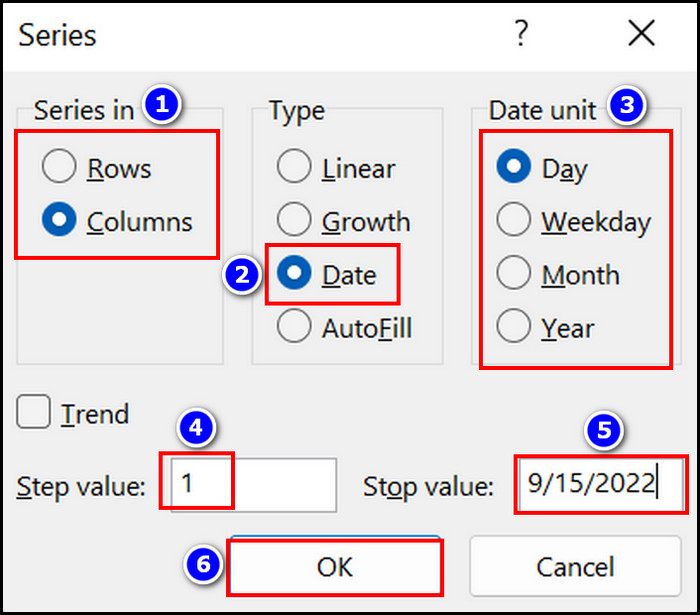
- Input the Step value according to your need, like 1 in my case.
- Insert your desired Stop value; for example, I choose the 9/15/2022 limit.
- Hit the OK key.
You successfully complete the autofill dates for different types of formats.
Related guides on how to lock a cell in Excel.
Frequently Asked Questions
How Can I Autofill Dates on MS Excel without Dragging?
You must use the Sequence formula to autofill dates on Microsoft Excel without dragging. The formula is =SEQUENCE(rows,[columns],[start],[step]). Also, you can use the Series window if you don’t like the Fill Handle dragging.
How Do I Autofill Dates in Excel Based On Another Cell?
You can apply the Sequence formula if you want to autofill dates on MS Excel. While using the formula, you must select the desired cell in the [start] written place, such as =SEQUENCE(rows,[columns],[chosen cell],[step])
What is the Formula for autofill Weekly Dates in MS Excel?
The formula for autofill weekly dates is =SEQUENCE(rows,[columns],[start],[7]). If you look closely, you can see that in the [step] place, I type 7 because there are 7 days a week.
Wrapping Up
The best spreadsheet program around the world is MS Excel. It is developed in such a manner that when you input data into a cell, another cell automatically understands its formula.
Therefore the autofill feature comes into play and makes our data processing job more accessible and straightforward. You can apply the Fill Handle to autofill dates or choose the Series Box option.
I also displayed the autofill month, week and year dates process in this article, so read and follow it properly to achieve your goal.
How can I further assist you? Let me know in the comment box.