If you are using Windows 11, you may have found yourself in a situation where you are running out of storage. Games, movies, and some other software may take up a lot of space.
Cleaning the app data folder is something you may look to do to free up space. But you might be asking yourself whether you should do that or not.
As a technology lover, I can often obsess over learning new things about operating systems. I want to spread what I learned to people who need help with specific problems related to operating systems.
So if you want to know if it is alright to delete the AppData folder in Windows 11, you have come to the right place.
Keep reading this article till the end to know if you can delete the AppData folder in Windows 11.
What is the AppData Folder?
In 2009, Microsoft added the AppData folder to Windows 7. Since then, it has been a critical part of the operating system. Each Windows user’s profile folder contains the AppData folder. Your computer’s apps can preserve a variety of user-specific data and preferences.
Cache files, app settings, app configuration files, and temporary files are all included in AppData.
The AppData folder keeps necessary files that store information about your progress in using different applications. This is why you should not touch the AppData folder unless you know what you are doing. Otherwise, you may accidentally damage the valuable data of an app.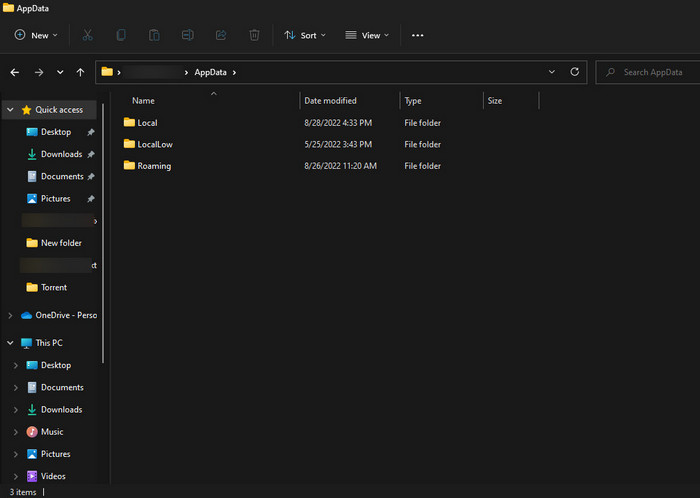
There are three folders in the AppData directory. Local, LocalLow, and Roaming are the names of the three folders.
Here is what they are used for:
Local folder: Your device’s settings and temporary files are saved in this folder. For this folder, there is a separate environment variable called %LOCALAPPDATA% that you can use in batch files and scripts.
LocalLow folder: The buffer data from various programs installed on your device is primarily stored in this folder. It is also utilized by low-level access mechanisms, such as your browser’s temporary files, when operating in protected mode.
You cannot transfer this directory to another computer.
Roaming folder: Last but not least, files can be transferred to another computer using this folder.
When roaming profiles or User Profile Disks are used, this directory enables users to constantly work in a comfortable environment on any server in the Remote Desktop Services farm. This directory’s environment variable is %APPDATA%.
The C:\ProgramData folder is where apps with global settings (options that apply to every user on a single computer) store their files.
Follow our guide to fix blue screen on Windows 11.
How to Open the AppData Folder in Windows 11?
People do not usually access the AppData folder. Again, this is a folder you should not tinker with unless you know precisely what you are doing.
The AppData folder is a hidden folder in Windows 11. So in order to view the file, you have to learn how to access hidden folders.
Follow these steps to make hidden folders visible:
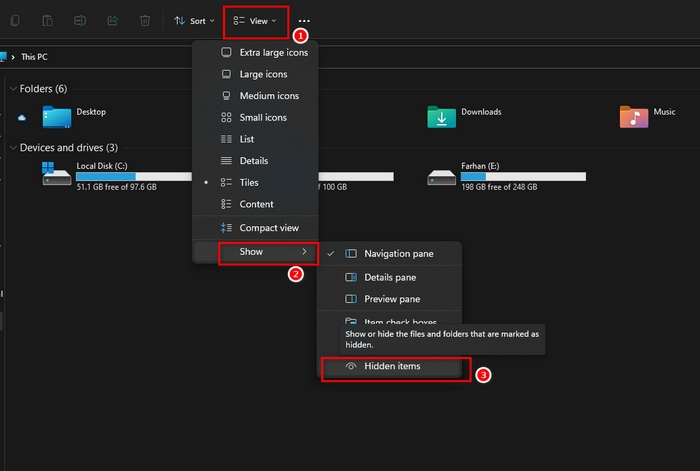
- Launch File Explorer.
- Click the View button at the top right corner of your screen.
- Click on Show options from the menu.
- Select Hidden Items from the sub-menu.
Hidden items should now become visible. But the work is not done yet. We still need to find the exact folder location, and we need to open it then.
The AppData folder is located in the following directory:
| C:\Users\[YourUserName]\AppData |
Replace the [YourUserName] part with your actual username. The brackets are not needed.
So what is next after identifying the directory? Heading there, of course!
You can use more than one method to reach the desired AppData folder. I will show you some of the methods below.
Method 1: Use the Run Dialogue Box to Access the User Folder.
You can quickly go to the user folder using keyboard shortcuts.
Follow these steps to enter the AppData folder using this method:
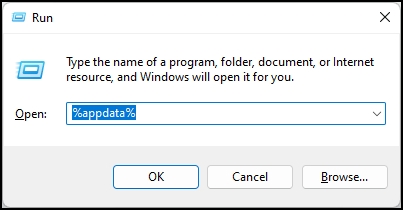
- Press the Windows+R key to launch the Run box.
- Type %appdata% folder from the user folder that will open.
- Open the AppData folder that you have found.
Method 2: Use the Run Dialogue Box to Access the Roaming Folder
This method is similar to the first one, but instead of going to the user folder and then the AppData folder, we immediately go to the roaming folder inside the AppData folder and go back a step to reach our exact desired location.
Follow these steps to enter the AppData folder through the Roaming Folder:
- Press the Windows+R key to launch the Run box.
- Enter %AppData% in the run dialogue box and press enter. The Roaming Folder should open.
- Select AppData in the location bar to go to the main AppData folder.
You can do this with the file explorer as well. Just open the file explorer and type %AppData% in the location bar. The Roaming Folder will open, and you can go to the AppData folder afterward.
Follow our guide to fix Windows can’t access network drive on Windows 11.
Method 3: Go Directly From the C Drive.
If you aren’t comfortable remembering what to type in the run dialogue box or the file explorer location bar, you can also directly access the AppData folder without depending on those with the help of Windows file explorer.
Follow these steps to enter the AppData folder without remembering any commands.
- Launch This PC.
- Enter the (C:) drive.
- Open the Users folder.
- Open the folder named after your username.
- Enter the AppData folder.
Now you can access the files in the AppData folder. But how can you delete them? What can you delete? How much should you delete? Hopefully, the following section will answer those questions for you.
How to Delete Files from Your App Data Folder?
Now, deleting files from the AppData folder is not very difficult. But the tricky part is only deleting the files that you do not need. This means you must identify what files you want to keep and what you want to get rid of.
You should only mess with the AppData folder if you urgently need to free up space. You should delete files according to how much space you need to free up.
I will show you two methods on how to clean your AppData folder. The first method relies on the file explorer, and the second method relies on the settings menu.
Here are the ways you can delete files from the AppData Folder:
Method 1: Use File Explorer
As we now know how to delete the AppData folder, deleting unneeded files will be easy. I recommend you not touch any files other than the files from a specific directory that I will show you how to delete.
Follow these steps to delete unneeded files using File Explorer:
- Go to the AppData folder located at C:\Users\[username]\AppData. Replace [username] with your username.
- Delete the files AppData\Local\Temp path. Make sure to not Shift+Delete the folder.
This should clear the Temp folder for you, which carries specific cached data and launch configurations.
But before that, go through our epic guide on adjust page file in Windows 10.
Method 2: Use the Settings Menu
For this method, you must go to the settings menu and modify specific storage settings.
Follow these steps to delete unnecessary files from the AppData folder in Windows 11 using the Settings menu:
- Press the Windows +I keys together to open the Settings.
- Click on System from the left pane.
- Select Storage.
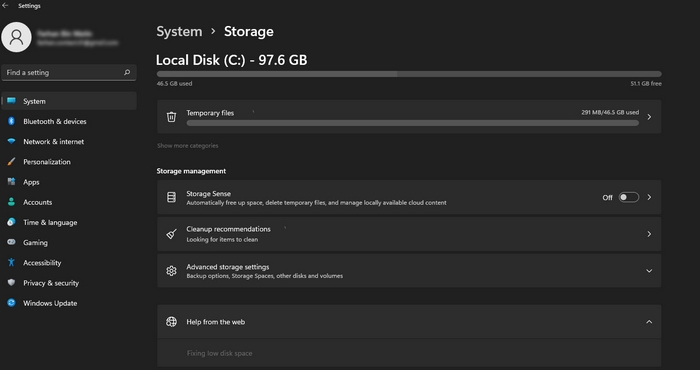
- Select Temporary. You’ll be directed to a different screen.
- Click on Temporary Internet Files and Temporary Files.
- Click on Remove files.
This will delete the unneeded files in the AppData folder.
How to Move the AppData Folder to Another Drive?
The AppData directory may take up a lot of space on your (C:) drive. This can slow down your computer and stop you from installing new software due to storage limitations. People often want to move the AppData files to a different drive.
It is certainly possible to do so. You just have to make some changes in the Windows Registry.
Follow these steps to move the AppData folder to another drive:
- Open the Run dialog box by pressing a keyboard’s Win + R keys.
- Type regedit and press Enter in the dialog box’s typing location.
- Click Yes when asked in the User Account Control prompt.
- Navigate to the locations mentioned below inside the registry editor.

| HKEY_CURRENT_USER\Software\Microsoft\Windows\CurrentVersion\Explorer\Shell Folders and HKEY_CURRENT_USER\Software\Microsoft\Windows\CurrentVersion\Explorer\User Shell Folders |
- Double-click AppData in both directories.
- Change the path to the folder directory you want to transfer in the pop-up window.
- Copy all the data in the original AppData directory to the directory you have just set.
- Restart your computer.
This should allow you to move the AppData directory to another drive.
Read more on how to activate Windows 10 auto login.
Conclusion
I once again recommend not touching the AppData folder beyond what was shown in the article. You can clean up the AppData folder by removing unneeded files through the 2 methods shown above. Locating the AppData folder can also be useful in many ways.
Hopefully, my attempt at solving your issues was fruitful. If you are facing any problems, let me know by commenting below. I will try my best to help out.