We use bullet points in our documents more often than not.
To make the document more readable, you must know how to align the bullet points in Word perfectly.
Aligning bullet points in Microsoft Word is not as complex as it seems initially. This post will give you a detailed walkthrough of the different ways to align bullets in Word.
You will learn how to change the alignment of bullets using fixed measurements and the horizontal ruler.
You will also know about aligning the second line of the text in the bullet list.
So keep reading the post till the end.
Follow our guide on how to access all documents in Word.
How To Align Bullets In Microsoft Word
Microsoft allows you to change the alignment of the bullet points in different ways.
You can enter fixed distances (in inches) to set the alignment from the left margin. You can also use the horizontal ruler at the top to visually align the bullets.
Follow the methods below to align bullet points in Word:
1. Change Bullet Indents
MS Word uses indents to align the bullet points in a list. In addition to the bullet point indent, there is a Text Indent that aligns the text after the bullet points.
Luckily there is a way to set the bullet indents to fixed values.
So you get to highly customize the spacing between the left margin and the bullet points, as well as the spacing between the bullet point and the text.
Here are the steps to change bullet indents in Word:
- Open the document in Microsoft Word.
- Click on any bullet point in a list. It will select all the bullet points in the list (without the text).
- Right-click on the selection. A context menu will appear.
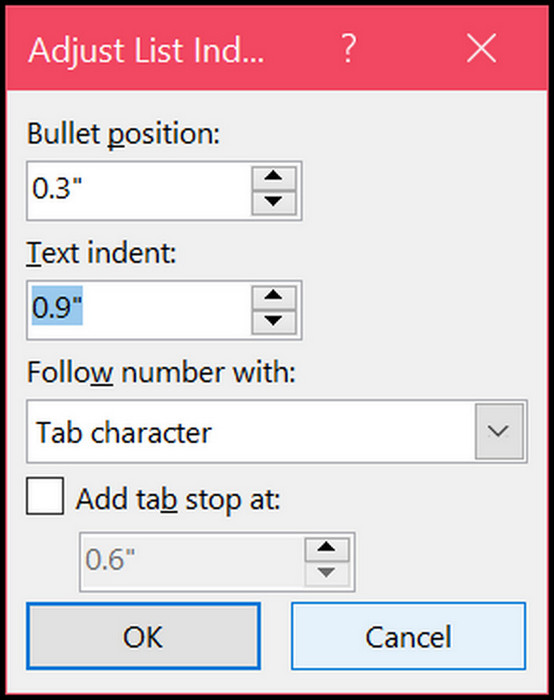
- Select Adjust List Indents from the context menu. The Adjust List Indents dialogue box will appear.

- Use the Bullet position box to set the distance (in inches) between the left margin of the page and the bullet points.
- Use the Text indent box to set the indent (in inches) for the text in the list. The indentation will be calculated from the left margin of the page. So the Text indent distance will be higher than the Bullet position distance.
- Ensure the Follow number with option is set to Tab character.
- Click on the OK button to apply the changes.
Now you will see the provided distances applied to the list. 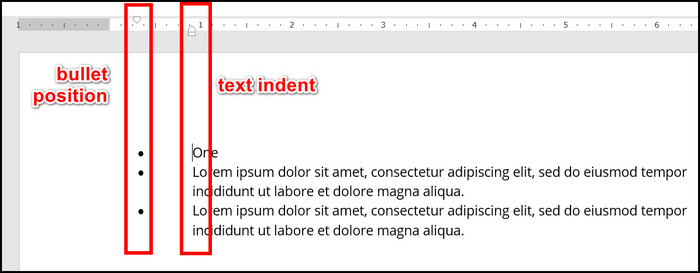 One important thing to note is that you should select the Tab character in the “Follow number with” option. Then Microsoft Word will apply the distance you have set between the bullet point and text by inserting a tab stop.
If you select the “Follow number with” option to Spacing or Nothing, the tab stop will not apply, and the provided Text Indent will not work.
Instead, Microsoft Word will apply 1 space distance between the bullet point and the text (when you select Spacing) or no gap (when you select Nothing).
You may also like to read 4 practical ways to use the clipboard Microsoft Word.
2. Align Bullets Manually Using The Ruler
The horizontal ruler at the top can be used to change the alignment of the bullet points in Word. So if you are unsure about the measurements of the indents (in inches), you can use this method to align the bullet points manually.
If the horizontal ruler is not visible, go to the View tab and check the box next to Ruler in the Show group.  Once the ruler is visible, you will see some markers (triangular marker pointing upward, triangular marker pointing downward, rectangular marker and so on) visible in the ruler.
The top triangular marker (pointing downward) will align with the bullet point. The bottom rectangular marker will move both the top and bottom triangular markers together (without changing the distance between them). 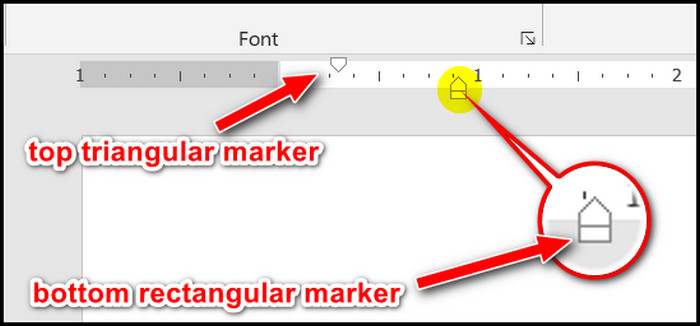 You will not deal with the bottom triangular marker as it is for aligning the second line of text (details are discussed in the next section).
The first line of text will be positioned 1 tab right to the bullet point. So changing the bullet point alignment will also change the first-line text alignment.
Here is the procedure to align bullets using the ruler in Word:
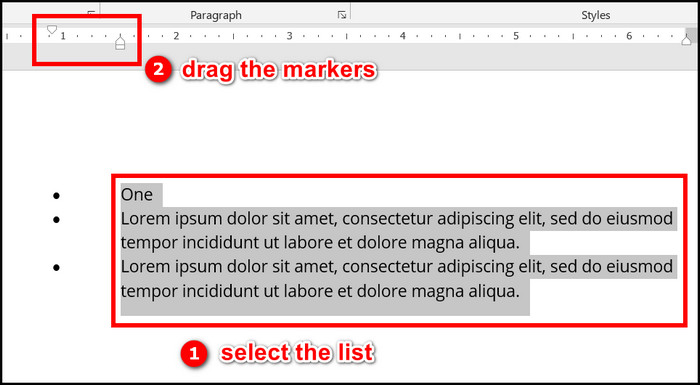
- Open the document in Word.
- Select the entire bullet list you want to align.
- Notice the markers at the left of the horizontal ruler.
- Drag the top triangular marker (pointing downward) to align the bullets.
- Drag the bottom rectangular marker (attached at the bottom of the lower triangular marker) to drag both triangular markers in sync. It will help you to move the text further and gather some extra space for moving the bullet points.
As you can see, this method is handy for visually aligning the Word bullet points.
Quickly check out our separate post on how to insert WordArt in Word.
3. Change The Alignment For A Single List Item
Changing the indentation of a single list item is quite easy compared to doing it for the entire list.
Here are the steps to change the indent for a single list item:
- Open the document in Word.
- Place the cursor next to the text of the bullet list you want to align.
- Go to the Home tab from the top.
- Click on the arrow next to the Multilevel list icon from the Paragraph group.
- Select Change List Level.
- Select the level you want to use. Each level has a different indentation (in ascending order) with separate bullet point symbols.
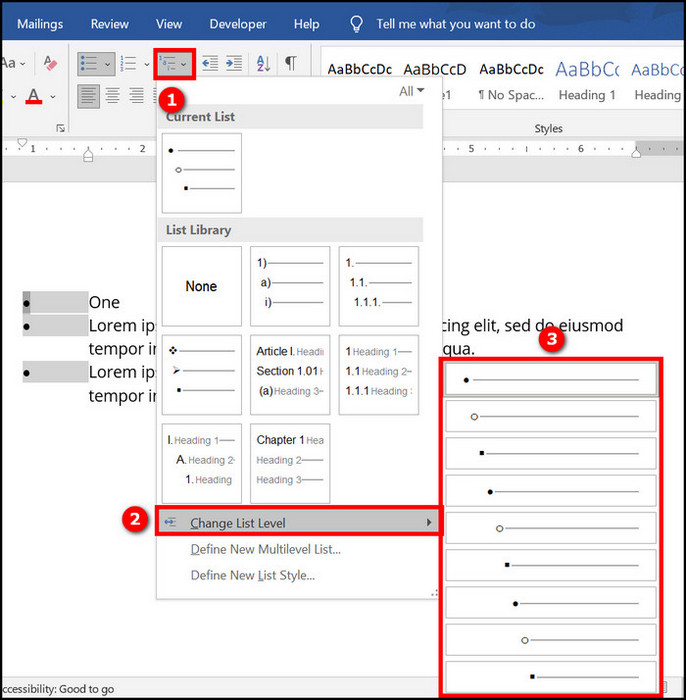
Alternatively, place the cursor at the beginning of the list item you want to align. Then press the Tab key to move the list item to the next level. Each Tab key press moves the list item to the next list level. Press Backspace to move back to the previous list item.
Go through our epic guide on how to dictate in Microsoft Word desktop/web.
How To Align The Second Line Of A Bullet In Word
The previous section discussed the different methods of aligning the bullet points and the text in Word. The text alignment was similar for all the lines in a list entry.
However, you might want to have separate indentations for the first line of a list entry and the rest of the lines.
Follow the methods below to align the second line of bullets in Word:
1. Use Tab Stops
You need to use tab stops if you want to set a fixed indentation distance for the first line and the rest of the lines.
Here are the steps to align the second line of a bullet using tab stops:
- Open the document in Word.
- Click on any bullet point in a list to select all the bullet points in the list.
- Right-click on the selection.
- Click on Adjust List Indents from the context menu. The Adjust List Indents dialogue box will appear.

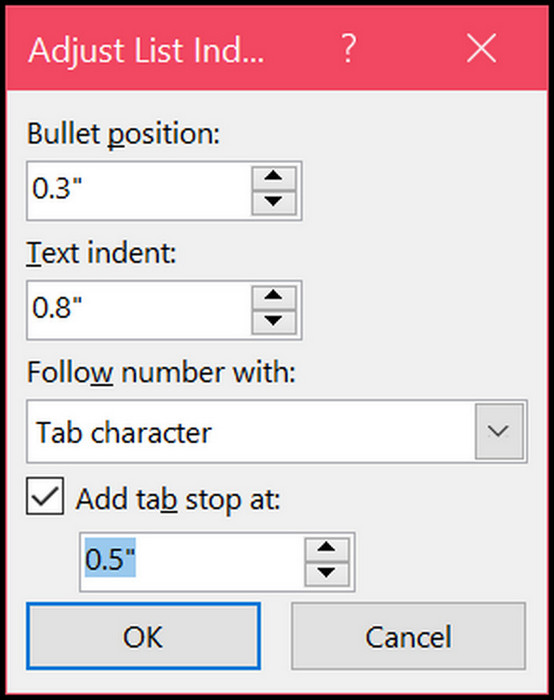
- Use the Text indent box to set the indent for the text’s second line (and the following lines) in the bullet list. The indentation will be calculated from the left margin of the page.
- Click on the Follow number with dropdown and select Tab character.
- Click on the checkbox labeled Add tab stop at (below the Follow number with dropdown).
- Enter the indent for the first line of the text in the bullet list.
- Click on the OK button to apply the changes.
Now you will see all the bullet points in the list have the first line aligned at one indentation and the second (and subsequent) lines aligned at another indentation.
For example, suppose there are three items in the bullet list, each with multiple lines of text. Each of the first lines of text will have an indentation of 0.5″ while the second (and subsequent) lines of each list item will have 0.8″ indentation.
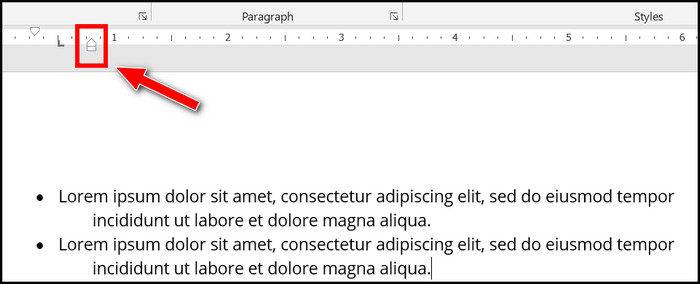
To achieve this, you would set the Text indent to 0.8″ and set the “Follow number with” option to Tab character. Next you would check the box labeled Add tab stop at and select 0.5″ as the value.  Click on the OK button to apply the indentation, and the outcome will be as follows:
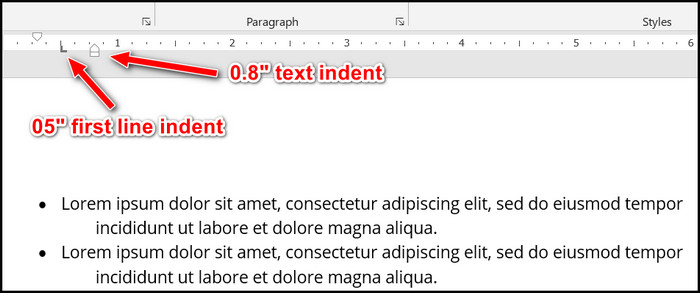
Read more on how to add headers and footers in MS Word.
2. Use The Horizontal Ruler
In the previous section, the discussion tells you how to align the bullet points using the ruler. But you can also align the text inside the bullet points using the ruler.
If the horizontal ruler is not visible, go to the View tab and check the box next to Ruler in the Show group. 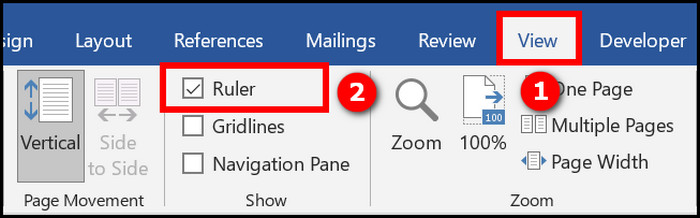 Once the ruler is visible, you will see some markers in the ruler.
The previous section states that the top triangular marker (pointing downward) will align the bullet points. The bottom markers are of interest to you.
The bottom triangular marker (pointing upward) will align the text (except the first line).
The bottom rectangular marker will move both the triangular markers together (maintaining the same distance between them). 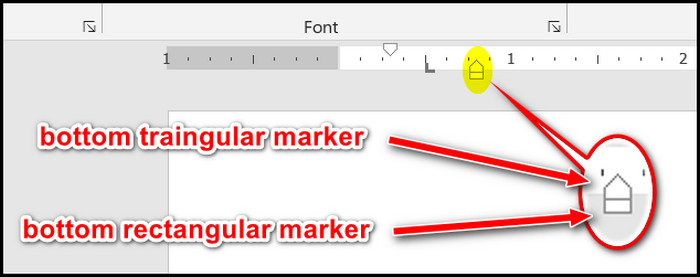 You can manually change the alignment of the multi-line text by dragging the bottom markers.
Here are the steps to align the second line of bullets using the ruler:
- Open the document in Word.
- Select the bullet list you want to align.
- Notice the three markers at the left of the horizontal ruler.
- Drag the bottom triangular marker (pointing upward) to align the Text Indent for the second (and subsequent) line. It is also known as a hanging indent.
- Drag the bottom rectangular marker (attached at the bottom of the lower triangular marker) to drag both the top and bottom triangular markers in sync.
Now, you will have the perfectly aligned bullet list with an indentation for the second line.
Final Thoughts
MS Word uses indentation to align the bullet points and the text inside them.
If you know the exact measurements for the bullet point and the text indentation, then you can set them using the Adjust List Indents dialogue box.
If you do not know the exact measurements and want to align the bullet points visually, then use the horizontal ruler.
MS Word also lets you separately align the second line of the bullet list text by adding a tab stop or using the ruler.