Adding page numbers to a document spanning multiple pages makes it look professional.
If you are adding a table of contents, then it’s a must to add page numbers. Without the page number, the table of contents becomes meaningless.
This post will provide you with detailed guidance on how to add page numbers in Microsoft Word. You will learn how to insert page numbers to the header, footer, page margins, etc.
You will also learn how to customize the page numbers, for example, the number format, style, font settings, etc.
This post will also discuss page numbering for different types of documents and alternate pages (even/odd).
So keep reading the post till the end.
You may also like to read about MS Word table of contents not updating.
How To Add Page Number In Microsoft Word
If you are in a hurry, adding page numbers is quite easy in Microsoft Word. It will only take you a couple of minutes to set page numbers to the document.
Follow the methods below to insert page number in Microsoft Word:
1. Insert The Page Number At The Top Of The Page
You can add page numbers in the header section of the document in Microsoft Word.
Here are the steps to insert the page number at the top:
- Open the document in Microsoft Word.
- Go to the Insert tab from the top.
- Click on Page Number under the Header and Footer group in the top ribbon. A dropdown list will open.
- Select Top of Page. You will see a list of different page numbering styles, such as plain style, accent bar, bold numbers, brackets, italics, roman numbers, vertical lines, circles, rectangles, etc.
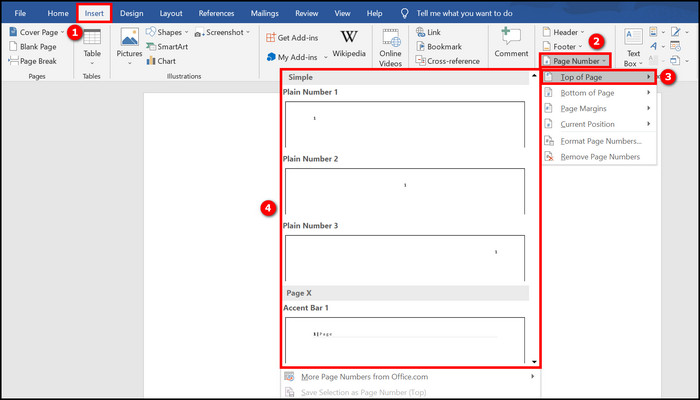
- Choose the page number style as per your requirements. You will see the tab switch to the Header & Footer.
- Click on Close Header and Footer from the top.

You can make further customizations which are discussed in the next methods.
Related content you should read about how to change language in Microsoft Word?
2. Add The Page Number At The Bottom Of The Page
Microsoft Word allows you to add a page number at the bottom of each page inside the footer section.
Here are the steps to add the page number at the bottom:
- Open the document file in Microsoft Word.
- Go to the Insert tab from the top.
- Click on Page Number in the top ribbon. A dropdown list will open.
- Select “Bottom of Page.” You will see a list of page numbering styles, such as scroll, square, star, triangle, etc., in addition to the styles available for page numbering at the top.
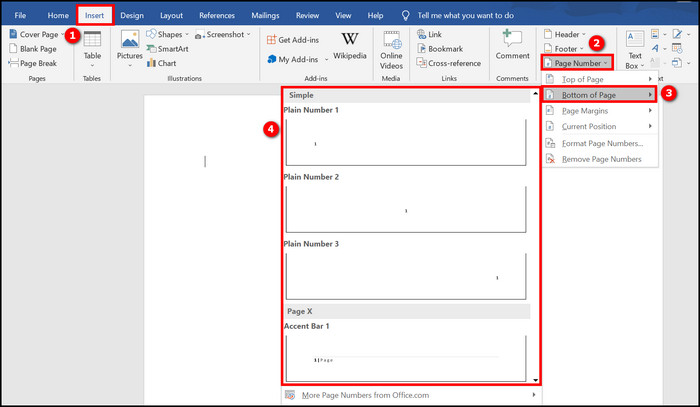
- Choose the page number style as per your needs.
- Click on Close Header and Footer from the top.

If you cannot find the required page number style, click “More Page Numbers from Office.com” instead of choosing a style.
Related guide on how to use Microsoft Word read aloud?
3. Insert Page Numbers On Page Margins
Using Microsoft Word, you can insert page numbers at the margins.
Here are the steps to add page numbers at the margins:
- Launch Microsoft Word and open the document.
- Go to the Insert tab from the top.
- Click on Page Number under the Header and Footer group in the top ribbon. A dropdown list will open.
- Select Page Margins. You will see a list of different page numbering styles such as vertical, accent bar, bold numbers, vertical lines, circles, arrows, etc.
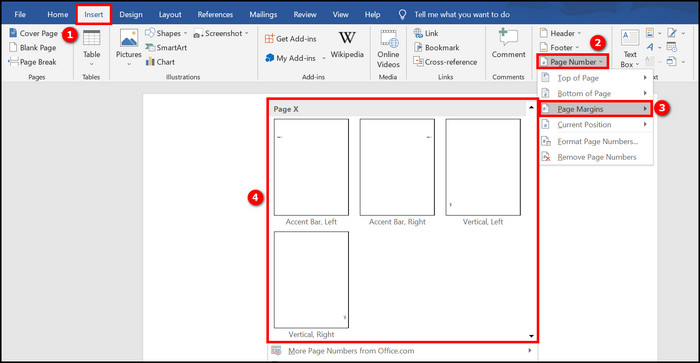
- Choose the page number style as per your requirements.
- Click on Close Header and Footer from the top.

Brochures and other documents that are more graphical usually insert page numbers at the margin. It makes the design look more trendy.
Also related to this guide on how to print in Microsoft Word?
If your document already has a header/footer, and you would like to insert a page number into it, then use the Current Position option to add page numbers.
Here are the steps to add page numbers to an existing header/footer:
- Open the document.
- Double-click on the header or footer where you want to add page numbers. You will see the Header & Footer tab open at the top.
- Click on Page Number in the top ribbon. A dropdown list will open.
- Select Current Position. You will see a list of different page numbering styles.
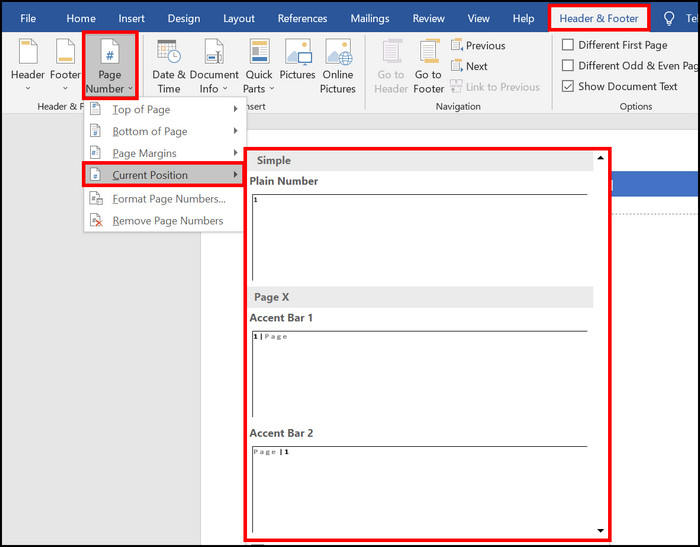
- Choose the page number style as per your requirements.
- Select the page number and go to the Home tab to change the formatting (font size, color, style, etc.).
- Go to the Header & Footer tab and click on Close Header and Footer from the top.

As you can see, adding the page number later to an existing header or footer is not difficult.
Read more on fix Microsoft Word won’t open.
How To Format Page Numbers In Microsoft Word
In addition to inserting page numbers in Microsoft Word, you can also format the page numbers per your requirements.
The tab switches to the Header & Footer tab when you add the page numbers, which contain the different page number formatting options. If you have already added the page numbers following the above section, you can double-click on the page numbers to bring back the Header & Footer tab.
Either way, once you are in the Header & Footer tab, follow the methods below to format pages:
1. Different Styles For Odd And Even Pages
Check the box next to “Different Odd & Even Pages” to apply different styles for the odd and even pages. You will see the page numbers for the even pages disappear, and you need to select a style for the even pages.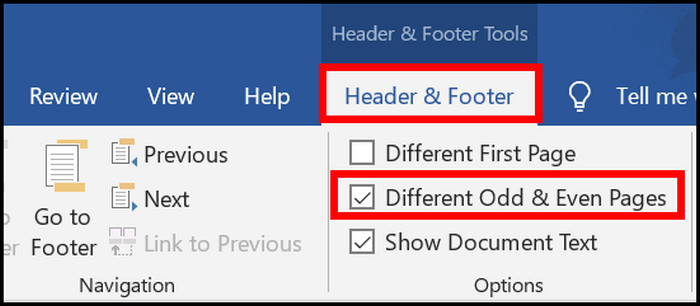 To do that, double-click on the header of any event page and click on Page Number from the top ribbon, then choose the location and style for the even page numbers.
2. Skip The Page Number For The First Page
If you do not want to put a page number on the first page (usually because it is the cover or the title page of a document), check the box next to “Different First Page.” Then no page number will be put on the first page, and the second page will start from 2.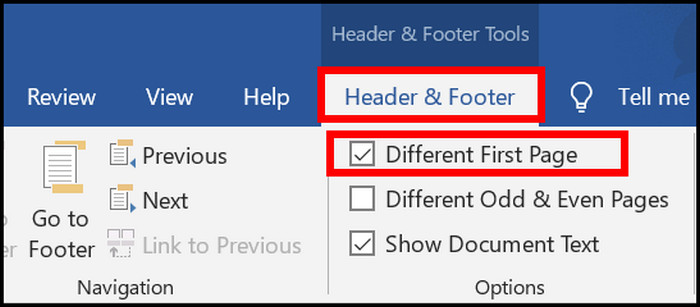
3. Start Page Number From A Specific Page
You can start the page numbering from a certain page in the document. For example, if you have a title page and an acknowledgment page in your document, and would like to start the page numbers after the acknowledgment page, then this option is for you.
Inside the Header & Footer tab, click on Page Number from the top ribbon and select Format Page Numbers from the dropdown. Then on the “Page Number Format” dialogue box, click on “Start at” and provide the number to be used as the starting page number.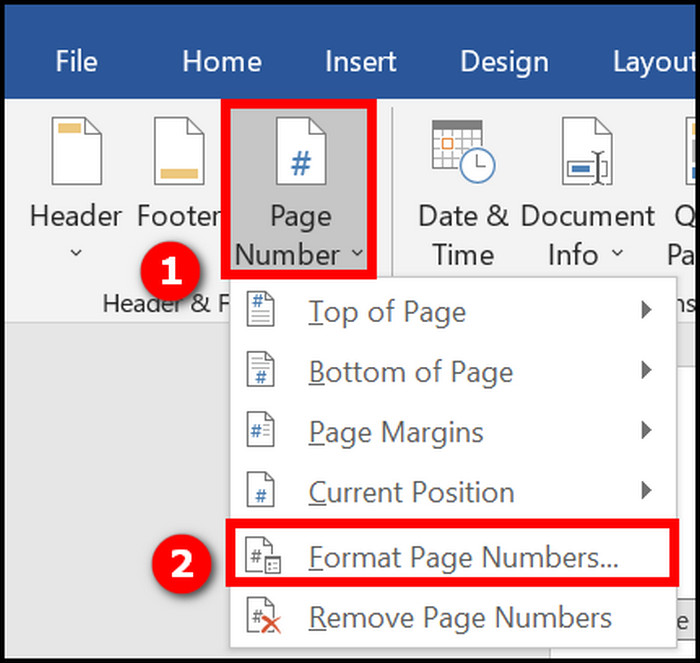
For example, if you want the second page to be 1, set “Start at” to 0. Finally, click on OK to apply the changes.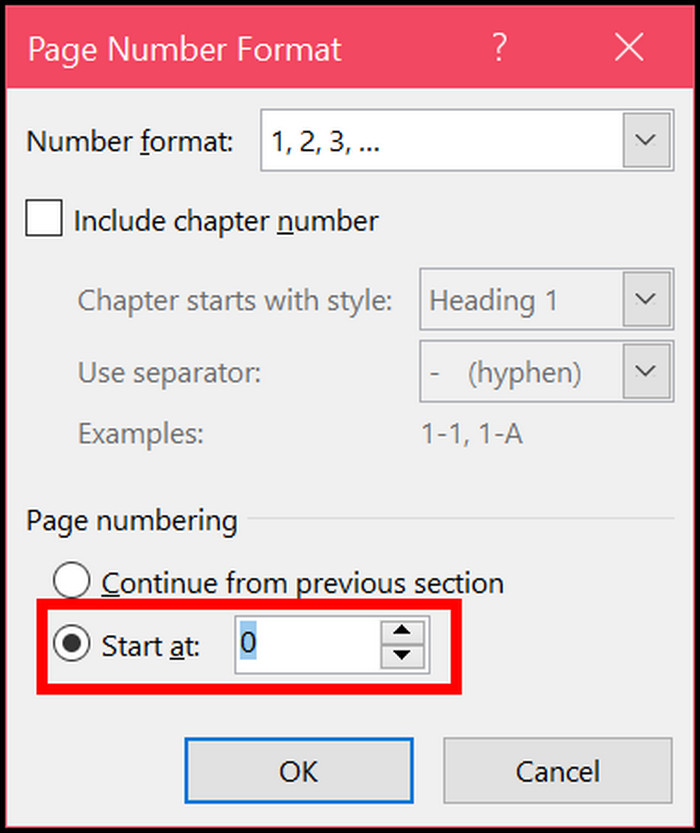
4. Change The Page Number Format
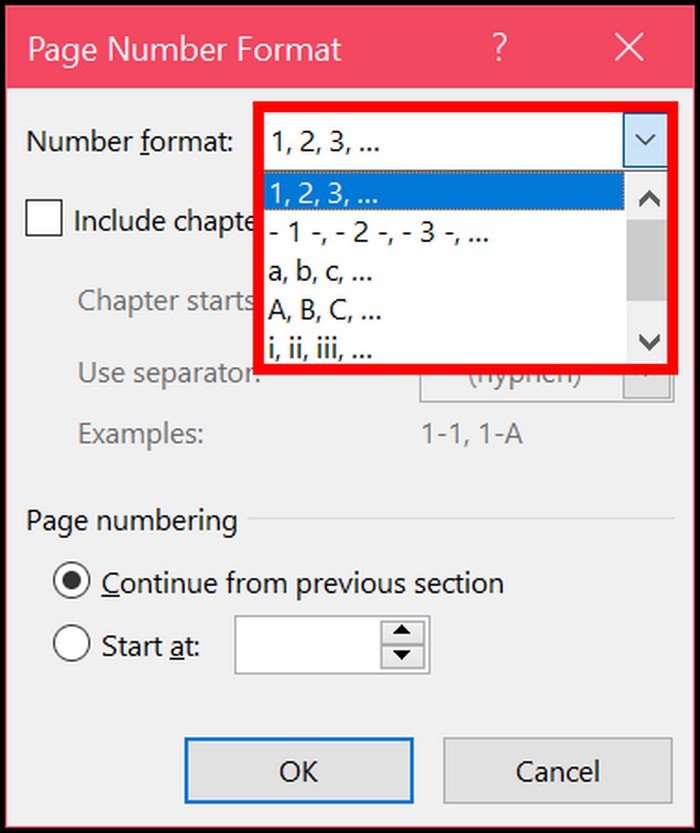
Microsoft Word uses the numbers 1,2,3,… by default as the page number. You can change it to roman numerals or alphabetical order.
Inside the Header & Footer tab, click on the Page Number from the top and select Format Page Numbers. Then on the “Page Number Format” dialogue box, click on the dropdown next to Number Format.  Select a number format from the list and click OK to apply.
5. Include Chapter Numbers In The Page Number
You can add the chapter number to the page numbers (for example, page numbers on chapter 1 would look like 1-1, 1-2, and so on).
Inside the Header & Footer tab, click on the Page Number from the top ribbon and select Format Page Numbers from the dropdown.  Check the box next to “Include chapter number.” You can then specify the heading representing each chapter and the separator to use between the chapter and page number (hyphen, period, colon, etc.).
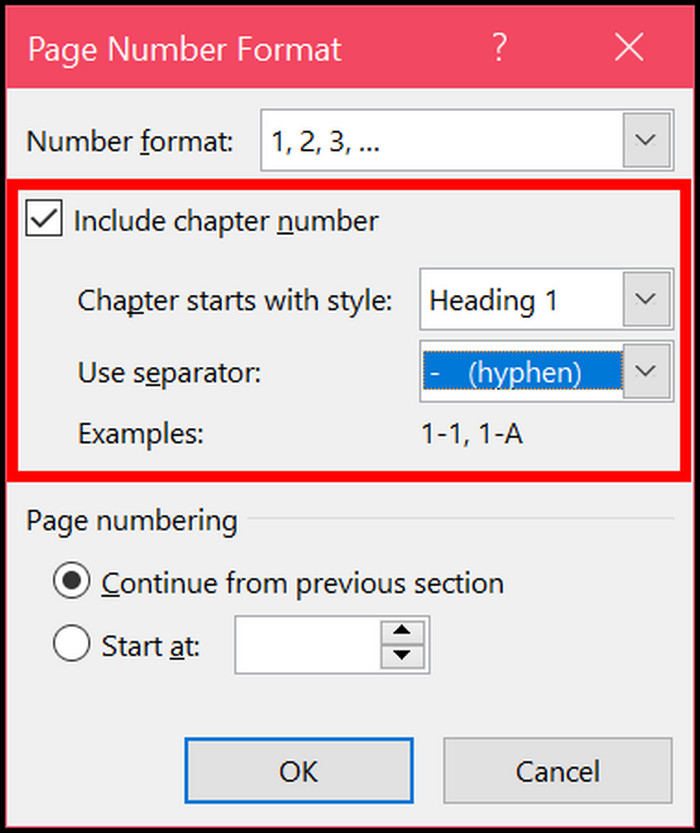 For example, if Heading 1 indicates the chapters in your document and you would like to have the page numbers as 1.1, 1.2, 1.3,…, 2.1, 2.2, 2.3,… then choose Heading 1 as style and period as separators, respectively.
6. Change Page Number Text Style
You can fine-tune the appearance of the page numbers in Word. Double-click on the page number and select it. Then go to the Home tab and change the font size, color, etc., as needed.
7. Add Different Page Numbers To Different Sections
An introduction, abstract, acknowledgment, and table of contents precede the main document in a thesis or a long document. Let’s declare the section before the main document (introduction, abstract, table of contents, etc.) as the beginning section to make the discussion easier.
You might want to have different page numbers for the beginning and the main section of the document (for example, roman numerals for the beginning section and numbers for the main section).
Here are the steps to add different page numbers to different sections:
- Go to the Home tab and click on the P icon under the Paragraph It will help you see the section break as you will insert it in a moment.

- Place the cursor in a position between the beginning and the main section of the document. For example, the main section starts after the table of contents. Then you would place the cursor at the end of the table of contents.
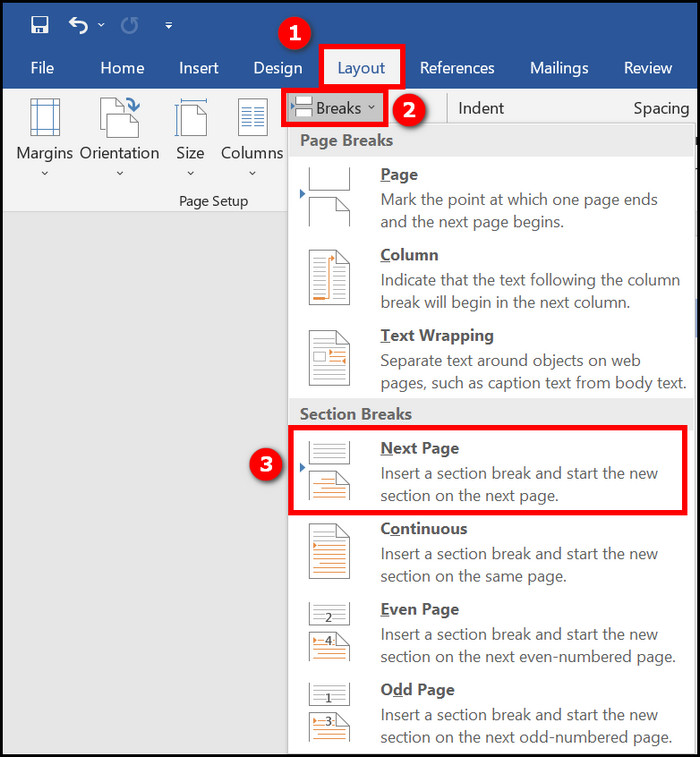
- Go to the Layout tab from the top.
- Click on Breaks and select Next Page from the dropdown. The document is divided into two sections: the beginning and the main sections.
- Double-click on the header of the main section. It will bring up the Header & Footer tab.
- Click on “Link to Previous” to deselect it. If the option is grayed out, the section break was not applied correctly in the previous step. As we have clicked on the P icon, you should be able to see the section break. Check if it is in the correct position.
- Place the cursor at any point in the beginning section of the document.
- Go to the Insert tab and click on Page Number.
- Choose the position and style of the page number.
- Click on Page Number > Format Page Numbers inside the Header & Footer tab. If you do not see the Header & Footer tab, double-click on the header of the beginning section to bring up the Header & Footer tab. Then go to Format Page Numbers as described.

- Click on the dropdown next to Number Format and select the roman numerals (or any other format you need). This number format will apply to the document’s beginning section (introduction, abstract, table of contents, etc.).
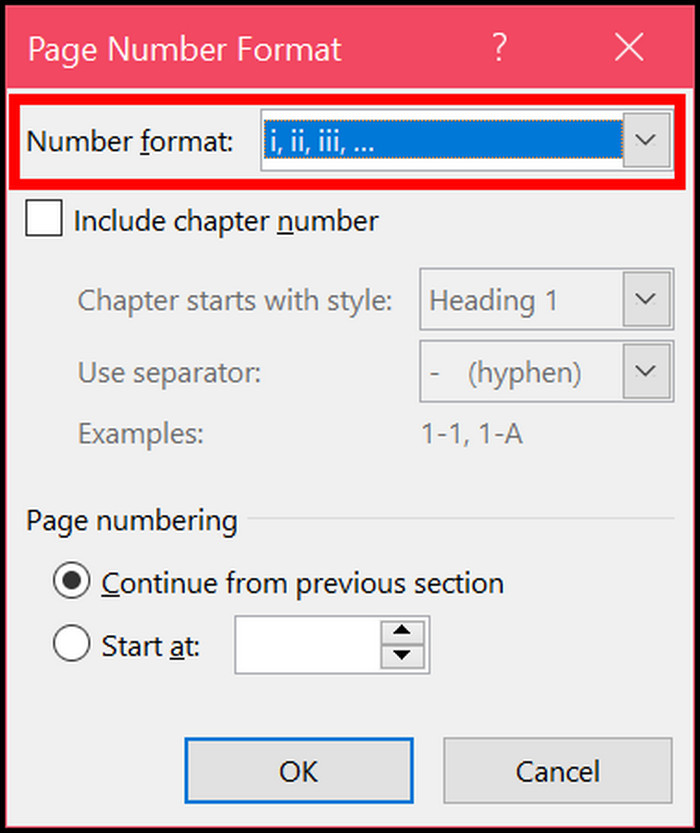
- Click OK to exit the “Page Number Format” dialogue box.
- Click on Close Header and Footer.

- Scroll to the main section of the document.
- Double-click on any header in the main section of the document. It will bring up the Header & Footer tab for the main section.
- Click on Page Number and add page numbers for the main section.
- Go to Page Number > Format Page Numbers from the top.
- Select “Start at” and enter 1 in the box to restart the page numbering from the first page of the main section.
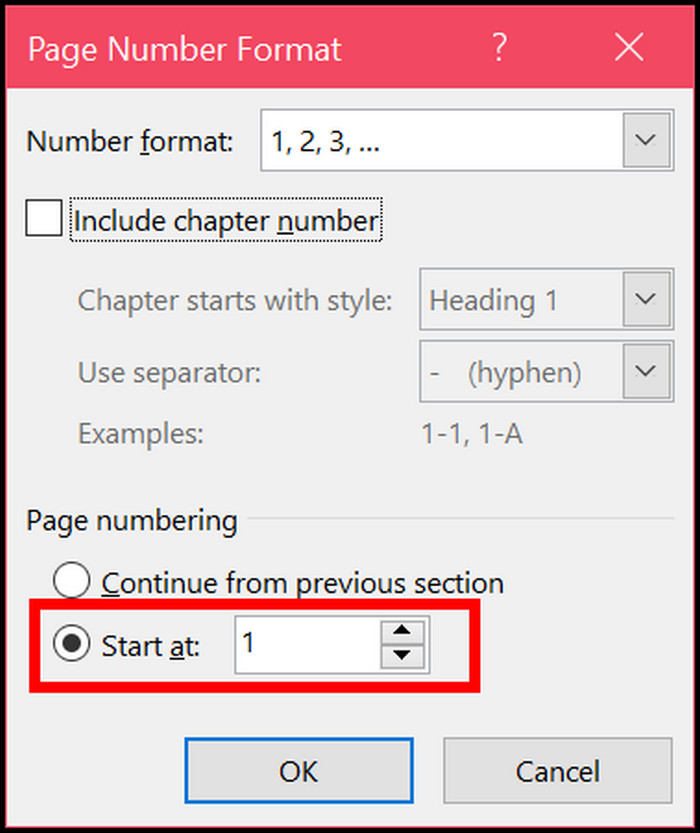
- Click on OK to close the dialogue box.
- Click on Close Header and Footer from the top.

Now you will have a different page numbering for your document’s beginning section (using roman numerals) and the main section (numbers with a page number reset).
How To Remove Page Numbers In Word
If you are unsatisfied with the page numbering in Microsoft Word, you can remove them.
Also, if you want to apply a different page number style, then you need to remove the page numbers first.
Here is the procedure to remove page numbers in Microsoft Word:
- Open the document in Microsoft Word.
- Go to the Insert tab from the top.
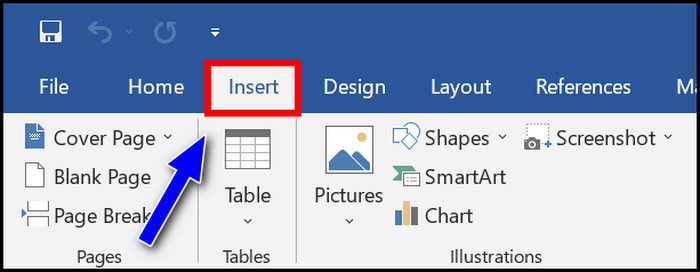
- Click on Page Number.
- Select Remove Page Numbers.
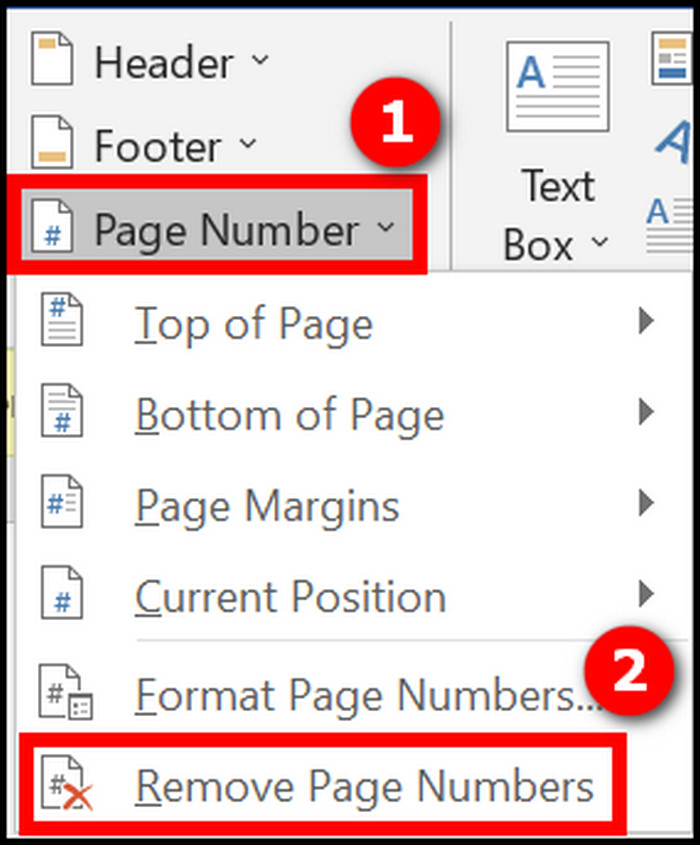
It will remove the page numbers for the document. If you have applied different styling for the even and odd pages, then either the even or the odd page numbers will be removed (depending on which page you were on while removing the page number.)
Then go to any page with the page number still visible and double-click on the header. It will bring up the Header & Footer tab. Click on Page Number > Remove Page Numbers; now, page numbering will be completely removed from the document.
Go through our epic guide on Microsoft Word find and replace is not working.
Final Thoughts
Adding page numbers to documents in Microsoft Word is easier than it seems. You can go to the Insert tab and click on Page Number to add page numbering to the document.
Microsoft Word has many options for styling page numbers in the page header, footer, and margins. You can also format the page numbers’ text style and number format.
You can also break a long document into multiple sections to add different page numbers to the different sections.