Need to move multiple shapes, images, charts, or text to the bottom corner but can’t move them in groups? You are not the only one to realize this.
PowerPoint is loaded with helpful abilities to organize your presentation slides without any hassle. However, the object grouping feature in PowerPoint doesn’t always work as you expect it to.
Why is this happening? That’s what I intend to show you in this guide.
There are actually some conditions that you need to keep in mind to use this feature properly. Don’t worry, it’s nothing you can’t grasp after spending a maximum of five minutes reading this article.
So, take a short break and dive into the next section.
Check out our separate post to use the Laser Pointer in PowerPoint.
How To Fix Can’t Group Objects in PowerPoint?
You can’t group objects in PowerPoint because Microsoft doesn’t support object grouping for some of the components you have selected. When this happens, the ‘Group’ option in the context menu is greyed out. This isn’t occurring due to any software issues but because of compatibility issues.
Apart from this, you might have an older PowerPoint version that doesn’t support this feature.
Follow these methods to fix can’t group objects in PowerPoint:
1. Upgrade to a Newer PowerPoint Version
If you can’t find the Group objects option anywhere in your PowerPoint application, then you need to upgrade to a newer PowerPoint version.
Here is the list of PowerPoint applications that don’t support the Group Objects feature:
- Microsoft Office 95
- Microsoft Office 97
- Microsoft Office 2000
- Microsoft Office XP
Now that you know which versions to avoid, you need to review your PowerPoint version.
Also, check out our separate post to enable automated kiosk presentation on PowerPoint.
Follow these steps to check your PowerPoint version:
- Launch Microsoft PowerPoint by searching for it in the Start menu or from the desktop.

- Find the Account option at the bottom left corner and select it.

- Look for the grid-shaped About PowerPoint button on the right-most panel and click on it.
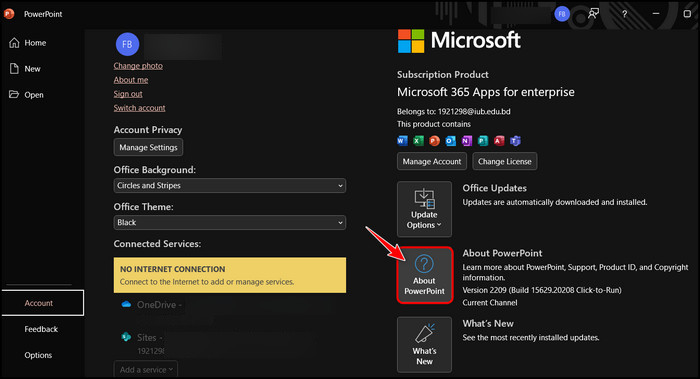
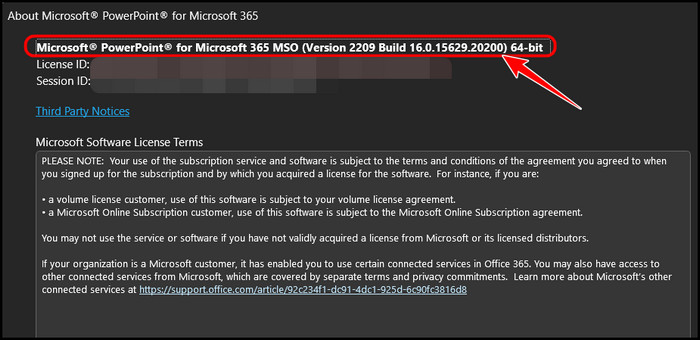
- Locate the PowerPoint version at the top and compare it to the list above. If it’s mentioned in the list, you need to upgrade to use the Group Objects feature.
Don’t worry, downloading and installing the latest version of PowerPoint only takes four simple steps.
Follow these steps to install the latest version of PowerPoint:
- Launch a browser and browse to the Microsoft Office homepage.
- Sign in or Sign Up for a Microsoft Account by clicking on the respective buttons.

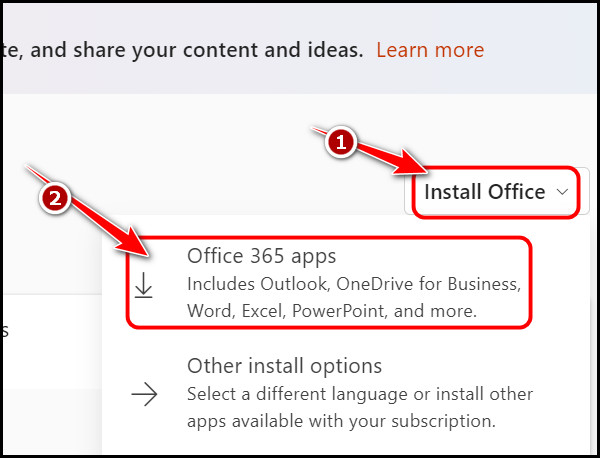
- Look for the Install Office button at the top right corner once you have entered your credentials and logged in successfully, and select Office 365 Apps once the menu expands.
- Wait for the installer to download and launch it once it’s done. Follow the instructions to install all the latest Microsoft Office apps on your PC.
If your PowerPoint version is already updated, follow the next method.
Related contents you should read on how to Blur images in PowerPoint?
2. Review the Selected Elements
Although PowerPoint’s grouping feature deserves high praise, there are also some downsides. For example, the grouping feature does not work with all elements or objects in PowerPoint.
Therefore, you need to make sure that the objects you are trying to group are compatible with the feature.
A common mistake people make is to select unsupported elements like a placeholder or embedded tables before clicking the Group Objects button. As soon as PowerPoint detects that an incompatible object has been selected, the Group Objects button will be greyed out.
Here is the complete list of objects that can’t be grouped in PowerPoint:
- Placeholders
- Tables
- Excel Worksheets
- GIF Images
Make sure any of the objects that you have selected do not contain any of the elements in the above list. Once you have confirmed this, the Group Objects button should work flawlessly.
While software bugs are uncommon in Microsoft apps, you may also be facing issues with the feature because of it. If you haven’t selected any of the items in the previous list and still can’t group them, you might need to try another approach to grouping.
Some more guide to format text as Superscript or Subscript in PowerPoint.
3. Use Another Method to Group Objects
If you have already failed to group objects using the default method, that is, by selecting the Group Objects button in the Home tab, then you need to try another approach by using shortcuts.
Likewise, you should use the Group Objects button method if you have already tried the Home shortcuts.
Follow these steps to Group Objects in PowerPoint using the Group Objects button:
- Launch PowerPoint and select multiple elements that you want to group by pressing the Ctrl button while selecting each individual object.
- Switch to the Home tab if you are not already there.

- Look for the Drawing section and click on the Arrange button to expand the drop-down menu.

- Click on the Group button in the Group Objects category.
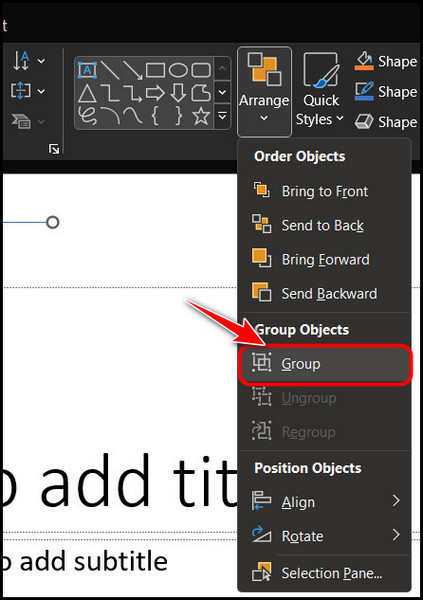
If you have already tried this method without success, then you should use the shortcut method below.
Follow these steps to use the shortcut method to group objects in PowerPoint:
- Select all objects that you want to group using the Ctrl button, as I mentioned above.
- Press the Ctrl and G buttons at the same time while all objects are selected to group them. Note that the shortcut won’t work if you have selected an incompatible object.
These should help you figure out the source of the problem and identify what needs to be corrected for the Group Objects feature to work.
When creating or editing a slide, there are some objects or arrangements that get ruined accidentally and getting them back to the previous state can be difficult.
This is where PowerPoint’s lock objects feature kicks in. The next section discusses this in detail, so check it out.
Check out the easiest way on how to Indent in PowerPoint?
Can You Lock Objects in PowerPoint?
Yes, you can lock objects in PowerPoint. This feature allows you to set a permanent or fixed position for a selection of objects which can prevent unexpected mishaps. For example, you won’t have to worry about accidentally ruining your slide’s design by moving certain objects.
Although this feature feels similar to the Group Objects feature, it’s quite different because this does not have any limitations on the objects that are compatible. As a result, you can lock anything in PowerPoint without any issues.
Moreover, it adds another layer of simplicity to your workflow, so there’s no harm in learning it.
Follow these steps to lock objects in PowerPoint:
- Launch PowerPoint and open a PPT file.
- Press and hold the Ctrl button and select all the objects that you want to lock in a fixed position (Make sure the objects are already positioned the way you want them).
- Right-click on any selected object and select the Lock option.
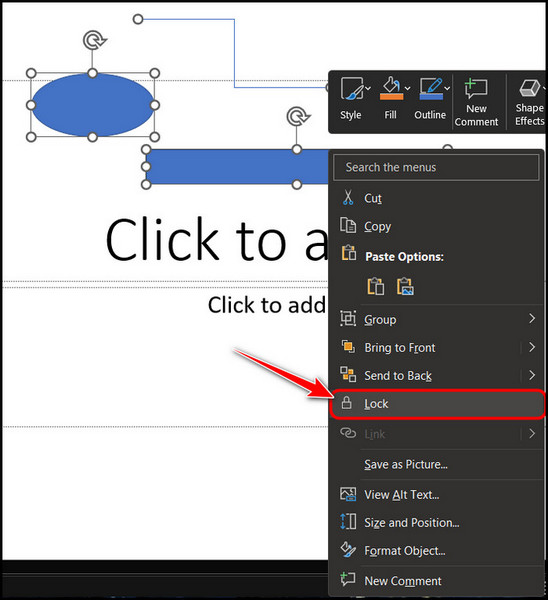
Once you do this, you won’t be able to move any of these objects by simply dragging them. If you want to unlock them and move them to another position, simply right-click and select unlock.
Note that you don’t have to select multiple objects to lock, unlike the Group objects feature. You can lock individual objects if you wish.
Follow our guide to fix Hyperlink not working in PDF Exported from PowerPoint.
Final Thoughts
To end with, if you are facing issues with anything in any Microsoft app, there’s always a perfectly good explanation behind it, and it’s our job to provide you with that information.
After reading the first section, I hope you understand why your Group button is greyed out and how to avoid those situations. While you are at it, you should also use the Lock Objects feature that I discussed in the second section to upgrade your PowerPoint skills.
Have confusions regarding anything in the article? Write them in the comments below, and I’ll do my best to get back to you.