Notifications are useful to provide users with information about new messages, mentions, replies and others. Pop-up notifications can quickly notify the user to increase conversion rate and productivity.
Experts say 5 to 10 seconds is perfect for a pop-up notification to read and understand the message. If they stay longer, the user experience gets gradually irritated.
But, when the notification doesn’t go away, it feels bothersome and inhibits the user’s concentration.
The notification issue is very common to the regular Microsoft Teams user, and without a quick resolution, it can hinder your upcoming important notifications.
In this article, I’ll explain the quick and most straightforward procedures to fix the Microsoft Teams not going away issue. So, let’s begin.
Follow our guide to fix Microsoft Teams Black Screen.
Why is Microsoft Teams Notifications not Going Away?
Because of problematic Microsoft Teams notification settings, network or server issues, unread messages and mentions in Activity Feed, users face notifications not going away problems. Also, syncing failure and a corrupted cache can lead to a notification issue.
Researching the problem of users, I’ve identified some of the most common reasons and described them below.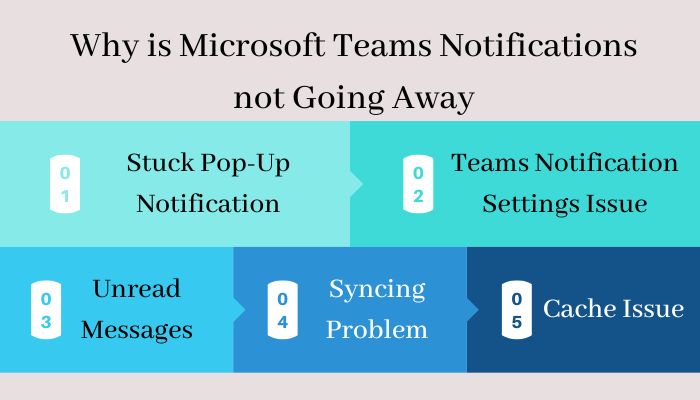
Here are the reasons behind Teams notifications not going away in Windows:
Stuck Pop-Up Notification
Microsoft Teams notification program automatically goes away after some moments. But, when the program doesn’t execute properly, the user faces a pop-up notification issue.
Teams Notification Settings Issue
Teams have separate notification settings for calls, messages, mentions and others. When the permission conflicts with the system or contains a bug, the notification doesn’t go away from the pop-up.
Unread Messages
Unread mentions and messages are common reasons behind the notification staying on the screen. If you set a priority or customize the notification settings, Microsoft Teams continues to show the new notification and doesn’t disappear after some moments.
Syncing Problem
Due to slow internet or network issues, your Microsoft Teams desktop client may not update the last action properly. As a result, the Teams notification program stays active and doesn’t go away.
Also, Microsoft server problems or maintenance can hinder the syncing process of your Teams.
Cache Issue
Microsoft Teams cache stores the information when a new mention or message arrives on your account. But, if the sender deletes them before you read, Teams continue to show the notifications in the pop-up.
Users often face notification problems, and they are effortless to resolve. If you have the same issue, follow the steps from the following passage to fix the notification problem without difficulty.
Check out the easiest way to add Teams Meeting in Outlook.
How to Fix Microsoft Teams Notifications Won’t Go Away Issue
By closing the Teams notification from the multitasking view, resetting notification settings, and filtering the unread messages, users can resolve the issue of the Teams notifications not going away. Also, clearing the Teams cache folders works as a fix for the pop-up notification problem.
There are additional ways to fix the notification issue in your Windows 10 & 11. Consider following the instructions below to solve the problem.
Here are the ways to fix the MS Teams notifications won’t go away issue:
1. Close Teams Notification from Multitasking View
Sometimes, the Teams notification gets stuck, and the pop-ups won’t disappear until you close the notification program.
Using the keyboard shortcuts, you can open the multitasking view to stop the program. Follow the quick steps below to close the Teams notification pop-ups.
Here is the process to close MS Teams notifications from the multitasking view:
- Press the Alt + Tab buttons together to open the multitasking view.
- Click the Close button from the Microsoft Teams Notification.
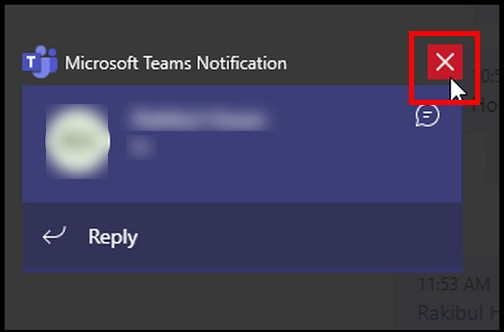
Closing the Teams notification program will dismiss the notification from your window.
Some more guides on crocs fix Microsoft teams can’t change status from offline.
2. Reset Teams Notification Settings
Microsoft Teams notifications are easily customizable from the settings. But due to some issue, they aren’t working on your computer correctly. Resetting the Teams notification will resolve the problem effortlessly.
Teams provide separate notification settings for mentions, messages, and others. Read the instructions below to reset the notification settings.
Here are the steps to reset Microsoft Teams notification settings:
- Launch Microsoft Teams on PC.
- Press the three horizontal buttons ( … ) from the top ribbon.
- Click on Settings.
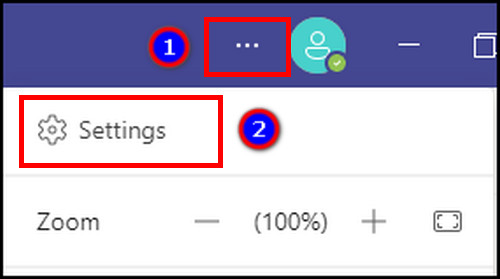
- Navigate to Notifications from the left pane.
- Press the drop-down menu from each option and select Off.
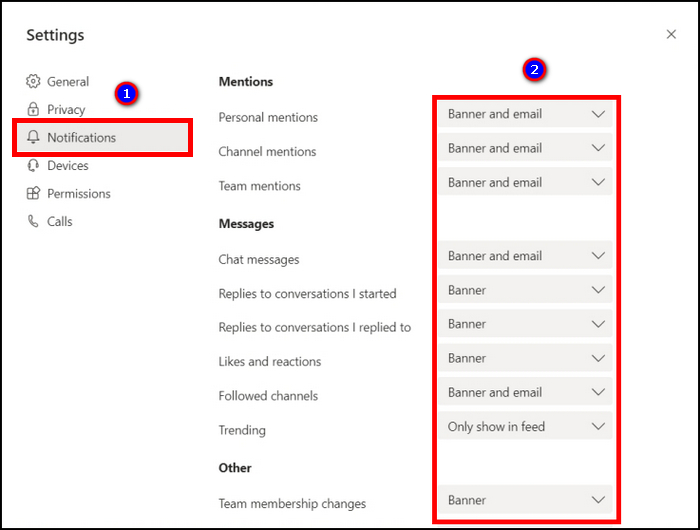
- Close the Teams application.
- Restart Microsoft Teams.
- Enable the notifications.
Re-enabling the notifications setting will solve the issues with the notification pop-ups. If you are still facing the problem, continue reading the procedures below.
Related contents you should read how to use Microsoft Teams shifts?
3. Filter the Unread Notification
Sometimes, the notifications may not go away if you don’t read the mention or message. The simple way to dismiss the notification is to read the message or use the Mark as read option.
The Activity Feed shows all the unread mentions, messages and replies. Follow the steps below to filter the unread notification.
Here is the way to filter the unread notification in MS Teams:
- Open the MS Teams application.
- Press on Activity from the left pane.
- Click on Filter or press Ctrl + Shift + F.
- Press the three horizontal buttons ( … ).
- Select Unread.

- Read the messages or right-click and press Mark as read.
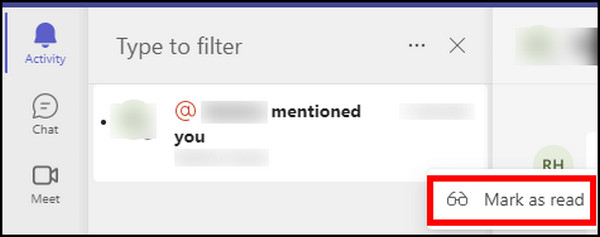
If you have unread messages, reading them will resolve the notifications not going away problem in Microsoft Teams.
4. Open Teams Web App
You may see the notification pop-up continually if your read action isn’t syncing correctly. Read the message using the Microsoft Teams web app to force it to go away.
The following instructions will guide you to open the Teams web app on your browser.
Here are the steps to open the Teams web app:
- Open a browser.
- Visit Microsoft Teams on the web.
- Log in to your account.
- Read your messages.
Once you read the messages from the Teams web app, the desktop client will start the syncing process. If the message is read, the notification pop-up will go away automatically.
Check out our separate post on how to disable chat on MS Teams meeting.
5. Clear MS Teams Cache
If the message sender deletes a mention or message before you read them, they are cached as unread on your PC. Microsoft Teams will show unread message notifications, but there aren’t any messages in your account.
You must delete the Teams cache from your PC to resolve the problem. Follow the below instructions carefully to delete the Microsoft Teams cache folders.
Here is the method to clear cache files of Microsoft Teams in Windows:
- Close Microsoft Teams desktop client.
- Open the Run dialog box by pressing the Win + R buttons together.
- Type %appdata%\Microsoft\teams and click OK.
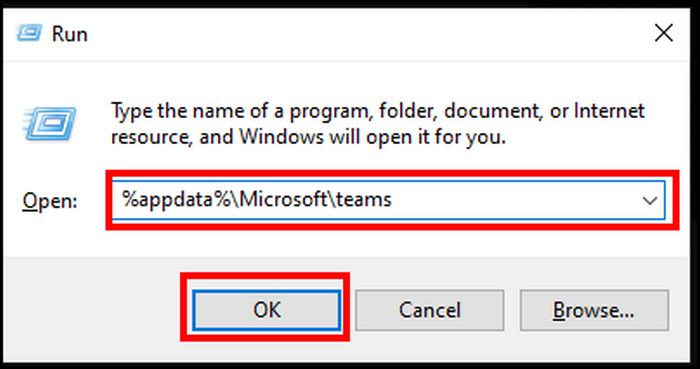
- Delete the Cache, blob_storage, databases, GPUCache, IndexedDB, Local Storage, and tmp folders.
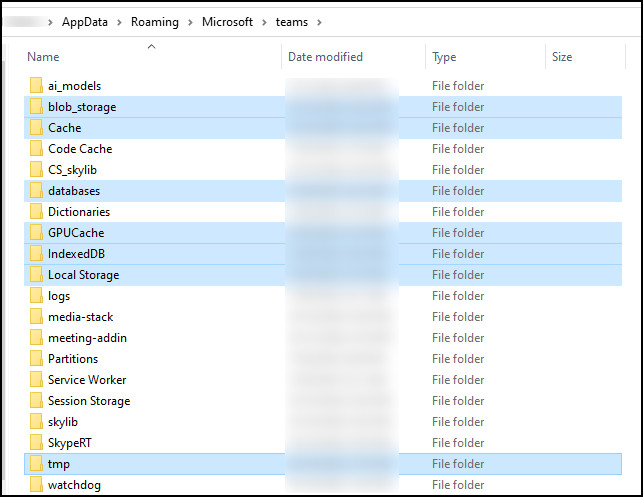
- Restart your PC and Microsoft Teams.
Deleting the folders will remove the problematic cached data from your PC, and the notifications will go away.
6. Disable Running on Background
By default, Microsoft Teams run continually in the background. If you are having an issue with the pop-up notification, disable the background running option. It will close the Teams application, and the notifications will go away.
If you are unaware of the settings, consider reading the steps below.
Here are the procedures to disable Teams running in the background:
- Launch MS Teams.
- Click the three horizontal buttons ( … ) from the top ribbon.
- Press Settings.

- Go to General.
- Uncheck the On close, keep the application running option.
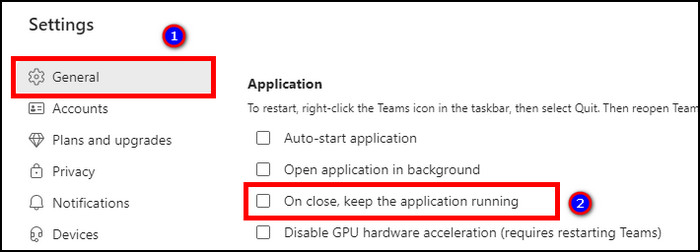
After disabling the option, Microsoft Teams will stop running in the background, and the notification pop-up will disappear.
Check out our separate post to 7 Ways to export chat history in Microsoft Teams.
7. Reinstall Microsoft Teams
The notification system will update and build from new by reinstalling the Teams application. You need to uninstall the current application and install the latest versions of Teams.
Allow me to guide you with the Teams reinstallation process from below.
Here are the steps to reinstall Microsoft Teams desktop client:
- Press the Windows Start menu.
- Search Apps & Features.
- Find Microsoft Teams from the list.
- Click on Teams.
- Click on Uninstall.
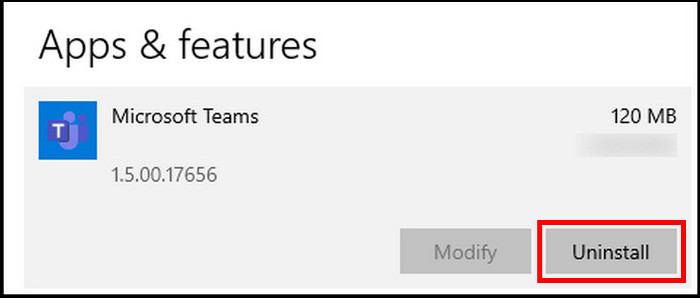
- Visit the Microsoft website using a browser to download the latest versions of Teams.
- Navigate to the download folder and install it.
- Log in to your account.
Reinstalling the application will resolve the issues with the previous version, and the notifications will go away.
8. Contact Support
The issue is familiar to people, and all the users have solved it by following the above procedures. I believe it has also worked as a charm for your device.
However, If the issue persists, your account may have some problems. Contact Microsoft Support for additional support regarding your account, and they will happily assist you with the situation.
You may also like to read about Microsoft Teams can’t change status from offline.
Frequently Asked Questions
Why do Teams show I have a message when I don’t?
Teams will show a notification, but you won’t see if the sender has deleted the message before you read them.
How to Stop Microsoft Teams Pop-up Notifications?
To stop Teams pop-up notification, go to Settings and more > Settings > Notifications > Choose Off from the drop-down options.
How to change Microsoft Teams status?
To change the MS Teams status, click on Profile Picture > Status > Choose Status.
Final Thoughts
Pop-up notifications are essential to keep the user updated with the latest information. However, they can be troublesome if they don’t disappear after a specific time duration.
This article has provided the reasons and the necessary methods to fix the issue quickly. I hope you’ve managed to resolve the issue before the arrival of any important notifications.
Don’t forget to comment and stay tuned for the next article. Until then, goodbye.