One of the most useful aspects of Microsoft Excel is to allow users to sort their data according to the dates. Its built-in sort choices are powerful and useful tools when it comes to sorting dates, but they do not always work correctly.
Are you in need of keeping track of your business schedules and earnings each day or, sorting the transactions in your weekly budget in preparation for the end of the year?
Here in this article, I will discuss a brief Excel tutorial with some helpful tips and strategies to organize your data in Excel by date.

Keep reading till the end to learn how to sort dates in Excel in a convenient way.
Why Can’t I Sort By Date in Excel?
The dates may not change their sorting order because the default sorting feature in Excel always looks at the year, even if your cells are set up to show only the month or month and day.
Suppose you import data into a Microsoft Excel spreadsheet and try to format a column of dates. But if the data contain year information, the default sorting functions in Excel would sort the data considering the year by default, which can be problematic if you want to sort by date or by month and date.
Moreover, while using Excel’s built-in sorting functions, if your dates don’t get put in order, it’s likely because you entered them in a way that Excel can’t understand.
It might be the case that the data you have as input or imported in an Excel file is text strings instead of numbers. Excel, by default, can not sort dates if the information is in a text format instead of being numerical.
Here’s a complete guide on how to Highlight Duplicates In Excel.
How to Sort By Date in Excel
Excel provides multiple options for arranging data based on date. Ascending or descending order is supported, as is sorting by day, week, month, or year. By going through the process of this, Excel will sort dates in chronological order.
Basically, Excel organizes information as per the format you specify. Hence, you’ll need to be familiar with the DATE FUNCTION in Excel to effectively use the Date sorting functionalities provided in the software.
Remember that if you utilize Excel’s built-in tools for date sorting, the dates will be sorted according to the preset format in Excel.
So you may ask:
What is the formula to sort by date in Microsoft Excel?
Here are the methods of sorting data by date in excel:
1. Sort Columns In Ascending or Descending Chronological Order
If all you need to do is sort a list of dates in a column and you will enter the associated data later, this is a good option. Microsoft Excel makes it simple to arrange dates in a chronological arrangement in any single column that you want.
The dates will always be presented in chronological order if you sort that column by year, month, and day. Therefore the default sorting order of Excel is ascending. You can also reverse the sorting order to make it descending if you want.
Here is how to sort by dates in ascending or descending chronological order:
- Select the dates column of your data that you intend to sort by clicking and dragging your cursor till the last entry of the column.
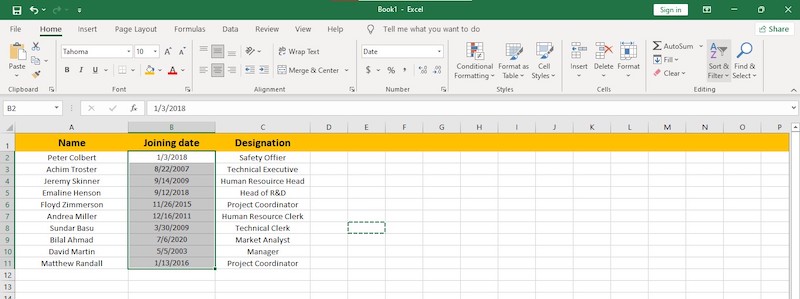
- Click on Sort & Filter from the Ribbon of the Home menu.
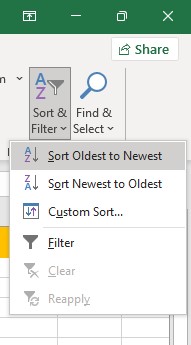
- Decide whether you want to sort the information in descending or ascending order by clicking Sort Smallest to Largest or Largest to Smallest.
- Select Expand the selection option from the popup window > Click on Sort.

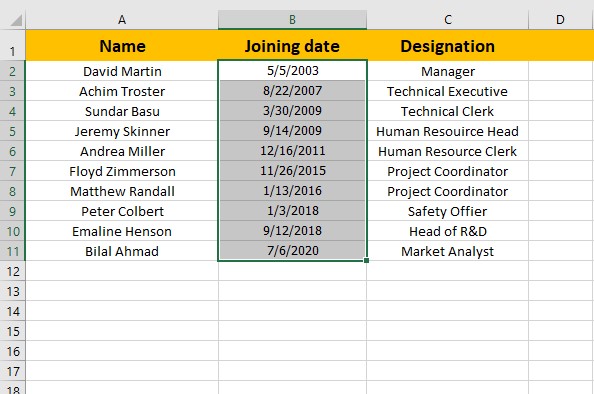
You may get the same outcome by selecting your data > Right-clicking on it > Clicking on the Sort option in the popup menu. Remember that all the dates should be in one column, and the date should be in numerical format, not as text. 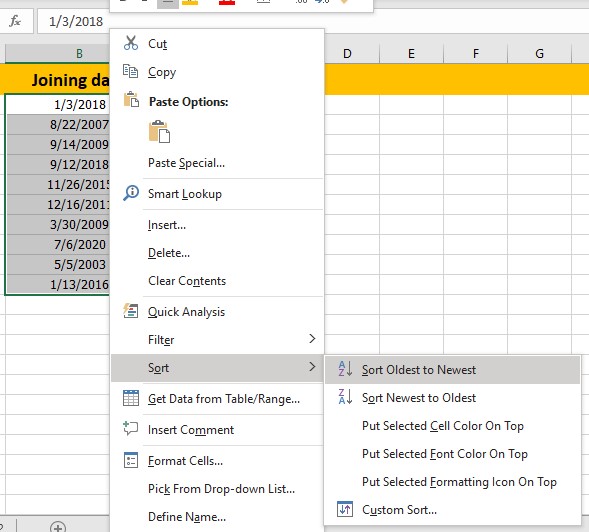
The following sections will cover several techniques for sorting by date in Excel, which may be necessary if you use Excel spreadsheet templates to manage your files or have many data tables.
Check our epic guide on how to Freeze Panes In Excel Easily.
2. Sort By Month
In case you want to sort dates by month instead of year, using the built-in sort function will not work. Default sort will still sort dates by year, even if your cells are set up to show only the month or the month and day.
The answer is to create a supplementary column, determine the month number, and then sort the data based on that metric. Use the MONTH function to find the month starting from a given date.
Here is how to sort your data by month:
- Add a helper column to determine the month number beside your date data.
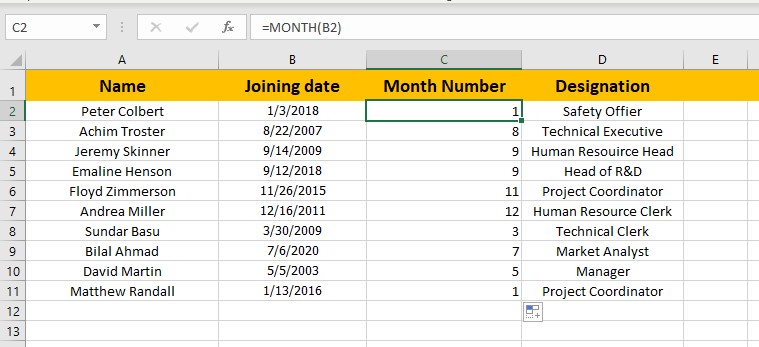
- Type =MONTH(B2) in the function box while selecting the Month Number Note that the B2 is there because the dates we have used as an example for this guide start from the B2 cell.
- Select the column with month numbers [in our case (C2:C11)] > Go to Sort & Filter.
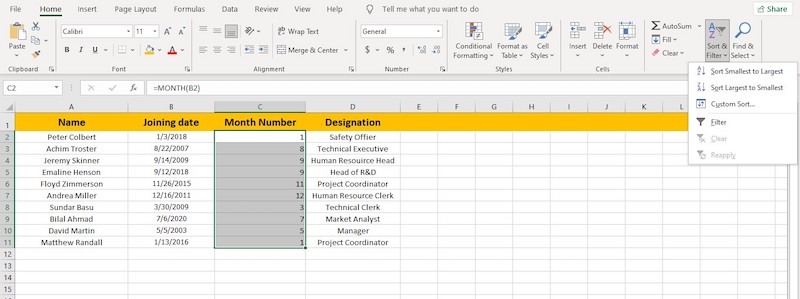
- Expand the selection when prompted by Excel > Sort Smallest to Largest.

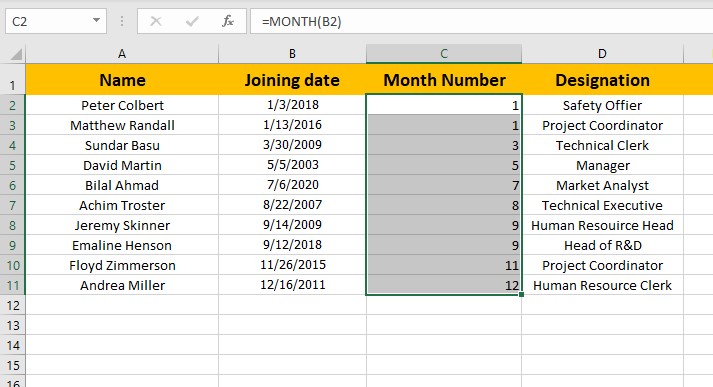
Note that we have ignored the years and days inside each month to sort the data by the month.
Quickly visit the links to find out how to freeze a row on Excel easily.
3. Sort Data by Month and Day
When organizing the dates for an employee joining calendar or for a birthday list, the most effective strategy will be to sort the dates according to the month and day. Consequently, you require a formula that can sort birthdays by month and year.
The TEXT function of Excel, which converts a date to a text string in the format you specify, is helpful in situations like this. The format code should be mmdd or mm.dd.
Here is the way to sort by month and day:
- Create a column and name it Month and day to store the month and day data.
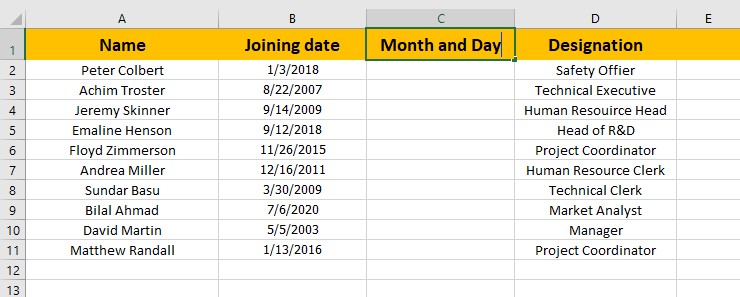
- Type =TEXT (B2, “mm.dd”) in the function box while selecting the month and day column. Note that the B2 is there because the dates we have used as an example for this guide start from the B2 cell.

- Sort the data in the column labeled Month and day from largest to smallest.
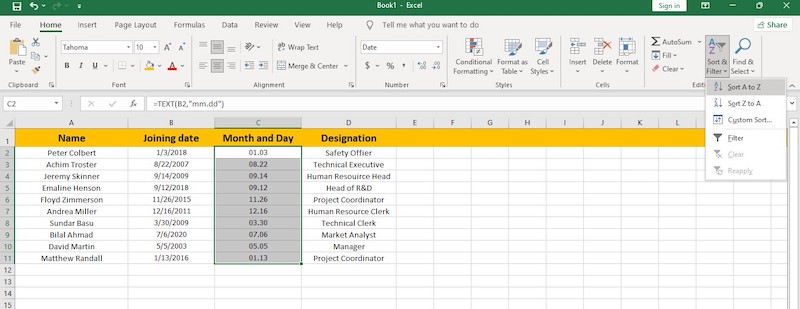

Obtaining the same result is possible by using the DATE formula in the following manner:
=DATE(2022, MONTH(B2),DAY(B2))
The formula produces a list of dates by extracting the month and day from the actual date in B2 and then storing it in another column. Note that the year information remains unchanged for the given formula, as we have set the year as 2022 for all cases.

Now, select the Month and day column and arrange the list of dates in the correct chronological sequence. Because the year is the same, you will be able to organize the dates according to month and day, which is precisely what you require at this point in time.
Here is the easiest guide to lock a cell in Excel.
4. Sort Data Using Excel’s Custom Sort Functionality
The Custom Sort function in Excel is another useful option. It’s often helpful for sorting by date. Even though they are not in the first column, you can utilize the headings of your data as categories to conveniently sort the rows in your table if your data has headings.
Because the date is in the second column, we need to use a Custom Sort to tell Excel to sort the dates in Column B.
You can select numerous sorting categories using the Custom Sort option. For instance, if you wish to view the list first by one column and then by another, you may use this function.
Here is how to sort your data using custom sort functionality:
- Select the headings and the date information cells.
- Click Home > Sort & Filter > Custom Sort on the Excel ribbon. Check the upper right corner box to use your data headers as sorting categories.
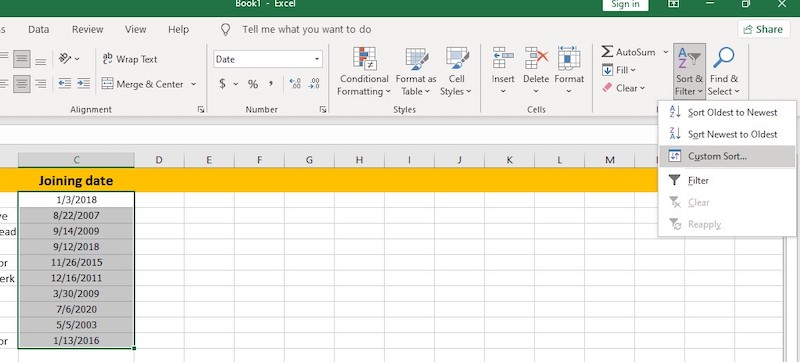
- Choose Date from the drop-down menu next to Sort by > Select Oldest to Newest or Newest to Oldest from the Order menu,
If you want to sort by different columns, Choose Sort by > [First Column] from the drop-down menu in the box labeled “Custom Sort.” After that, select Add Level > Then by > [Second Column] from the drop-down menu. Click the OK button to finish sorting. 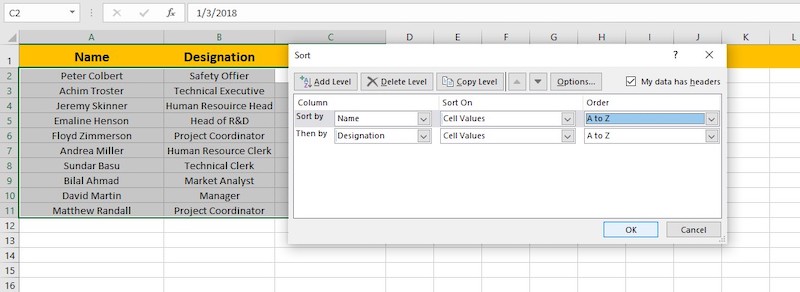
Follow our ultimate guide if you want to know how to post Bank Statement in Excel to Quickbooks.
5. Sort Your Data By Month If the Data is in Text Format
Using ascending sort could be problematic if you have a list of month names stored as text rather than as dates that display the numerical values.
Because it will arrange the month names alphabetically rather than sorting them by month order starting with January and going through December. In this situation, a specialized kind of sorting will be of assistance.
Here is how to sort your data by month if the data is in text format:
- Select the entries that you wish to sort.
- Go to the Data tab > Navigate to Sort & Filter > Click on the Sort button.
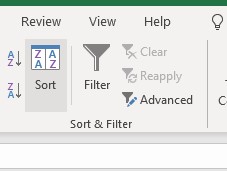
- Select the column’s name in the Sort dialog box containing the month data > Click OK.
- Select Cell Values in the section labeled Sort on.
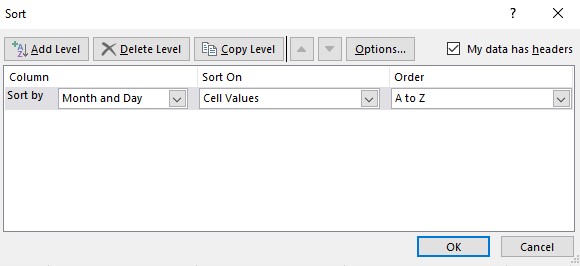
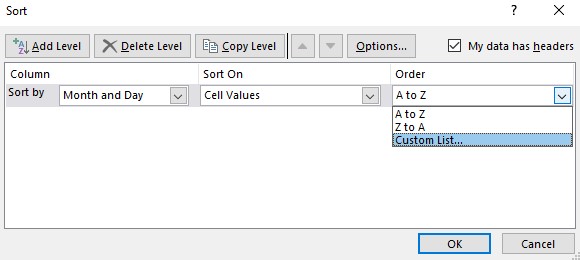
- Select Custom List under the Order section > Choose either the full month names (January, February, March, etc.) or the short names (Jan, Feb, Mar, etc.) for the months in the Custom Lists dialog box, depending on how the months are presented in the worksheet.
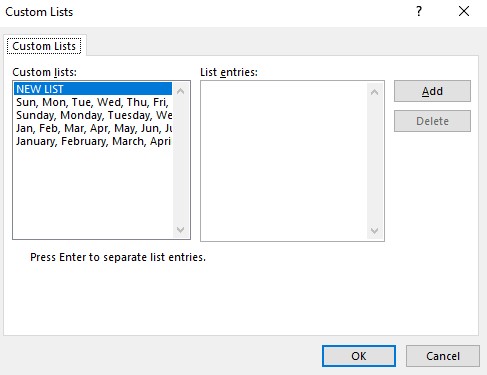
- Click on OK.
Done! Your information has been organized chronologically according to the names of the months, not alphabetically.
Also, check out our separate post on Microsoft Outlook not connecting to server.
Conclusion
There are a lot of apps and handy templates for spreadsheets out there that can be used to perform practically any activity, from making a budget and keeping track of expenses to planning a wedding.
Although putting the dates in the correct order may seem like a tedious activity, it is an important task that needs to be done precisely. For this reason, you should rely on Excel’s sorting feature to arrange your dates most efficiently.
I hope that the following strategies mentioned in this article will assist you in finishing the sorting tasks in a reasonable amount of time. You can also easily use templates now that you know how simple it is to arrange data by date in Excel.