The drag-and-drop feature allows you to move files and folders easily if you don’t want to do everything manually; this is a great shortcut to ease up your workload.
Now, you might be in a position where you can no longer use this feature. So why is this issue happening? And how can you possibly fix it?
I am going to write a guideline to answer these queries and the fixes you need to go through to make the feature work again.
So keep reading till the end to get your desired fix!
Follow our guide on how to fix drag and drop not working on Windows 11.
Why Has My Drag-And-Drop Stopped Working?
Your drag-and-drop feature might not be working because of an application glitch. If your mouse version or Windows version is outdated, that can also be the reason behind this. Sometimes corrupted files can also disable the feature, or the application you are using simply may not support this.
The “drag and drop” feature allows users to choose an item or a piece of text and then move it anywhere they’d like. While the capability to drag & drop files across applications is commonplace in graphical user interfaces, not all programs support this feature.
Many users have reported that after using the PC for quite some time, their drag & drop feature stopped working. This indicates that Windows Explorer is being unresponsive; a simple restart would fix the issue. I faced the issue when my Windows version was outdated. After updating the Windows, the feature was working again. You might also try restarting the application that you were using when the drag-and-drop feature stopped working.
Check our epic post on how to sign out of Windows 10.
How To Fix Drag And Drop Not Working In Windows 10
You can fix the drag & drop feature by pressing the ESC button while left-clicking on your mouse to undo the previous command. Restarting the File Explorer would fix the issue as well. Also, an SFC Scan with a command prompt will clear the corrupted data, which will aid in fixing the issue.
The drag-and-drop feature is meant to make it easy for users to relocate or make another copy of a file. To grasp an item, the user must first highlight it with the mouse cursor or make it the active selection and then push and hold down the left mouse button.
In order to move the item, the user clicks and holds the mouse button in its current position. When you let go of the mouse button, the item is “dropped” in the target position, where it is either relocated or copied according to the application.
But the problem arises when you cannot use the feature. Now I have already discussed the probable reasons behind this issue. So, let’s get into the troubleshooting steps.
Follow the steps to fix drag & drop not working in Windows 10:
1. Undo The Last Command
Your mouse might not perform the drag-and-drop feature because of a previous action. So you have to press the ESC key to undo the whole action to be able to perform drag & drop again.
Follow the steps to fix the drag-and-drop issue by pressing the ESC button:
- Locate a Folder.
- Left-Click on it.
- Press the ESC button while holding Left-Click.
- Release the Left-Click.
This should fix the issue. Now perform the action again and see if you are able to select and relocate your files.
Also, check our epic post on how to 6 ways to fix Windows 10 searching index problem.
2. Restart Windows Explorer
If you are still unable to fix the issue, then you should restart Windows explorer. Because if there is a system glitch, then restarting Windows explorer would fix the issue.
Follow the steps to restart Windows explorer:
- Press CTRL+SHIFT+DELETE.
- Select Task Manager.
- Scroll down and select Windows explorer.
- Restart Windows explorer.
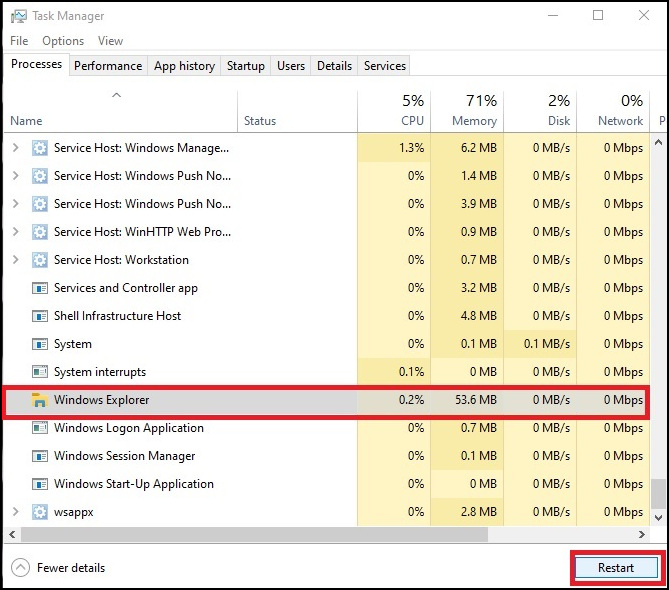
After the restart, your Windows screen will go black and take some seconds to fully back on. You should be able to perform drag & drop after the restart. If you still cannot follow the next method.
Check our epic post on how to turn on auto login in Windows 10.
3. Update Your Windows Version
If you are using an outdated version of Windows, that might be the reason behind this feature not working.
Follow the steps to update your Windows:
- Go to Settings.
- Select Update & Security.
- Click on Check For Updates.
- Download & Install the update.
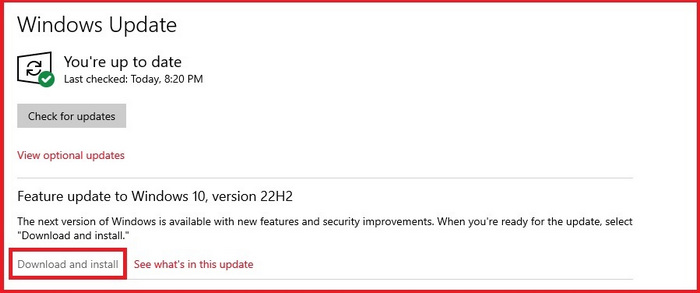
Your Windows will need a restart to install the update completely. So make sure you restart the Windows after you are done installing it.
Quickly check our epic post on how to use password instead of a PIN to log into Windows 10.
4. Update Mouse Driver
Your mouse driver can be another reason why the drag-and-drop feature is not working. You can also download your mouse driver from your manufacturer’s website.
Follow the steps to update the mouse driver in Windows:
- Search for Device Management.
- Open the application.
- Go to Mice and other pointing devices.
- Select your mouse from the drop-down menu.
- Right-click on the mouse.
- Select Update.
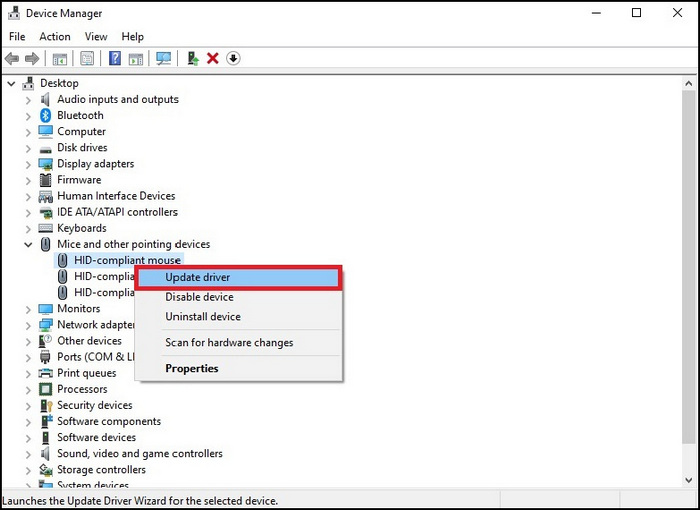
After the update, try out the feature; it should be working.
5. Check For Corrupted Files
If the issue is still there, that means there is a corrupted file in your system. So to clean your system up, you can use the command prompt and run a command to check and fix the corrupted files.
Follow the steps to check corrupted files using the command prompt:
- Go to Search.
- Type in Command Prompt.
- Right-Click on the application.
- Select Run As Administrator.
- Type in sfc /scannow.
- Hit Enter to run the command.
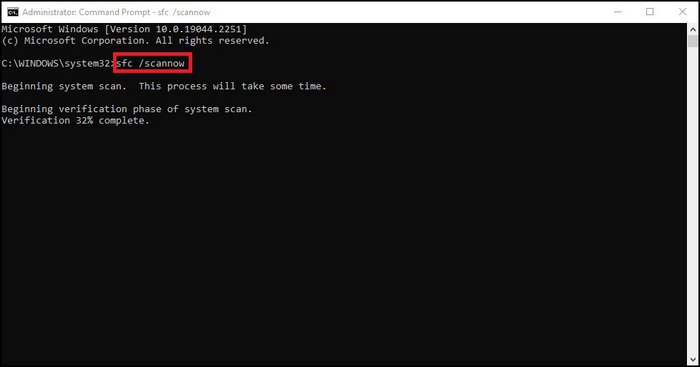
It will take some time to complete the whole process. Wait until the whole process is finished, and then try to move your files using a single click; hopefully, it will work.
6. Use Windows PowerShell
There shouldn’t be any corrupted files after running the SFC scan on the command prompt. However, if you still cannot use the drag-and-drop feature, then you should use Windows PowerShell for a deeper file scanning.
Follow the steps to use Windows PowerShell for file scanning:
- Open Windows PowerShell.
- Run the Program as an Administrator.
- Type in Dism/Online/Cleanup-Image0/ScanHealth.
- Hit enter to run the command.
- Run Dism/Online/Cleanup-Image/RestoreHealth after the first command is done.
This should fix the issue with your corrupted files and system glitch. If you are still facing any issue, follow the next method.
7. Disable UAC Using Registry Editor
If you change the value of UAC using the registry editor from 1 to 0, it will automatically disable the command.
Follow the steps to disable UAC using the registry editor.
- Open Registry Editor.
- Select HKEY_LOCAL_MACHINE.
- Select SOFTWARE.
- Go to Microsoft.
- Drop down Windows.
- Select CurrentVersion.
- Choose Policies.
- Go to System.
- Double Click on EnablelULA.
- Set the Value to 0.
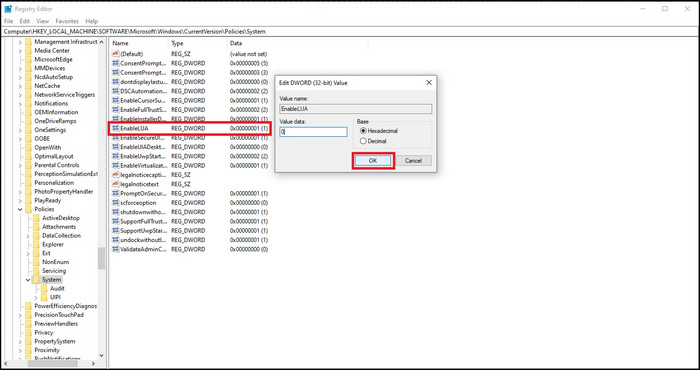
After disabling UAC, restart your Windows PC and run an SFC scan in your command prompt. This should fix the issue with your drag-and-drop feature.
Final Thoughts
If you need to attach a file to an e-mail, you can always use the keyboard shortcuts Ctrl + X and Ctrl + V, or you can navigate through directories and move files using the same method.
However, Drag & Drop feature makes things easier as you are accustomed to it. You can fix the issue by deleting the last action you have taken with your mouse. Simply press the escape button on your keyboard and hold left-click button and then release it; this will undo your last action.
Updating Windows will help to eradicate the issue as well. While you are, these might as well update the mouse driver. Clearing out corrupted files will fix the issue if all the methods you have tried don’t mop up the issue.