Installing windows 10 from a bootable USB drive is way faster than installing it from a Disc Drive, as the transfer rate is much higher.
Also, you might not have a disc drive on your PC, so the only way to install windows 10 is from the USB drive.
In this guideline, I am going to write all steps you need to take to install Windows 10 from a USB flash drive.
To learn how to install Windows 10 using a USB flash drive the right way, read on!
Follow our guide how to turn on auto login in Windows 10.
Why Can’t I Install Windows 10 From A USB?
You are unable to install windows 10 from a USB drive because not all the pendrive support ready to boot format. Also, you have to set your pendrive as your boot option from your motherboard. If your PC doesn’t recognize the USB stick, then you won’t be able to install windows from it.
The USB drive you are trying to boot may not be compatible with Windows 10. USB 1.0 and 2.0 are incompatible, for instance.
Your computer might not be able to read the bootable USB drive if the format is incompatible with your PC’s specifications. A computer that operates in the old BIOS mode, for instance, requires a USB flash drive to be formatted with the NTFS file system. However, if UEFI boot mode is being used, the USB device must be formatted using the FAT32 file system.
That being said, many people cannot create a USB drive to be bootable. A poor creation of setup files would wreck the whole installation process.
Find out how to enable BitLocker in Windows 10 Home.
How Do I Install Windows 10 From A Bootable USB?
In order to Install Windows 10 from a bootable USB, you need to change your BIOS mode to UEFI from Legacy BIOS. Then format your USB to a FAT32 drive. After that, with the help of the windows media creation tool, make your USB drive Bootable.
The suggestion I would like you to consider is changing your BIOS mode to UEFI from Legacy. As UEFI is way faster and you will have a lot of room to customize from.
However, that doesn’t mean you won’t be able to install windows 10 from legacy BIOS. You can, but you have to format your pendrive to NTFS rather than FAT32. But this situation isn’t preferable as Legacy BIOS is outdated and lacks a security firewall.
Follow the steps to Install windows 10 from a bootable USB:
1. Change BIOS Mode
If you are creating a bootable USB drive, then it is preferable to change the BIOS mode from legacy to UEFI.
Follow the steps to change bios mode:
- Restart your PC.
- Enter the BIOS setup by pressing the F2 key.
- Use the Boot Maintenance Manager menu option.
- Navigate to the “Advanced Boot Options” menu.
- Click the “Boot Mode” button.
- Select UEFI as the boot system type.
- Press F10 to save the changes and exit.
Your PC will take a reboot after changing the settings. Now that you have changed the BIOS mode, you have to format your PenDrive and make it bootable.
Here’s a complete guide on how to sign out of Windows 10.
2. Format Your USB Drive
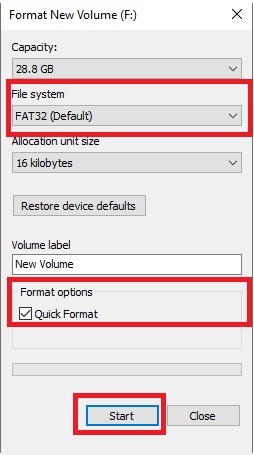
If you have UEFI BIOS, then you have to Format your USB drive to FAT32, and if you are using Legacy BIOS, then you have to format the drive to NTFS or else your motherboard will not recognize the USB drive, and you won’t be able to boot from the USB.
Follow the steps to format your USB drive:
- Connect the USB drive to the PC.
- Get to File Explorer with the mouse, or Pressing Windows + E will open File Explorer.
- Right-click on the USB and choose “Format”.
- Click “Start” after selecting “FAT32” as the file system and the “Quick Format” checkbox.

Diskpart allows you to convert a USB flash drive to a FAT32 file system. To access it, open a command prompt with administrative privileges, type “diskpart” into the search bar, and then type the following commands one after the other.
Follow the steps to format the USB drive using cmd:
- Search DiskPart, which will open the CMD.
- Type in List Disk.
- Write Select Disk X. In Select Disk “X”, type in your USB Disk number.
- Enter Command: List partition.
- Type in Select Partition “X.” In “x,” type in the partition number.
- Enter the command format fs=fat32 quick.
After formatting the USB drive, you have to make the USB bootable with the help of Windows Media Creation.
Follow our guide step-by-step to fix Windows 10 searching index problem.
3. Make Your USB Drive Bootable
The creation of the ISO image on your bootable USB might be a problem that arises during the Windows 10 installation from a USB. A damaged or corrupted USB is the result of utilizing a less-than-reliable version of Microsoft’s Media Creation program to make your USB bootable. So better to use the official one from Microsoft.
Windows 10 won’t be able to be installed properly because of the corruption. A bootable USB that has been compromised cannot be repaired. Meaning you’ll have to start over with the USB drive if you want to get it to boot. Before making the USB bootable make sure you have a FAT32-formatted USB with a flash disk of at least 8 GB in size. Everything on the USB drive will be wiped clean while creating the ISO file.
Follow the steps to make your USB bootable:
- Insert the FAT32 USB Stick.
- Go to the website of Windows Media Creation Tool.
- Click the “Download tool now” button.
- Select “Run.” To utilize this application, you must have administrative privileges.
- Click Accept if you agree to the conditions of the license.
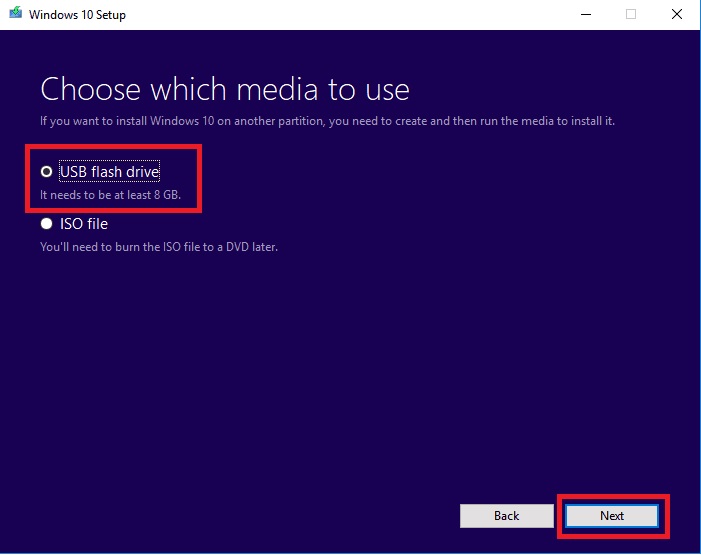
- Choose to Create installation media for another PC from the What do you want to do?
- Click Next.
- Choose the Windows 10 language, edition, and architecture (64-bit or 32-bit).
- Pick which media you want to use: Memory stick with a USB connection.

The process will start. It might take an hour or so, depending on your internet connection.
4. Set The USB As your Primary Boot
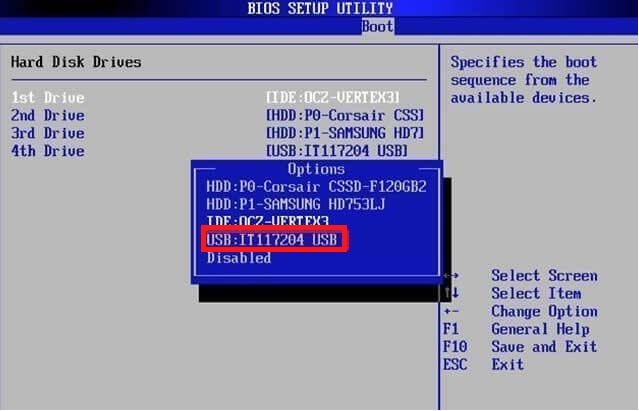
You may need to access a boot menu or modify the boot sequence in the computer’s BIOS or UEFI settings to get your computer to boot from the USB or DVD media. Most computers need you to hit a key (such as F2, F12, Delete, or Esc) soon after powering them on in order to access a boot menu and alter the boot sequence.
Follow the steps to set USB as your priority boot:
- Insert the USB drive.
- Reboot your PC.
- Press F2 to enter BIOS settings.
- Select Boot.
- Change the 1st drive to your USB drive.

After you are done changing the settings, you will be able to install windows 10 from your Bootable USB. In the event that you are unable to boot from a USB or DVD media device, you may need to contact your computer’s manufacturer for guidance on how to disable Secure Boot in the system’s BIOS temporarily.
5. Install Windows 10 From Bootable USB
Now that you have done all the steps, you will be able to install windows 10 from the bootable USB.
Follow the steps to install windows 10 from a USB drive:
- Put the DVD or USB flash drive into the computer.
- Turn your computer back on.
- Access the Windows installation page.
- Select the language you wish to use, the time zone you like, and the keyboard layout you prefer, and then click Next.
- Pick the “Install Windows” option.
The Installation process will take some depending on your PC & your USB drive’s transfer rate.
Final Thoughts
You can install windows 10 from a USB drive by selecting the UEFI boot mode. Then you have to format the USB drive to FAT32. To create the ISO file of windows 10, you have to download the Windows Media Creation tool from the official Microsoft page.
After that, you have to set your USB as the priority boot mode. Then all you have to do is insert the USB drive and install windows 10! Easy, right?
If you still have any queries left, make sure to reach out to us!