If you haven’t upgraded your PC for a long time, you might feel the performance getting slower.
Well, these days, everyone wants a boost in their PC. So why are you lagging behind while you have an option like ReadyBoost to become quicker than before?
You might have heard about ReadyBoost. This feature will make your age-old potato PC run faster than before. This feature is available from Windows Vista to most modern Windows 11. If you are using a PC with Windows 7 and have only 2GB or less RAM, this article is for you.
You may have heard about expanding RAM using USB flash drives or sharing a small part of your HDD. But you are confused about exactly how you can do it! No need to be confused anymore as in this session, I will discuss every trifling thing about ReadyBoostand how you can enable it on your computer. So stay tuned till the end to find out!
What is ReadyBoost?
The concept of ReadyBoost is nothing but the allocation of space of an HDD or flash drive for use as memory when the space of physical memory(RAM) turns out. In other words, when Windows runs out of memory, the allocated space of your HDD or flash drive acts as memory.
It is a much slower memory than usual RAM. But it significantly impacts the PC, which has a low amount of physical memory installed. Physical memory(RAM) usually operates with a greater speed than a conventional HDD or flash drive.
The technique of ReadyBoost was revealed first when Microsoft launched Windows Vista. Windows Vista required a graphical user interface. At that time, people didn’t have much memory and ran out of memory easily. So they get stuck every now and then.
But ReadyBoost came as a blessing for them. However, this is not the permanent solution to the problem. Eventually, you need to expand your physical memory. Considering everything now, let me explain how you can turn on ReadyBoost.
How to Enable ReadyBoost Windows 7
The requirement is only a USB 3.0 flash drive. You can use USB 2.0 but it isn’t preferable. And Windows recommends using a drive that has a storage capacity of twice or at least more than the physical memory. That means if you have 2GB of RAM installed, you need to use at least a 3GB drive, but 4GB is recommended. Now, let’s turn on ReadyBoost.
How to Turn On ReadyBoost
Both hardware and software need to be managed for turning on the ReadyBoost option.
Follow the steps below to turn on the ReadyBoost:
- First, plug in the USB drive on your PC’s USB port. The ports directly connected to the motherboard are preferable for this task.
- Wait for a moment, and the AutoPlay popup will appear on the screen. Among the available options, you have to choose “Speed up my system”
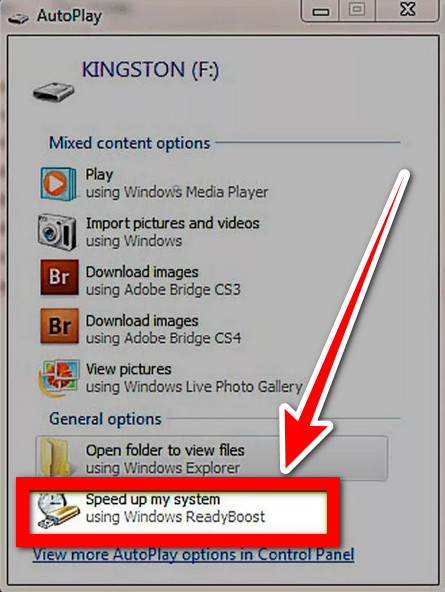
(If you miss the AutoPlay tab, you can go to My Computer and choose the USB drive.)
- Right-click on the targeted drive.
- Head over to properties and click on the ReadyBoost tab.
- Choose Dedicate this device to ReadyBoost.
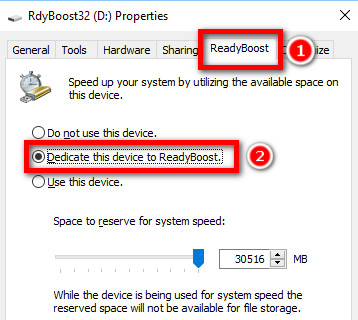
- Now hit Apply, then OK.
Congratulations! Now your USB device is acting as a ReadyBoost device.
Note: Remember, if you choose “Dedicate this device to ReadyBoost, ” you can’t access other files stored in the drive.
To eliminate this problem, you can choose other options available in the ready boost tab. Suppose your Flash drive has 8GB of storage capacity. You can dedicate only half of the storage capacity for the ReadyBoost.
Follow the steps mentioned below to use half of the flash drive memory for ReadyBoost:
- Right-click on the targeted drive.
- Head over to properties and click on the ReadyBoost tab.
- Choose “Use this device” to ReadyBoost.
- Now tune the pointer to fix the amount you want to dedicate for ReadyBoost.
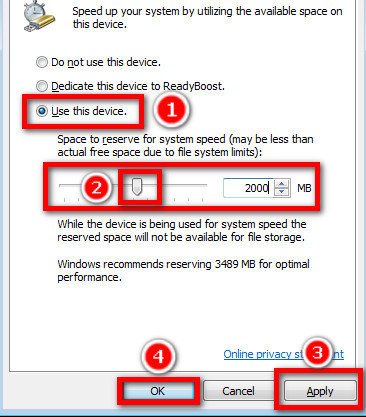
- Now hit Apply, then OK.
Okay, now you know how to configure your drive for ReadyBoost. Then Why are you waiting? Try it on your device.
Are you planning to use your USB drive as ReadyBoost for a lifetime? Absolutely not! So now you need to turn your drive back to normal, right? For that, read the remaining part of the article to know how to disable the ReadyBoost, the pros and cons, and frequently asked questions that may appear in your mind.
You may also like to read about how to fix HDR washed out Windows 10.
How to Turn Off ReadyBoost
I guess you already noticed the available options in the ReadyBoost tab. If not, no worries at all.
Follow the steps below to turn off ReadyBoost:
- Go to the ReadyBoost tab.
- Select Do not use this drive option instead of other options.
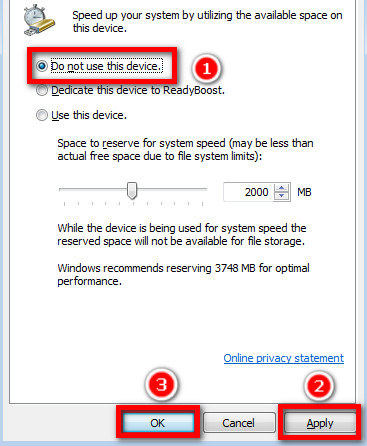
- Now hit Apply and OK.
Great now your drive isn’t used as the ReadyBoost Device anymore. That closes how you can turn on or off the feature in Windows 7.
Note: This process works for both HDD and flash drives.
Related contents you should read about how to use password instead of a PIN to log into Windows 10?
Do You Need the ReadyBoost?
I recommend this feature to those still using Windows 7 or earlier versions of Windows. Because this technique works best for devices with less than 4GB of ram installed. Though I don’t think in 2022, anyone is still using old versions of Windows.
Previously I used this trick on my old PC. There I used an 8GB USB drive to speed up my rig and got a better performance from my PC. It got more responsive while using multiple software at a time. However, that was not up to the mark, like physical memory.
But if you use an SSD, you don’t need to use the ReadyBoost feature, because your storage drive will be more responsive than a regular HDD. So it is just a waste of a USB device or HDD space.
At this stage, I think you have some questions in your mind, and maybe you are planning to search for the answer on the internet. No worries now; I will answer some common queries. Take a look in the next segment to clarify more about ReadyBoost.
But before that, go through our epic guide on how to reduce RAM usage in Windows 10?
FAQs
Can I unplug the USB drive when ReadyBoost is on?
The answer is simply no! The mechanism behind this trick is storing cache memory in the USB drive, which helps the software respond faster. But if you remove the USB drive, the cache file will be lost. And the performance of your PC goes down to normal. So the idea of removing or unplugging the USB is not feasible.
What is the performance level of ReadyBoost compared to the physical memory?
The performance level of ReadyBoost compared to physical memory is very low. A physical memory works rapidly, while a ReadyBoost device is just like a normal storage device. That means the response rate is much lower than the actual RAM.
How long can I use this technique?
This is not a permanent solution. Though there is no time limit on how much time you can use this, eventually, you need to install physical memory. In other words, you can use this as long as the USB drive works fine.
Is NTFS or FAT32 the better file system for ReadyBoost?
NTFS is definitely better for ReadyBoost. Cause there is no size limit on how much storage you can convert to Memory, but FAT32 has limitations. It allows only 4GB of space for this purpose. FAT32 is the latest system of file allocation. It should be faster than other systems, but you need a lot of space to run multiple software simultaneously. Otherwise, again you will fall short of memory, and in the end, you will get lower performance.
Conclusion
If you’ve read everything till now, you’ll know everything about the Windows ReadyBoost. Therefore, you can successfully implement this feature on your PC and enjoy better performance than before. But I recommend installing physical memory if you have an option.
In this session, I have tried to clarify every little thing related to ReadyBoost. Please comment below if you think something I didn’t mention in the article. And don’t forget to share your experience after turning on the ReadyBoost.
Hopefully, this article has saved you some time. We always try our best to provide a compact solution so that you come to know exactly what you are doing and why. If you need further help on any issue, don’t hesitate to contact us. We will reach you with every possible solution ASAP.