Tired of making annoying typos in every sentence you type on Word? Simply enable the built-in spell check tool from Microsoft to catch them. Otherwise, if you find the spell check tool isn’t reliable and only interferes with the workflow, you can just disable it.
As someone who uses Microsoft 365 on a daily basis, I am very familiar with this tool. After keeping it enabled for five years in a row, I decided to turn it off for all my future documents.
You came here to find step-by-step instructions to enable and disable spell check, so I’ll tell you my reason later. For now, just grab a cup of coffee and start reading the next section.
You may also like to read about MS Word table of contents not updating.
How to Activate Spell Check in Microsoft Word?
You can activate spell check in Microsoft Word by opening Word Options from the file menu and configuring the spelling and grammar options in the Proofing category. You can also manually check for spelling by going to the Proofing section of the Review tab.
One point to consider here is that the methods to enable the spelling check functionality in Microsoft Word standalone and web versions are completely different. As a result, I decided to show them separately in this guide.
Keep in mind that the steps to turn on and off Microsoft Word spell check are different. That’s why, I have decided to separate them into sections for your convenience.
Follow these methods to activate spell check in Microsoft Word:
1. Enable Auto Spell Check
If you want Microsoft Word to monitor your keystrokes actively and suggest corrections in real-time, you should enable this tool.
Follow these steps to enable auto spell check:
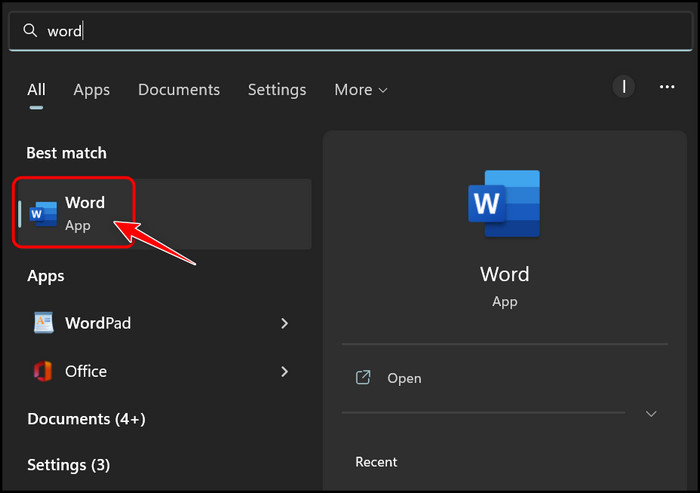
- Go to Start, search for Microsoft Word and launch it. Alternatively, you can launch it from your desktop if you have a shortcut.
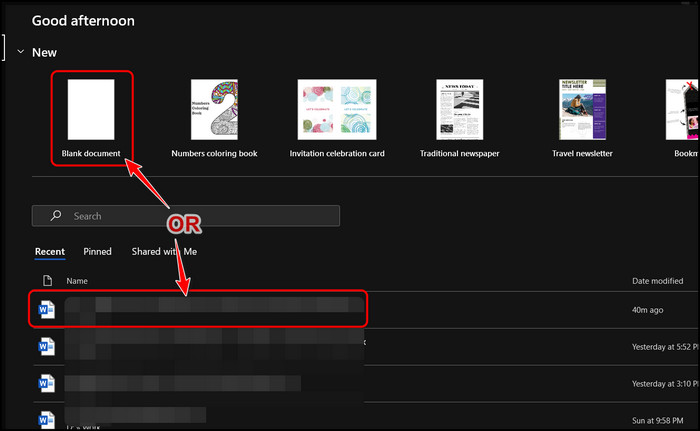
- Create a new Blank Document or open an existing one.
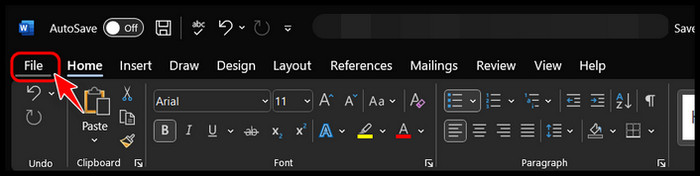
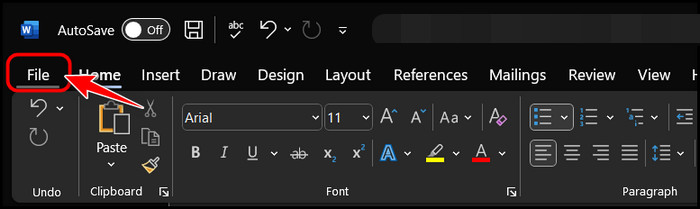
- Click on the File menu at the top left corner.
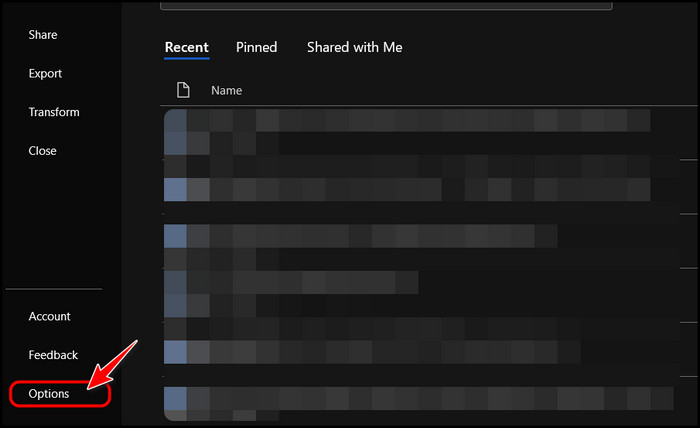
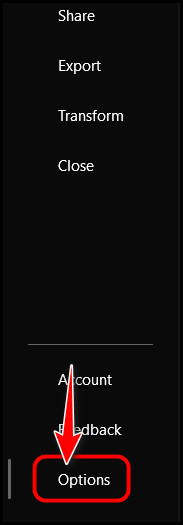
- Select the Options button at the bottom left corner to proceed.
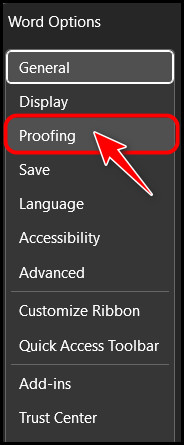
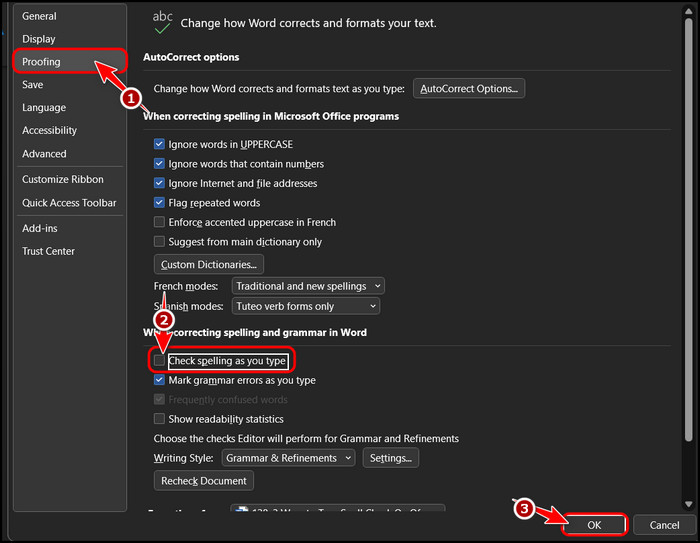
- Switch to the Proofing section of the Options window from the left panel.
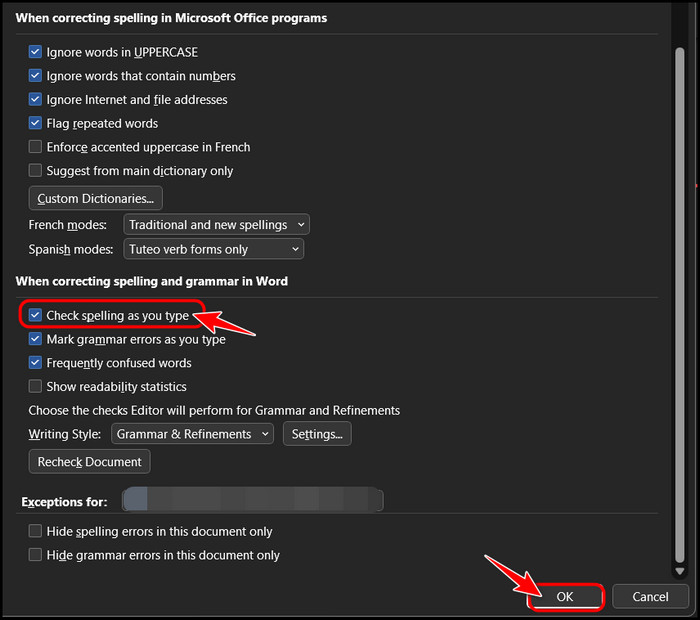
- Enable the checkbox for ‘Check spelling as you type’ under the ‘When correcting spelling and grammar in Word’ Then, click on the OK button to save the changes.
Once you do this, Microsoft Word will analyze every word you type and mark the word with a red underline if it detects a mistake with the spelling.
You can also make Word detect grammatical mistakes by enabling the checkbox for ‘Mark grammar errors as you type’ in the Proofing category earlier. While this may be convenient for most people, some may find the constant detection distracting.
If that’s you, then you can choose to manually run a spell check at the end of your report to find and correct all errors at once. Follow the next method for more information on this.
Related guide on Microsoft Word Ctrl+Z not working.
2. Enable Manual Spell Check
I prefer using this method because there are no annoying interruptions in the middle of my workflow. If you feel the auto spell check is annoying and makes a lot of mistakes, you should give this a shot.
Follow these steps to enable manual spell check:
- Launch Microsoft Word as you did earlier.
- Open an existing document.
- Switch to the Review tab from the top menu bar.

- Go to the Proofing section at the top left corner and either click on the ‘Spelling and Grammar’ button or the Editor button from there.

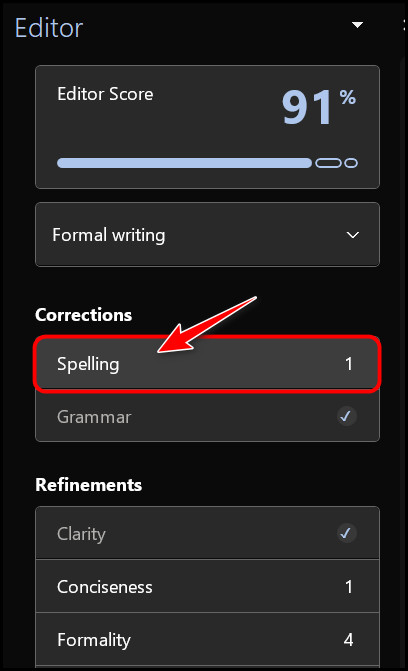
- Click on the Spelling button in the Corrections section on the right panel to expand it.
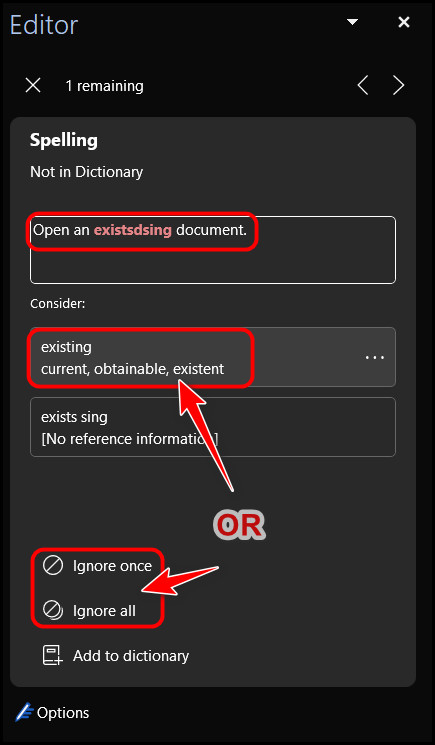
- After that, you will see a sentence preview for the incorrect words and the suggested spellings for them. Please select one of them to replace your word. If you don’t want to apply the corrections, click on the Ignore All button instead.
That’s all you need to do for the spelling part. If you prefer, you can also correct various grammar aspects, like conciseness and punctuation, by scrolling below and clicking on their respective buttons.
As I mentioned earlier, I keep spell check turned off for all my documents. Well, there is actually nothing wrong with Microsoft’s spell checker. It’s just that I have found an external tool called Grammarly that does it better.
Sometimes, the two services offer corrections that are conflicting and in most cases, I prefer Grammarly, which is why I disabled Word’s spell check. However, if you don’t have any third-party service to rely on, you should definitely keep using spell check.
The two methods discussed so far were for the standalone desktop version of Microsoft Word. If you prefer using Microsoft 365 on the go through the browser, follow the next method to enable spell check.
Some more guide on Microsoft Word paste function not working.
3. Enable Spell Check for Microsoft Word Web
The standalone version is more stable and optimized compared to the web variant, but you may want to use the web version because of its portability. You don’t need to spend hours waiting for the program to install.
Follow these steps to enable spell check for Microsoft Word Web:
- Launch any Chromium-based browser like Microsoft Edge, Chrome or Brave and browse the Office 365 website.
- Click on the highlighted Sign in button at the bottom left corner.

- Enter your credentials if asked and log into your Microsoft Account. Note that Windows users may be logged in automatically to the Microsoft account that’s registered to your Windows OS.
- Open an existing document or create a new one by clicking on Word from the left icon.
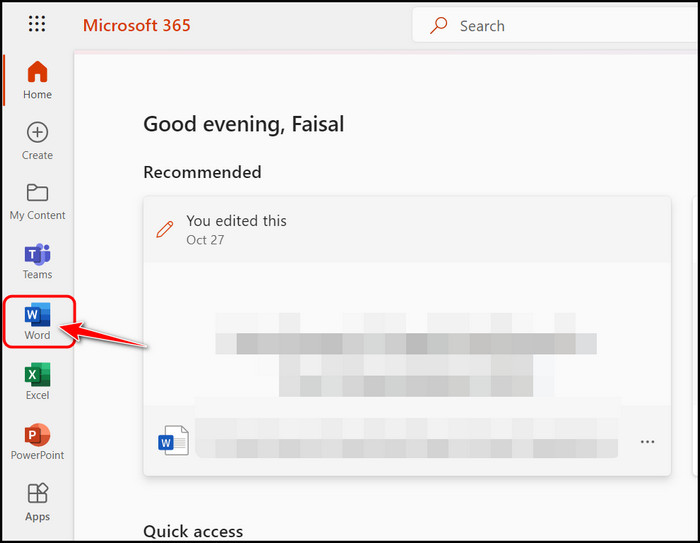
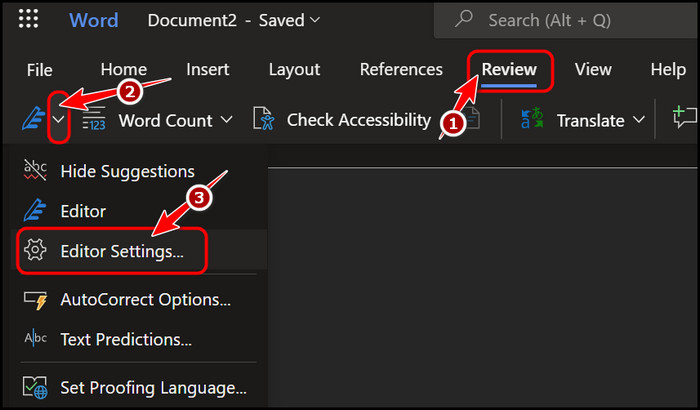
- Switch to the Review tab from the top menu bar.

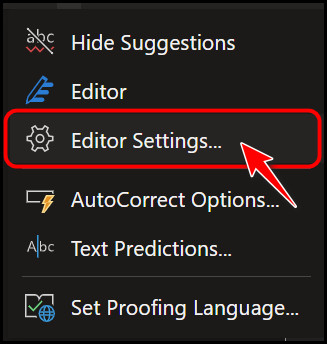
- Click on the small drop-down arrow icon next to the Editor icon in the left corner.

- Select Editor Settings from the menu.
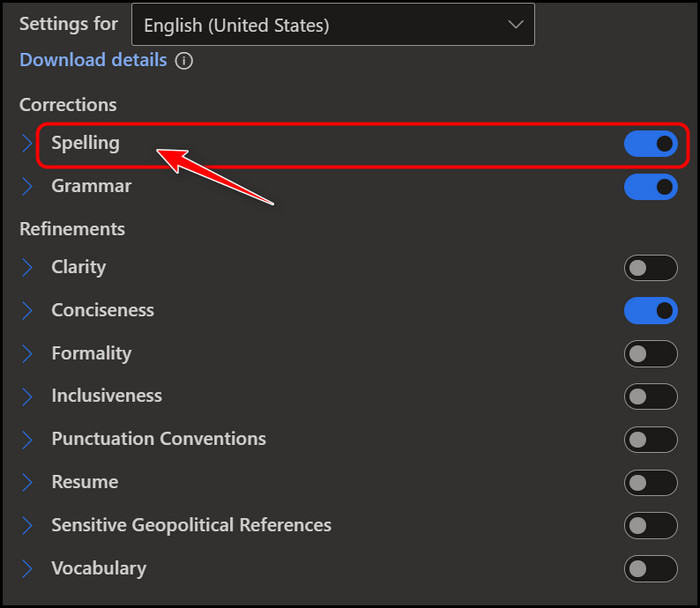
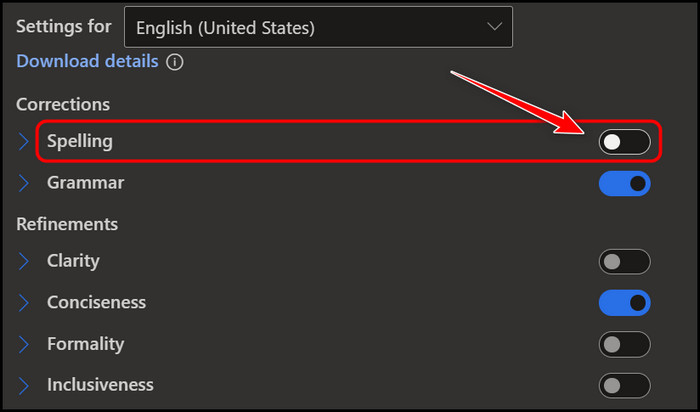
- Enable the toggle for Spelling in the Corrections section.
Now you can type documents in your browser without worrying about typos.
While the Spell check is helpful most of the time, some people may get annoyed if Microsoft keeps it enabled by default. If you are looking for a way to disable this feature, read the next section.
Also related to this guide on Microsoft Word: quotation marks not working.
How to Disable Spell Check in Word?
You can disable spell check in Word by unchecking its option in the Proofing category of Word options. For the web version of Word, you need to navigate to the Review tab, expand the drop-down menu for Editor and disable spelling under its settings.
Follow these methods to disable spell check in Word:
1. Disable Auto Spell Check
Since you can only enable manual spell check by clicking on the Editor button, it’s always disabled. As a result, the only spell check you need to disable is auto spell check.
Follow these steps to disable auto spell check:
- Launch Microsoft Word and create or open a document.
- Click on the File menu at the top left corner.
- Select Options at the bottom left corner.
- Go to the Proofing category and disable the checkbox for ‘Check spelling as you type’ on the right panel. Finally, click OK to save the changes.
That’s it! You won’t see any annoying error underlines as you type your documents anymore. Check out the next method to do the same for the web version.
Read more on how to fix unable to zoom in Microsoft Word?
2. Disable Spell Check in Microsoft Word Web
I’m going to skip the sign-in process for this, as I already showed you how to do that in the previous section.
Follow these steps to disable spell check in Microsoft Word web:
- Go to office.com and open any document.
- Go to the Review tab, expand the Editor drop-down menu and select Editor settings.
- Turn off the toggle for Spelling on the next page to disable spell check.
Windows will stop suggesting corrections when you type on your browser after this.
That’s it! You now know exactly how to turn on or off Microsoft Word spell check.
Related contents you should read about Microsoft Word not pasting correctly, flip quotation marks in Word easily, fix export to PDF error in Word.
Final Thoughts
To sum up, spell check is just like any other tool in Word: you can easily enable or disable it depending on your preferences. If you have never tried it and want to give it a shot, read the first section to experience it.
Otherwise, the second section will help you disable spell check once and for all.
Are you keeping spell check enabled or disabled? Type something to let me know in the comments.