Unlike other internet services where your internet speed depends on the package you are using, Starlink is different. When using Starlink, the signal strength depends on where you put the dish.
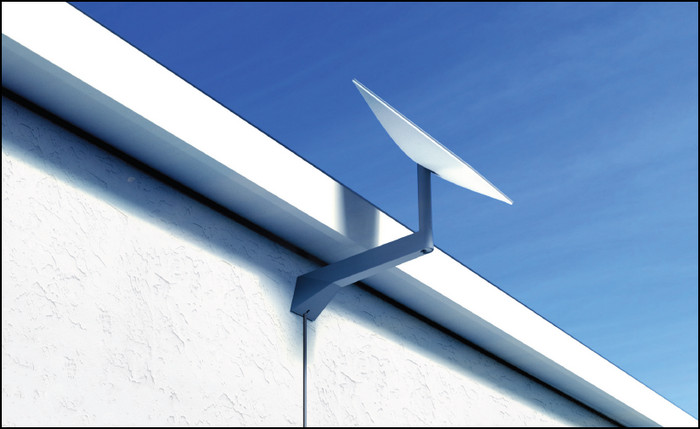
To get the best possible speed, different users had to install their dishes in various places. Some mount them on the roof, some on poles or pipes and some on the side of a wall.
And when you are mounting the dish somewhere with no obstructions, you must know the exact dimensions of the dish and mast.
Here I’ve explained the measurements of the dish and mast and the tools you’ll need to install the dish in various areas.
Let’s start!
What are the Dimensions of the 2nd Generation Starlink Dish?
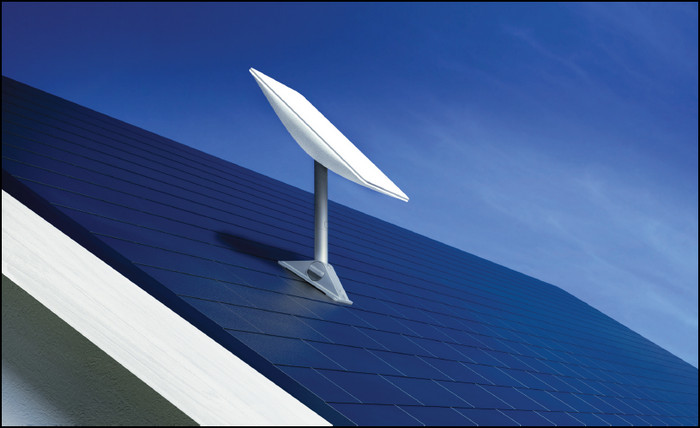
The shape of the 2nd generation Starlink dish is rectangular and smaller than the 1st generation dish. The dish is 20.25 inches (51.44 cm) long and 12 inches (30.48 cm) wide. It weighs about 9.2 lbs (4.2 kg), almost 7 lbs less than the Gen 1 dish.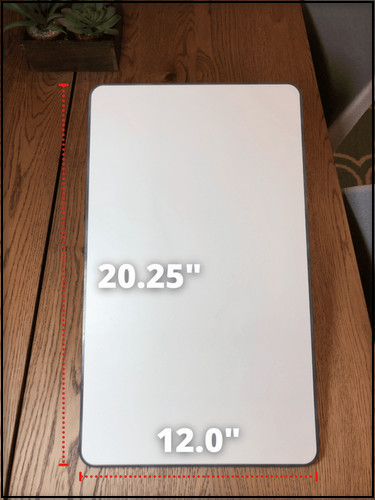
Starlink has made the Gen 2 dish more portable by making it shorter and lighter and adding removable wires, which you couldn’t do in the 1st generation circular dishes.
It can operate from -22°F to +122°F (-30°C to +50°C) temperature. It has an internal heater that can melt ice on its surface at freezing temperatures.
The Starlink dish has an IP54 rating, meaning that it is protected against the amount of dust that could affect regular operations but is not thoroughly dust-tight. It is also protected against water splashing from any angle.
Related contents you should read about how to fix the Starlink disconnected error?
What are the Measurements of the 2nd Generation Starlink Mast?
The pipe-shaped mast, attached to the 2nd generation Starlink dish, is 10.75 inches (27.31 cm) long, including the tip of the mast, which is 2.17 inches (5.5 cm). The diameter of the mast is 1.5 inches (3.81 cm), and the tip is 1.34 inches (3.4 cm).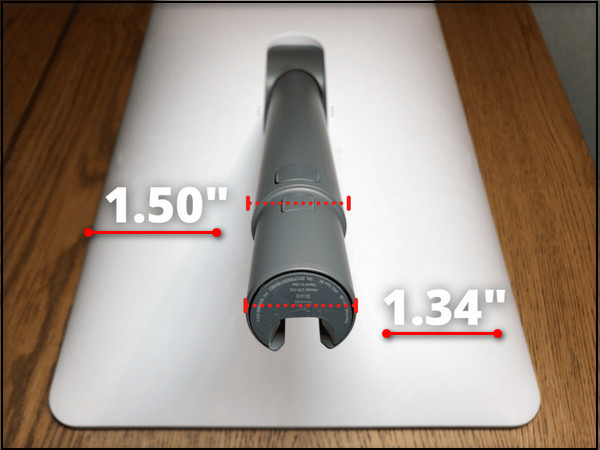
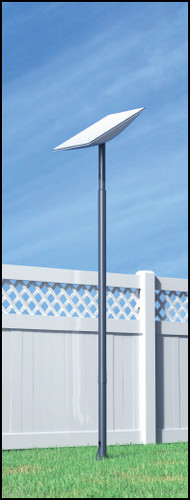
This type of mast allows you to mount the Starlink antenna anywhere you want with ease. You can securely place the dish on any roof you have or mount it on a pole or pipe; you can even mount it on the side of a wall.
In the following section, I’ve described all the tools you can attach to the Starlink dish mast to mount it on different objects and places.
What Tools can You Attach to the Starlink 2nd Generation Dish Mast?
To safely and securely set the Starlink dish in different places, you will need different tools to connect to the antenna’s mast. The Pipe Adapter allows you to mount the dish on a pipe. There are also Short Wall & Long Wall, Ground Pole Mount etc., tools.
Here are the tools to attach to the Starlink 2nd generation dish mast:
Pipe Adapter Mount
The adapter is 5.12 inches (13 cm) long, and the diameter is 3.15 inches (8 cm). The diameter of the more narrow part is 1.49 inches (3.8 cm).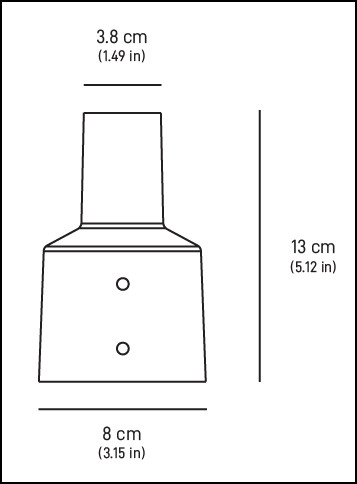
You can attach the Pipe Adapter to any pole with a maximum diameter of 2.5 inches (6.35 cm). You just slide the adapter over the top of the existing pole, put the screws in, and drop the Starlink dish mast.
You’ll need a 7/16 inches (11.1 mm) Socket Wrench to install the Pipe Adapter Mount.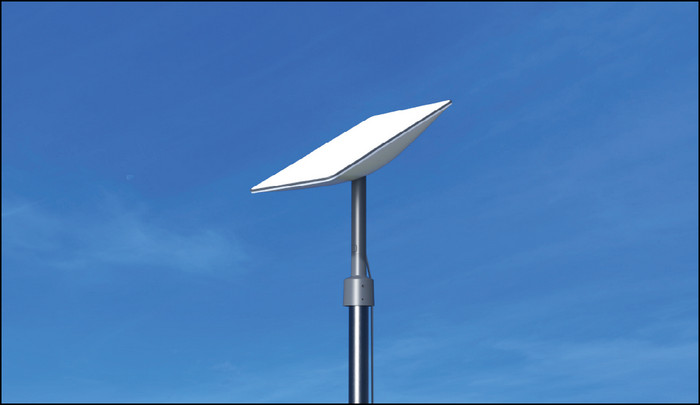
Short Wall Mount
This wall mounting tool is 6.02 inches (15.3 cm) long and 2.77 inches (7 cm) wide. You can install it on an exterior wall near the top of the roof.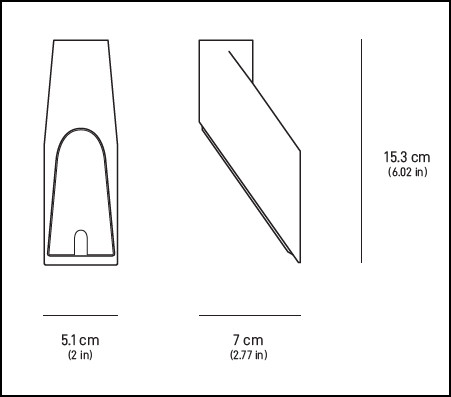
Here’s the list of tools you need to install the Short Wall Mount:
- Stud / Electrical Finder.
- Socket Wrench.
- 5/32” (4 mm) Drill Bit.
- 5” x 2.5” (12.5 mm x 63.5 mm) Socket.

Long Wall Mount
This wall mounting tool is 16.8 inches (42.7 cm) long and has a maximum width of 4.44 inches (11.3 cm). You can also install it on an exterior wall near the roof, but the extra length provides clearance for overhang.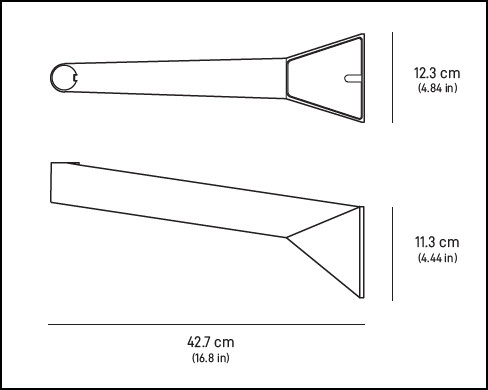
Here are the tools you need to install the Long Wall Mount:
- Drill.
- Stud / Electrical Finder.
- Socket Wrench.
- 5/32” (4 mm) Drill Bit.
- 5” x 2.5” (12.5 mm x 63.5 mm) Socket.
Ground Pole Mount
This is a 44.45 inches (112.9 cm) long pole. When roof or wall mounting is not possible, you can use this mount for in-ground installation.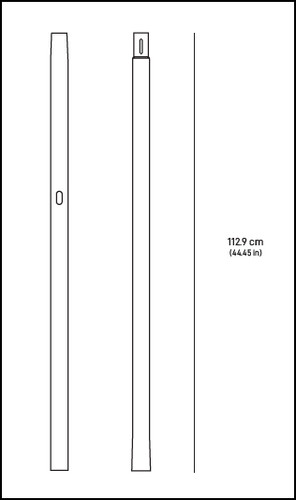
Here’s the list of tools you need to install the Ground Pole Mount:
- Shovel.
- Mortar Hoe.
- Mixing Trough/Bucket.
- Concrete Mix.
- Water.
Pivot Mount
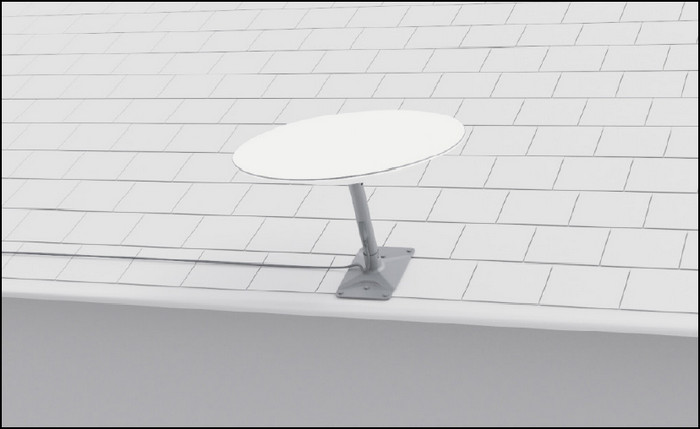
This tool is 6.14 in (15.6 cm) long and 8.66 inches (22 cm) wide. It is used for mounting the Starlink dish on shingled roofs. You should install it closer to the edge for cable routing.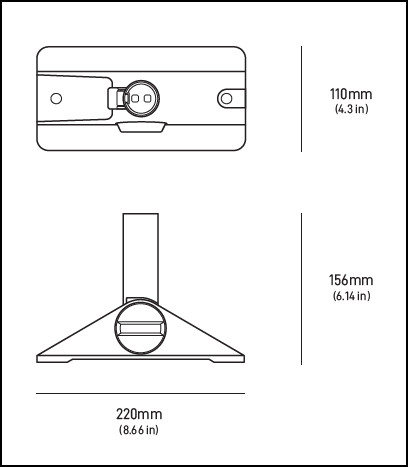 Do not use the Pivot Mount tool for tile, slate, and clay roofing. For best results, set the dish as close to vertical as possible in the tool.
Here are the instruments you need to install the Pivot Mount:
- Drill.
- 5/32” (4 mm) Drill Bit.
- 1/2” (12.7 mm) Socket Wrench.
What are the Measurements of the 1st Generation Starlink Dish & Mast?
The circular 1st generation Starlink dish has 23.2 inches (58.9 cm) diameter and weighs about 16 lbs (7.3 kg). It has an 11 inches (28 cm) long mast. The diameter of the mast is 1.5 inches (3.82 cm), and the more narrow part is 1.41 inches (3.58 cm).
Without any mounting tools or stands, the surface of the Starlink Gen 1 dish stays about 15 inches (38 cm) above the ground. The maximum width of the dish is 4 inches (10.16 cm).
Similar to the Gen 2 Starlink dish, the 1st generation dish supports a variety of mounting tools for easy installation at any place.
In the next section, I’ve described all the tools you can attach to the Starlink Gen 1 dish mast to mount it on different objects and places.
Follow our guide to know about does Starlink work well in bad weather?
What Tools can You Attach to the Starlink 1st Generation Dish Mast?
For a secure installation of the Starlink dish in different places, you’ll need different tools to connect to the antenna’s mast, such as the Volcano Mount, which lets you mount the dish on shingled roofs. There are also Pipe Adapter Mount, Flashing Mount etc.
Here are the tools you can attach to the Starlink 1st generation dish mast:
Pipe Adapter Mount
This tool is 7.5 inches (19.05 cm) long, and the diameter is 2.86 inches (7.26 cm). The diameter of the more narrow part is 1.68 inches (4.28 cm).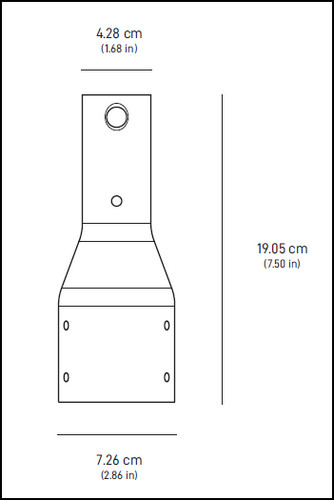
You can secure the Pipe Adapter to any pole with a maximum diameter of 2.5 inches (6.35 cm). You need to slide the adapter over the top of the existing pole, put the screws in, and drop the Starlink dish mast.
You’ll need a 7/16 inches (11.1 mm) Socket Wrench to install the Pipe Adapter Mount.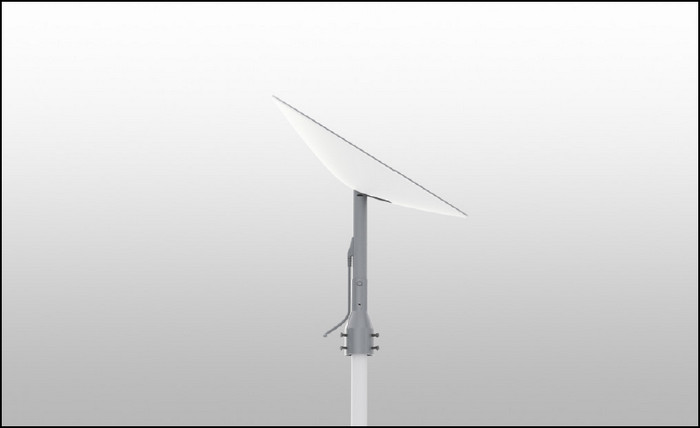
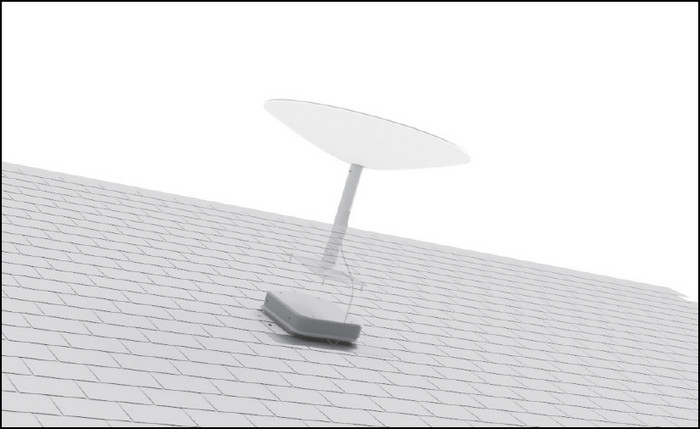
Volcano Mount
This tool is 9.04 inches (22.96 cm) long and 6.16 inches (15.6 cm) wide. You can use it for installation on shingled roofs but not for tile, slate, and clay roofing. You need to set the Starlink dish in the Volcano Mount within 35° of vertical.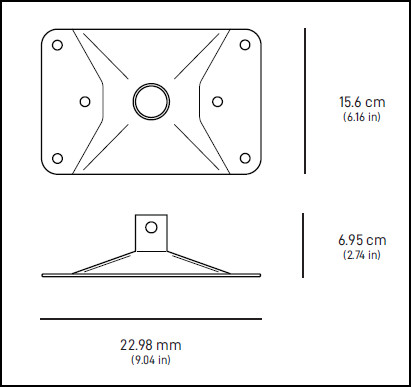
Here’s the list of tools you need to install the Volcano Mount:
- Drill.
- 5/32” (4 mm) Drill Bit.
- 1/2” (12.7 mm) Socket Wrench.
Flashing Mount
This tool is 10.58 inches (26.89 cm) long and 9.07 inches (23 cm) wide. It provides water-tight protection when installing the dish on shingled roofs while delivering extra storage for cables.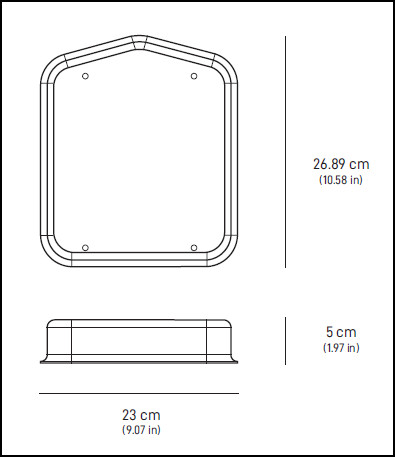
Here’s the list of instruments you need to install the Flashing Mount:
- Drill.
- Phillips Head Drill Bit.
- 5/16” (7.9 mm) and 7/16” (11.1 mm) Socket Wrenches.
- 7/16” (11.1 mm) Wrench.
- Utility Knife.
- Pry Bar.
- Roof Cement.
- Stud Finder.
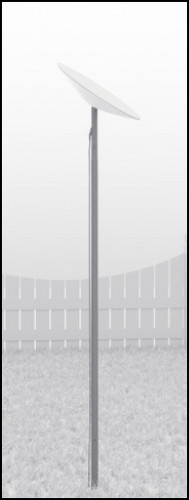
Ground Pole Mount
It is an 89.94 inches (228.45 cm) long pole. When roof or wall mounting is not possible, you can use this mount for in-ground installation.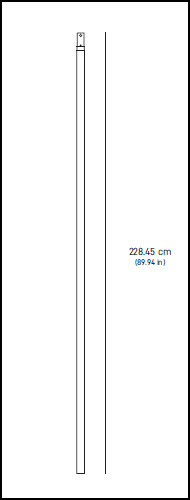
Here’s the list of tools you need to install the Ground Pole Mount:
- Shovel.
- Mortar Hoe.
- Mixing Trough/Bucket.
- Concrete Mix.
- Water.
What are the Measurements of Other Starlink Equipment?
Along with the mast-attached Starlink dish, you also get a wireless router, a mounting base, and an ethernet cable in the Starlink kit box. You should know the dimensions of these components to clearly understand the Starlink installation process.
Here are the measurements of the Starlink equipment:
Starlink Router
The router is 7 inches (17.78 cm) wide, 10 inches (25.4 cm) tall, and the thickness is 2.5 inches (6.35 cm).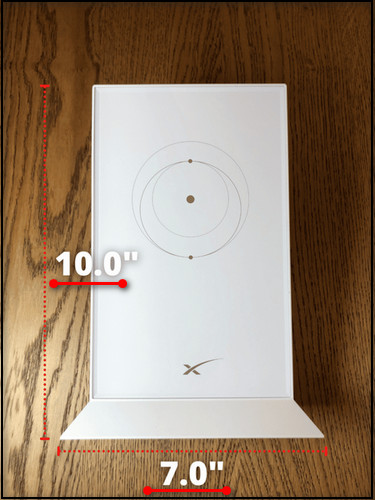
Mounting Base
Starlink mounting base is 22 inches (55.88 cm) long and 12.88 inches (32.7 cm) wide. It sits 4.75 inches (12.07 cm) above the ground. In the mounting holes of the base, 1/4 inch or M6 screw/bolts would work correctly.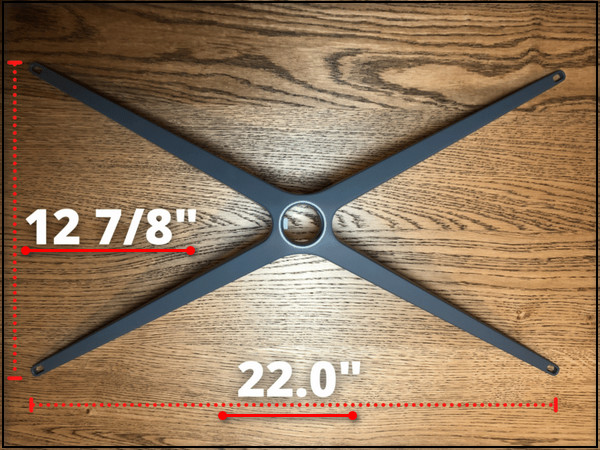
Starlink Cable
The cable is 75-foot long, and as it is removable, you can replace it in case of damage. You can also purchase the 150-foot long Starlink Cable from the Starlink Kit if you need additional length between the dish installation location and the router.
Also, check out our separate post on how long is the waitlist for Starlink?
FAQs
What are the dimensions of the Starlink router?
The Starlink router is 7 inches (17.78 cm) wide, 10 inches (25.4 cm) tall, and 2.5 inches (6.35 cm) thick.
What size pole is needed for Starlink dish?
For the Gen 1 Starlink dish, you’ll need an 89.94 inches (228.45 cm) long pole. For the Gen 2 Starlink dish, a 44.45 inches (112.9 cm) long pole.
What size pipe does Starlink use?
Starlink uses a pipe with a diameter of 1.5 inches, such as the Winegard DS2000A.
Final Thoughts
When using the Starlink internet service, the placement of the dish matters the most. It controls everything, from speed to latency to outages. And your ideal dish area is unique to you only.
Here, I’ve described all the dimensions of the Starlink dish and mast and all the tools you’ll need to mount the dish in your ideal location, wherever it is.
Let me know if you have further questions regarding the installation process of the Starlink unit. See you in the comment section.