Starlink Internet is a name in the broadband satellite internet market that created a stir among enthusiasts and regular rural users alike. Their promise to cover the whole world with low latency, high-speed broadband internet really has made an impression.
Are you someone who just ordered a Starlink internet subscription or thinking about getting one but not sure about what way your satellite “Dish” should face?
Here in this article, I go through all the necessary details about how the Starlink internet dish has to be oriented to get optimal network strength. Let’s dive in!.
What is The Starlink Dish?
The Starlink dish, also known as Dishy McFlatFace, is an antenna designed to receive or broadcast information through radio waves to or from the Starlink satellite constellation in Low Earth Orbit (LEO).
The user terminal is a flat piece of hardware about the size of a pizza box and is equipped with phased array antennas for tracking satellites. The terminal can be installed in any location so long as it has a clear view of the sky.
Conventional satellite dish antennas accomplish their function by utilizing the parabolic form of the dish to reflect the signal onto the focal point of the dish. A device known as a feedhorn is often positioned on brackets at the dish’s focal point.
This feedhorn serves as the front-end of a waveguide, which sends the signals to a low-noise block downconverter, also known as an LNB. Hence, the signals are gathered at or around the focal point.
The LNB is responsible for shifting the communications from the downlinked C-band and/or Ku-band range into the L-band range and converting the signals from electromagnetic or radio waves into electrical signals.

These phase shifters can electronically change the phase or signal delay, allowing the beam of radio waves to be directed in a different direction.
As a result, it is able to track the moving satellites to provide an optimal connection in high-speed scenarios, such as when the user is travelling in a moving vehicle or on a high-speed train.
Related contents you should read can you cancel Starlink internet anytime?
What Is The Best Place to Set Up Your Starlink Dish Antenna?
Starlink is significantly more susceptible to interference than its competitors, such as Viasat or Dish Network. The dish needs a view of the sky free of obstructions.
The dish will need to be put at a higher elevation if there are a lot of trees and other large objects in the area surrounding your home. Those who live in regions devoid of large trees can mount it lower on the roof.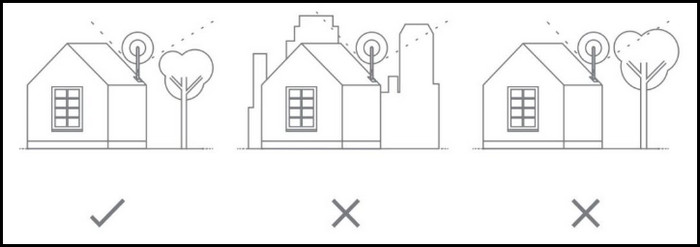
However, they must still be mindful of other potential obstructions, such as chimneys or buildings.
Fortunately, Starlink makes it simple to determine whether or not a potential mounting site is appropriate. Using the Starlink app, you can use the camera on your phone to check for obstacles. This should be done before you attempt to install the dish in that particular place.
Here is how to detect obstructions while using the Starlink app:
1. Use The Camera in The App
You can look around using the camera on your phone for anything that might be in the way. Open the app when you are standing where you want to mount the Starlink dish.
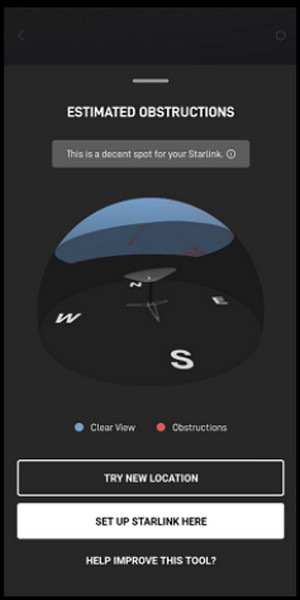
Use the app’s obstruction detector to determine whether or not Starlink will have an unobstructed view of the sky. This will provide you with an overall picture of the obstacles in that area. 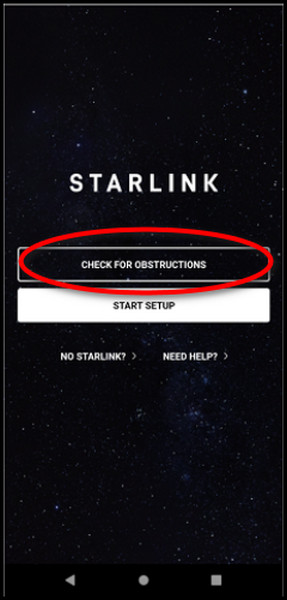
2. Let The Antenna Sit in The Environment for Some Time
If possible, position your dish using the tripod mount that came with it in an appropriate location close to where you believe you would like to permanently put it. You should give the app at least a day and a half to gather data.
After the time has passed, you should check back to see how your field of view has changed. 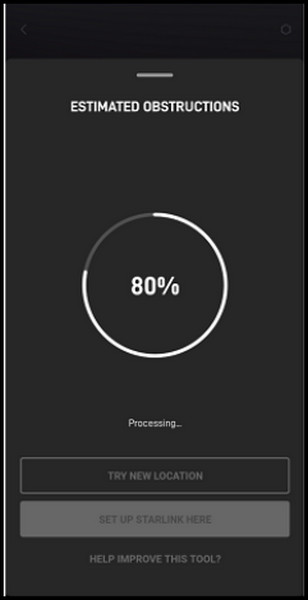
If the quantity of obstacles is not low enough according to the data, you will need to either move the dish to a less obstructed location or raise it, so it has a greater height to obtain a suitable field of vision.
Follow our guide about Starlink Vs. Viasat
Which Way Should The Dish Face?
Although it depends on where you live in the world, Starlink dishes are usually oriented at a nearly vertical angle, as it provides a wide field of view at various angles.
Even if the satellites are positioned farther toward the north or south, Starlink still requires a clear view of the sky in all directions surrounding it.
The only method to determine which way your dish will point after mounting is to utilize the obstacle detector tool in the Starlink app where you intend to install it. Using the tool will inform you in which region of the sky the Starlink has absolutely no obstructions to receive a reliable signal.
Some users have experienced difficulties after mounting the dish in a position that is too close to chimneys or other obstructions, which causes an error message to be displayed on the app whenever the dish cannot move freely.
When you install the satellite dish for Starlink, you need to be sure that it has a clear view of the sky. If the dish is in a heavily wooded area, you will need to find a spot where it can be seen clearly from above.
This is especially important if the dish is being used for aerial surveillance.
How to Orient My Starlink Dish For Optimal Connection?
The satellite dish used by Starlink is motorized and can align itself automatically. Once it has been erected following Starlink’s guidelines, the user is not required to aim the dish in any direction.
As a matter of fact, if you try to move the dish by hand, you can end up damaging the motors that are located inside.
The Starlink dish will automatically align to the Starlink satellites without requiring you to aim or alter its orientation. If trees or structures begin to obscure the view, you may, on the other hand, be required to relocate the mounting site.
The dish has unrestricted mobility. It may spin and tilt on its own at any time. If required, the Starlink dish will align itself by moving with its electric motors. It doesn’t need to be moved constantly if it’s being used normally.
After it has been locked to the satellite constellation, the dish does not have to re-adjust itself. During the initial phase of Starlink’s booting process, the system will determine the optimal dish orientation.
Moreover, the dish doesn’t have to move to track satellites. Due to the fact that Starlink antennas are phased arrays, they can adapt to the signal without the dish having to be physically moved.
Starlink will automatically aim for the satellite that provides the best reception, even while installed on moving objects.
However, you must remember that using Starlink in motion is not supported at the moment, and doing so will render your warranty null and invalid.
Some more guides on Starlink Setup and Install Guide.
Conclusion
The Starlink Dishy McFlatFace can face different directions depending on where you are in the world. The dish lines up itself and doesn’t need to be aimed. It will tilt and spin on its own to achieve maximum signal strength.
When mounting the Starlink dish, obstacles are the main thing to watch out for. Using the Starlink app, you should look for things like trees in the area where you want to mount the dish. Without a clear view of the sky, Starlink won’t work properly.