Excel is an excellent tool for storing, modifying, sharing, and analyzing data. Microsoft’s spreadsheet tool is used all over the world. A common problem people talk about when using Excel is that the gridlines of a spreadsheet do not print automatically.

If you are facing the same problem, do not worry. I’ve got you covered. I have been working on Excel for years and have enjoyed it. As someone who has faced his fair share of struggles trying to operate Excel, I wanted to help those who are relatively new to Excel.
I will show you how to show gridlines when printing in Microsoft Excel.
So keep reading this article until the end to learn how to print from Excel with gridlines.
How to Print from Excel with Gridlines?
It is not difficult at all to print with gridlines from Excel. You just need to keep a specific Print check box checked. The option is easy to find and will only take a few seconds of your time.
Even if you miss that, you can later modify the page setup settings when printing.
Here are the methods you can use to print from excel with Gridlines:
1. Turn on the Print Gridlines Option
You can turn on print gridlines by finding the checkbox and checking it under Gridlines in the Page Layout tab. Using this method, you do not have to modify the page every time to enable the printing of gridlines.
Follow these steps to turn on the print gridlines option:
- Choose the worksheet or worksheets you want to print.
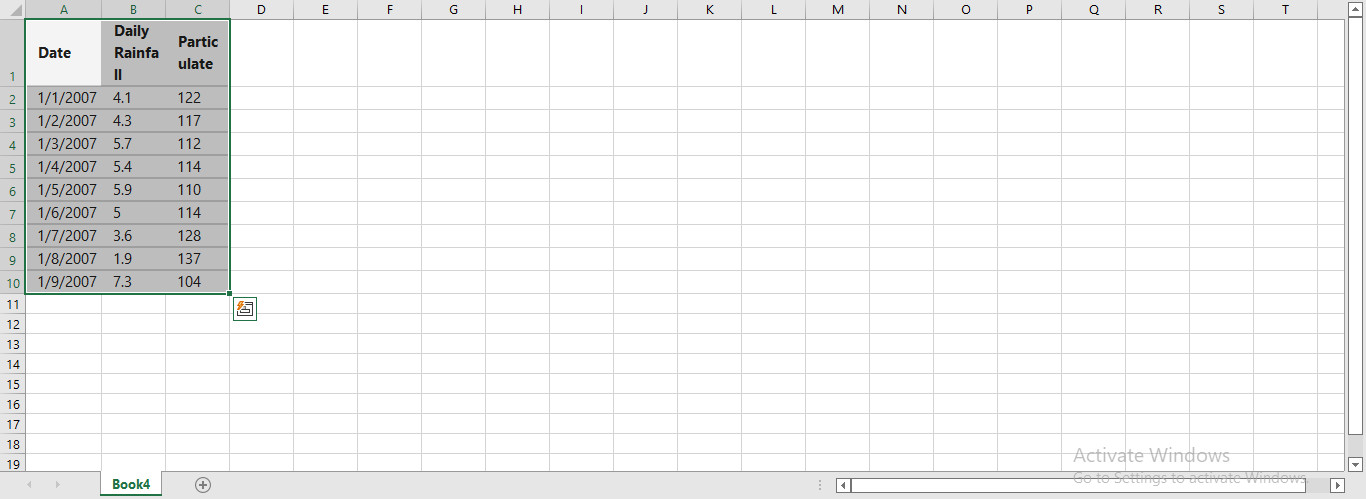
- Click on the Page Layout tab unless it is already the active tab.
- Select the Print check box under Gridlines next to Headings in the Sheet Options group.

- Click Print after selecting the File tab. You can also use the keyboard shortcut Ctrl+P.
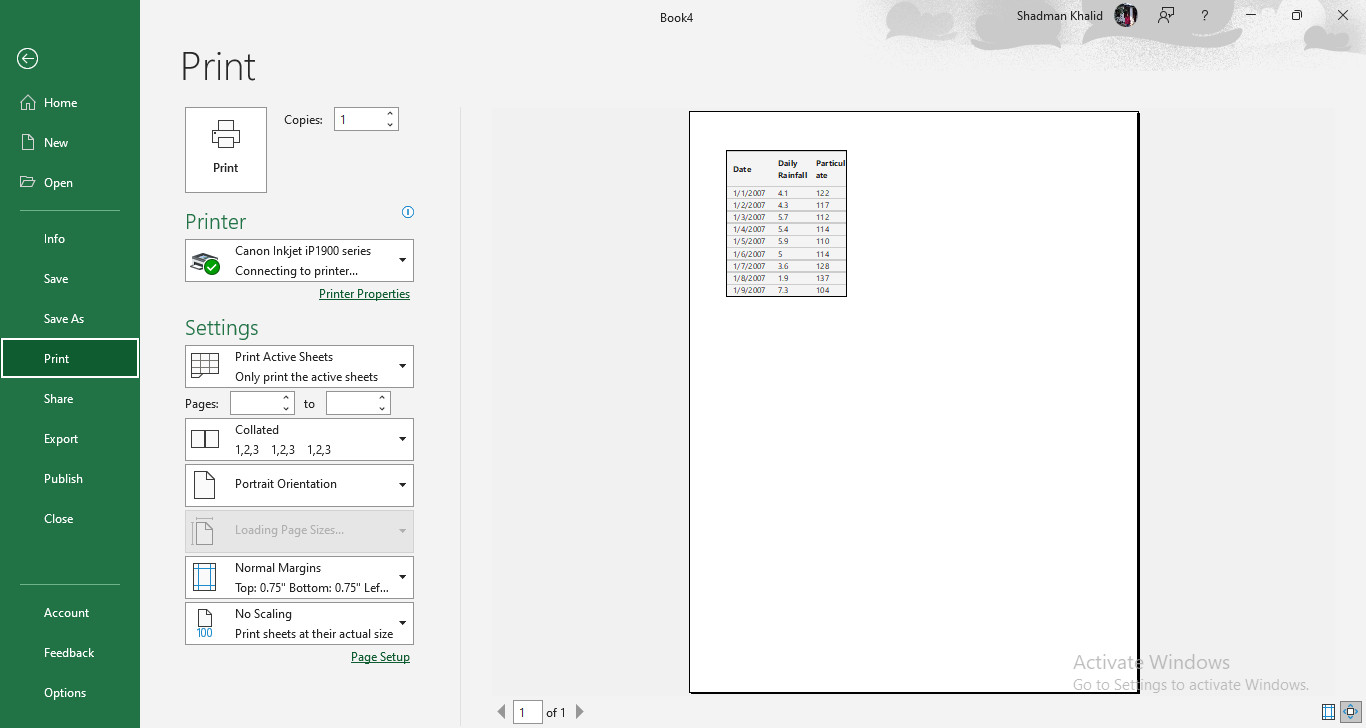
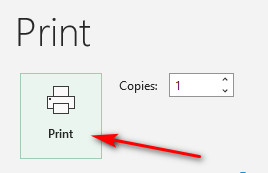
- Select Print from the menu.
You can check the print preview to see if the gridlines do appear. It should appear if you have followed all the steps correctly.
If the Sheet Options group checkboxes seem faint, you may have selected a worksheet object such as a chart, image, or another similar object. You can use the checkboxes if you choose to undo that selection.
The title bar at the top of the worksheet displays [Group] when numerous worksheets are selected. Click any worksheet not chosen in a workbook to clear the selection of multiple worksheets.
if there is no unselected sheet visible, right-click the tab of a selected sheet. Then click on Ungroup Sheets, and this should unselect the sheets.
Also, check out our separate post on add leading zeros in Excel.
2. Modify the Page Set Up Settings to Print Lines in Excel
From the previous section, we know that you have to turn on the Print gridlines option in the Excel ribbon to print with gridlines from Excel.
There is no need to worry if you fail to check the checkbox mentioned above. You can accomplish the same thing during printing from your page setup options.
Follow these steps to set up the Page Set Up settings to print lines in Excel:
- Click the Page Setup link inside the Print Settings list.
- Navigate to the Page Setup dialog box and click on the Sheet tab.

- Select the Gridlines checkbox in the Print section.
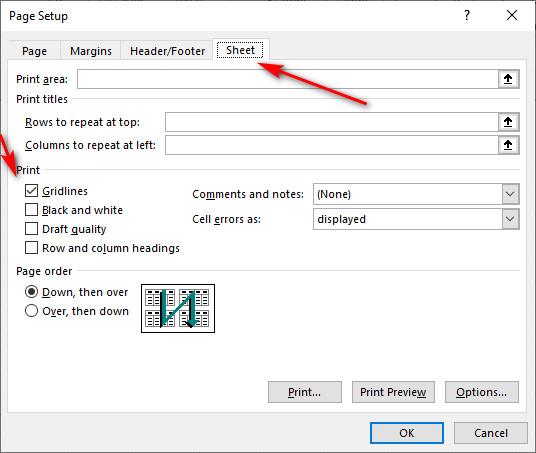
- Click OK to finish the process.
Gridlines should appear on the print preview. If everything looks okay, you can proceed to print the spreadsheet data.
Excel does not print gridlines surrounding empty cells in a worksheet. Use the Print Area icon to define the range if you also wish to print blank rows and columns.
Related content you should read how to remove password from Excel file.
How to Change the Color of the Printed Gridlines in Excel?
You can customize the color of the gridlines when printing in Excel. Gridlines in Excel spreadsheets are light gray by default. If you’re printing a grid-based sheet in color, you can alter the line colors to make them look more appealing.
Follow these steps to change the printed gridlines color:
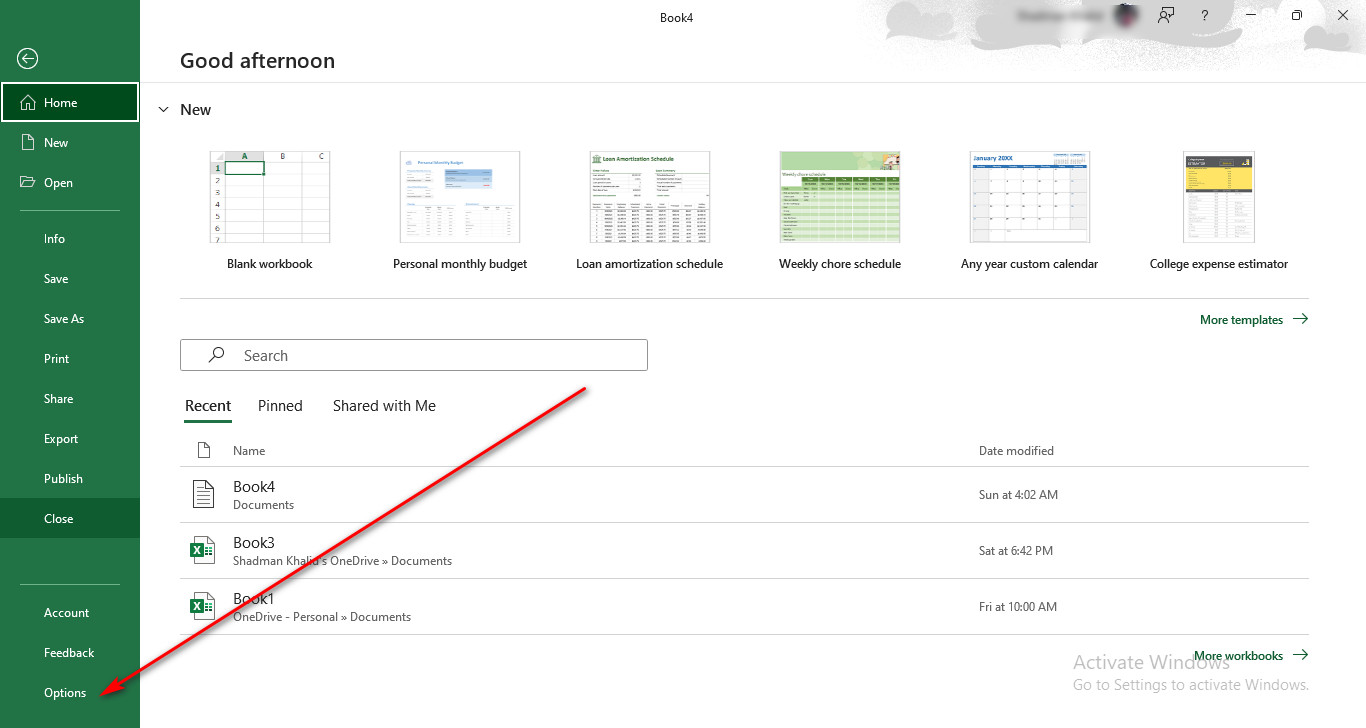
- Select the FILE tab from the Excel Ribbon.
- Choose Options from the FILE menu to launch the Excel Options dialog. On the Excel Options window’s left pane, select the Advanced category.
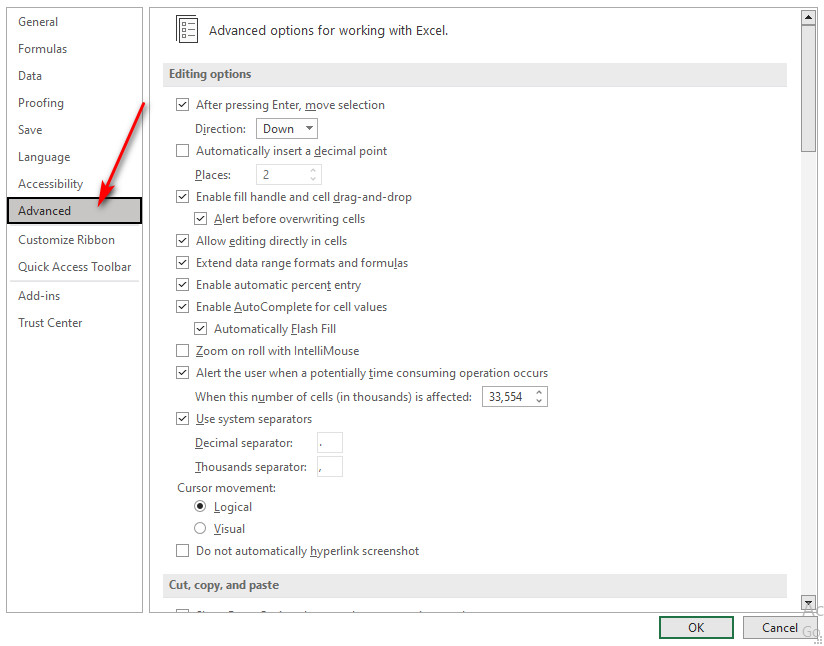
- Go to Display options for this worksheet by scrolling down.

- Choose the sheet from the drop-down menu where you wish to alter the color of the grid lines. You must select the Show gridlines checkbox.
- Click on the tiny arrow next to the Gridline color.

- Select the desired hue, then click OK.
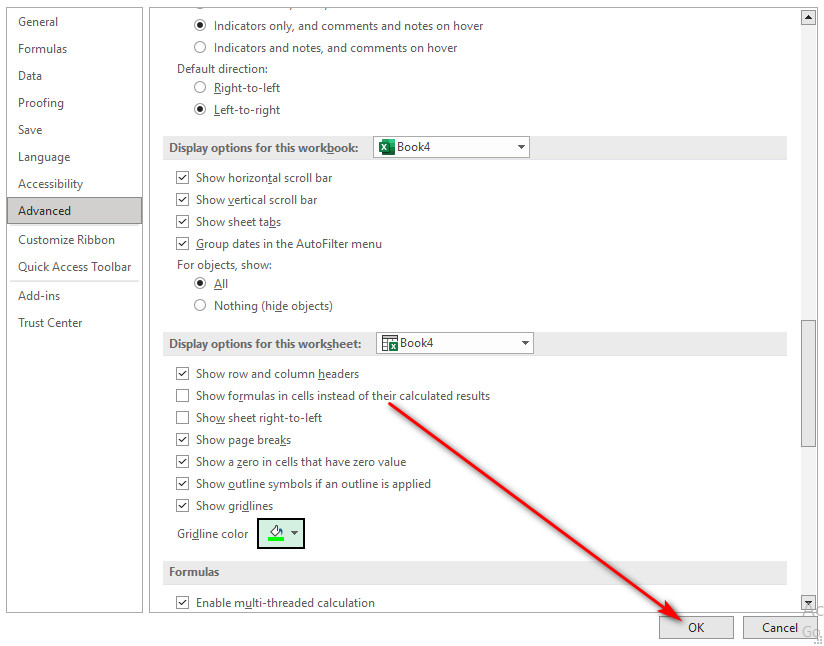
If you have followed the steps correctly, you should now be able to choose your desired color. You’ll see that colored lines correctly delineate the borders of each cell.
They will maintain the rows and columns of data aesthetically arranged, making it easier for you to understand information on the printed version of your spreadsheet.
Some more guide on how to autoFit columns in Excel file.
How to Check the Print Preview on Excel?
I have mentioned checking Print Preview before to know if the steps you have applied work or not. If you do not know how to check print preview, then there is no need to worry.
Checking Print Preview in Excel is pretty straightforward. When you Ctrl+F2, the File tab opens, and a printed worksheet preview appears. Only the actual data in a worksheet’s gridlines print. 
You must adjust the print area to include empty cells if you wish to print gridlines around those cells as well. You might also apply borders around the cells you need to print.
How to Troubleshoot Printing Issues with Gridlines in Excel?
If you have followed all the steps correctly, but gridlines still do not show up when printing from excel, you can try taking some steps to troubleshoot the problem.
If you have tried checking the print preview on excel and the gridlines do not show up, you can immediately start the troubleshooting process.
Follow these steps to troubleshoot printing issues with gridlines in Excel:
- Click on the Page Layout Alternatively, you can press Alt+P.
- Navigate to the Page Setup dialog box and click on the Sheet tab. On the keyboard, you can press S,P successively after pressing Alt+P to open the Page Setup dialog box.

- Uncheck the Draft quality checkbox under Print.
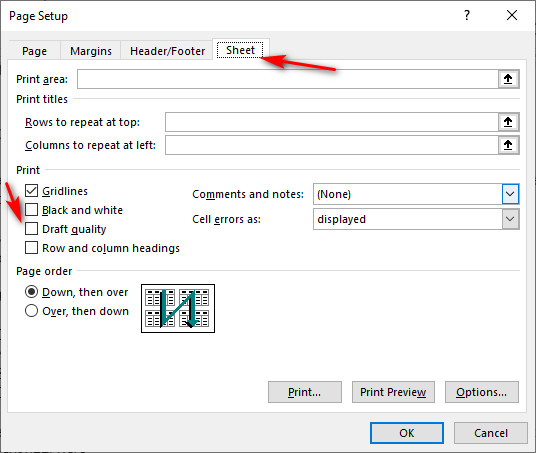
This should solve the problem. Gridlines might not print correctly if your printer driver is faulty. Try downloading the most recent driver from the printer manufacturer’s website. You can draw boundaries around the cells you want to print.
Check out the easiest way for how to find a circular reference in Excel.
How to Print Column and Row Headings in Excel?
Excel does not print column and row headings in excel by default. However, you can turn on the option to do so. The process is similar to how you turn on the option to print gridlines.
Follow these steps to turn on the print headings option:
- Choose the worksheet or worksheets you want to print.

- Click on the Page Layout tab unless it is already the active tab.
- Select the Print check box under Headings next to Gridlines in the Sheet Options group.

- Click Print after selecting the File tab. You can also use the keyboard shortcut Ctrl+P.

- Select Print from the menu.

You should now see the column and row headings in the print preview.
Follow our guide for how to add a total row in Excel.
FAQ
Why should I print from Excel with gridlines?
When reading data on worksheets printed in Excel, gridlines and row and column titles can be helpful. We’ll demonstrate how to activate a few options so that the gridlines, row headings, and column headings appear on printed worksheets.
How to Print from Excel Webs with Gridlines?
Unfortunately, you cannot print gridlines if you are using Excel web. But there is a workaround to achieve what you want. You can add borders to cells to make them appear like gridlines.
How to add borders to cells in Excel?
Select the cells you wish to include in the border by clicking and dragging them.
Click Borders > All Borders in the Font section under the Home menu. Now, the boundaries around the sections will have darker lines.
Conclusion
If you have followed all the instructions correctly, you should be able to print from Excel with gridlines. But there is always a chance that you might use a different version of Excel where some of these methods do not work.
In case you come across any problems, please comment below! I will try my best to assist you.