While using the Outlook email service, it’s a common scenario where you send important emails to someone, and they never receive them; Automatically, the emails are stored in the spam folder.
Due to a strict protection policy, Outlook uses Junk email folder to keep spammy and potentially risky email contents away from the inbox. But sometimes, good and safe emails are also moved into the junk folder, which is really unpleasant.
Fortunately, Outlook gives us a helpful feature to add our most trusted contacts to the whitelist so that their emails never get moved into the junk folder in future.
In this article, I have provided all the key information that will help you to add your contacts to the Outlook safe recipients list.
So, let’s dive in!
What is Outlook Safe Senders List?
The Safe Senders List in Outlook contains email addresses and domains trusted by the user and never considered junk files. Through this feature, your emails are never moved to the Junk Email folder, regardless of the contents of the email.
Junk E-mail Filter of Office 365 always trusts the contacts added to your Outlook account by default. But whenever you receive an email outside of your Outlook contact, that email address automatically gets moved to the Junk email folder.
The good news is, you can manually add all your desired email addresses to outlook’s whitelist so that you never miss any of your important messages and always get them straight in your inbox.
There are more than enough ways to add your required contacts to the trusted recipient’s list, even if they are not Outlook accounts.
Keep on reading the article to learn about each of the techniques.
Also, check out our separate post on add meeting to Outlook calendar easily.
How to Add Emails to Outlook Safe Senders List for Office 365 Outlook Desktop App
To ensure your known email address never gets stuck into the Junk E-mail folder, you must manually add those emails to the Outlook truster senders list.
You can easily add contacts to the whitelist of Outlook by using the Junk E-mail Options or Never Block Sender function.
Here are the two methods to add emails to Outlook safe senders list in the Desktop App:
1. Junk E-mail Option
Till now, there are a few versions of the Outlook desktop app released. The options are almost the same, with a few changes here and there.
The steps to add contacts to your Safe list are exactly same for the modern version of Outlook 2010, 2013, 2016 and 2019. Only in Outlook 2007, the options are slightly different.
So, follow the procedure according to your Outlook version(07/10/13/16/19) to add emails to the whitelist.
Here are the steps to add emails to the safe sender’s list for Outlook (13/16/19):
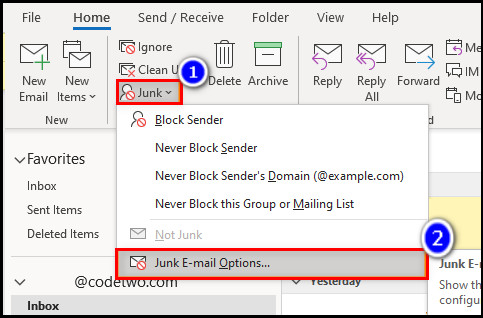
- Open Outlook and click on the Home button.
- Hover on to Junk in the Delete section.
- Select Junk E-mail Options.
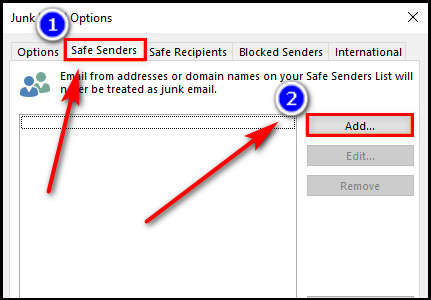
- Switch to the Safe Senders tab and hit Add button.
- Type email address or domain in the Add address or domain dialog box. Such as,
- Single address: [email protected]
- Complete domain: domain.com only.
To Avoid subdomains automatically getting added to the whitelist, include @ sign. For example, @domain.com.
- Mark the box Automatically add people I e-mail to the Safe Senders List.
- Click on Apply to save the changes.
Now, all your provided emails are saved in the Safe sender’s list of Outlook.
Here are the steps to add emails to the safe sender’s list for Outlook 2007:
- Launch Outlook and click on the Tools menu (three dots in the top right corner).
- Select Options.
- Move to the Preference tab.
- Click Junk-Email under E-mail.
- Open the Safe Senders tab.
- Click on Add and type all your required contacts in the Add address or domain box and click OK.
- Check the Automatically add people I e-mail to the Safe Senders List box.
- Hit OK to confirm the changes.
Follow our guide step-by-step to add multiple emails to Outlook easily.
2. Never Block Sender Feature
An alternative way to add recipients to the trusted list of Outlook is using the Never Block Sender feature.
However, the biggest downside is that you can only add one address at a time.
Here’s how to add emails to Outlook save list using Never Block Sender:
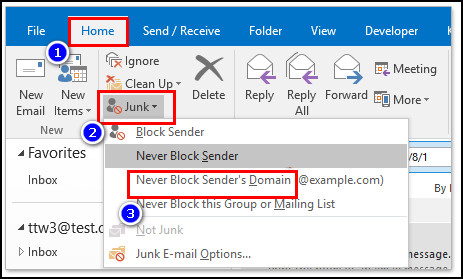
- Select the email that you need from your inbox or junk folder.
- Click on the Home menu and hover on Junk.
- Select Never Block Sender’s Domain. A window will display saying the selected sender has been added to the safe sender’s list.
- Click OK.
Repeat the steps to add multiple accounts to the allowed list or simply follow method no.1 to do your job more efficiently.
Also read how to add new Mailbox in Outlook easily.
3. Import and Export Safe Senders List
When you have a bunch of emails or domains to add to the safe list together, you can use the Import and Export feature of Office 365. This feature is only exclusive to the Office 365 Outlook app.
First, you need to create a TXT file with all your required email address and domains written on it and then carry out the following steps:
Here’s how to import and export safe senders list in Outlook:
- Run Outlook and open the Home tab.
- Click Junk and then Junk E-mail Options.
- Switch to the Safe Senders tab and choose Import from Files.
- Browse your created TXT file and select it.
- Click Open and Apply.
- Click OK to confirm.
Now, all your given addresses will be listed in the Safe sender’s section.
Also, check out our separate post on add optional attendees in Outlook mac meetings.
How to Add Emails to Outlook Safe Senders List for Outlook Web Application
You can access your Microsoft office account through the official web application from any browser regardless of your operating system or device platform.
Additionally, Outlook online application also gives you the function to include contacts on the whitelist.
Here’s how to allow contacts to the trusted senders list in Outlook online app:
- Browse to Outlook online website and sign in to your Microsoft account.
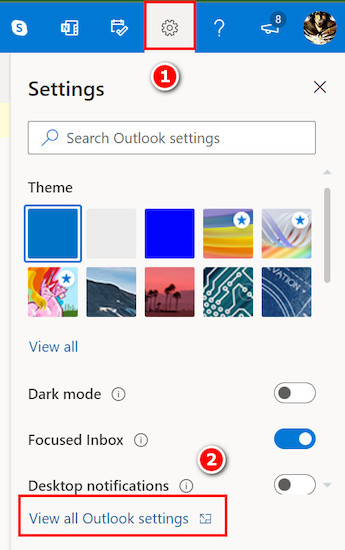
- Click on the gear icon in the upper right corner and open View all Outlook settings.
- Click on Junk Email.
- Open Safe Senders and domain tab and click on Add button.
- Type your needed email addresses and domains and press enter to save the changes.
Now, your given contacts are added to the Safe list and won’t be moved to the spam folder.
Read more on Outlook rules not running automatically on shared mailbox.
How to Add Emails to Outlook Safe Senders List From Inbox
When you have already received emails from your sender, you can add them to the trusted list from your inbox. This is the fastest way to add a single account to your whitelist.
On top of that, this procedure is executable both on the Outlook Desktop client and the online application.
Here are the steps to add emails to Outlook whitelist from your inbox:
- Launch Outlook app or log in to your account on Outlook website.
- Go to Inbox.
- Open the email you want to mark as safe.
- Click on the More Options (three vertical dots) next to forward, replay action.
- Select Add to Safe Senders.
- Click OK to confirm.
Thus, the email you opened will get added to the safe sender list immediately.
How to Add Recipients to Outlook Safe Senders List for Mac
In Mac supported system, you can quickly add emails to the safe sender list of Outlook using the official app.
You just need to configure the junk email preferences to allow your required emails and domains to the trusted list. Thus, you can prevent these emails from getting stored in the spam folder.
Here’s how you can add contacts to Outlook whitelist from macOS:
- Run the Outlook app on your Mac device.
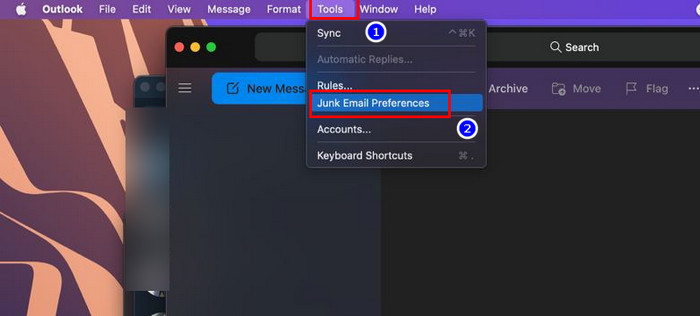
- Click on the Tools menu and choose Junk E-mail Protection.
- Open the Safe Domains tab.
- Click on Add button.
- Type your required domains and address names.
- Click OK to save changes.
Now, you can view your safe sender list to check if all the addresses are properly included or not.
How to Add Recipients to Outlook Safe Senders List on Android or iOS
Microsoft has dedicated Outlook apps for mobile devices running on Android and iOS(iPhone or iPad). Unfortunately, these apps do not include the features of adding contacts to the safe senders list.
The only way to modify the Outlook whitelist for mobile users is by browsing the online web app.
Here are the steps to add contacts to Outlook safe list on Android and iOS:
- Open your browser and go to the Outlook website.
- Input your credentials and log in.
- Click on the Settings button (gear icon) on the top-right.
- Select Mail and expand it.
- Open the Accounts list.
- Choose Block or allow on the left side.
- Enter your required email addresses and domains under the Safe senders and recipients tab.
- Press Save at the top of the screen.
After that, You can open the safe senders list to confirm whether all accounts you entered are added or not.
How to View Safe Senders List in Outlook
To ensure all your required domains and email IDs are properly stored properly in the Outlook Safe senders list, you need to view the whitelist.
You can view the list of trusted senders through the Office 365 Outlook client or Online web application.
Here’s how you can view Outlook safe senders list in the desktop app:
- Launch the Outlook app and click on the Home button.
- Hover on Junk and select Junk E-mails Options.
- Switch on the Safe Senders tab.
You can see a list of contacts marked as safe under the safe sender’s tab.
Here’s how you can view Outlook safe senders list in the online web app:
- Go to Outlook and log in to your office account.
- Click on the Settings (gear icon) in the upper right corner.
- Select View all Outlook settings.
- Open Junk Email.
- Open Safe Senders and domain tab
You will see a list of all your added trusted senders in the Safe Senders and domain tab.
How to Edit Safe Senders List in Outlook
In Microsoft Office 365 Outlook, you can add your trusted contacts to the safe senders list so that their emails get stored in the junk email folder.
However, while adding an email address, you can make silly typing mistakes. Or even, you may change your mind and think of removing the added contact. In such cases, Outlook gives you a very handy feature to edit your safe senders’ list.
Here are the steps to edit the safe senders list in Outlook:
- Launch the Outlook app
- Open the Home button.
- Select Junk E-mails Options from the Junk option.
- Switch on the Safe Senders tab.
- Select your required recipients and click on the Edit button.
After that, you can make corrections in the entry email or choose to delete it for good. Save and exit to apply the settings.
FAQs
Where is the safe sender list in Outlook?
To find the safe senders list in Outlook, go to Home > Junk option > Junk Emails Options > Safe Senders tab.
How do I edit safe senders list in Outlook?
To edit the safe senders list in Outlook, open Outlook app > Open Home > Junk > Junk Emails Option > Safe Senders tab > Select your required email entry > Edit button.
How do I add a Sender to the Safe Senders List in Microsoft Outlook?
To add a sender to the safe senders list, launch Outlook and go to Home > Junk > Junk Emails Options > Safe Senders tab > Add button > enter your email address and domains > Click OK > Save.
Final Words
It’s really annoying when you see your important emails stored in the Spam folder of Outlook. But fortunately, Outlook safe senders feature helps you to add your necessary contacts to the trusted list so that you never see them in the Junk emails folder again.
In short, you can easily add your trusted contacts to the safe senders list for Mac and Windows from the Outlook desktop app, the Online web version or even from your mobile devices (Android or iOS) by following the steps I mentioned above.
I am sure that this article has guided you to everything there is to know about the safe senders list in Outlook.
If you have any more questions or suggestions, feel free to share them in the comment below.