HDMI (High-Definition Multimedia Interface) is a form of digital audio or video interface that’s supported across numerous technologies. Basically, it can transmit crystal-clear audio and video from one device to another at incredible speeds.
DVD players, AV receivers, set-top boxes and TVs are no longer messy with crowded cables because one HDMI cable is enough to transmit data.
But what if your HDMI-connected device fails to recognize the audio and video data transmitted by an HDMI signal? For the past few days, I have been racking my brain, trying to fix the No HDMI signal error on my monitor.
After 10 hours of research, the issue is gone, and I’m here writing this article to tell you precisely what happened. So, stop what you are doing, grab a cup of coffee and scroll down to find your solutions.
Read more on how to tell if HDMI cable is 2.0.
Why Is HDMI Not Showing On TV?
HDMI is not showing on the TV because your TV is not configured to receive the HDMI signal. If it’s already on HDMI mode, it is probably happening because your TV fails to recognize the HDCP encryption embedded in the HDMI signal. As a result, video/audio data is being transmitted.
HDCP stands for High-bandwidth Digital Content Protection, and it’s like an anti-piracy mechanism to prevent a signal from being routed elsewhere.
It uses a verification process termed handshake, which exchanges a set of keys between the source device, which is typically your Blu-ray player, game console or Roku, and the display, almost exactly like online encryption.
You usually get the no HDMI signal error when there’s a problem with the handshake process.
In most cases, faulty HDMI cables are the primary cause of this issue. Since there isn’t much to configure in the TV, the TV is not the source of the problem.
The story is different when it comes to HDMI signals not detected in a monitor. The graphics drivers of your PC play a significant role in the detection process, among other things.
Although the problem may come off as complicated, you should be able to fix it 99 percent of the time without replacing any hardware.
The following section is all about those fixes, so scroll to that section.
Check out some of the best ways to fix Motherboard HDMI no signal.
How To Fix No HDMI Signal from Your Device
All the fixes listed in this section are guaranteed to work for you regardless of the HDMI output device. For example, the issue will always be with your PC if the HDMI output device is your TV or monitor. The same applies to most other output devices.
Follow these steps to fix no HDMI signal from your device:
1. Switch Input Source (For TVs)
All Televisions have multiple input sources to display video, and while some newer models automatically detect HDMI connections and switch modes accordingly, most lack this feature.
As a result, you have to manually go to settings and check that HDMI is selected as the primary source.
Unfortunately, the precise steps for this vary from brand to brand and model to model, but they are roughly similar.
Follow these steps to get a general idea of switching input sources:
- Turn on your TV by pressing the Power button on the remote.
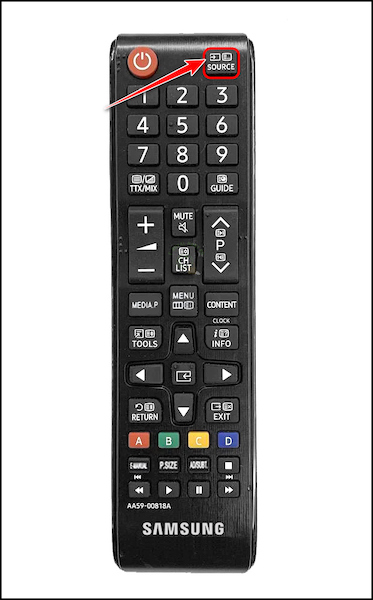
- Locate the ‘Source’ or ‘Input’ button on your remote and press it. On Samsung TVs, this is usually located at the top right corner.
- Use the directional arrow keys on your remote to highlight the HDMI option, and press the OK button on your remote to select it.
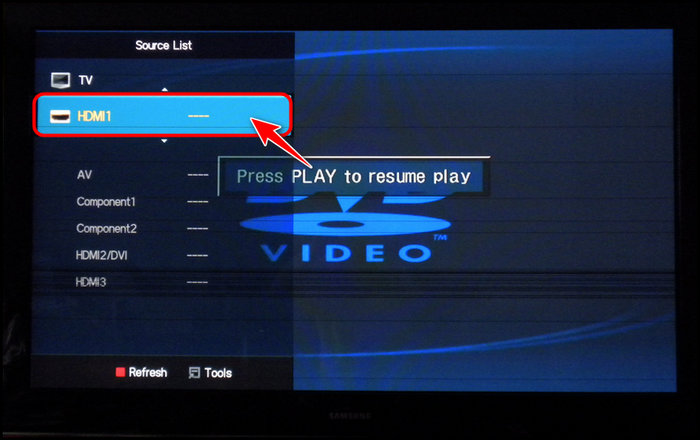
Your video/audio should display correctly after doing this. If the HDMI option was greyed out in the Sources section, your TV did not detect the HDMI cable, which means either the cable wasn’t plugged in properly or it’s faulty.
Either way, move on to the next method to find a fix.
Here is the easiest solution to fix PS5 HDMI not working.
2. Recheck the Cable Connections
You can quickly tell if there’s anything wrong with the physical connection by checking if the TV detects the HDMI connection. As I mentioned in the previous method, the HDMI will be greyed out if the TV doesn’t detect it.
In the case of monitors, you may see a message on the screen confirming the HDMI connection, but most monitors lack this feature.
Don’t disregard this method even if your HDMI connection worked perfectly a few days earlier. That’s because, over time, the cables might come loose and pull away from the ports.
Instead of wiggling the HDMI cables and tightening the connections, I recommend unplugging them on both ends and carefully plugging them back in. Try pulling the cables gently to make sure the connection is tight enough.
3. Check with a New HDMI Cable
Another common reason why your TV cannot detect the HDMI connection is that the cable is faulty. Try going through your cable carefully and look for any frayed, bent, worn out or broken parts.
Even the slightest crack in the wire can interfere with the data transmission, so don’t keep using the cable if you spot anything wrong.
Borrow your friend’s HDMI cable and try connecting it to your devices. If it works, it’s a clear sign that your cable is damaged and needs a replacement. While it’s not necessary, I suggest trying this, even if your cable is spotless, just to eliminate the cable as an issue.
4. Power on The Source Device
This might be a little obvious for some users, but it’s also overlooked for that exact reason. Before plugging in the cable, you may have powered on your device, like your laptop/device, but the PC might power off due to a low battery or some app configuration.
As a result, check quickly and ensure the source device is turned on.
5. Update Graphics Drivers
You should manually update the graphics driver if you have disabled updates on your device. Outdated drivers mean your PC may lack some information or have bugs that were fixed in a later update.
Follow these steps to update graphics drivers on your laptop/desktop:
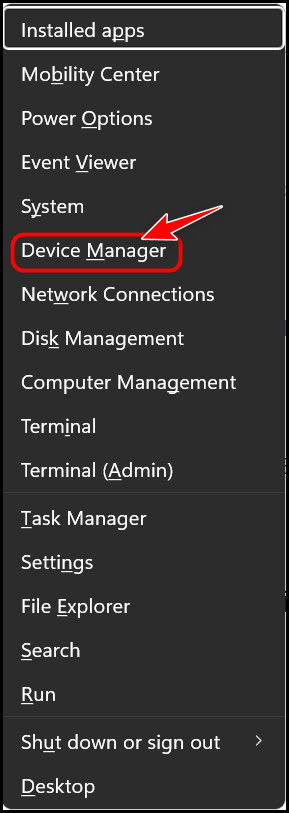
- Press the Windows and X keys at the same time to bring up a context menu above the Start icon.
- Click on Device Manager from the list.
- Double-click on Display Adapters on the new window and right-click on the option below. Select Update driver to proceed.
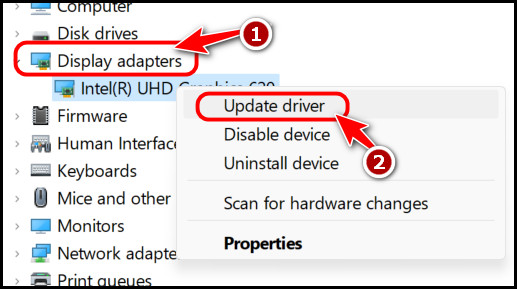
- Select Search automatically for drivers on the next window after ensuring your PC is connected to the Internet.
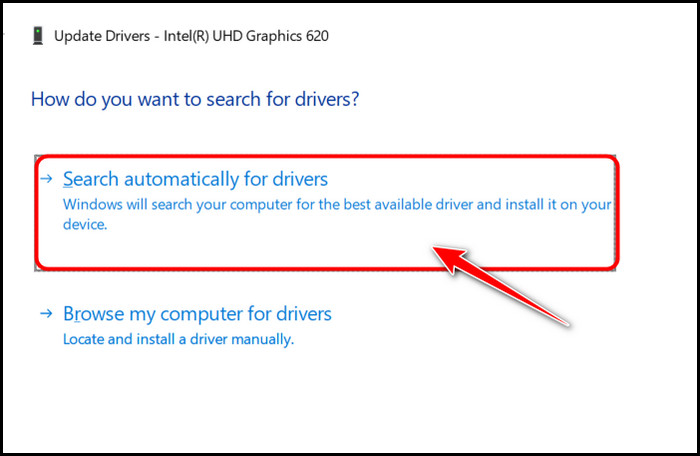
After this, reboot your PC and check if the HDMI connection works now. If it doesn’t, you can try updating other drivers too. Unfortunately, it’s not easy to do that with the Device Manager.
Instead, I suggest using third-party applications like IOBit Driver Booster or Driver Reviver to do the job. You can find free versions for both, so try them out.
6. Adjust HDMI Output Resolution
HDMI cables are typically configured to output video at a specific resolution, and there is no way to change this. However, the TV and the HDMI source, usually your laptop, probably support higher resolutions.
You need to make sure that your HDMI source isn’t projecting the video at a higher resolution. I suggest reading the manual or case that came with the cable to find precisely which resolution it can handle.
You should be okay with using lower resolutions, but I recommend sticking to the supported resolution to be on the safe side.
Make sure to adjust the HDMI output device, like the TV, along with the PC.
7. Switch HDMI Ports
Since swapping out the cables and configuring both the source and output device didn’t work, the HDMI ports might be at fault. This can be a severe issue if you don’t have multiple HDMI ports.
If you do have multiple ports, I suggest connecting the cable to a different port on both ends. If there is no change, try it again with another HDMI cable that is confirmed to be working.
What about if you only have one port? Well, this is where it gets complicated. You may have to take your laptop to a service center to replace the HDMI port. However, even if they can do it, there is always the risk of frying your motherboard in the process.
If you only have one HDMI port in your laptop, connect the HDMI cable to a different port on the TV to look for changes. If the HDMI port was terrible on the TV, you should see the video on the screen.
Final Thoughts
Although DisplayPort is better than HDMI in terms of both performance and quality, HDMI is more popular since it’s compatible with more devices. As a result, it can be a letdown if they stop working suddenly.
You can take a look at some of the popular causes for this earlier in the article, but if you follow the next section, you won’t have any future problems with it.
The first method was enough to solve the problem on my PC, but what about you? Switching HDMI ports worked for most of my friends but do let me know your method below.