Suddenly something caught your eyes on your desktop icons, and you started wondering what these checkmarks are on the icons and why are they even here? Well, these might signify different things based on different colors or types. Don’t get worked up too much; I will give you all the details below.![]()
A few years back, I saw these check marks on my newly bought laptop. They seemed odd as I was not used to them. So, I searched the internet for a fix and fortunately found some after a bit of hurdle.
Now here I am going to compile all my findings so that you guys can easily look for them if the need arises.
So, follow this article very carefully till the end to learn more about these check marks. Then you may decide to remove them or keep them as they are.
Why Do My Desktop Icons Have Check Marks?
Your Desktop icons might have check marks because your files are all synced and safely stored in clouds. This is the main reason why you see check marks of different colors on your computer. If you have Microsoft One Drive or Google Drive enabled, only then you will see them.
These check marks are of different colors, signifying different conditions of your files. If you see a white cloud icon with blue borders, then that means your file is not on your computer but available through the cloud.
A solid red circle with a white cross inside signifies that files have run into a problem trying to sync with the cloud. If the circle is formed with two arrows circling around, then your files are in the syncing process.
Another type of icon has a human icon next to it. It signifies that the file is shared with someone. So they can access that particular file.
Here is the easiest guide to fix drag and drop not working on Windows 11.
How Do I Get Rid of Check Marks on My Desktop Icons
There are various ways to get rid of check marks on your desktop icons. It is not a complicated process. So, you do not need to be an IT expert or anything; just be the jack of all trades, and find your black pearl! Anyone who can operate a computer can easily follow my instruction to do this.
Here’s what you have to do to get rid of check marks on your desktop icons:
1. Pause Syncing
This is the simplest way to remove the check marks from your desktop icons. Most users will find this method effective and solve the mark issue.
Follow the steps to pause syncing:
- Click on the system tray icon at your screen’s bottom right corner. Click on the OneDrive icon.
- Select Help & Settings in the pop-up menu. Some other options will appear.
- Look for an option saying Pause Syncing and select a time period. The selected time period will be of limited options. During these periods, the sync will be paused.
You might think this solution is temporary. Well, it actually is and is limited to the time period you set during the process. But it is easy and effective. Try the next solution if you need a permanent one.
Follow our guide to fix blue screen on Windows 11.
2. Disable Onedrive Service
Disabling the OneDrive service is another way to remove the icons from your desktop. This will turn off OneDrive, thus removing those icons permanently from your desktop.
Follow the steps below to disable One Drive Service:
- Click on the system tray icon located at the bottom right corner of your screen. Click on the OneDrive icon.
- Select the settings icon. Multiple options will appear.
- Click on Disable Drive, and your One Drive Service will be disabled. It means no further syncing and obviously no more tick marks on your desktop icons.
This method is to work for all of you for sure. But if you do not want to disable the service altogether but still want to remove those tick marks, head over to the next fix.
Also, check out our separate post on how to fix PC won’t go to sleep in Windows 11.
3. Try Rebuilding Icon Cache
If disabling and pausing did not help you get rid of those marks, then rebuilding your icon cache is worth a shot. It might help you as it has helped a few users.
Follow the steps to try rebuilding the icon cache:
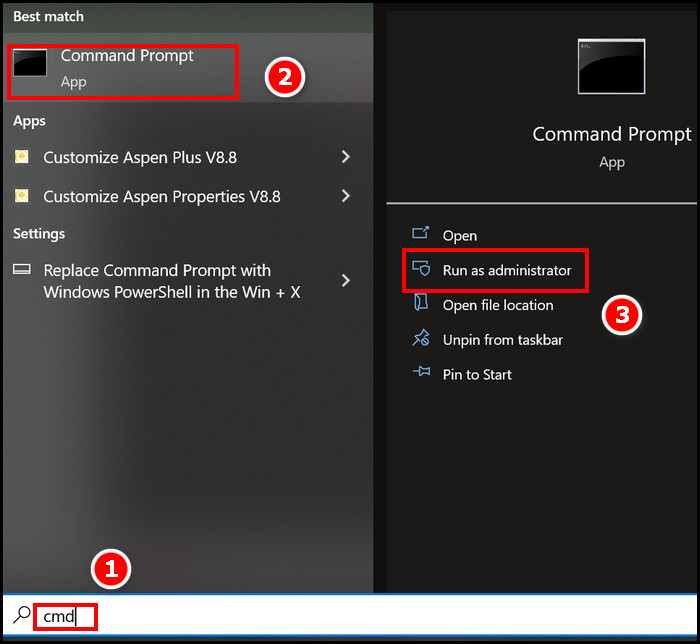
- Press the Windows button on your keyboard and type CMD in the search bar.
- Right-click on the command prompt, and you will see some options pop up.
- Click on the Run as administrator option and click on OK in the user access control window that pops up. CMD will open up in administrator mode.
- Type the following commands one by one and press Enter.
- exe-show
- taskkill /IM explorer.exe /F
- DEL /A /Q “%localappdata%\IconCache.db”
- DEL /A /F /Q “%localappdata%\Microsoft\Windows\Explorer\iconcache*”
- Shutdown /p
- Wait for a few minutes, and your computer will shut down after executing these commands. Turn it on and see if the problem is solved or not.
Check out the easiest way to install active directory users & computers on Windows 11.
4. Stop Desktop Files Back up
If you stop desktop file backups, your desktop icons will return to normal. So, it is another effective method to remove the tick marks from your desktop.
Follow the steps to stop desktop files back up:
- Click on the system tray icon from the bottom left corner of your screen. Select Help & Settings and then click on Settings.
- Make sure your Backup Tab is selected, and then select Manage backup.
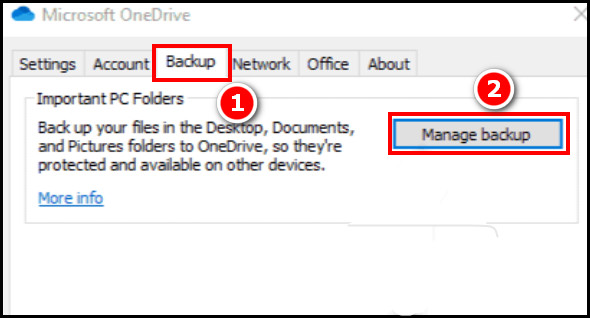
- Select Stop backup under the desktop option. Your desktop icons will no longer keep backups, solving the whole problem.
Hopefully, following this option will solve your problem if the previous ones did not work for you. But be careful not to mess the options up.
Now, as you are well aware of the basic reasons behind the green marks, let’s fix ‘em together.
But before that, go through our epic guide on adjust page file in Windows 10.
Green Check Marks on Windows 11
If you see only green check marks on your Windows 10, it means your OneDrive service is active and has already synced all your desktop icons.
These green check marks are not harmful in any way, nor is the work of a virus or malware. If you are unfamiliar with these icons, the first thing that will come to mind is that it is the work of malware.
Most people panic at this point. If really any virus attacks or something similar happens, it is advised not to panic as it affects your decision-making. Calm yourself down and search online about how you can solve it.
If you want to solve the green check marks in your Windows 10, just follow the next part of this article.
How to Remove Green Check Marks
To remove green check marks from your desktop, an effective method is to free up space from your drive. Freeing up space from your One Drive might help you remove those marks. Some users have reported that freeing space helped them solve their problems without disabling Drive Service.
Follow the steps below free up space:
- Find all the options on your desktop with green check marks. Now you have to right-click on them one by one.
- Select Free up Space from those options that pop up. Click ok if any confirmation pops up. Your Drive space for that selected icon will be cleared.
- Do the same process for all the icons one by one. Your desktop will be free from all those green check-marked icons in no time.
FAQs
1. Why do my desktop icons have green check marks on them?
It is probably because your One Drive service is ON, and your icons are synced with the copy in your One Drive.
2. Is the Green Checkmarks on my desktop icons works of malware?
No, it is not. Carefully check if the icons have a green outlined checkmark; then, it is surely not any work of malware. But if the mark is something different, you need to check online specifically the meaning of that mark.
3. Is it a problem if I leave the checkmarked icons as it is on my desktop?
No, absolutely no problem whatsoever. Some people are not used to seeing these marks and feel uncomfortable. This is especially true for older generations. You can safely use your PC as usual, even with these marks on your desktop icons.
Conclusion
Hopefully, you have solved your icon problem after going through this article and following my instructions word to word. I rebuilt the icon cache to solve my odd situation.
Comment down below which method helped you the most, and if you found other ways of removing icon check marks, then let us know. Also, don’t be shy to share other tech-related problems with us so that we can get to you asap.