Installing a new CPU cooler is possible without touching the system board, but it’s not as simple as it sounds. Not all computers support this.
You need to check some things before you proceed with the installation to make sure you complete the process without damaging the processor. Don’t worry if this question has been dwelling on your mind for a while now. You will find your answers as you go through this guide.
So, let’s find out if you need to remove Intel and AMD motherboards before you remove the CPU cooler.
When Should You Change CPU Cooler?
The CPU in your computer needs sufficient cooling because otherwise, the heat it produces will damage it or oven other parts of your computer. If you find out that your current CPU cooler isn’t providing enough cooling or if you upgrade your processor, you should change your cooler.
Note that some Intel’s or Ryzen AMD CPU have pretty capable stock coolers so it’s enough for general use.
Not sure which cooler you are currently using? Find out what CPU cooler you have in less than a minute by reading this article.
As a general rule of thumb, your CPU temperature should not cross 80 degrees Celsius temperature under workloads.
Faulty Installation, Cooler Malfunction or overclocking can overheat the CPU.
It’s necessary to monitor the temperature of your CPU while performing intensive tasks on your computer, to keep it from reaching higher CPU temperatures. Your stock cooler, if you have one built-in, is not doing its job if the temperature crosses 90°c.
In these situations, you must immediately turn off your computer system before your CPU reaches dangerous temperature levels. Otherwise, the damage can be expensive.
Do keep in mind that you may have just installed the cooler in the wrong orientation. This can cause major issues with the airflow which means the cooler doesn’t work. Don’t worry, you can read this quick guide to easily rotate a CPU cooler and fix everything before changing your cooler altogether.
Here’s when you should change your CPU cooler:
- If your cooler is relatively old and has started to malfunction as of late, you need to replace it with a new one.
- If you are upgrading your processor with a new one with higher specifications, your old cooler might not be enough to regulate the heat it releases. In this case, you must get a suitable cooler along with your new processor.
- When you notice that your processor is reaching concerning temperatures, you need to check and see if your cooler is working properly. If you notice that the fan is not working, change it that instant.
- If you want to switch from air cooling to liquid cooling.
Finding yourself in one of these situations isn’t desirable, especially since replacing a CPU cooler can be time-consuming and a bit tricky.
Now, about replacing your cooler, whether or not it’s possible without having to take off the board can be known by inspecting certain factors in your computer. These are discussed in detail in the following section of this guide.
So, keep reading because I will reveal how you can know if you can.
Also, check out our separate post on can I start a PC without a CPU cooler.
Can You Install a CPU Cooler Correctly Without Removing Motherboard?
Installing a CPU cooler without removing motherboard depends on your computer’s casing, other components on it and the type of cooler and board but it’s usually possible. As the name suggests, the CPU cooler is placed over your CPU on your computer’s motherboard.
You need to check these things to know if you can access the cooler on it in the casing. You can easily change and install a new cooler on your computer if you have full access to your cooler and your CPU while the motherboard is still in place.
The ways of knowing whether you have full access to the area around your processor from both sides of the processor are presented here.
Follow these steps to know if you can install a cooler correctly without damaging motherboard:
1. Check Your Casing’s Side Panel
The casing that houses your motherboard and other internal devices of your computer is the first thing you need to check to see if you can install a cooler this way.
There should be a cutout on the side panel behind the area where the processor is situated on the motherboard. Most modern CPU coolers need to have a backplate installed on the other side of it. So, to access that part, your casing should have an opening behind it so that you can fit in the backplate for the cooler.
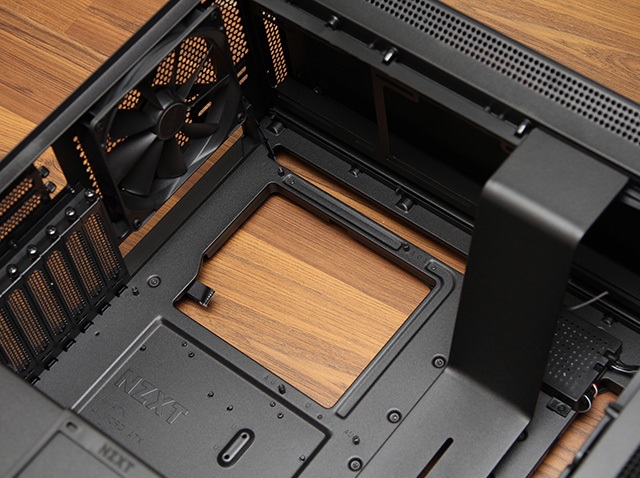
To check this, open the side panel covering at the back and see if it has an opening to the back of the part where the CPU goes in. If it does, you’re good to go. You can get your cooler installed without removing the motherboard.
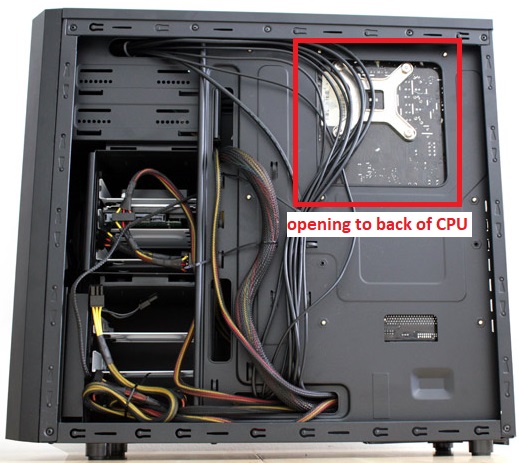
If you use a less expensive casing, chances are there won’t be any opening behind the board. In this situation, you must remove your motherboard to install the cooler.
Here’s a complete guide on how to know if CPU cooler is compatible with Motherboard.
2. Make Sure Other Components Have Clearance
Besides your CPU, several other components are installed on the system board. Devices like RAM, GPU, CPU fans, PSU, etc., can exist in the vicinity of your CPU, depending on the shape and size of your casing and motherboard.
Some of these devices have physical parts and RGB lights protruding from them. They also come in various shapes and sizes.
When installing a cooler, you must check the area around it to see if any other devices obstruct your access to the CPU cooler. You have to check if it is possible to unscrew your old cooler and screw in the new cooler gently without facing any physical resistance from other parts of your computer.
If it is possible to do the task gently without any obstruction, you can install the component without taking anything off. Otherwise, if any component obstructs you, you can try removing that part only to see if it gives you ample access.
Even after removing the obstructing components, if you find it difficult to place and screw in your cooler, you should remove the board before doing it, as it is an intricate task.
3. Check If New Cooler Fits Your Casing
If the new cooler that you have got is one of those tall, tower-style coolers, you have to check if it has enough clearance inside your computer casing.
Cheaper casings generally have little width as they are designed to hold just the basic components required to run a computer system. To install high-spec parts and extra components, you must ensure that your casing has enough space to accommodate them.
You will most likely be upgrading your cooler if you are going to replace it. High-spec coolers usually have a taller stacked heatsink and multiple fans. As a result, they must have the necessary clearance to be installed in your casing.
You can install your new cooler with the motherboard in the casing only if the size allows it.
If the new one does not have the necessary space, you will have to remove the system board and relocate it into a completely new casing that is wide enough to house your tall new cooler.
Are you in the market for AIO coolers? Check out this short article to find out how long they last if you have some time to spare.
How to Install a CPU Cooler Without Removing The Motherboard?
This process might save time, but, in contrast, it can also be quite cumbersome. You should carry out the installation carefully so that your cooler is installed properly and no other component, including the cooler, gets harmed in the process.
The way of installing a new CPU cooler in your computer is described here in easy words. Take a look at it before starting the process.
Here are the steps to install a cooler without touching the board:
- Run your PC a bit before removing the cooler to ensure the thermal compound doesn’t stick.
- Disconnect all cables from the PC case.
- Disconnect the case fans from the 4-pin fan header.
- Take off the side panel coverings on both sides of your casing.
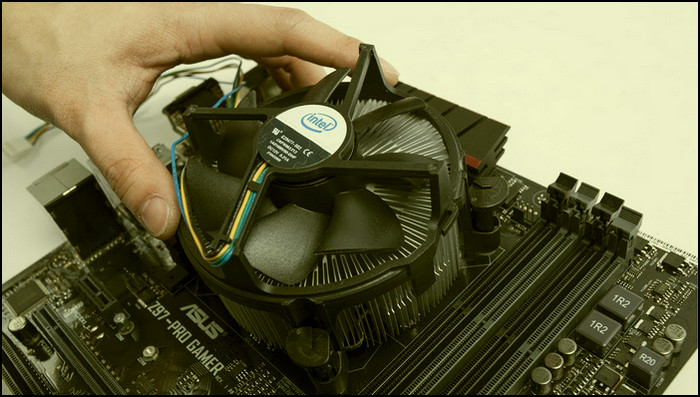
- Twist the CPU cooler to the sides until the link between the heat sink and the CPU socket is undone.
- Fit in the backplate for the cooler first behind where your CPU is supposed to go on your motherboard.
- Clean the CPU with a microfiber cloth and small brush to remove dust.
- Fetch the right bracket for your CPU to install it.
- Use the line method for applying thermal paste onto your processor before placing the cooler on it.
- Do not use too much force when placing the cooler on the CPU as that helps spread the thermal paste evenly.
- Line up your cooler’s heatsink in alignment with the holes on the board and gently place it on top of your processor.
- Align the cooler with the socket, Coolers are not universal with motherboards, but many of them support several kinds of mounting that can enhance which options are open to you.
- Secure the connectors of your CPU cooler by screwing them in one by one in a diagonal fashion. Make sure to not tighten the screws too much to prevent damaging the motherboard.
- Place the fan on top of the heatsink (if it was separate before) and screw it in.
- Connect the fan’s cables to the power supply unit of your computer.
This is optional but you may also clean the cooler before installing it.
Having issues with the installation? Simply read this 2-minute guide to understand why your CPU cooler won’t install and fix it.
Also, always remember to never use a screwdriver to overtighten any of the screws as many motherboards were damaged because of it.
Conclusion
Changing your CPU cooler and replacing it with a new one is a fiddly task. Having to remove your motherboard only adds to the workload and time required for installing the main component. If you can avoid it, you can just install the cooler without removing the motherboard.
To find out if you can fit a cooler in your computer with the motherboard in place, you can check the ways of knowing it from this guide and move on to installing the cooler immediately.