If you are writing a professional report, an academic paper, or creative content, knowing how to indent the second line in Microsoft Word can make your text look polished and organized.
With so many options available to control the indentation in Word, you can easily create a hanging indent with just a few clicks.
In this article, I’ll explain different techniques to indent the second line in your documents using Word.
Let’s begin!
What is Indent & How Many Types are Available in MS Word?
In Microsoft Word and other word-processing applications, indent refers to the horizontal positioning of text within a document. You can apply indentations to individual paragraphs or specific lines of text to improve a document’s structure and readability.
In MS Word, three types of indentations are available: First-line indent, Hanging indent, and No indent. Let’s discuss them briefly.
First Line Indent
This type of indent affects only the first line of a paragraph, pushing it further to the right from the left margin while keeping the rest of the paragraph aligned with the left margin. It is commonly used to indicate the start of a new paragraph.
Hanging Indent or Second Line Indent
This indent type is the opposite of the first line indent. It keeps the first line aligned with the left margin while pushing the remaining lines or hanging lines of a paragraph to the right. Hanging indents are often used in lists, bibliographies, MLA work cited pages, and APA reference sections.
No Indent
It means all lines in a paragraph align with the left margin, i.e., no horizontal text displacement.
How to Create a Hanging Indent in Microsoft Word
To add a hanging indent in Word, select your text, then move to the Home tab and click the Paragraph dialog launcher. Now, go to the Indents and Spacing tab, choose Hanging from the Special dropdown menu, change the width of the indent in the By field, and click OK.
You can also use the keyboard shortcut and utilize the ruler on top of your page to indent the second line in Word without indenting the first.
In the following 3 methods, I’ve explained how to do a hanging indent or second line indent in Word with more details.
Here are the methods to create a hanging indent in MS Word:
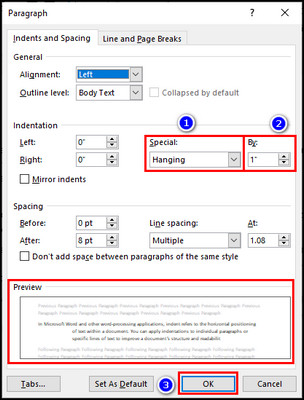
1. Indent the Second Line through the Paragraph Dialog Box
The Paragraph dialog box gives you complete control over indentation, spacing, and line & page breaks. It allows you to change indent for the second line with precision.
Here are the steps to Indent the second line through the Paragraph dialog box:
- Open your document in Microsoft Word.
- Highlight the paragraph where you want to add a hanging indent.
- Go to the Home tab.
- Click the small arrow (Paragraph Settings) from the bottom right corner of the Paragraph section on the Quick Access Toolbar.

- Select Hanging for the Special option in the Indentation group.
- Adjust the depth of the indent in the By field.
- Check the Preview of your text at the bottom of the Paragraph dialog box.
- Click OK to apply the indentation.
You can also use the above steps to indent the second line in Word on Mac. But on macOS, you have to select Format from the top bar and choose Paragraph to access the Paragraph dialog box. The rest of the process remains the same.
Additionally, the Paragraph dialog box can be used to indent in PowerPoint.
2. Use Shortcut to Indent the Second Line
On most computers, you can indent the second line on your page in Word using a keyboard shortcut. Although making a hanging indent in Word using the shortcut is faster, it is less precise. So, I’d recommend using this method to indent short blocks of text.
Here’s how to use a shortcut to indent the second line:
- Place your cursor anywhere in the paragraph where you want to create a hanging indent.
- Press Ctrl + T (for Windows users) and Command + T (for Mac users) on the keyboard to indent the second line of the selected paragraph.
To remove the second line indent from a paragraph, press Ctrl + Shift + T on Windows and Command + Shift + T on macOS.
3. Add or Change a Hanging Indent with the MS Word Ruler
Finally, you can use the Word ruler at the top of the page to make a hanging indent.
To add or change a hanging indent with the Microsoft Word ruler:
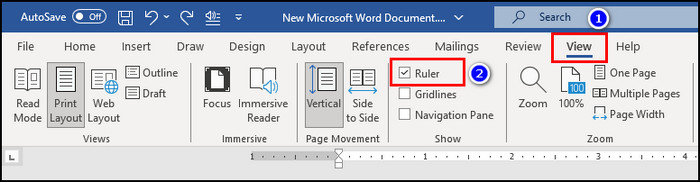
- Open your document in Word.
- Go to the View tab and put a checkmark on the Ruler option.
- Place your cursor in the paragraph whose second line you want to indent.
- Drag the lower triangle marker on the top ruler to the right.
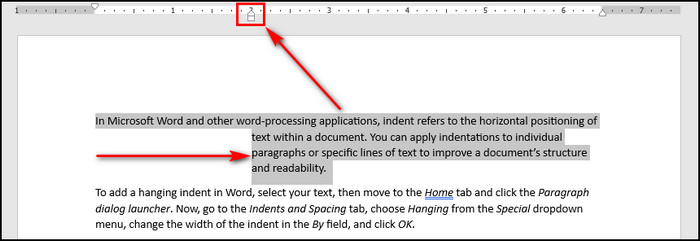
Now, Word will automatically form your hanging indent.
Related article: How to Indent in Microsoft Excel.
When to Use the Second Line Indent?
You typically use the second-line indentation when formatting documents that require a hanging indent, such as bibliographies, reference lists, or citations. It is beneficial when creating a document according to the APA or MLA formatting guidelines.
Below, I’ve described different use cases of the hanging indent in Microsoft Word.
Here’s when to use the second line indent:
- Nested Lists: When you have a list within a list, a hanging indent helps differentiate the main points from the sub-points. It helps readers to understand the information hierarchy.
- Instructions or Procedures: Use a second line indent for each step in a set of instructions to make it clear that each step is a part of a sequence.
- Citations or References: If you are listing references or citations, a hanging indent is required to separate each entry. It creates a clean and organized look for the bibliography.
- Long Description in Bullet Points: When you have to provide long descriptions for bullet points on a certain topic, a second line indent can prevent text from appearing too close to the different points. It enhances the document’s aesthetics.
FAQs
How do you indent the second line of a citation in Word?
To indent the second line of a citation in Word, select the citation, right-click on it, and choose Paragraph. In the Paragraph dialog box, select Hanging under the Special option, change the depth of the indent in the By field, and click OK.
How do you indent only one line in Word?
If you want to indent only one line in Word, just place the cursor in front of the line you want to indent and press Tab on the keyboard. You can also select the Increase Indent option from the Quick Access Toolbar to indent single lines.
Why is your hanging indent not working?
Your hanging indent won’t work if you have inserted hard or soft returns at the end of your sentences. In case you’ve changed the format of all your paragraphs in a document, Word will automatically include soft returns, stopping you from using hanging indents. The sentences need to wrap naturally to be able to use second-line indentation.
Final Thoughts
Now, you’ll be able to create well-formatted and professionally structured documents by inserting hanging indents. It’ll make your paper stand out and leave a lasting impression on your readers.
So, go ahead and take full advantage of the second-line indentation to elevate your document formatting to the next level.