The emails you receive day by day take up considerable space in your email client server. As the emails pile up, everything gets slower. Sometimes, you don’t even receive emails, and when you open your mailbox, you get a full mailbox warning.
Archiving emails can help you deal with overflowing mailboxes, especially after collecting years of messages.
Unfortunately, the auto-archive email process in Outlook is not that straightforward. You have to understand every checkmark and every option.
That’s why in this article, I’ve explained the step-by-step process that will archive your emails automatically on all versions of Outlook.
Let’s begin!
What Does Auto Archive Email Mean in Outlook?
The auto-archive feature runs in the background; it goes through your Outlook mailbox folders and moves your old emails to a different data file or a .pst file on your local computer. So it keeps the Outlook size much smaller and provides a cleaner interface.
When you archive emails in Outlook, you’ll see them in a folder called Archives in the folder pane outside your mailboxes. It keeps the folder structure as it moves the emails.
This Archives folder holds more folders like Inbox and Sent Items. The old emails are dumped in separate folders depending on where the messages were before.
You can choose different rules and properties for various folders or use the same settings when setting up this feature.
In the following section, I’ve described the process of archiving emails automatically in Outlook.
Also, check out our separate post on how to add meeting to Outlook calendar easily.
How to Archive Emails Automatically in Outlook & Office 365
You can configure your emails to archive automatically in Outlook using the AutoArchive Settings option. Choose what folders to archive and where to save them. Also, you can set the duration period for automatically archiving items in each folder.
Here are the steps to auto-archive emails in Outlook & Office 365:
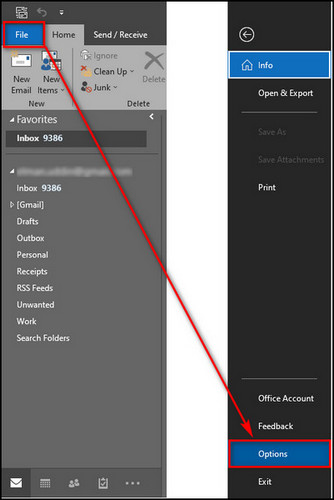
- Launch the Outlook app on your desktop.
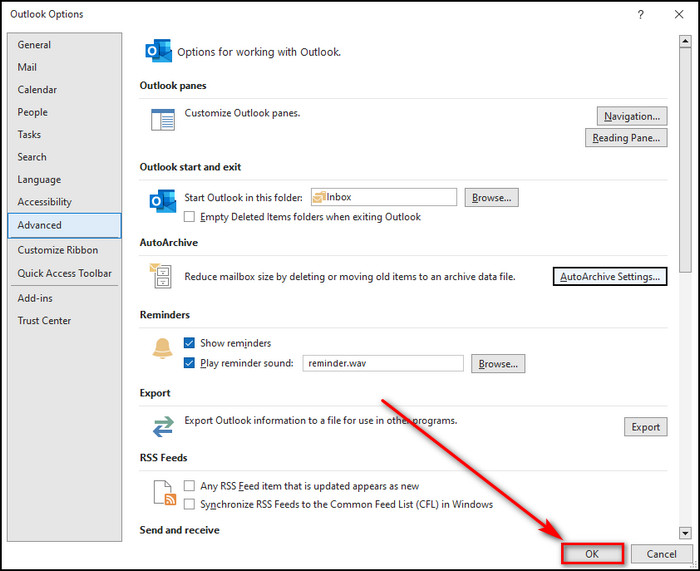
- Go to File > Options.
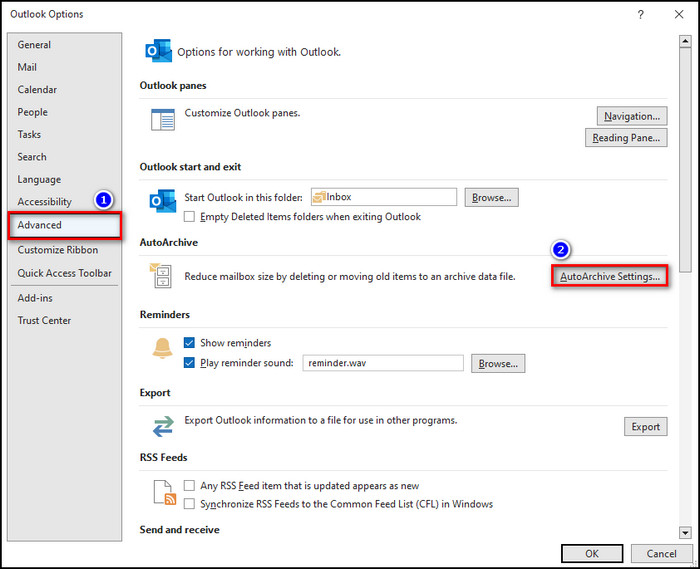
- Choose Advanced from the left menu.
- Click on AutoArchive Settings.
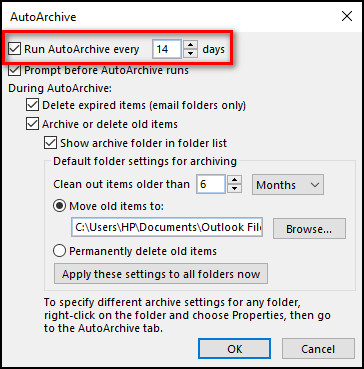
- Check the Run AutoArchive every X days checkbox and specify how often this feature should run.
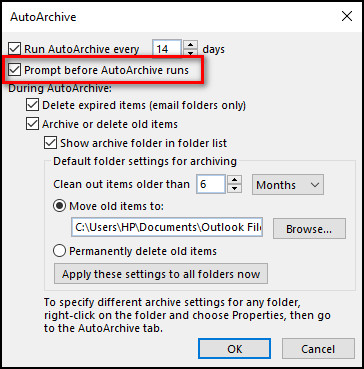
- Put a checkmark on Prompt before AutoArchive runs. So, Outlook will notify you before it starts to archive emails, and you can cancel the process if you want.
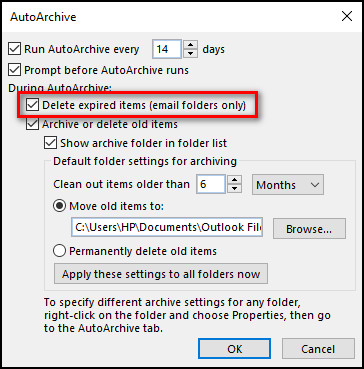
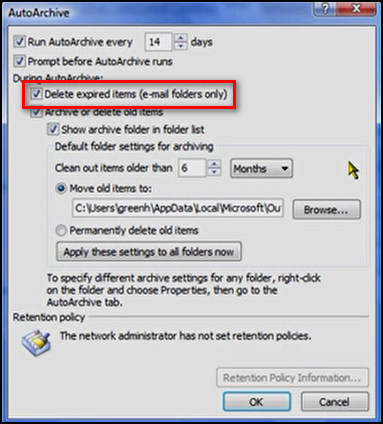
- Check Delete expired items. These items refer to the emails with an expiry date.
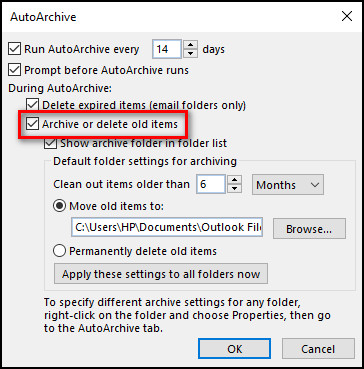
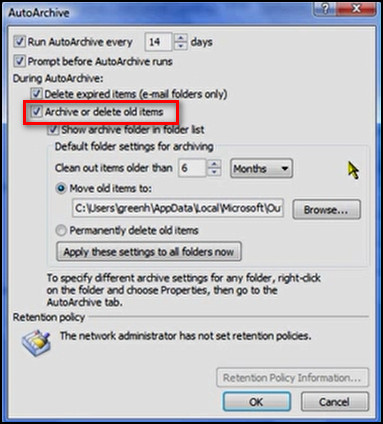
- Put a checkmark on Archive or delete old items.
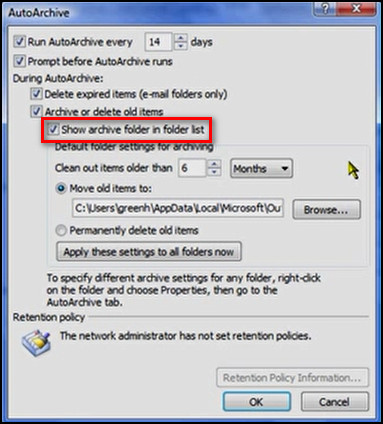
- Check the Show archive folder in folder list so you can easily access the archived items from the folder pane.

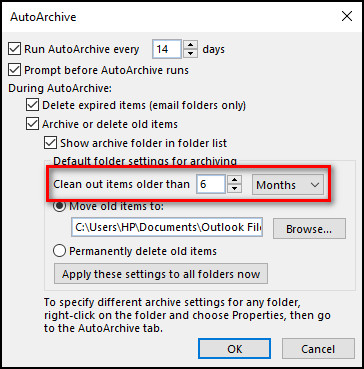
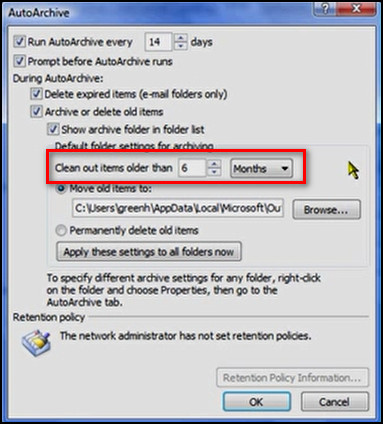
- Specify the duration after which the emails will move into the archive.
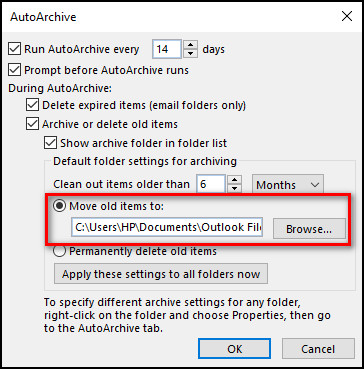
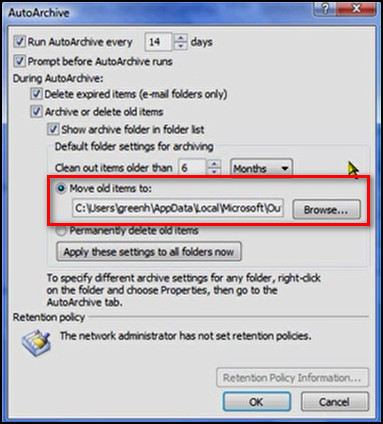
- Click Browse if you want to save the emails to a different folder. All the archived emails will move to this folder automatically.
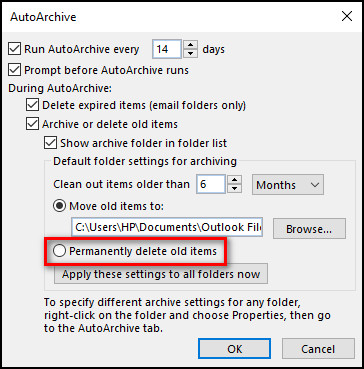
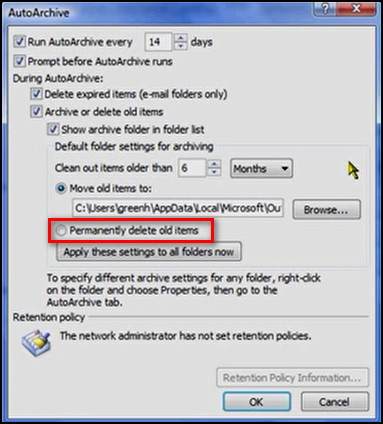
- Check Permanently delete old items only if you are sure you want to get rid of the items, or else keep this option unchecked.
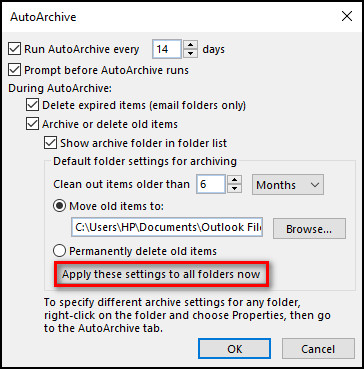
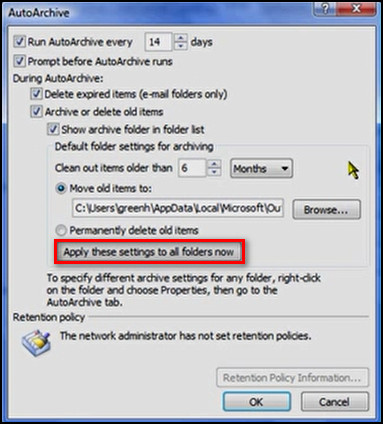
- Select Apply these settings to all folders now so the settings you’ve just changed will be applied to all the folders in your mailbox. But if you want to choose different archive periods for various folders or you don’t want to enable auto-archive for some folders, don’t select it.
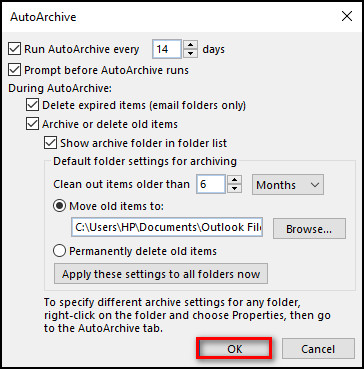
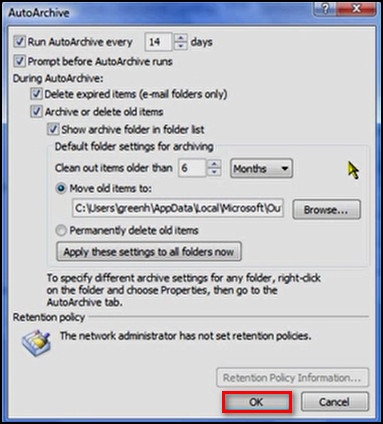
- Click the OK button to apply the settings.
- Select OK on the Outlook Options window.
If you don’t see the AutoArchive Settings option in your Outlook, you are either in a corporate environment, and the admin has disabled this feature, or you have an exchange account, and online archive is enabled.
How to Setup Auto Archive Emails in Outlook 2007 & 2003
In Outlook 2007 & 2003 versions, you can automatically move the emails to the archive using the AutoArchieve option. Choose what folders to archive and where to save them. Also, you can set the period for automatically transferring items in each folder.
Here are the steps to auto-archive emails in Outlook 2007 & 2003:
- Open the Outlook app.
- Select Tools > Options.
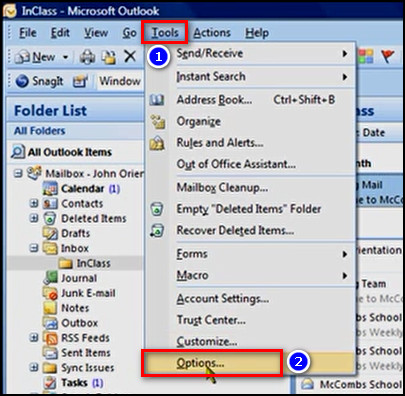
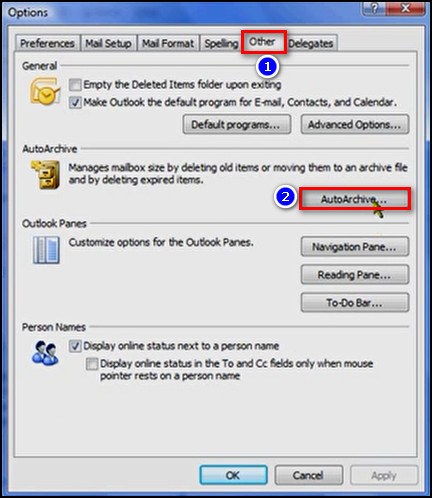
- Go to the Other tab and select AutoArchive.
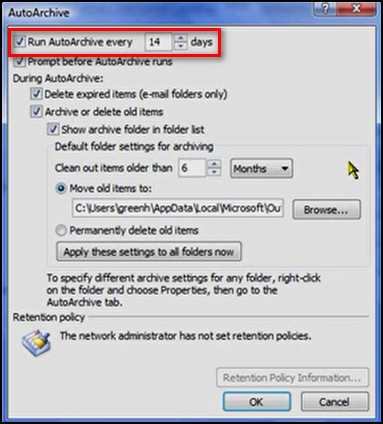
- Check the Run AutoArchive every X days checkbox and determine how often this feature should run.
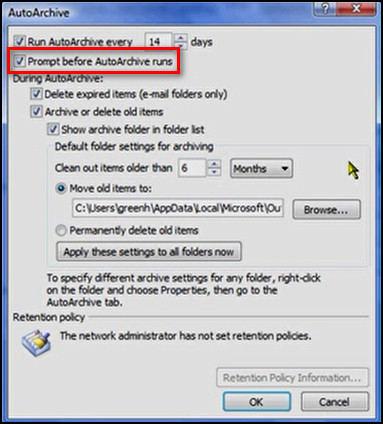
- Check Prompt before AutoArchive runs. Now Outlook will let you know before it starts to archive emails, and you can cancel the process if you want.
- Put a checkmark on Delete expired items. These items are emails with an expiry date.
- Check Archive or delete old items.
- Tick the Show archive folder in folder list option, so archived items go in the folder pane.
- Specify the time after which to archive items.
- Click on the Browse button to save the emails to a different folder.
- Check Permanently delete old items only if you are sure that you want to remove the emails.
- Select Apply these settings to all folders now so the settings you’ve just modified will be applied to all the folders. But if you want to choose different archive periods for each folder or don’t want to enable auto-archive for some folders, don’t select this option.
- Click OK to apply the changes.
- Click the OK button on the Options window.

Also read how to add new Mailbox in Outlook easily.
How to Auto Archive Emails in a Specific Folder on Outlook
Outlook grants you the ability to choose a particular folder to archive rather than going through and scanning all the folders in your mailbox. It makes the archiving process much quicker and only archives the emails that are important to you.
Here’s the process to Auto archive emails in a specific folder on Outlook:
- Open the Outlook app on your device.
- Right-click on the folder you want to archive and select Properties.
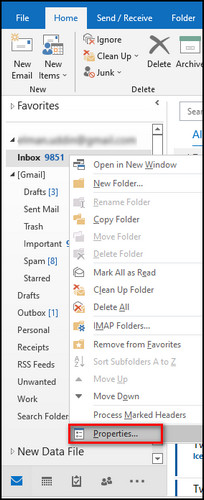
- Go to the AutoArchive tab.
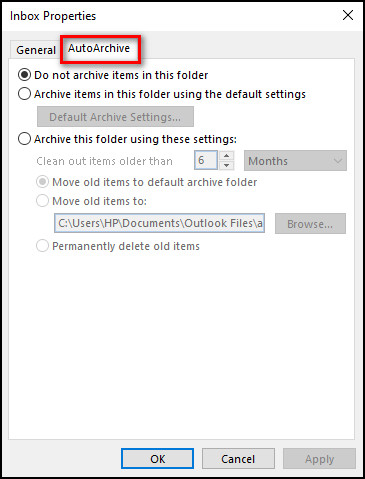
- Check Archive this folder using these settings.
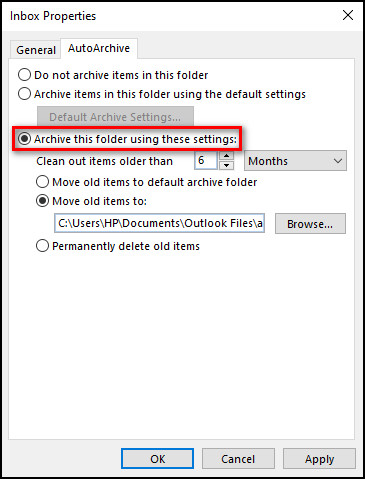
- Specify the period after which you want to archive the items in the selected folder.

- Pick either Move old items to default archive folder or Move old items to and choose the directory where you want to move the items by clicking on Browse.
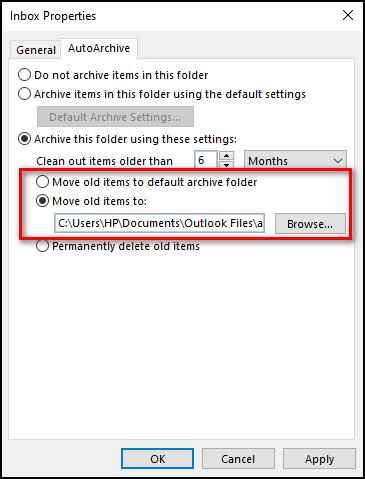
- Select Apply and click on the OK button.

Read more on Outlook rules not running automatically on shared mailbox.
How to Check Auto Archive Emails in Outlook Web
You can configure the Outlook web to archive automatically only for the emails sent by a specific contact that you choose. But in the web version, the auto-archive feature is not as flexible as in the Outlook desktop app. The emails just move to a different folder.
Here’s how to check auto-archive emails using Outlook Web:
- Open a browser on your device.
- Go to the Outlook website and click on the Sign in button.

- Sign in with your Microsoft account credentials, and Outlook will open.
- Open an email from a sender that you want to archive.
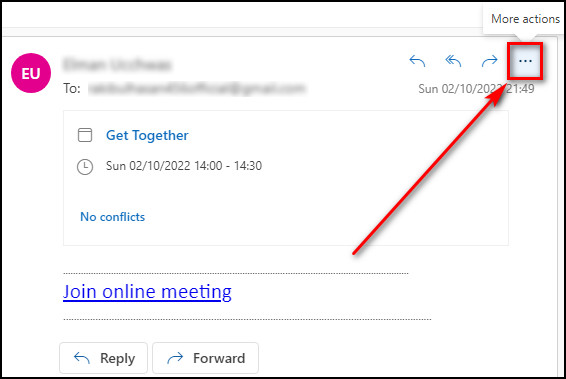
- Click on three dots or More actions at the top right.
- Select Advanced actions > Create rule.
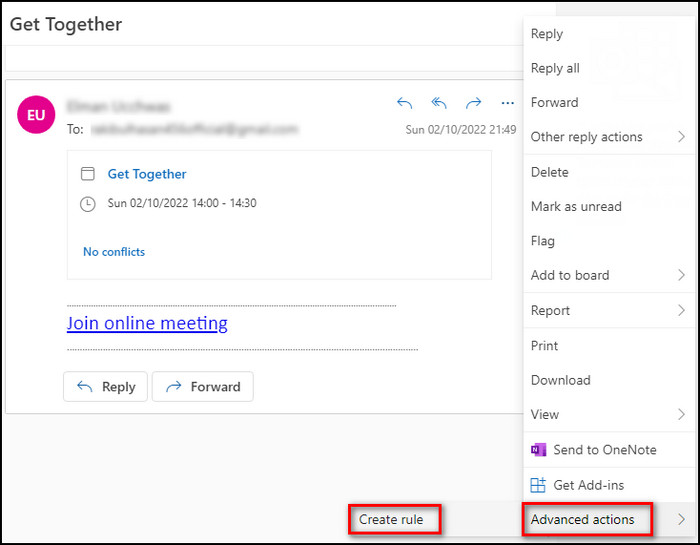
- Choose More actions.
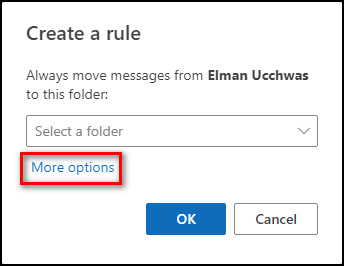
- Pick Move to under Add an action.
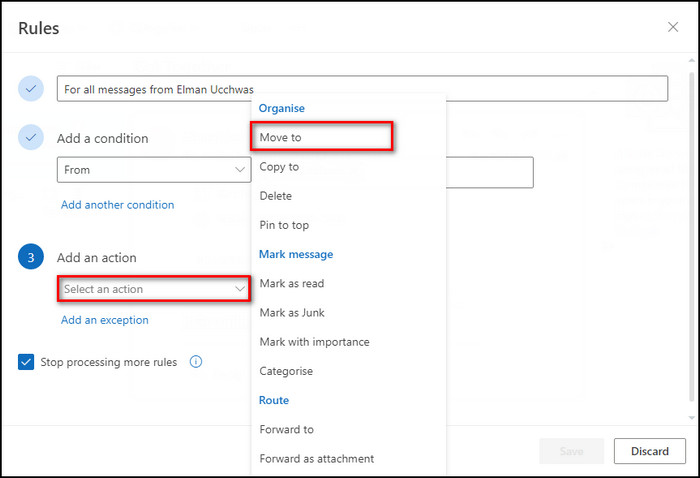
- Choose Archive from the Select a folder dropdown item.
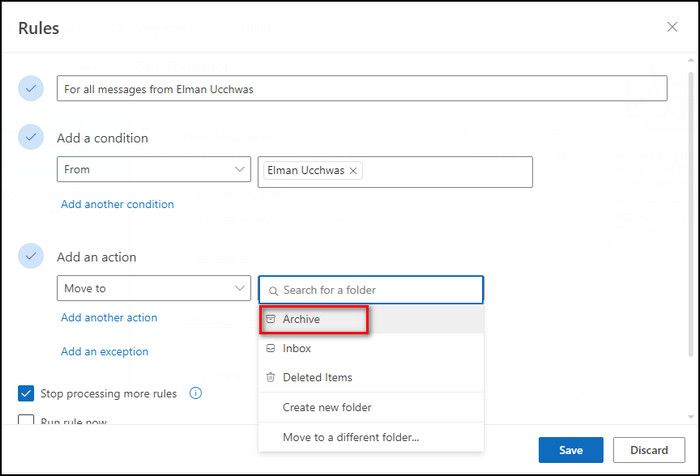
- Click on Save.
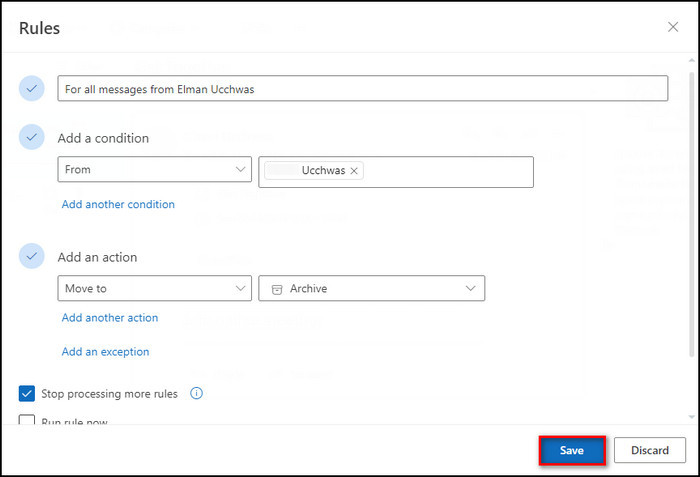
From now on, all the emails from the contact you have selected will be automatically transferred to the Archive folder.
Why Should You Use Auto Archive Emails in Outlook?
Auto-archive moves your emails automatically in the background. You just have to set it up and never think about it again. Thus it saves time. It also reduces your mailbox size and keeps your Outlook interface clean. You can also access the archived items easily.
Here’s why you should auto-archive emails in Outlook:
- It clears your mailboxes and makes them more organized.
- It helps you to find the critical messages you need right now.
- You can save emails in offline folders and open them whenever you want.
- As the archiving process runs automatically in the background, it can save time.
Auto archiving lets you use your mailbox more constructively and only see the emails you need. You can always recover the archived emails later.
Also read how to fix Outlook junk mail rules not working.
FAQs
Why is Outlook not auto-archiving?
Outlook is not auto archiving because the Run AutoArchive every X days option is unchecked. Open Outlook, select File > Options > Advanced > AutoArchive Settings and check the option.
How to archive emails in Outlook automatically?
Follow the steps below to archive emails in Outlook automatically:
- Open Outlook.
- Go to File > Options > Advanced > AutoArchive Settings.
- Check Run AutoArchive every X days and specify how often it should run.
- Tick Prompt before AutoArchive runs.
- Check the Show archive folder in folder list.
- Specify the duration for which to archive items.
- Check Permanently delete old items only if you want to get rid of the items.
- Click the OK button to apply the settings.
Does auto archive delete emails in Outlook?
No, auto-archive doesn’t delete emails in Outlook. It just moves your old emails to a separate folder.
Does Office 365 automatically archive emails?
In Office 365, Emails will be automatically archived every 14 days unless you change the settings.
Final Thoughts
The auto-archive feature cleans your Outlook interface and clears up space without deleting any emails in Outlook. But if you choose the wrong options, the feature won’t work as intended.
However, if you follow all the steps I’ve described here, you can easily enable auto-archive and old emails will be transferred automatically in the background.
Let me know if you have further questions about Outlook or other apps. See you in the comment section.