USB ports are a kind of gateway that helps you to transfer data from one device to another. Along with data, it also passes electric power. Most motherboards come with many USB ports to connect peripherals or share data.
You will find multiple USB ports in the front panel as a desktop user. Almost all use the back panel’s ports for the wired mouse and keyboard.
Suppose all the back USB ports are fully connected, and you need to connect a USB device. So, you insert it into the front panel’s USB port. Surprisingly, it didn’t work!
Moreover, the second one didn’t work either. Well, why aren’t the front USB ports working and how to fix it?
To get all the answers, you must read till the end of this article. So, let’s get started on fixing the USB ports.
Why are Front USB Ports Not Functioning?
Front USB ports might not work due to the accumulation of dirt in the ports, the front USB port got disconnected from the motherboard, or rust damaged the ports pins. Besides, faults in the USB host controller driver, outdated system, and enabled USB selective suspend can trigger this issue.
USB or Universal Serial Bus is the most important port in our computer devices. You can’t send and receive data from your storage drive without it. Desktop motherboards support lots of USB ports. You will find multiple USB ports, such as USB 2.0 and USB 3.0, on the motherboard panel.
USB 3.0 versions are available in both Type A and C. You may find multiple USB ports in the front panel of a high-level desktop case, including USB 2.0 and 3.0.
Those front USB ports might not work when the USB host controller lacks functionality. Plus, some USB 2.0 devices have compatibility issues, like not working with USB 3.0 ports. Sometimes backdated OS and BIOS can kick out the USB port’s functionality.
If you have turned on the Fast Startup feature in your system, you may face front USB ports not working on your PC. So, many reasons like these can provoke this issue. Now let’s move on to the fixing part.
How to Fix Front USB Ports Not Working
You can fix front USB ports that are out of functionality by cleaning up the ports and reconnecting the loosened front USB ports connector with the motherboard. Additionally, uninstalling the USB host controller can fix it. Also, updating the OS and BIOS to the latest version will work.
First, take a look at the USB ports and confirm whether they are clean or not. Sometimes dust clogged up the port pins, making the USB port unusable. There are other factors to look for, so follow the methods below to fix the USB port problem.
Here are the methods to fix front USB ports not working:
1. Clean the Ports
Cleaning the port is the first thing you should do when there is dirt inside the USB ports. The ports become unusable for dirt because the ports pins can’t connect to USB device pins.
So, take a soft brush and gently clean the dirt inside the port. You can also use tweezers to pull out hard debris if any are found. Moreover, you can also use canned air to blow out all the dust inside it.
If you find USB port pins are bent or broken, it’s time to change the port by opening the PC casing. You can also go for a USB hub to extend more USB ports.
2. Look for Loose USB Port Connector
Sometimes the front USB ports connector with the motherboard gets loosened. For this, you won’t be able to connect any USB device from the front panel. So, if you can’t connect any USB device from the front desktop panel after cleaning the dust, it’s time to look for a loose port connection.
First, open the side panel of the casing and then identify the front USB panels cable that is connected with the motherboards with a connector.
That connector connects with the motherboard’s dedicated USB header pins. Check for any loose connection, pull the connector, and plug it in again. I hope doing this will solve the problem if a loose connection triggers it. Perhaps go for the following method when this is not the case.
3. Reinstall USB Host Controller Driver
This is the best method to use when your desktop’s front USB ports are unresponsive. First, disable the USB host controller driver and install it again. Doing this should recover the unresponsive USB port and make it work again. So, follow the below steps to reinstall the USB host controller driver.
Here are the steps to reinstall the USB host controller driver:
- Take the cursor to the Windows Menu icon.
- Right-click on it and choose Device Manager.

- Locate and click on the USB Serial Bus controllers expand button.
- Right-click on the first USB Host Controller driver and choose Uninstall from the options.
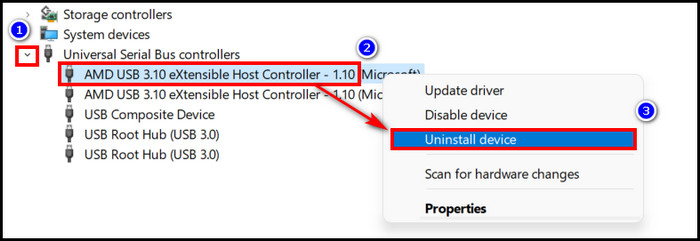
- Follow the onscreen guide to uninstall it.
- Restart your PC.
The driver will install automatically by Windows itself after restarting the PC. So, reinstalling the USB host controller driver will free up any issues with the USB port.
4. Run Scanner for Hardware Changes
You can run the scanner for any changes in the hardware functionality. The process is straightforward, so you must go to the device manager again. Meanwhile, follow the below steps to run the scanner for any hardware changes.
Here are the steps to run a scanner for any hardware changes:
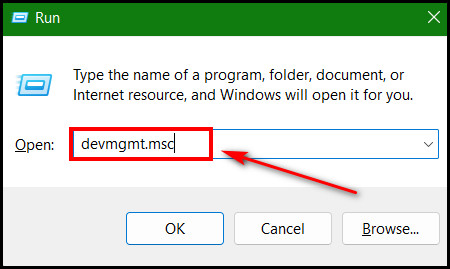
- Go to the Device Manager from the Run dialog box.
- Launch Run and type devmgmt.msc and hit the Enter key.
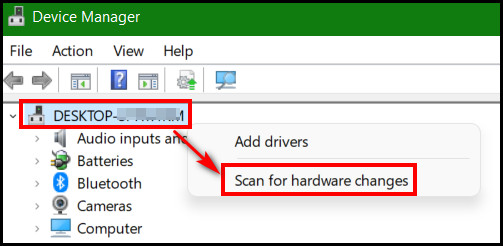
- Right-click on the PC name example: DESKTOP–xxxxxx (combination of alphabet and number).
- Choose the Scan for hardware changes option.
Now it will launch the scanner for any hardware changes in the system and apply any fixes if any issues are found. I hope it will detect the USB port issue and fix that immediately.
5. Run Hardware and Devices Troubleshooter
You can also run a troubleshooter for Hardware and Devices. First, the Windows troubleshooter will run to identify faults in the USB ports and apply the fixes automatically. So, follow the below steps to run the troubleshooter for the Hardware and devices section.
Note: For Windows 10 version 1809 and later, including Windows 11, the Hardware and Devices troubleshooter option is hidden. But you can still run the troubleshooter with CMD with a single command line.
Here are the steps to run the Hardware and Device troubleshooter:
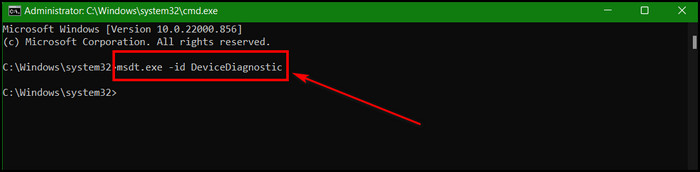
- Launch CMD with Administrative privileges.
- Press Winkey + R and Type CMD in it.
- Press Ctrl + Shift + Enter to open CMD with Admin privileges.
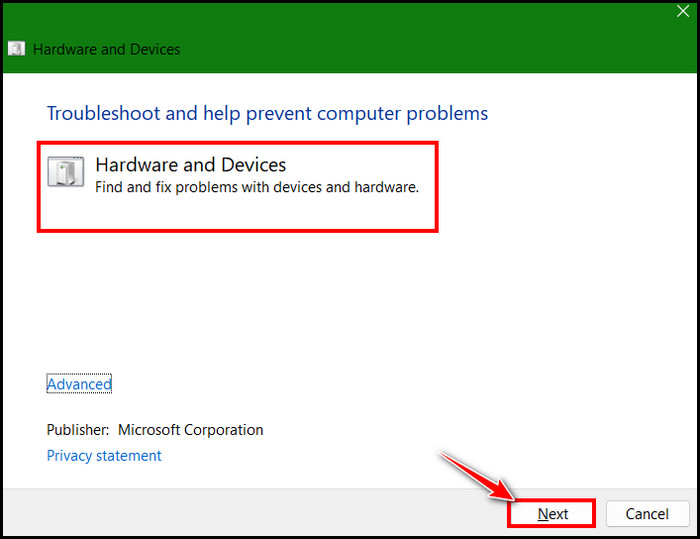
- Type msdt.exe -id DeviceDiagnostic and hit the Enter button. It will launch the Troubleshooter UI for Hardware and Devices.
- Click on the Next button.
Now the troubleshooter will run and scan for the hardware issues and apply the fixes. After applying the fixes, I hope the front USB port’s functionality will return.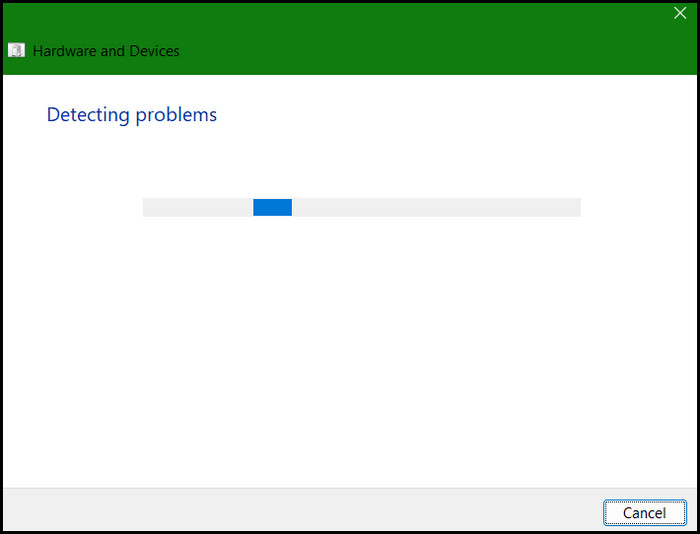
6. Check USB Power Settings
Windows power settings sometimes turn off the USB ports to save power. That’s when you may find the front panels aren’t working. So, follow the below steps to check and change USB power settings.
Here are the steps to check USB power settings:
- Go to the Windows Device Manager.
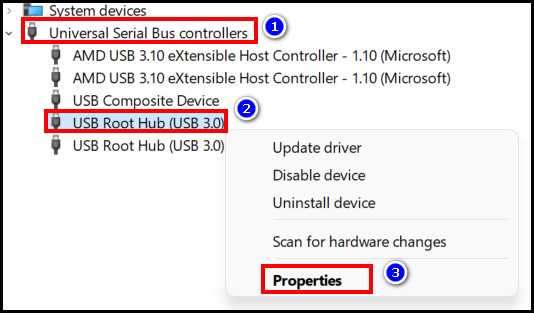
- Click on the USB Serial Bus controllers expand button, which is the last option.
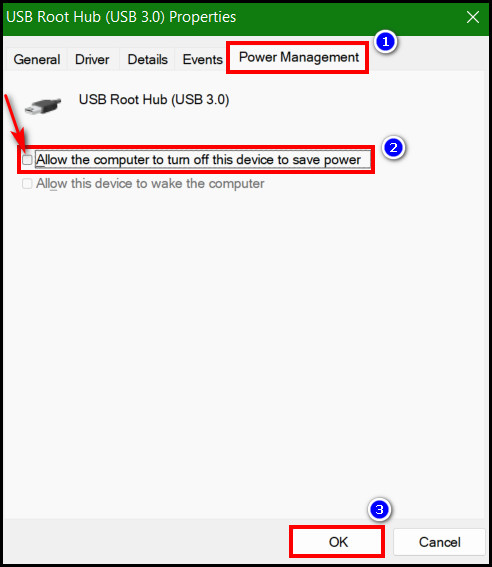
- Right-click on the USB Root Hub and choose Properties from the option.
- Click on the Power Management tab.
- Uncheck the Allow the computer to turn off this device to save power option to disable the feature.
- Click on the OK button.
Repeat the same steps for other USB Root Hubs also. After that, restart the PC. Disabling this feature will turn on the USB port if it was turned off by it.
7. Turn Off Fast Startup
If you are using Windows 10 or 11, you may notice the booting up process is faster, and it happens because the Fast Startup feature is enabled in the system. You may find it pretty advantageous in terms of speed.
But for a fast startup, the system might fail to detect some USB devices. So, turn off this feature to fix the front panel USB not functioning issue.
Here are the steps to turn off Fast Startup:
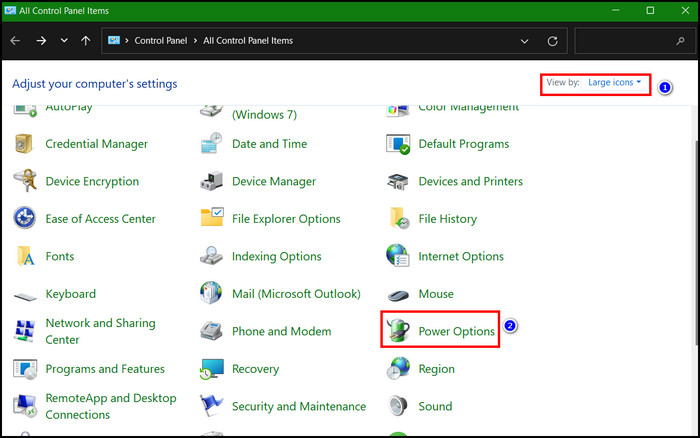
- Go to the Control Panel and click the View by options drop-down icon.
- Choose Large icons and select Power Options.
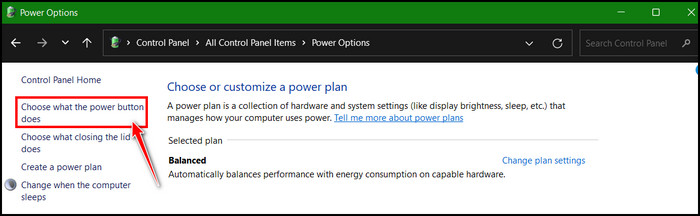
- Click on What the power buttons do from the left pane.
- Click on Change settings that are currently unavailable to enable the grayed-out options.
![click-on-change-settings]](https://10pcg.com/wp-content/uploads/click-on-change-settings-1.jpg)
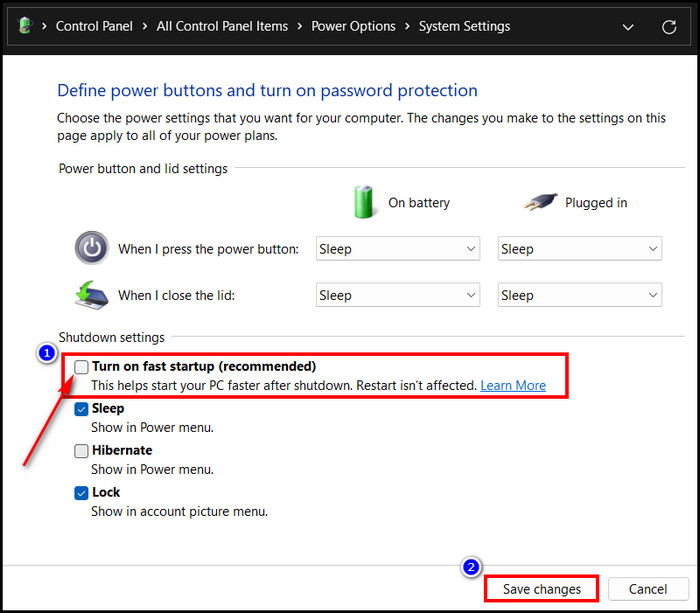
- Uncheck the box to disable the Turn on fast startup (recommended) feature.
- Hit the Save changes button to save the settings.
After that, restart the PC and check whether the USB ports are working again or not. I hope turning off the fast startup will solve the problem, provided that’s causing the issue.
8. Update the USB driver
Sometimes backdated drivers can cause a malfunctioning issue. If you don’t update the USB driver for a long time, it can create problems with the system. For this, the USB ports might stop working.
Just update the USB driver to fix this issue. So, follow the below steps to update the USB driver.
Here are the steps to update the USB driver:
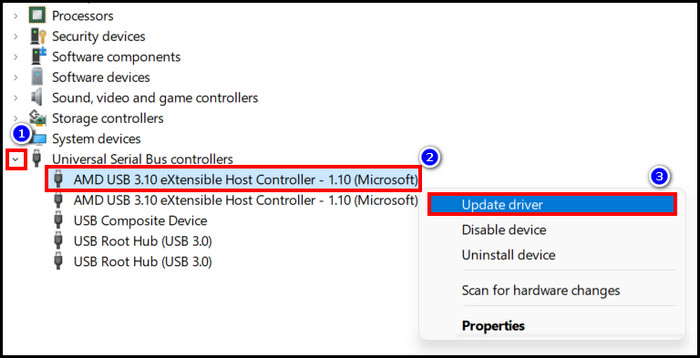
- Go to Windows Device Manager.
- Click on the expand button of the USB Serial Bus controllers.
- Right-click on the USB Host Controller driver and choose Update driver from the options.
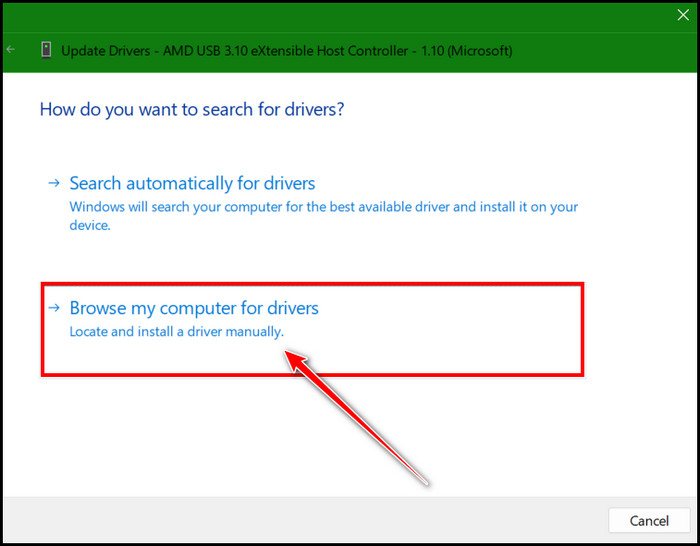
- Choose the Browse my computer for drivers option.
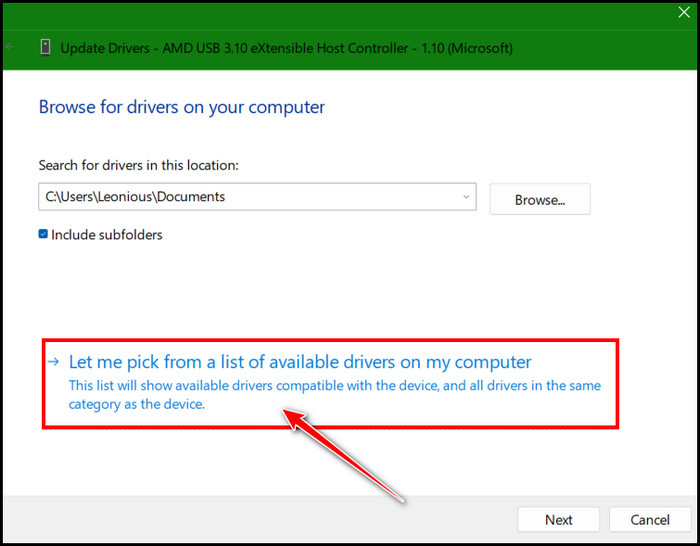
- Choose Let me pick from a list of available drivers on my computer.
- Click to check the box for Show compatible hardware.
- Click on the driver under the Model section and hit the Next button.
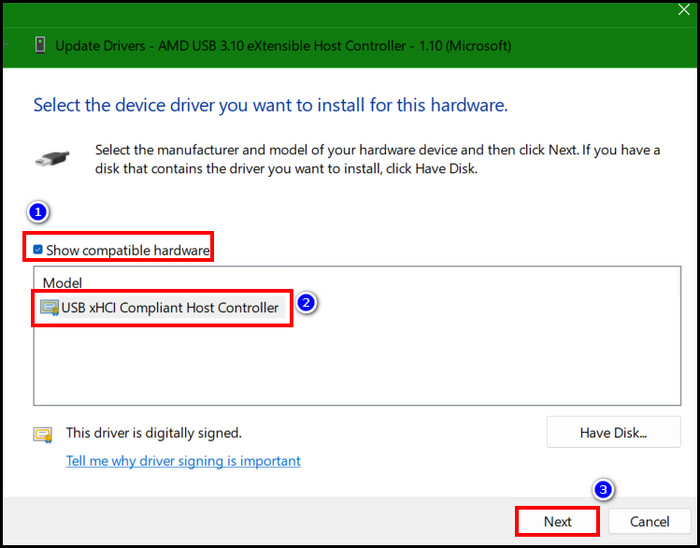
Windows will install the latest driver automatically. Updating the USB driver to the latest version will solve the issue.
Pro Tip: You can go to the motherboard manufacturer’s website to download the latest USB driver version. Look for the motherboard’s model number on their website and enter the download section. Select the latest driver according to your OS. Next, download and install it.
9. Update the Windows
When updating the USB driver and running the troubleshooter didn’t work for you, it’s time to Update the Windows. Perhaps the main problem is with Windows. So, start applying the following steps to update windows to the latest releases.
Here are the steps to update the Windows:
- Press Windows key + I to go to Windows Settings.
- Click on the Windows Update option from the left pane options.
- Click on the Check for updates button.
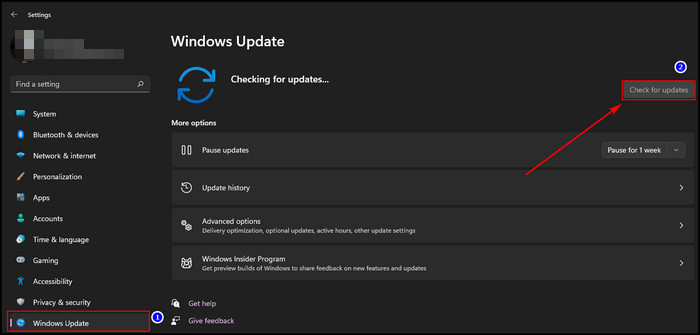
Windows will check for available updates and download if any are found. Next, Windows will install the update and ask for a restart. After the restart, insert any USB device in the front USB port and check if it’s working or not.
After a fresh Windows update, I hope the USB ports will start working again.
8. Update the BIOS
It’s time to update the BIOS when the Windows update didn’t bring back front USB ports functionality. But updating the BIOS is risky for desktops and requires an electrical power backup. You must use an IPS or UPS to survive the power surge.
If your PC shuts down while updating the BIOS, you will end up with a dead motherboard. So, be careful while updating the BIOS. You can update the motherboard’s BIOS in two ways — Manually or by using the BIOS update app provided by the motherboard manufacturer.
To update the BIOS manually, go to your motherboard’s dedicated website to download the BIOS. First, check your current BIOS version and then look for the latest one on the website.
Download the latest BIOS and double-click to install it. Once clicked, the system will restart, and the BIOS update page will appear. Follow the on-screen guide to complete the BIOS updating process.
To update the BIOS by using the BIOS update app, go to the motherboard manufacturer’s website and download the app. Different motherboard manufacturers like ASUS, MSI, GIGABYTE, and ASROCK have their own BIOS updating software.
You don’t need to restart your computer when the BIOS updates through the software. But you must restart the PC when the update is completed. After updating the BIOS, check whether the USB port is working or not. If it’s not working, then the USB port must be damaged.
Note: Change the USB port or use a USB hub to fix the issue when the USB port is physically damaged.
FAQs
Why are my front USB ports not functioning?
The USB port might have gotten loose or damaged after using it for longer. Moreover, a malfunctioned USB host controller or backdated USB driver is responsible for a disabled USB port.
How do I enable the USB ports on the front?
Go to the Windows Device Manager, update the USB host controller driver, and restart the PC after the update. You can also download the latest USB driver from the motherboard manufacturer’s website and install it. Running the Hardware and Device troubleshooter can fix the problem too.
Can I repair a damaged USB port?
Repairing a damaged USB port is difficult; sometimes, it becomes unrepairable. You can permanently remove and replace the whole USB port itself.
Bottom Line
You will need many USB ports when you have too many USB devices and require them all simultaneously. That’s where desktop PCs come in handy due to lots of USB port availability.
But for some unavoidable reasons, front USB ports get out of functionality. That’s why I came up with this article to help you to fix the front USB port and bring them back to work.
After applying the methods, I hope you have recovered the faulty front USB ports.
Let me know if you need further assistance by knocking me in the comment box. See you at the next one. Peace out!