Have you encountered sudden slowdowns and noticed odd errors mentioning AHCI compatibility? When I upgraded my hardware with my OS’s storage drivers, I ran into glitches with the AHCI BIOS boot. Thankfully, after enabling AHCI, the issues were resolved smoothly.
In the following article, I will provide case examples and outline simple steps to help you troubleshoot BIOS not installed frustrations.
Therefore, let’s begin.
What is AHCI BIOS?
AHCI BIOS stands for Advanced Host Controller Interface, enabling communication between your software and SATA devices. More precisely, it signifies a storage mode facilitating communication between motherboards and Serial ATA (SATA) devices like hard disks and SSDs.
AHCI is a way of handling data that’s more efficient than the old IDE standard. It lets each of your drives work independently instead of all together. Furthermore, AHCI takes some of the work off the CPU, making things faster and smoother.
In summary, AHCI is there to maintain communication with storage hardware, and when you encounter any errors like AHCI not being installed, you need to fix the issue. Most of the time, if there are ACHI issues, you will encounter errors when you turn on your PC.
How To Fix AHCI BIOS Not Installed
To fix the AHCI BIOS error, you must enable AHCI for the SATA mode and proper AHCI driver to your system. Furthermore, update your BIOS to the latest version; reset your BIOS if that doesn’t work. Finally, check your storage hardware, like the hardware and connecting cables.
The first time I encountered the AHCI error, my PC took forever to boot up and then displayed the AHCI error code. I started with checking the hardware first, then I changed the SATA mode to AHCI from IDE. That solves my issue.
However, that’s not always the issue. For one of my colleagues, we have to reset the BIOS to solve the issues. I arranged all the possible and practical solutions to fix this AHCI error issue.
Here are the methods to fix AHCI BIOS error:
1. Enable AHCI in BIOS
When first encountering the AHCI BIOS-related errors, you must check and enable AHCI from your BIOS. AHCI or RAID has better compatibility than the IDE. Therefore, tweaking the SATA drive can solve issues like sudden crashes or BSOD (Blue Screen of Death).
Follow the below steps to enable AHCI in BIOS:
- Restart your desktop or laptop.
- Press the F2 or Delete key continually to enter the BIOS.
- Navigate to the System and hardware configuration.
- Locate AHCI or SATA mode and turn on AHCI or set the SATA mode to AHCI.
- Click on Save and Exit.
That will enable AHCI on your system. You can also turn on AHCI on Windows 11 without getting into the BIOS. Usually, AHCI is activated by default. However, check properly when you encounter the issue, and make necessary changes when needed.
2. Update the AHCI Driver
When your AHCI drivers are not installed properly, you might face an AHCI BIOS error or BSOD. That’s why you need to install or update the latest AHCI drivers for your system.
Here are the steps to update AHCI Driver:
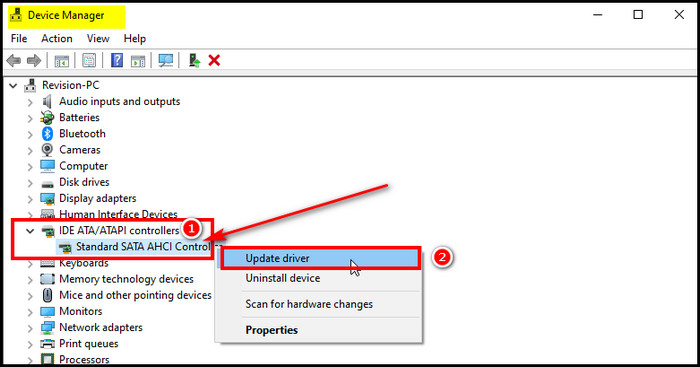
- Search for device on the search bar and launch Device Manager.
- Expand the IDE ATA/ATAPI controllers.
- Right-click on the Standard SATA AHCI Controller and click on Update Driver.
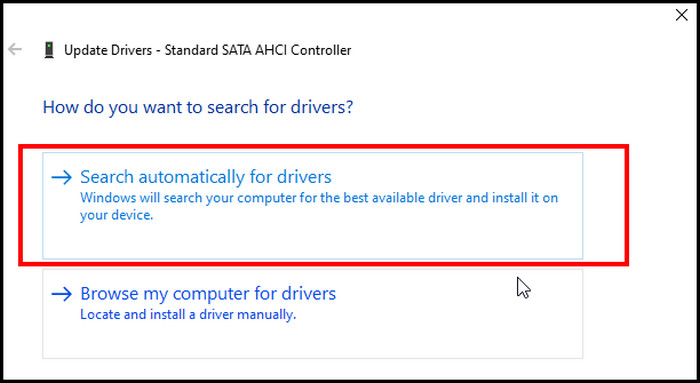
- Choose Search automatically for drivers and follow the process.
After you complete the process, your AHCI driver will get updated. Now, let’s give your system a quick reboot and see if that fixes the problem.
3. Update the BIOS to the Latest Version
In case your BIOS version is old, you might experience many errors. Therefore, updating the BIOS to the latest version is the best choice. Also, you can update BIOS from Windows.
Follow the below steps to update your BIOS:
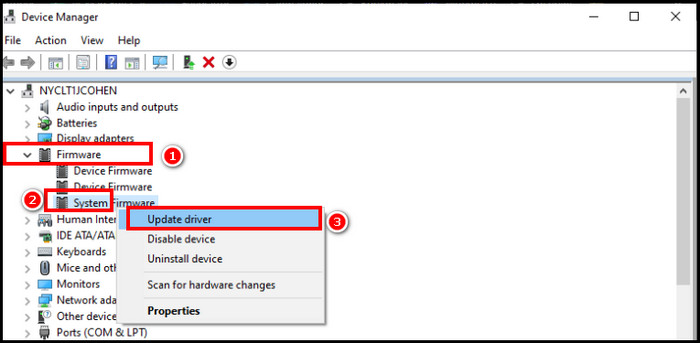
- Launch Device Manager.
- Click on Firmware.
- Right-click on System Firmware and choose Update driver.
- Choose Search automatically for drivers and proceed with the on-screen instructions.
After the update completes, launch your PC and check for the error.
4. Reset your BIOS
Reset your BIOS and check how that affects the AHCI in the case where the BIOS is not installed when the issue persists. Resetting the BIOS will return it to its default settings, which may resolve the issue.
Follow the below steps to reset your BIOS:
- Download the latest version of BIOS from your Motherboards support page.
- Unzip the file and take it to a USB flash drive.
- Locate the UEFI Flash port on the motherboard’s USB hub (it may be written BIOS or colored differently) and insert the flash drive there.
- Reboot your PC and get into the BIOS menu.
- Initiate the UEFI’s firmware update or flashing tool.
- Follow the on-screen instructions to complete the process.
Your BIOS is now being reset to its default settings. Restart your system and check for any issues. Resetting your BIOS should resolve any AHCI problems.
5. Reinstall Windows
If none of the above methods work, reinstalling your Windows system is the last resort. Sometimes, the issue is persistent, and you need to get rid of the old system to get away from the issue.
Reinstalling Windows will wipe your computer clean, so make sure you back up any important files before you do it.
Here are the steps to reinstall Windows:
- Go to the Microsoft site and download your preferred Windows version.

- Make a bootable USB with the Windows installation file and insert the USB.
- Restart your PC, enter the boot menu by pressing F2 or Delete, and your system will automatically open the Windows installation Window.
- Navigate to the Drive option, locate your C drive, and format it.
- Select your C drive to Run the Windows setup after formatting it.
- Follow the on-screen instructions to finish the setup.
After the setup is completed, install the drivers properly. This will ensure that your hardware is appropriately recognized and functioning correctly. As it is a new system, all of your previous issues with AHCI BIOS will be resolved.
Wrap-Ups
You can make some simple changes to your BIOS to resolve the BIOS not installed message. Moreover, the AHCI setting can help you update your BIOS without problems and improve your computer’s performance.
Following the methods in this article can help you quickly eliminate confusion and get the most out of your hardware.