For the past few weeks, I have been getting reports from several users complaining that there’s something wrong with Discord, and it just keeps disconnecting and reconnecting non-stop.
The first thing I did was check Discord’s official community pages for any updates on this incident, and there was nothing. While most may consider this bad news, I was happy to see this.
If there’s nothing wrong with Discord itself, you only need to tweak a few simple settings to get your Discord back up and running again. Since there’s no specific way to find the root of the problem quickly, you will have to go through all the methods one by one.
Don’t worry, I have kept all the steps short and to-the-point so you won’t be spending too much time reading this article. So, please grab a cup of coffee and join me on this ride.
You may also like to read about what does a Disabled Discord Account look like?
Why Does Discord Keep Disconnecting Then Reconnecting?
Discord keeps disconnecting and then reconnecting, most probably because there’s an issue with your network connection. If that’s not it, there’s an excellent chance that the local server area you are currently connected to has high traffic, which means it’s busy.
After reading those lines, you might be thinking that simply changing the discord server area should fix the issue. Unfortunately, the manual server selection has been turned off according to the latest update.
Discord introduced a new mechanism where the app will automatically determine your current area from your IP address and location and then connect you to the closest available server.
Apart from this, you might be getting this problem because your Discord application doesn’t have the required permissions or the installation wasn’t completed properly. You should also try disabling high-priority audio packets for better network stability.
Related contents you should read about how to add Emojis to Discord Channels?
How To Fix Discord Keeps Disconnecting Reconnecting
Before you start applying these methods to fix your issue, I recommend doing some basic troubleshooting first.
These troubleshooting steps could be anything from rebooting your PC to re-checking your internet connection.
Some more guides on Discord not Installing Error.
Here are the steps to fix Discord keeps disconnecting and reconnecting:
1. Turn Off Quality Of Service High Packet Priority
This is a setting that most users overlook, and it’s totally fine to do that if you don’t have any issues. However, when there are network issues, the first thing you want to disable is the Quality of service toggle.
When this toggle is turned on, you get a slightly better audio quality on calls with the cost of network stability. You won’t see a noticeable difference after turning it off.
These are the steps to turn off Quality of Service High Packet Priority:
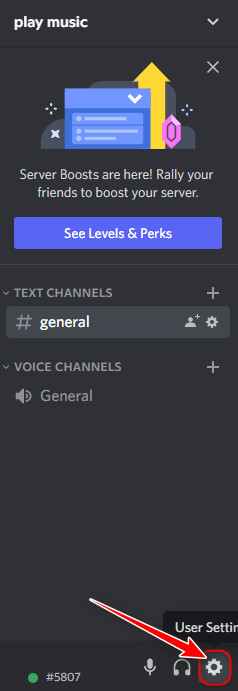
- Open the Discord application on your desktop.
- Launch the User Settings page selecting the tiny gear icon at the bottom left corner, next to your username and avatar.
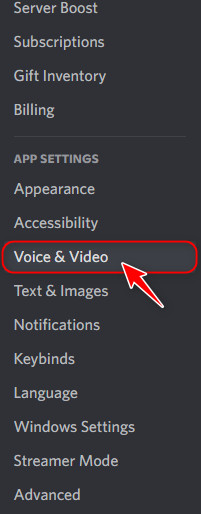
- Once you are on the settings page, scroll down on the left panel to the App Settings section, and click on ‘Voice and Video’.
- Switch to the right panel and scroll to the Quality Of Service section, which comes after the Voice Processing section. Then, disable the toggle for ‘Enable Quality Of Service High Packet Priority’.

- Once that’s done, exit the page by clicking the X icon at the top right corner.
Re-check whether your issue gets solved after this and if it does not work, move on to the next solution.
Check out the easiest way about Discord showing Blank Screen on Startup.
2. Tweak Audio Subsystem Settings
Another setting that has to do with higher quality is the audio subsystem settings, and this needs to be set to legacy for a stable internet connection.
Follow our guide to Stop Discord from Opening on Startup.
Here are the steps to tweak audio subsystem settings:
- Launch the Discord app and click the gear icon next to your username.
- After that, switch to the ‘Voice and Video’ tab from the left panel in the App Settings category.

- This time, scroll further below to the Audio Subsystem section and expand the drop-down menu below it. Select the Legacy option for better network stability.
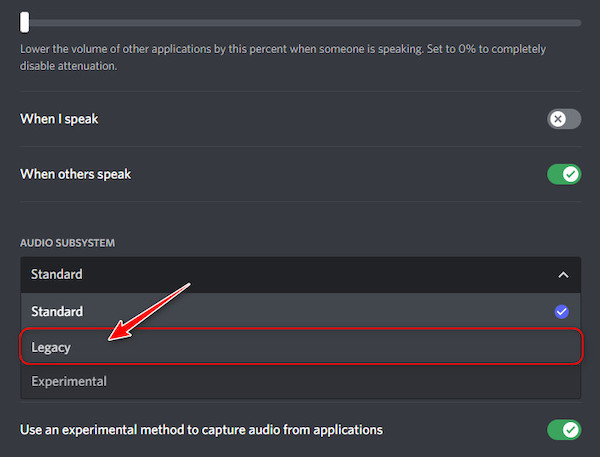
- Exit the page by selecting the X icon at the top and check whether there have been any improvements.
3. Use Region Override
If you can recall, I mentioned earlier that Discord had introduced an automatic method of server selection that is turned on by default. While this may sound like a good thing, sometimes, the server selected by Discord’s algorithms is not optimal.
One point to keep in mind is that region override only works for voice channels, so if your issue isn’t associated with voice channels, skip to the next fix.
Follow these steps to use region override:
- Launch the Discord application from your Desktop and switch to the server where you are having network issues.
- Hover your cursor above one of your voice channels to display a tiny gear icon next to it. Click on that to proceed.
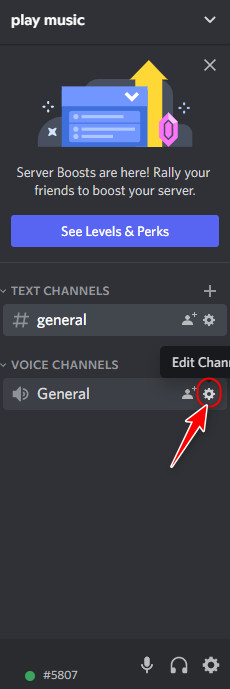
- Make sure you are on the Overview tab from the left panel on the next page.
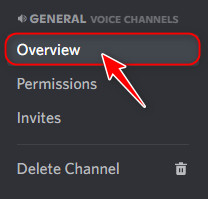
- After that, scroll to the Region Override section on the right pane and expand the drop-down menu to choose any country. For better results, I suggest choosing your own country or one that’s really close to your country.
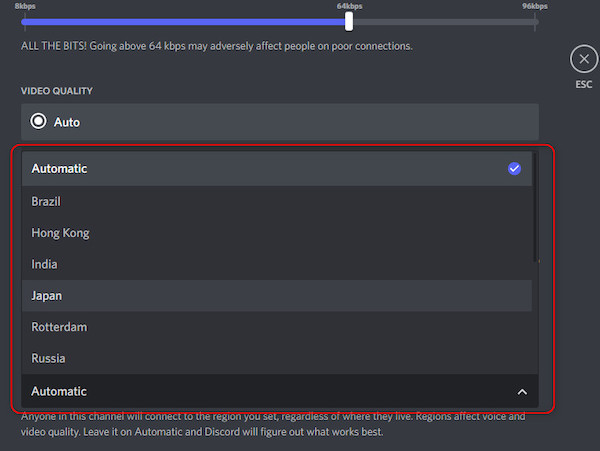
- Close the page, restart the Discord app, and check if there are any connection issues now.
4. Turn Off All VPN Connections
VPNs or Virtual Private Networks are a popular tool these days to bypass restrictions and access hidden content. However, Discord has implemented several security features that can detect VPN connections.
This means that your connection can become unusable if your VPN is connected to Discord. All you have to do is launch your VPN app and click on the Disconnect button to disable it. 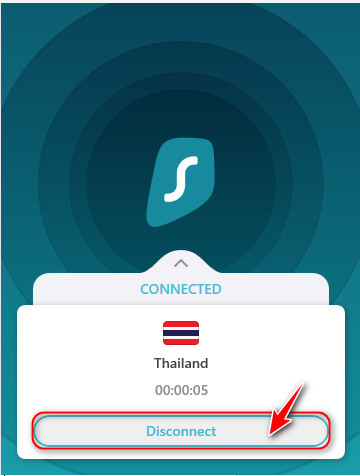
5. Check Firewall Settings
All versions of Windows have a firewall system installed to ensure safety from malicious apps and viruses.
The problem with this is that it tends to block connections to apps that are not harmful as well. You need to check if Discord is one of them.
Here are the steps you need to follow to do this:
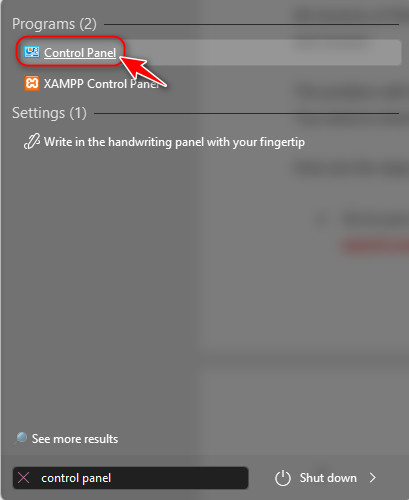
- Go to your Start menu, search for Control Panel and press the enter key.
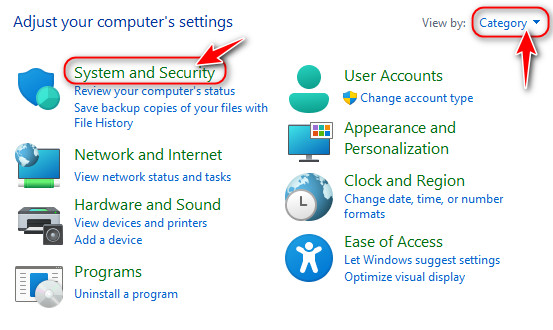
- Check to ensure that the Control Panel is in the Category view from the top right corner, and click on System and Security at the top left corner.
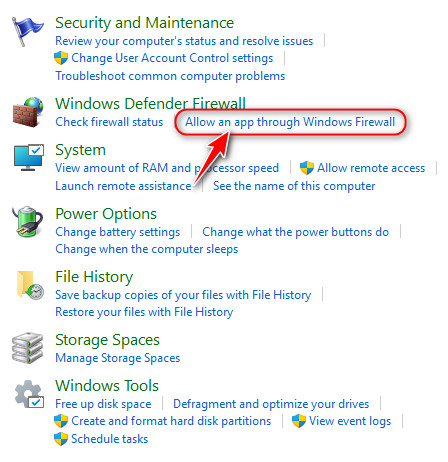
- On the next page, click on ‘Allow an app through Windows Firewall’ below the Windows Defender Firewall section.
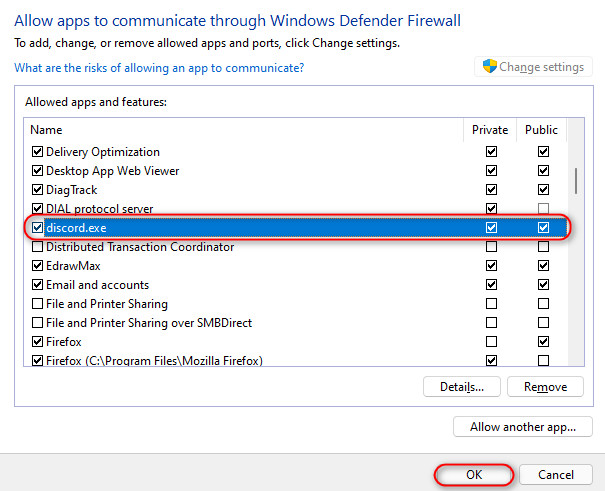
- You should see a list of all the programs and features on the next page. If you don’t see Discord in the list, click on Allow another app and select the executive file of Discord (discord.exe).
- Once you find Discord in the list, enable all three check boxes next to it and click on OK.
6. Perform a DNS Flush
Your DNS cache contains tons of web pages when you are connected to your internet, and after a certain point, it can cause issues with your network. You usually don’t have to do this manually, but if you are facing connection issues, you need to try this.
Here are the steps for flushing the DNS cache:
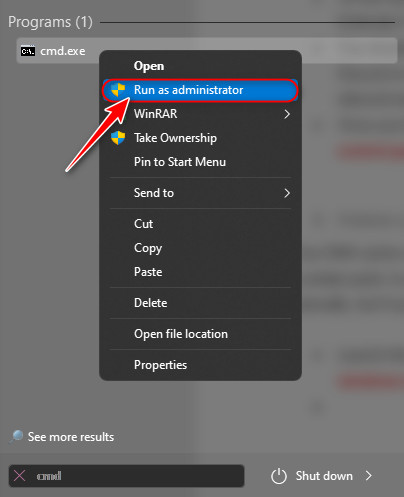
- Launch the Start menu, search for CMD, right-click on it and run it as administrator.
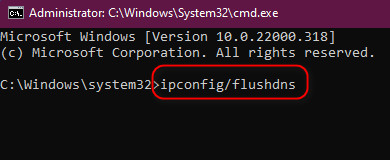
- Once the Command Prompt window appears, type in the following command and press Enter.
ipconfig/flushdns
- Perform a simple reboot and relaunch the Discord application.
7. Update Internet Drivers
Network drivers are an essential component of any operating system, and it’s mainly required for the network components of your CPU to communicate with the software in your computer correctly.
Follow these steps to keep internet drivers up-to-date:
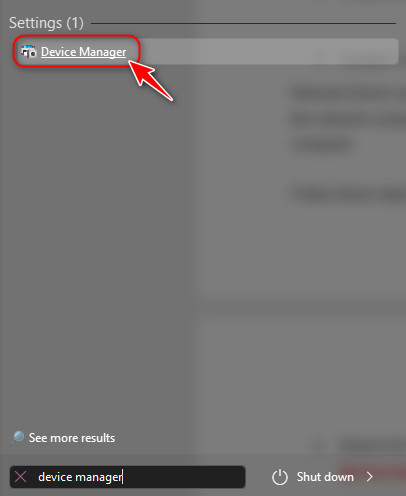
- Search for Device Manager from your Start menu and hit enter.
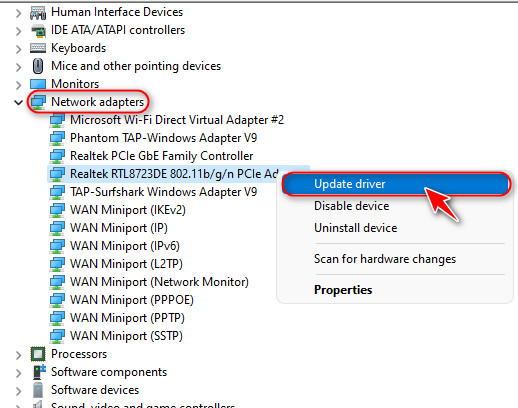
- Next, expand the Network Adapters category by double-clicking, right-click on the device you are currently using, and selecting Update Driver.
8. Uninstall and Reinstall Discord
If none of the methods you tried earlier worked, there’s a very good chance your Discord installation might be corrupted. The only way to fix this is to reinstall Discord from scratch.
Note that your issue won’t be fixed by simply installing Discord over your existing installation.
Follow these steps for fixing your Discord installation:
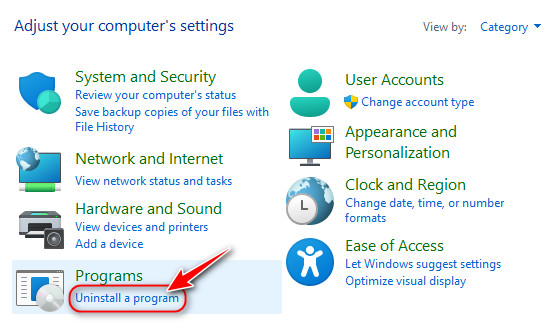
- Launch Control Panel from the Start menu as you did earlier.
- Click on Uninstall a Program in the Programs category.
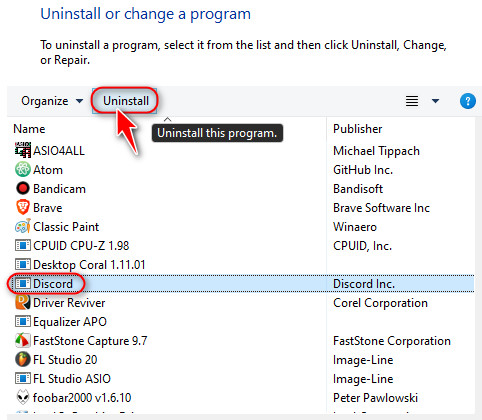
- Locate Discord from the list and click on the Uninstall button to delete the app and all related files.
- After that, download the latest Discord installer from their website and reinstall it. Ensure you have enough free space and a stable internet connection before starting the installation.
Final Thoughts
That are all the ways to fix your Discord problems, and as you might have noticed, they don’t require too much time. Please let us know how well they worked for you in the comments below.
Have a wonderful day ahead!