You are probably trying to install your new SATA SSD or extended storage in your Windows PC, but you are constantly getting an error.
It is because your storage configuration is still using the old IDE method, which doesn’t support Solid State Drives. You have to change your settings to AHCI to be able to use your SSD.
In this guideline, I am going to assist you in switching on AHCI mode on your windows 10.
So keep reading till to turn on AHCI on Windows 10!
Follow our guide how to turn on auto login in Windows 10.
What Is AHCI?
The SATA interface supports a connection method known as the Advanced Host Controller Interface (AHCI). It is the most up to dated data transfer host, as the use of IDE connection is no longer in use. With the new AHCI mode, SATA connections may quickly transmit data.
The AHCI standard was first produced by Intel in 2004 and defines the AHCI’s operational behavior and software interface.
Intel’s Advanced Host Controller Interface (AHCI) is a non-implementation-specific interface standard for Serial ATA (SATA) host controllers on its motherboard chipsets. To facilitate communication between the host, onboard storage and associated storage devices, SATA details a memory management structure for use by computer hardware manufacturers.
AHCI provides a uniform technique for identifying SATA/AHCI adapters and configuring and reprogramming them for use by software and hardware makers. AHCI is not part of the SATA 3 Gbit/s standard, although it does allow host computers to take advantage of SATA’s more sophisticated features, including hot swapping and native command queuing.
Find out how to enable BitLocker in Windows 10 Home.
How To Setup AHCI Mode In Windows 10
To enable Advanced Host Controller(AHCI), first of all, you need to turn on the mode in your BIOS settings. Then you have to re-install a fresh Windows 10 on your PC. However, if you want to enable AHCI After installing Windows 10, you can do that using the registry editor or command prompt.
You cannot enable AHCI without turning it on from the BIOS settings. Also, if you are changing the BIOS settings, then you have to install a new Windows 10 on your PC to prevent possible data crashes.
And if you don’t want to install fresh windows, then you can turn on AHCI using the registry editor or command prompt.
Now that you know the procedure let’s get into the troubleshooting steps.
Follow the steps to enable AHCI In Windows 10:
1. Enable AHCI Mode In BIOS
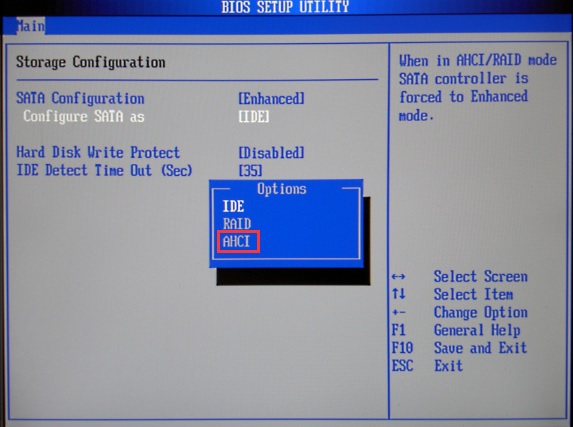
First, you have to change the settings in BIOS mode. If you can configure the storage settings in the BIOS mode, then your next step would be installing Windows 10.
Follow the steps to enable AHCI mode:
- Reboot your PC.
- Press F2 to enter BIOS settings.
- Choose Advance Settings.
- Go to Storage Configuration.
- Select SATA Configuration
- Set SATA Configuration to AHCI.

After the Storage configuration, you have to install a fresh Windows 10 then you will be able to use SSD storage in windows 10.
Here’s a complete guide on how to sign out of Windows 10.
2. Install Windows 10
A fresh Windows 10 installation is mandatory in order to activate the AHCI mode, or else there is a big possibility of crashing the whole storage system. It will be preferable if you get a bootable pendrive to install Windows 10. And while you are installing the fresh Windows, make sure you choose the professional X64 edition.
Follow the steps to install windows 10:
- Insert the Bootable FAT32 USB pendrive into your PC.
- Restart your PC.
- Press any key to enter the installation process.
- Follow the on-screen instructions.
Windows 10 installation would take around 30-35 mins. Sometimes the installation process might take more than that. Your PC will take reboot automatically for few times. And eventually, when the installation is done, you will be able to set up your username and password.
Now that you have installed windows 10, you will be able to use any SSD storage via AHCI on your PC.
Follow our guide step-by-step to fix Windows 10 searching index problem.
3. Enable AHCI Using Registry Editor
You can easily turn on the AHCI mode using the Registry Editor if you don’t want to install a new Windows.
Follow the steps to enable AHCI using the registry editor:
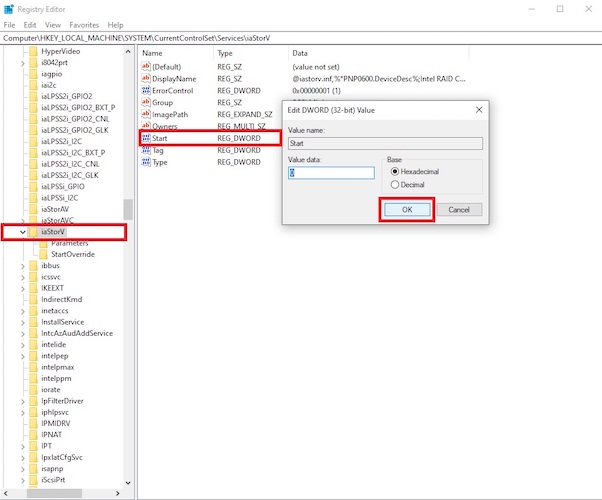
- Open Registry Editor.
- Go to HKEY_LOCAL_MACHINE/SYSTEM\CurrentControlSet\Services.
- Scroll down and select iaStorV.
- Double-Click on Start.
- Set the Value to 0.

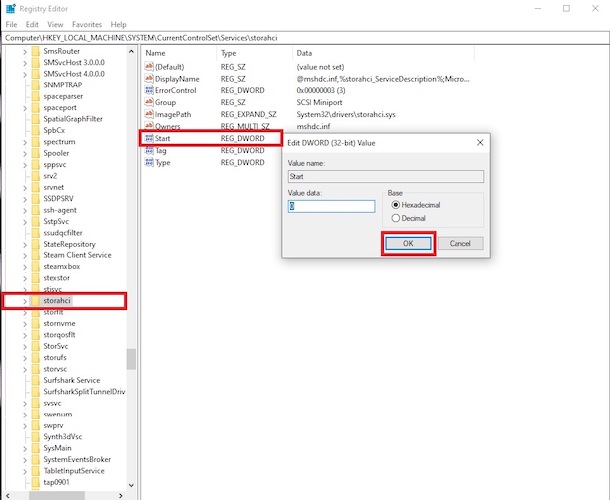
- Navigate to path HKEY_LOCAL_MACHINE/SYSTEM\CurrentControlSet\Services/storahci.
- Tap on Start.
- Set the value to 0.

This should allow you to use your SSD drive without any error; if you are facing issues enabling the AHCI via this method, then follow the next method.
4. Turn on AHCI Using Command Prompt
Enabling AHCI via the using command prompt is a bit easier than the last method. As the PC does the whole work for you, you just have to write the command and change the BIOS settings from your PC.
Follow the steps to turn on AHCI using the command prompt:
- Click “Start” and then type “cmd.”
- Run As Administrator by right-clicking.
- Enter the command: bcdedit /set {current} safeboot minimal.
- Turn the computer back on and go to the BIOS Setup.
- Change the SATA configuration mode from IDE to AHCI.
- Save your changes, and Windows will automatically start up in Safe Mode.
- Turn on Command Prompt as Admin.
- Type in the command: bcdedit /deletevalue {current} safeboot.
- Hit Enter.
After the reboot, your PC will automatically boot in the AHCI mode. Check your storage device and local directory to see if all the drives are enlisted properly.
Should I Activate AHCI Mode?
You Should Activate AHCI mode as it allows you to use Solid State Drive on your Windows PC and boost the transfer rate significantly. With the IDE mode, you will only be able to use the HDD. Also, not many motherboards come with any newer support for IDE as it is no longer in use.
The Advanced Host Controller Interface (AHCI) feature is activated in the default setting of the Unified Extended Firmware Interface (UEFI) or BIOS on most motherboards. The IDE mode on some older motherboards must be changed to the AHCI mode before the OS can be installed.
Input/Output Device Express is a legacy SATA interface option that is very identical to its predecessor, PATA. This kind of operation was commonplace until AHCI became widely available and unleashed the full power of today’s drives in terms of performance and functionality.
Hot-swapping and Native Command Queuing are only two of the many innovative SATA capabilities made possible by AHCI (NCQ). Through the use of hot swapping, SATA drives may be replaced without powering down the machine.
By reducing the amount of time spent moving the read-write units and boosting the AHCI protocol’s access time, NCQ improves the responsiveness of SSDs and storage devices to many data requests at once. NCQ boosts the speed of massive file transfers on SSDs.
When using a fast hard drive, using AHCI mode can enhance your computer’s writing speed by 10-20%, providing a noticeable performance gain. When AHCI is turned on, users should expect to spend less time copying and pasting data into files.
Final Thoughts
Before installing Windows 10, you must go into the BIOS and turn on AHCI. However, if you have already installed Windows 10, you may turn on AHCI mode by going into the registry editor or the command prompt. This will allow your computer to recognize your hard drive as having an AHCI interface.
Though a clean installation of windows 10 is preferable as, without a clean installation, your storage device might crash, creating more hassle for you.