The startup repair diagnoses the issue in a storage drive and solves the problem of missing or damaged Windows system files.
Startup repair starts working when the PC is turned on, and there’s a file missing in the system directory. Usually, the process takes a short time to complete. But, it can take longer, depending on the issue.
A few years ago, I also encountered a startup repair in my Windows 7. These moments are very intensive, and problems may occur at any time. However, I’ve managed to solve my problem using some effortless solutions.
This article will inform the normal startup repair time in Windows 7 and the procedure to solve any issue with the startup repair.
Without wasting any time, let’s begin.
What is Startup Repair?
Startup repair is a tool to fix problems, such as damaged or missing Windows system files preventing the computer from starting correctly. It appears when the PC is booting, and the process fails to execute correctly. The startup repair scans the files in your computer to find the problem.
The repair tools find the best way to solve the issue and replace or delete the corrupted or damaged files.
The incident may occur when the PC shuts down unexpectedly, turns off suddenly due to insufficient power or electricity, and switches off the PC while updating.
The process starts automatically and completes most of the normal issues without any problem. But, depending on the problem, the repair time may vary.
If you are worried about the startup repair time or don’t know the normal repair time in Windows 7, consider reading the following passage.
How Long Does Startup Repair Take in Windows 7
The startup repair process in Windows 7 normally takes between 15 to 45 minutes. However, the repair time varies depending on the issue. In most cases, the problem is minimal and solved relatively quickly with the startup repair. For a typical issue, the process may take less than 5 minutes.
If the problem is severe or a couple of critical Windows files are damaged, it can take more time than a regular startup repair.
Though, the startup repair time is directly involved with the storage drive.
An SSD is much faster than an HDD and consumes less time to repair the files. Also, the storage drive speed becomes the main factor.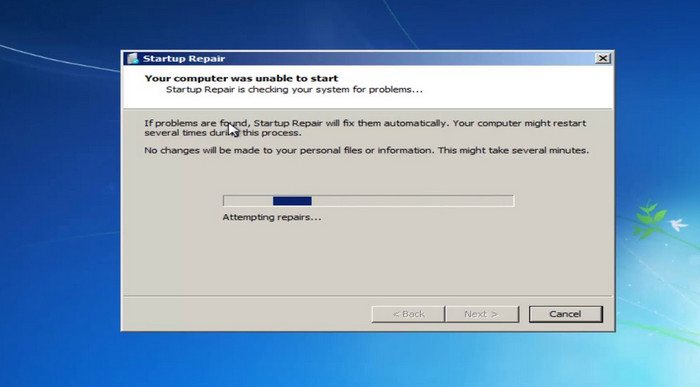
But, in every case, the process should finish in 45 minutes. If it’s taking a long time, there’s something wrong with the startup repair tool. Read the following procedure to learn the reason behind the problem.
What Causes Startup Repair Stuck in Windows 7
Usually, the startup repair process completes within 45 minutes. But, if the period exceeds, one of the main reasons is the process is stuck. The startup repair is getting stuck at the boot screen because of corrupted MBR & BCD files and damaged system files.
To get proper knowledge about the reason behind stuck startup repair, continue reading the passage.
Here are the reasons behind startup repair stuck in Windows 7:
Corrupted MBR
The MBR or Master Boot Record identifies and tells the computer where the system’s operating file is located. If any virus or errors corrupt the MBR file, it can cause the startup repair to get stuck.
Damaged System File
Windows fails to verify the file when booting up if the system file is missing or damaged. Thus, the startup repair process gets stuck.
Corrupted Boot Partition
BCD or Boot Configuration Data contains information about the operating system and boot parameters. If the partition gets damaged or corrupted, the startup repair may get stuck during the process.
The problem is very worrying, and it requires a quick solution. To learn about the solutions, consider reading the following passage.
How to Fix Stuck Startup Repair in Windows 7
Running the chkdsk command and pressing the Disable automatic restart on system failure option can fix the stuck problem in startup repair. The chkdsk can detect the problem in your system file, and disabling the automatic restart will stop the startup repair loop issue.
The startup repair stuck issue and looping can freeze the screen and prevent you from opening the computer. Follow the procedures below to fix the stuck startup repair issue in Windows 7.
Here are the methods to fix stuck startup repair in Windows 7:
1. Run CHKDSK
The chkdsk command scans and finds the error in a drive. If any error is encountered, it shows the process to fix it.
To find the procedures to run the chkdsk command, follow the instructions below.
Here are the steps to run the CHKDSK command:
- Boot your Windows.
- Click the F8 button.
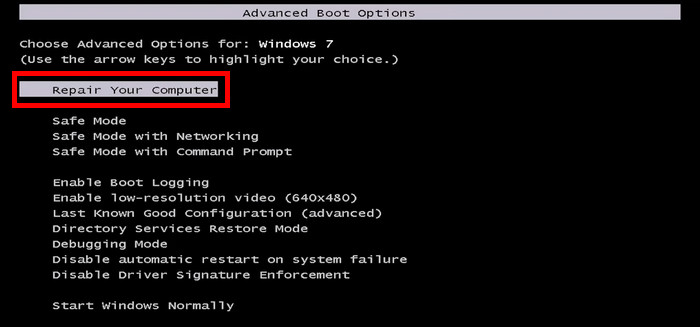
- Select Repair your computer from the Advanced Boot Options.
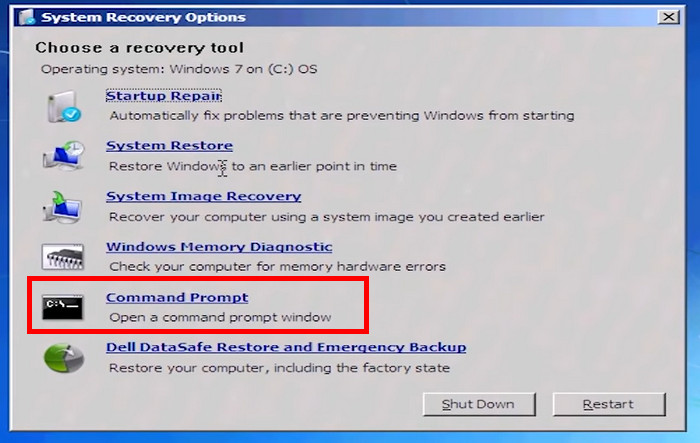
- Press on Command Prompt from the System Recovery Options.
- Type chkdsk /r c: and press the Enter button.
It will check if the installation contains any corrupted, invalid or deleted system files.
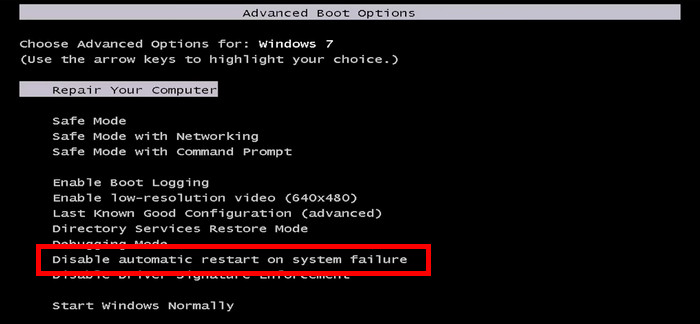
2. Disable Automatic Restart
Disabling the automatic restart allows the user to proceed further to find the actual reason. Otherwise, the startup repair will start a loop and interrupt the process.
For disabling the automatic restart, follow the instructions below.
Here are the procedures to disable automatic restart in Windows 7:
- Restart your PC.
- Wait for the BIOS to complete the POST process.
- Click on the F8 button from the keyboard.
- Select the Disable automatic restart on system failure from the Advanced Boot Options.
- Press the Enter button to boot your PC.
However, if the startup repair fails to repair the computer automatically in Windows 7, consider reading the process from the following passage.
How to Fix Startup Repair Can’t Repair This Computer Automatically in Windows 7
You can fix the startup repair that can’t repair this computer automatically by running the sfc /scannow command and rebuilding the Boot Configuration Data or BCD. Additionally, users can solve the startup repair issue by fixing the Windows file using the command prompts.
The process is crucial, and you must be careful while doing it. Read the instructions below to solve the issue.
Here are the ways to fix startup repair can’t repair this computer automatically:
1. Run sfc /scannow
Run the sfc /scannow command in the safe command prompt to scan the critical system files and replace the damaged ones.
Continue reading the process below to learn how to run the sfc /scannow command effortlessly.
Here is the process to run the sfc /scannow command in Windows 7:
- Restart your PC.
- Press the F8 button to enter the Advanced Boot Options.
- Click on Safe Mode with Command Prompt.
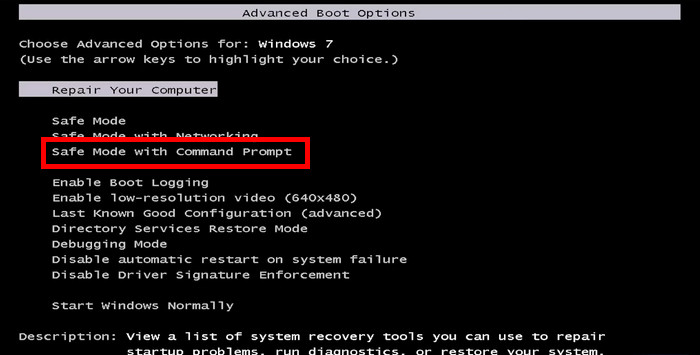
- Type sfc /scannow /offbootdir=d:\ /offwindir=d:\windows in the Command Prompt.
- Press the Enter button.
If the issue persists, try rebuilding the BCD or Boot Configuration Data by following the instructions below.
2. Rebuild the BCD
The Boot Configuration Data stores the information about the system files and disk partition. If the startup repair isn’t automatically repaired, try rebuilding the BCD.
Allow me to guide you through rebuilding the BCD through the procedure below.
Here are the steps to rebuild the BCD:
- Boot your PC.
- Press the F8 button repeatedly.
- Click on Repair your computer from the Advanced Boot Options.
- Press on Command Prompt from the System Recovery Options.
- Type the bootrec /fixmbr, bootrec /fixboot, bootrec /rebuildbcd commands, and press the Enter button.

I hope the issue is already solved. But, if you’re still facing the problem, there are some issues with the Windows file. Fix the files using the instructions discussed below.
3. Fix Windows File
If Windows is missing any file or any files are corrupted, you must fix the Windows file using the command prompt.
Learn the most straightforward procedures to fix the Windows file from below.
Here are the ways to fix the Windows file from command prompts:
- Restart your PC.
- Click on the F8 button continuously.
- Press on the Repair your computer from the Advanced Boot Options.
- Click on the Command Prompt from the System Recovery Options.
- Type the following command and press the Enter button after typing a command.
- Command 1: – C: (change the CMD path)
- Command 2: – dir
- Command 3: – cd\windows\system32\config
- Command 4: – dir
- Command 5: – MD mybackup
- Command 6: – copy *.* mybackup
- Command 7: – CD RegBack
- Command 8: – DIR
- Command 9: – copy *.* ..
- Command 10: – exit
The above process should solve the startup repair can’t repair this computer automatically if Windows contains any corrupted or damaged file.
Frequently Asked Questions
Does the system repair delete personal files?
No, system repair only scans and repairs the system files. It doesn’t delete any personal files inside the storage drive.
How long does Windows 10 take to repair?
It takes 20 to 45 minutes to repair the system in Windows 10. The time depends on the storage read-write speed and the size of the problem.
How do I stop startup repair from checking for problems?
To stop the startup repair from checking problems, Advanced Boot Options > Repair your computer > Command Prompt > chkdsk /f /r c: > Disable automatic restart on system failure.
Conclusions
The startup repair is essential to resolve the error with the system file and boot up the device without any issue. But, many people are unaware of the required time to complete a startup repair.
In this article, I’ve provided the definitive answer regarding the required time for a startup repair and the necessary steps to solve any issue while running the startup repair.
Share your experience with the startup repair in the comment box below.