Are you getting burned out from back-to-back meetings and presentations? And not to forget the Outlook inbox full of unread emails. Just thinking of replying to each of them makes your head spin.
Thankfully you have delegate access in Outlook. Think of this as an assistant, handling all your emails and calendar appointments.
Sounds like just the thing you need. So, why wait? Join me as I show you how to set up delegates on Outlook.
Let’s begin.
Go through our epic guide on how to recall an email in Outlook.
Why Should You Set Delegate Access on your Outlook?
If you have a managerial role, you need to oversee a lot of work by your employees. A typical workday can include meetings, setting targets, evaluations of performances, keeping track of the progress made on a project and so on.
Among these, attending emails and managing calendar events can add to the workload. Imagine replying to your colleagues after a long hectic meeting.
To offset this, you can allow someone from your organization to access your emails and calendars. They can manage your meetings and set calendar events for you – while you continue your daily assignments.
Adding a delegate does not mean all your stuff is shared. Different delegate levels in Outlook provide varying levels of access.
Let’s take a look at them.
Delegate Access Levels
The three delegate levels present in Outlook are Editor, Author and Reviewer. They have different levels of permissions for accessing emails and calendars.
An Editor can read, create and modify emails and calendar events. They get full access, similar to what you would get on your personal account.
An Author can set meetings on the Outlook calendar. They can only view other items, such as emails and calendar.
Finally, a reviewer can only view the shared items. They do not have permission to change or create any appointments or emails.
Now let’s look at how you can set someone as your delegate in Outlook.
You may also like to read: add Outlook calendar to Apple calendar.
How to Give Someone Delegate Access in Outlook
Outlook has a separate menu for selecting the permissions that you can set for a user. By default, the delegates are assigned as an Editor to access your Calendar on Outlook.
Here are the steps to set a delegate in Outlook Desktop:
- Open Outlook from the Start Menu.
- Click on the File button at the top.
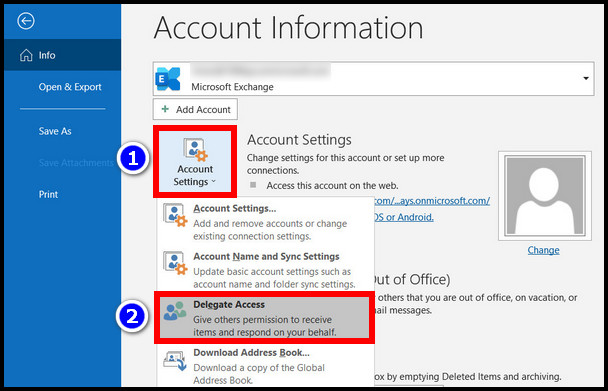
- Press on Account Settings and go to Delegate Access.
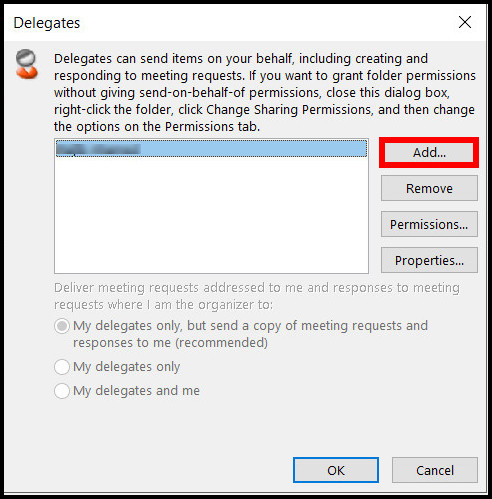
- Click on the Add button in the Delegates window.
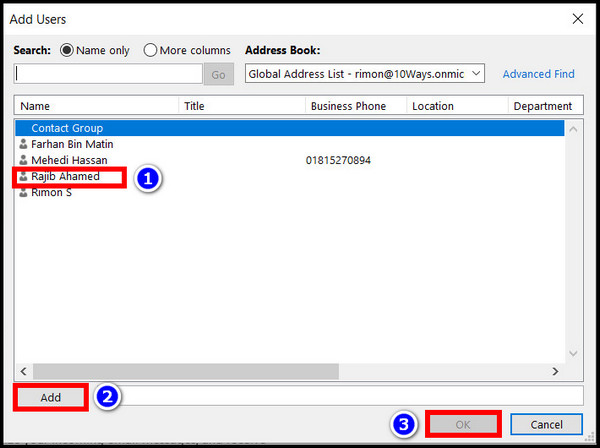
- Select the person from the address list.
- Assign the delegate levels for Tasks, Emails, Calendars etc.
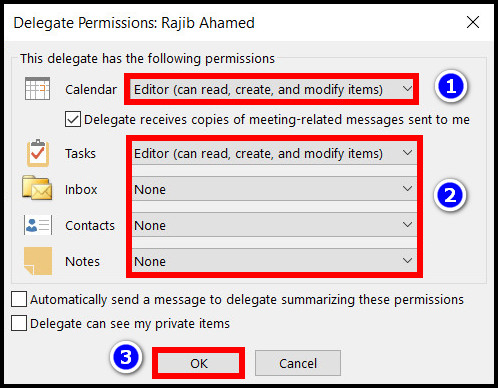
- Select Delegate can see my private items if you want to provide them this access.
- Click Ok to save the changes.
After configuring the settings, the selected person will receive your emails and calendar events. Now they can assign meetings and reply to emails on your behalf.
Check out our separate post to solve Outlook rules not working in Windows 10.
Set Delegate Access in Office 365
Office 365 is the web counterpart of Office for desktops. It also has Outlook with all the features of the desktop app.
You can also set delegates from the Office 365 interface. Then you can assign the permissions to the users that I discussed earlier.
Here are the steps to set delegate access on Office 365:
- Go to Office 365 website.
- Log in using your username and password.
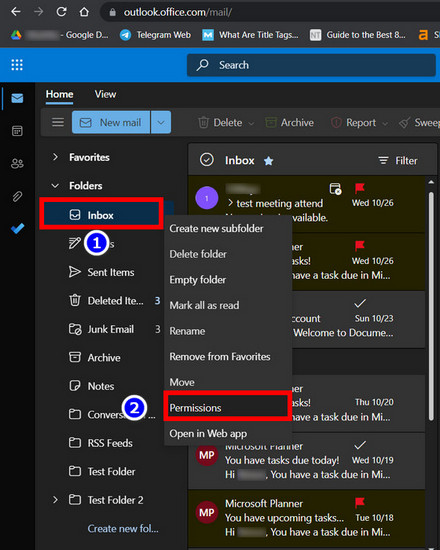
- Right-click on Inbox and select Permissions.
- Select the user from the list in the pop-up window.
- Click to expand the Permissions drop-down menu and select the Delegate level you want to assign to the user.
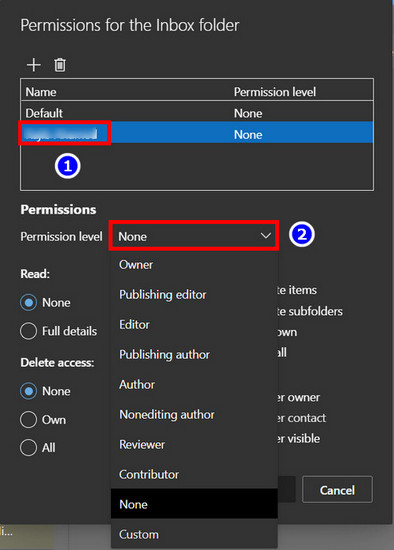
- When you are done, click Ok.
You have successfully set a user as a delegate in Office 365.
Read more on how to add rules in Outlook.
Change Permissions for your Delegates in Outlook
If you need to change the access permission of a user, you can do that in the Delegates window. It has the Permissions window that provides you with access types for individual tasks such as email and calendar.
These are the steps to change permissions for your delegates in Outlook:
- Open Outlook.
- Click on File and press Account Settings.
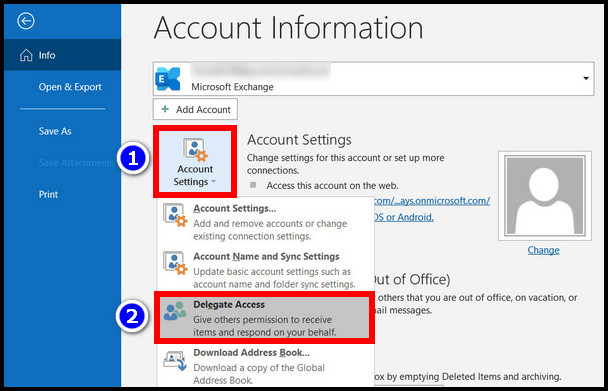
- Go Delegate Access.
- Click on Permissions.
- Change the desired permission for each task in the Delegate Permissions dialog box.
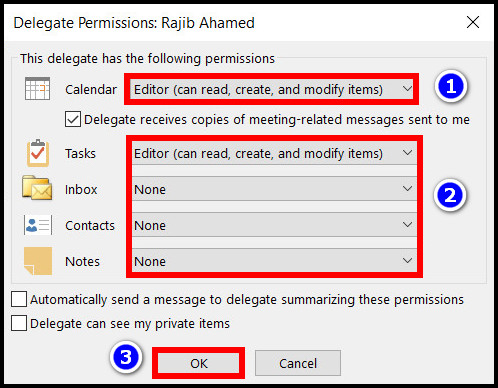
- Click Ok to close the window.
The user can no longer access the shared emails and calendars. If you want to prevent the user from accessing your private items, remove the checkbox next to Delegate can see my private items.
Follow our guide on how to use advanced find in Outlook.
Remove the Assigned Delegates from Outlook
A situation requiring removing a user from your delegate list can arise. Maybe your colleague was transferred to another department. Now he longer needs access to your items in Outlook.
You can remove delegates in Outlook from the same option where you added the users.
Let’s take a look.
Here are the easy steps to remove a delegate in Outlook:
- Press File and click on Account Settings.
- Open Delegate Access.
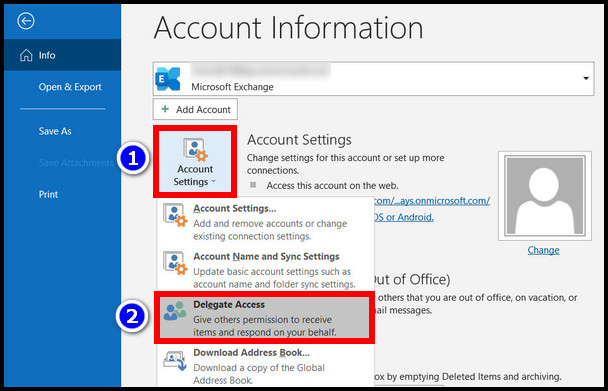
- Click on the user you want to remove and press the Remove button.
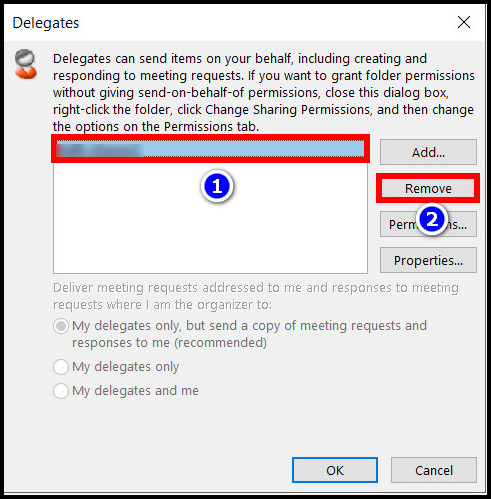
The user cannot access your files and calendar from now on.
Frequently Asked Questions
How do I give delegate access in Outlook?
To give delegate access to someone in Outlook, go to File > Account Settings > Delegate Access > Add > Insert the user from the address book.
Can delegates see confidential emails in Outlook?
Delegates cannot see items that are marked as private. If you have any confidential or private items, you can set permissions to prevent users from viewing them.
How do I turn off delegation in Outlook?
You can turn off delegation by removing the users from the Delegation Access option in Outlook. To do that, go to File > Account Settings > Delegate Access > Remove the user from the list of delegates.
Final Words
So now your work will become a bit easier; thanks to delegate access on Outlook. You can finally enjoy that coffee between meetings.
This article explains everything you need to know about giving access to your emails on Outlook. If you have further queries, let us know in the comments.
Signing off now.