Before presenting or submitting the PowerPoint slide, it’s essential to check the spelling of the writing. An error in the spelling may create a wrong impression of you to the audience.
The spell check allows a writer to identify and correct the misspelled word and improves the knowledge and proficiency of words.
However, a user can face difficulties while writing or creating a presentation slide if the spell checker doesn’t work as intended or stops working completely.
This article will explain the effortless procedures to resolve the spell-checking issue and the appropriate ways to use it.
So, let’s jump in.
You may also like to read about use the Laser Pointer in PowerPoint.
Why Spell Check Not Working in MS PowerPoint
Because of the disabled spell checker option, issues in the uppercase checker, and missing authoring language, users can face problems with the spell check option. Additionally, PowerPoint add-ins and default templates can create issues, and the spell checkers may not work properly.
Most of the issues related to spell check are very common. Read the following reason to learn about them in brief.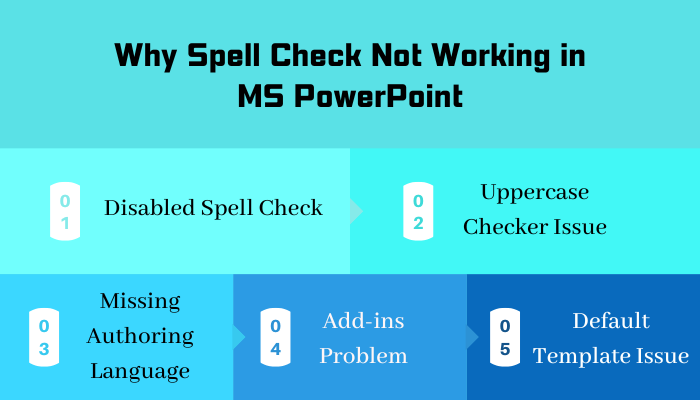
Here are the reasons behind spell check isn’t working in Microsoft PowerPoint:
Disabled Spell Check
Your spell checker in PowerPoint won’t work if they are disabled from the settings. It’s the most common reason behind the spell check not working correctly.
Uppercase Checker Issue
Sometimes, the spell check can’t detect an uppercase word and suggest a fix. You may have disabled the uppercase checking settings, or there are some issues with the option.
Missing Authoring Language
Spell check only appears for the authoring language. If you are working with another language that isn’t added to the authoring language, you won’t get the spell-check service for the specific language.
Add-ins Problem
Some add-ins may create problems with the spell-check option in MS PowerPoint. You can face issues while using the spell check feature because of problematic add-ins installed in your PowerPoint.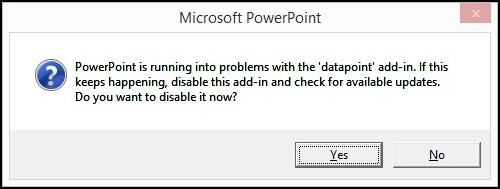
Check out the easiest way about how to Indent in PowerPoint?
Default Template Issue
The default global template in PowerPoint may contain bugs or create problems while checking spells or using other functions. You will likely face a spell-check problem if your template has the issue.
The following passage will describe the methods to overcome the issues and difficulties with spell check in Microsoft PowerPoint.
How to Fix Spell Check Not Working Issue in Microsoft PowerPoint
By enabling the spell check, changing the uppercase settings, and adding an authoring language will resolve the spell check issue in Microsoft PowerPoint. Also, disabling the add-ins, opening the apps in safe mode and renaming the default template will fix the issue.
There are additional solutions for the spell check not working issue in Microsoft PowerPoint. Consider reading the instructions below to fix your issue.
Here are the ways to fix the spell check not working issue in Microsoft PowerPoint:
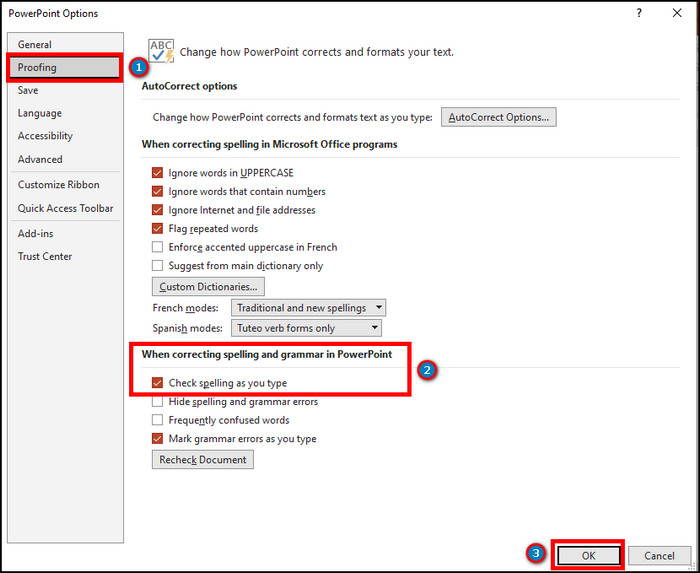
1. Enable Spell Check
If the spell check option is turned off from the settings, it won’t check the spell automatically. You can turn on the spell check by going to the PowerPoint options.
Follow the procedures below to turn on the spell check on PowerPoint.
Here are the steps to turn on spell check in PowerPoint:
- Open PowerPoint.
- Click on File.
- Press on Options.
- Go to Proofing from the left pane.
- Check the Check spelling as you type option.
- Press on OK.
After turning on the spell check, go to your presentation slide and check the spelling. If you are having issues with the uppercase word, read the following steps.
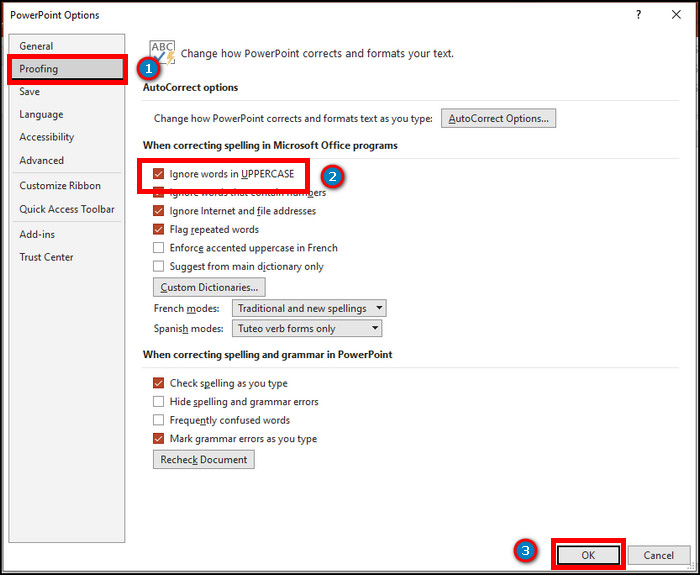
2. Turn On or Off Uppercase Checking
Sometimes, the spell check doesn’t count the uppercase words in your presentation slide. There’s a specific option to turn on or off the uppercase checking.
Consider reading the process below to turn on/off the uppercase checking in MS PowerPoint.
Here are the procedures to turn on or off uppercase checking:
- Launch Microsoft PowerPoint.
- Navigate to File and click on Options.
- Go to Proofing.
- Check or Uncheck the Ignore words in UPPERCASE option.
- Click OK.
After changing the settings, check if the uppercase words are counting in the spell check.
3. Add Authoring Language
Authoring language helps to check the grammar and spelling of the PowerPoint slide. Add an authoring language to enable the proofing and spell check option for the particular language.
Read the following methods to add an authoring language in PowerPoint.
Here is the way to add authoring language in Microsoft PowerPoint:
- Open PowerPoint and navigate to File.
- Go to Options.
- Click on the Language tab from the left pane.
- Press on Add a Language option from the Office authoring languages and proofing.
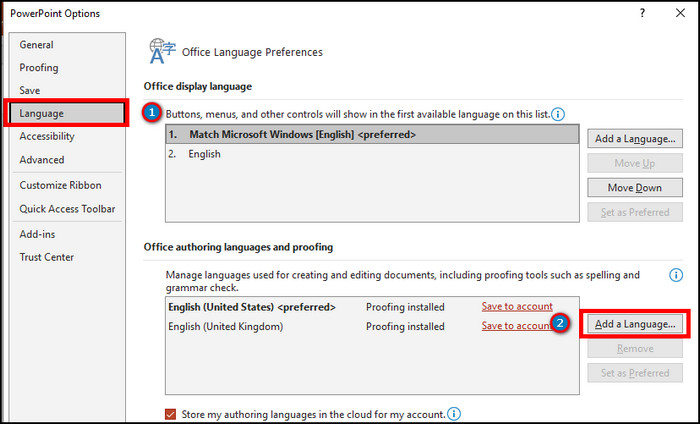
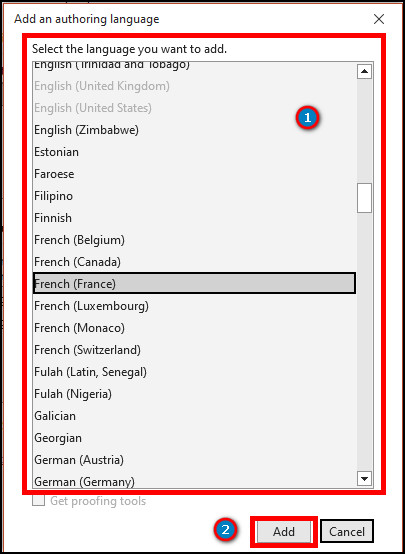
- Select your language from the list.
- Click on Add and press OK.
4. Open in Safe Mode
Microsoft PowerPoint or some functions may not operate properly due to some reason. Opening the application in safe mode will solve the issue.
Allow me to guide you through opening the PowerPoint in safe mode from below.
Here are the steps to open Microsoft PowerPoint in Safe Mode:
- Open the Run dialog box or press the Win + R button together.
- Type powerpnt /safe and click OK.
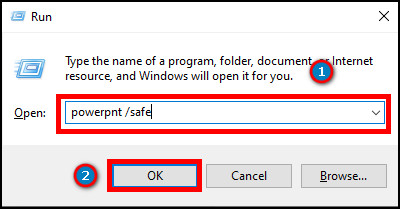
- Check the spelling.
If you still face problems with the spell check, continue reading the process below.
Check out the easiest way about how to get PowerPoint Design Ideas & use it?
5. Disable Add-ins
Sometimes, PowerPoint add-ins create hindrances with spell-checking. Disabling or removing them from settings will resolve the issues with spell check.
The following instruction describes the ways to disable the add-ins in MS PowerPoint.
Here is the method to disable add-ins in PowerPoint:
- Launch MS PowerPoint.
- Click on File and go to Options.
- Navigate to Add-ins.
- Choose COM Add-ins from Manage and press Go.
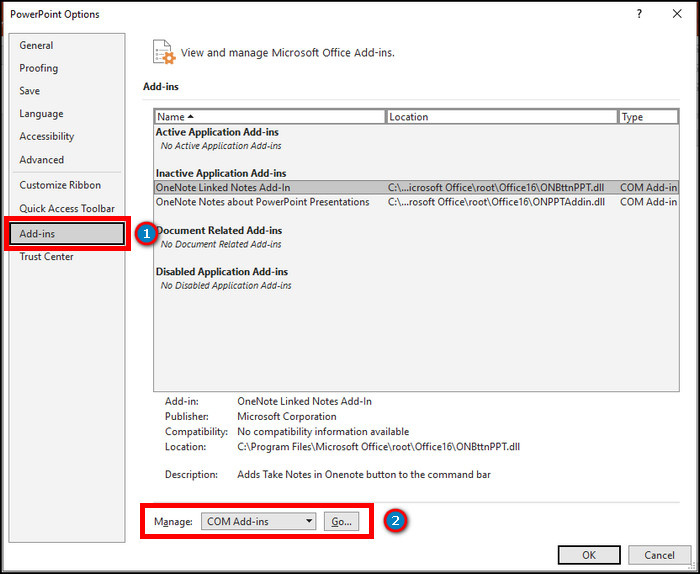
- Uncheck the Add-ins and press OK to disable the Add-ins.
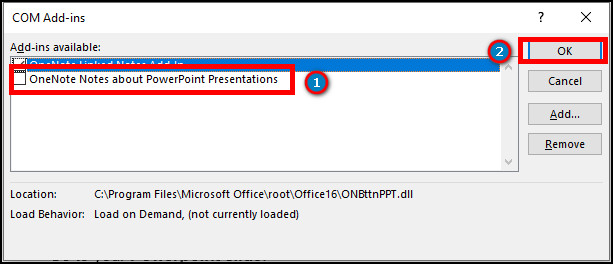
Check if the spell check is working properly after restarting the PowerPoint application.
6. Rename Default Template Name
The spell check issue may appear if there’s any issue with the PowerPoint’s global template. Renaming the template will resolve the problem.
Consider reading the procedures below to rename the default template name in PowerPoint.
Here are the steps to rename the default template name in Microsoft PowerPoint:
- Open the PowerPoint slide.
- Go to File and click on Save As.
- Press on Browse.
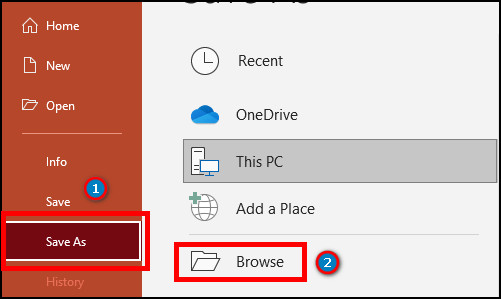
- Rename the File name and click on Save.
7. Repair Office
If your PowerPoint application has bugs or issues, you must repair the Office application to resolve the problem. It will fix the issues with the spell-check function.
PowerPoint data is connected with the Office application. Repair the Office apps by following the steps below.
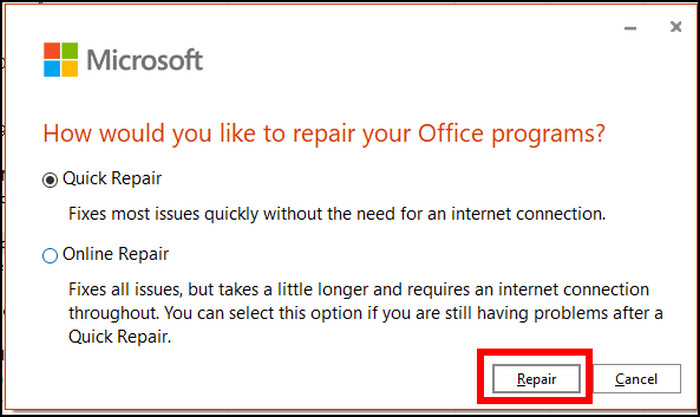
Here are the procedures to repair Microsoft Office:
- Close the Microsoft PowerPoint application.
- Go to the Control Panel.
- Press on Program & features.
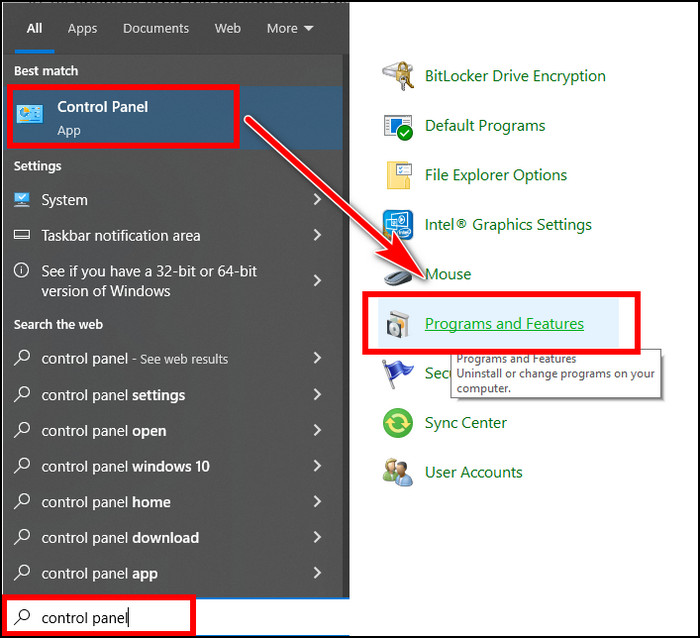
- Right-click on Office and press Change.
- Select Online Repair and click Repair.
8. Contact Support
Most users have fixed their issues by following the steps described above. I hope the above solutions have already resolved your problem with the PowerPoint spell check.
But, if the issue persists, you must contact Microsoft Support for additional guidance and instructions.
If you are looking for the proper way to use the spell-check feature, follow the instructions from the passage below.
Follow our guide to Enable Automated Kiosk Presentation on PowerPoint.
How to Check Spell in Microsoft PowerPoint
Users can check and fix the spell in Microsoft PowerPoint as they work by selecting the suggestions after pressing the right-click. Additionally, you can correct the spelling for the whole presentation slide by using the Spelling options from the Review tab.
If you are wondering about the red squiggly line underneath the word and want to fix the errors, read the instructions carefully below.
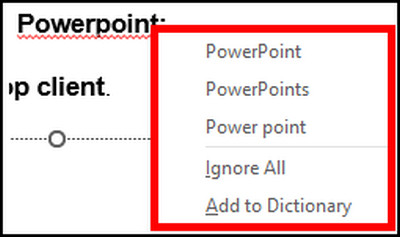
Here are the steps to check to spell in Microsoft PowerPoint:
- Open the PowerPoint slide.
- Right-click on the word with a red squiggly line underneath.
- Select the correct spelling from the suggested list.
- Press Ignore All to remove the suggestion and red squiggly line.
- Click Add to Dictionary to add the word to your preferences.
The above process helps when you are working on the text. But if you want to check the spelling for the whole slide, follow the procedures below.
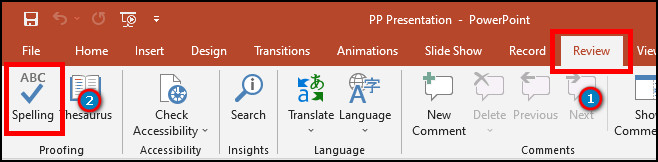
Here is another way to check to spell for the whole PowerPoint slide:
- Go to the PowerPoint slide.
- Click on Review from the top ribbon.
- Press on Spelling or click F7 to open the Spelling pane quickly.
- Select Change or Change All to fix the spelling error.
- Click on Ignore Once or Ignore All to remove the suggestion and red squiggly line.
- Press Add to include the word in your dictionary.
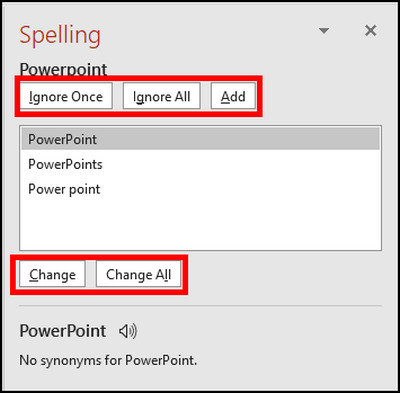
The Spelling option will help to fix the errors in the whole PowerPoint presentation slide quickly.
Frequently Asked Questions
How to check spells in Microsoft PowerPoint?
To check spells in Microsoft PowerPoint, open the PowerPoint slide > Review > Spelling > Ignore/ Change.
How do I turn off spell check in PowerPoint?
To turn off the spell check, go to File > Options > Proofing > Uncheck the Check spelling as you type option.
What is the shortcut key for spelling checks in MS PowerPoint?
The shortcut key for checking the spell in Microsoft PowerPoint is the F7 button on your keyboard.
Final Thoughts
When you have the option to correct your mistake, it’s always wise and useful to use it. But it’s pathetic when the feature doesn’t work properly and causes difficulties.
In this article, I’ve explained the ways to resolve the spell check not working issue and the proper way to utilize them. I believe you’ve successfully fixed the problem and used the feature well.
Don’t forget to share your experience with spell check in the comment box below.
Goodbye, and I’ll see you at the next one.