Being a PC enthusiast, you would love to know all the information about your personalized computer.
You might want to know your boot mode if you are trying to dual boot with Linux and windows or if you just simply want to increase your start-up time and use bigger storage with your computer.
That brings up the important question, what BIOS are you using? Legacy BIOS or UEFI.
In this guideline, I am going to write some easiest methods to find out your BIOS mode.
So keep reading till the end to get your desired methods.
You may also like to read about how to fix CPU fan not detected in BIOS?
How To Check If You Are Using UEFI Or Legacy BIOS
System information in Windows will tell you whether your computer has UEFI or Legacy BIOS. You can also check what booting method you are using by running a command prompt or by going to the disk management of your windows operating system.
BIOS is primarily used to mediate communication between operating systems and hardware. The basic input/output system (BIOS) is the software that acts as a go-between between the computer’s CPU and the various input/output devices.
However, the BIOS may oftentimes send data from devices like graphics cards, which necessitates quicker data flow straight into system memory.
There are currently two BIOS systems. One is known as Legacy BIOS & the other is UEFI.
Recently, The basic input/output system Legacy (BIOS) has lost ground to the more modern Unified Extensible Firmware Interface (UEFI). In 2017, Intel declared its intention to phase out traditional BIOS systems by 2020 in favor of UEFI.
So in order to get the best out of your workstation or gaming pc, you need to know which BIOS your PC is running.
There are plenty of ways you can check if your PC is running UEFI or Legacy BIOS. The easiest way to check if you are using UEFI or Legacy BIOS is to go to the system information.
Here are the steps to check BIOS mode:
- Go to the search bar.
- Type in system information.
- Click on the application.
- Select System Summary.
- Look for the BIOS Mode.
In BIOS mode, you will be able to check your PC boot-up BIOS. Now, if you are facing difficulties in identifying your BIOS this way, you can also follow the steps down below.
Related guide on why your BIOS settings won’t save?
Follow the steps to check UEFI or Legacy BIOS on your Windows PC:
1. Check From System Information Via Run
If you cannot find the system information application manually, then you can easily search BIOS mode using the run application.
Follow the steps to check BIOS mode using run:
- Press Windows+R Button on your keyboard.
- Type in MSInfo32.
- Tap on System Summary.
- Search for BIOS Mode.
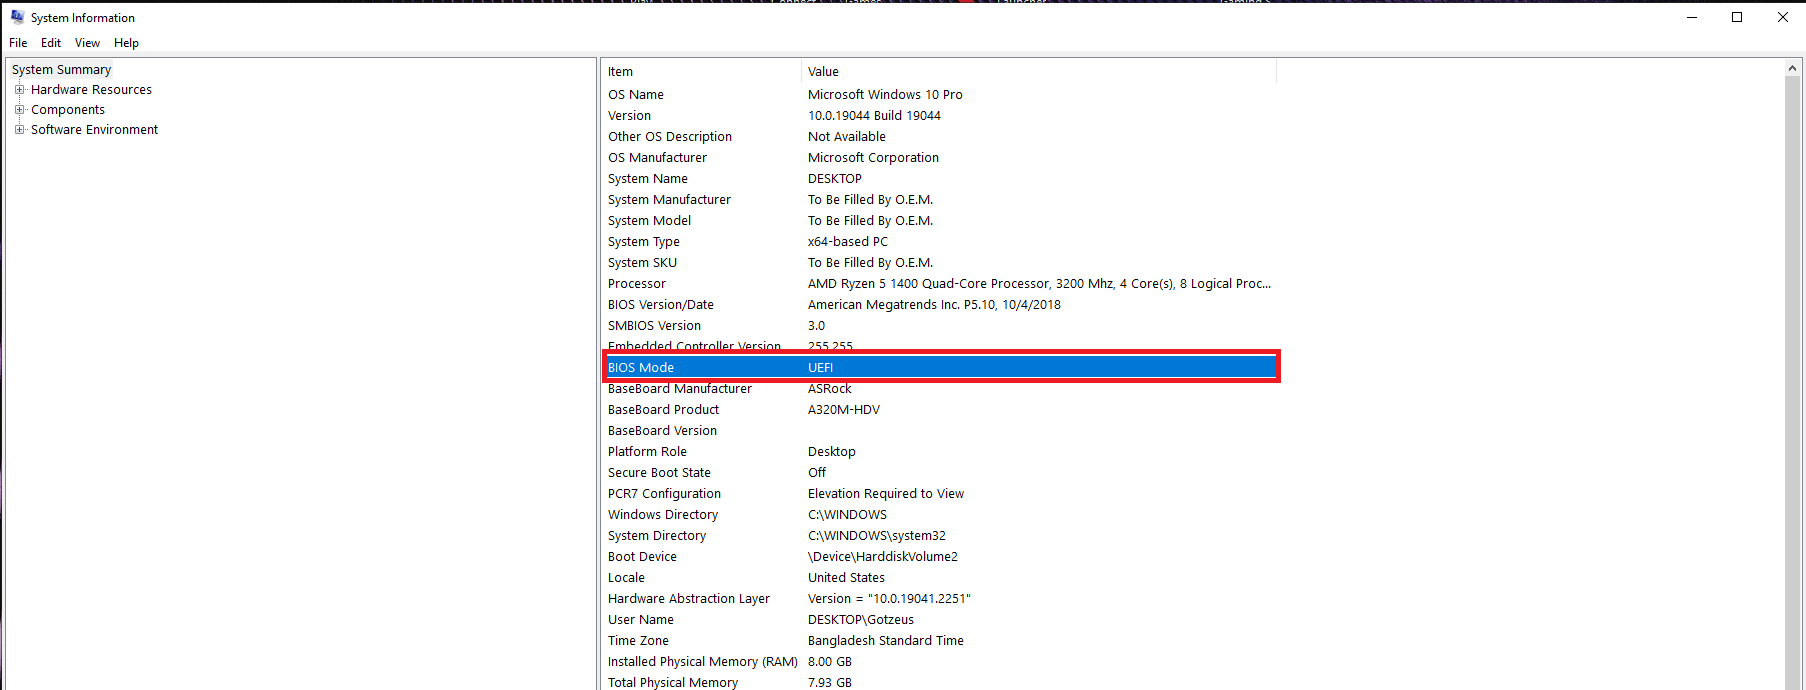
You should be able to identify your BIOS mode now. But if you still cannot find what BIOS you are using, then follow the next method.
2. Identify BIOS Mode Using File Explorer
File explorer is not just for finding your personal stuff like pictures or videos; you can find out relevant information like your BIOS mode.
Follow the steps to find out your BIOS mode using the file explorer:
- Open your File Explorer.
- Go to C:\Windows\Panther.
- Double-click setupact.log to open it.
- Launch the Find dialog box by using Ctrl + F.
- Input “Detected boot environment,” then select the Find Next button.
- Verify if the Detected boot environment value is set to BIOS or EFI.
When you enter the find button, you will see one of these lines in the text body: Callback_BootEnvironmentDetect: Detected boot environment: BIOS.
Callback_BootEnvironmentDetect: Detected boot environment: EFI.
If it is set to BIOS, that means you have the legacy BIOS mode, but if you see the command line with EFI, then you have to understand that you have the UEFI BIOS mode.
However, sometimes you might not be able to identify the setupact.log file or open it; in those circumstances, follow the next method.
Also related to this guide on how to fix Gigabyte BIOS ID check error?
3. Check Boot Mode Using Command Prompt
What BIOS mode you are using can also be identified by using the Command Prompt of your Windows OS.
Follow the steps to check boot mode using the command prompt:
- Type in CMD in your Windows search box.
- Left-click on CMD to run as Administrator.
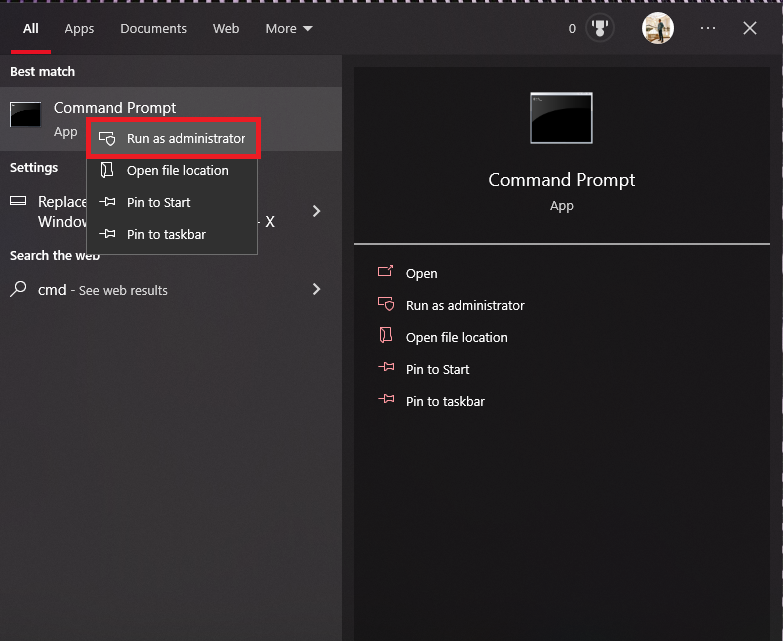
- Type bcdedit into cmd.
- Hit Enter.
- Search for “path” under the Windows Boot Loader section.
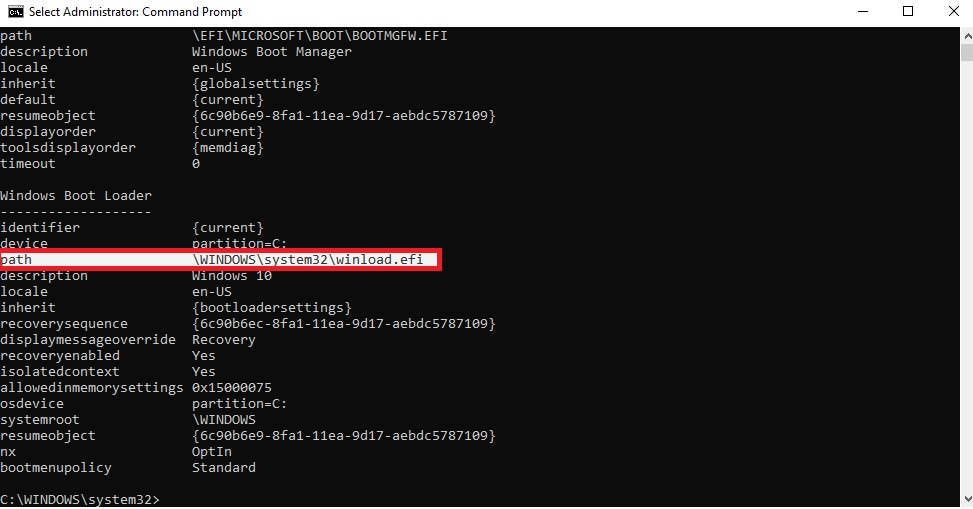
In the Command Prompt under the Booth loader menu, if you have UEFI BIOS Mode in the path section, you will see “Windows\system32\winload.efi.”
And if you have Legacy BIOS, then you will see “\Windows\system32\winload.exe.”
Go through our epic guide on keyboard and mouse work in BIOS but not in Windows.
4. Use Disk Management To Search BIOS Mode
If you still cannot find the BIOS mode, then you can try your Disk Management tool to check the type of BIOS you are using.
Follow the steps to check BIOS mode using disk management:
- Open Run by pressing Windows+R.
- Search for diskmgmt.msc
- Go to Disk 0.
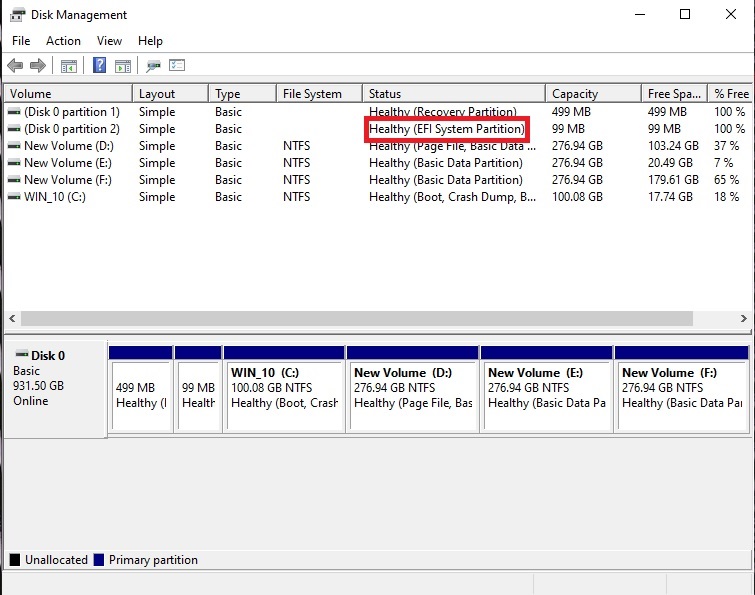
Just stretch the status of your Disk a little bit to check if you are using UEFI BIOS for booting up your PC.
Read more on why your PC won’t boot to BIOS?
5. Check BIOS Mode Using PowerShell
You can also use PowerShell to identify whether you are using Legacy BIOS or UEFI BIOS.
Follow the steps to use PowerShell to identify BIOS mode:
- Open Windows PowerShell.
- Enter $env:firmware_type command.
- Hit Enter.
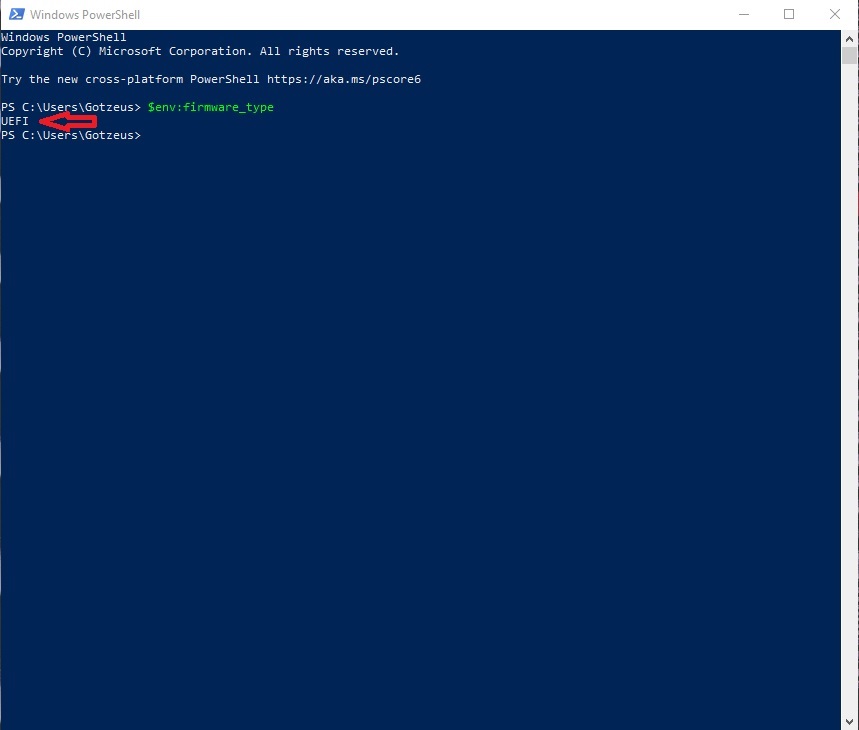
You should be able to find out which BIOS you are using by following the steps mentioned above.
Also read, how to enable SLI in BIOS?
How To Change BIOS Mode From Legacy To UEFI Windows 10
You can change BIOS Mode from Legacy to UEFI on Windows 10 by restarting your Windows pc and accessing the advanced options. From there, you can launch a command prompt that will validate your disk for the conversion of BIOS. After that, you have to boot to your motherboard settings and change BIOS.
UEFI, short for Unified Extensible Firmware Interface, is a more recent booting technology used in computers. The term “Legacy Boot” refers to the method of starting up a computer with the BIOS as the firmware.
Key differences exist between the two BIOS modes. Compared to traditional BIOS, UEFI is easier to utilize. The EFI boot process relies on URFI firmware, which keeps track of valid boot partitions in the form of EFI Service Partitions.
When in legacy boot mode, the boot process is handled by the BIOS firmware. The GUID Partition Table (GPT) is the partitioning technique used by UEFI, while the Master Boot Record (MBR) is used by BIOS.
Compared to conventional boot, UEFI is faster and has more built-in security measures. These are the reasons you might want to change BIOS mode on your PC.
Check out the easiest way about how to fix GPU not detected in BIOS issue?
Here are the steps to change BIOS mode from legacy to UEFI on Windows 10:
- Press Windows+X.
- Select Restart and hold down the Shift button on your keyboard while doing so.
- Go to troubleshoot.
- Select Advance Options.
- Choose Command Prompt.
- Copy and enter mbr2gpt /validate.
- Type in mbr2gpt /convert again on the cmd.
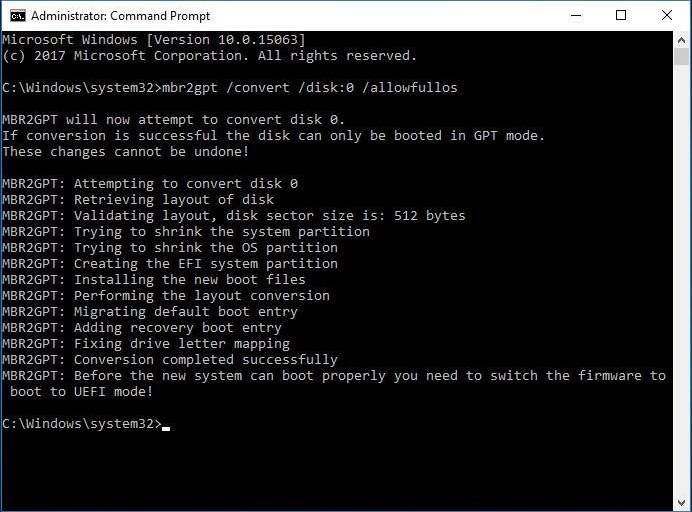
- Reboot your PC.
- Go to your Motherboard’s settings by pressing either F12, Del, or F2 buttons.
- Go to the Boot Manager’s Maintenance Menu.
- Click the “Advanced Boot Menu” option.
- Pick the “Boot Mode” button.
- Choose UEFI Mode.
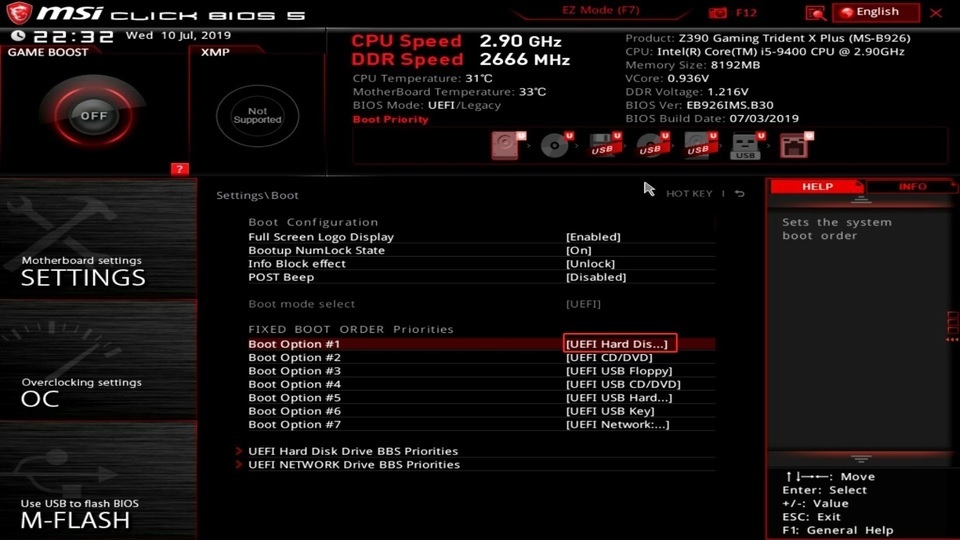
Your MotherBoard’s settings might not be the same. So check on your manufacturer before converting to UEFI mode.
I would suggest before changing the BIOS mode, make sure you make a backup of it. Also, if you don’t have any urgency or need to change the BIOS mode, then refrain from doing so.
Also, check out our separate post on how to fix a PC that won’t Boot to BIOS?
Final Thoughts
You can easily check the BIOS mode by entering your Windows PC’s system information. If you are facing issues finding out the BIOS mode, then you can take the help of the command prompt and PowerShell to identify if your PC is booting on Legacy or UEFI BIOS.
And if your PC is stuck on Legacy BIOS, you can also change that by going to the command prompt and changing the BIOS settings on your motherboard.