A misaligned image in an email looks unprofessional. It ruins the beauty of the carefully written email.
Knowing how to change image alignment in Outlook will help you create emails with perfectly aligned images.
You can also fix the image alignment if there is an issue. Moreover, aligning images will help you create visually appealing and professional signatures in Outlook.
This post will discuss the various methods to change the image alignment in Outlook email and signatures.
So keep reading the post till the end.
How To Change The Alignment Of An Image In Outlook
In Outlook, it is straightforward and intuitive to align texts as needed. The sent mail preserves the alignment set before. But the same cannot be said about images.
Aligning images in Outlook is a more involved process than aligning text. Even if you align the picture, it might not look the same when the recipient sees the email. The alignment might not be preserved in the sent email.
You might think about writing the email and aligning the images in Microsoft Word, then copying the document in Outlook. But it will not work, and you will have to insert the images again using the Pictures Inline option to get it working.
There are different ways to edit the image alignment. You can also use these methods to deal with picture alignment issues in Outlook.
Related contents you should read about how to add signature to Outlook 365?
Follow the methods below to change the alignment of the Outlook image:
1. Use the Wrap Text option
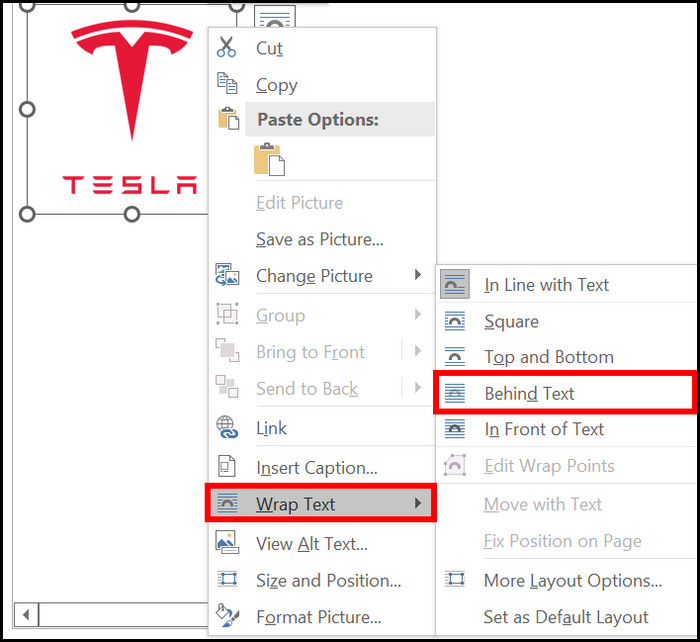
If you try to use the Align option after adding images, you will see that the Align option is grayed out. You will also be unable to move the images with the cursor.
In that case, you need to follow the steps below:
- Insert an image in the email.
- Right-click on the inserted image. A context menu will appear with the Wrap Text option.
- Click on Wrap Text.
- Select Behind Text.
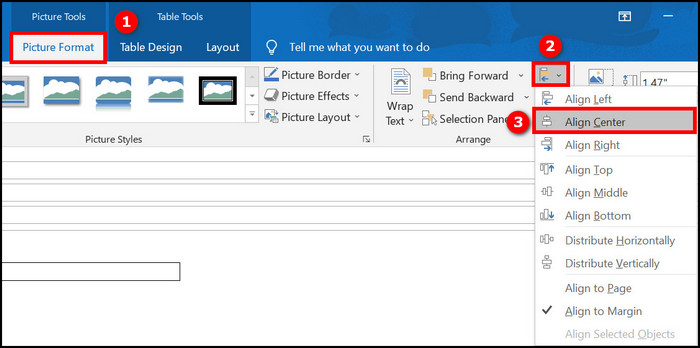
- Select the image.
- Ensure you are in the Format tab from the top.
- Click on Align from the top menu. The dropdown menu will show different alignment options.
- Select between Align Left, Align Center, Align Right, Align Top, Align Middle and Align Bottom to align the image.
You can also select the image and drag it with the mouse to align it manually.
2. Edit HTML code
If the recipient is getting the image misaligned even though you have aligned it correctly, it means that the email client is applying a different style to the email.
So you need to add the image through HTML code with styling applied. It will ensure the image preserves the alignment after it is sent.
First, we need to create the HTML file and then insert it into the email.
From Outlook 2016 and later, Outlook does not include the “Insert As Text” option by default which is required to add HTML into an email. So you need to go through some extra steps to add the “Insert As Text” option in Outlook.
Here is the procedure to align image using HTML code:
- Open the Outlook desktop app.
- Open the email with the misaligned image.
- Go to the File tab from the top.
- Select Options from the left. The Outlook Options window will open.

- Click on Quick Access Toolbar from the left.
- Click on the dropdown “Choose commands from” and select All Commands.
- Scroll through the list and select Attach File (without the arrow beside it).
- Click on the Add button to add it to the right box.
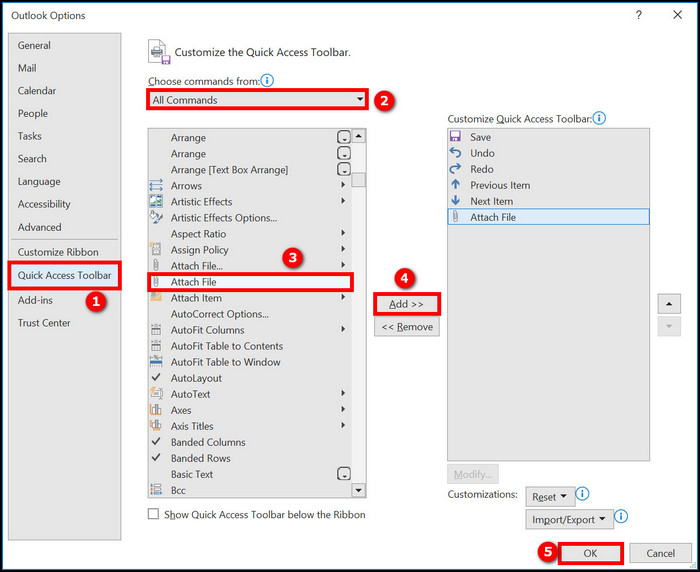
- Click on OK and exit the Outlook Options window. Now you will have the “Insert As Text” option at the top of the Compose Message window needed to insert HTML into an email in Outlook 2016 or later versions.
- Copy the URL of the image you are going to insert from the web.
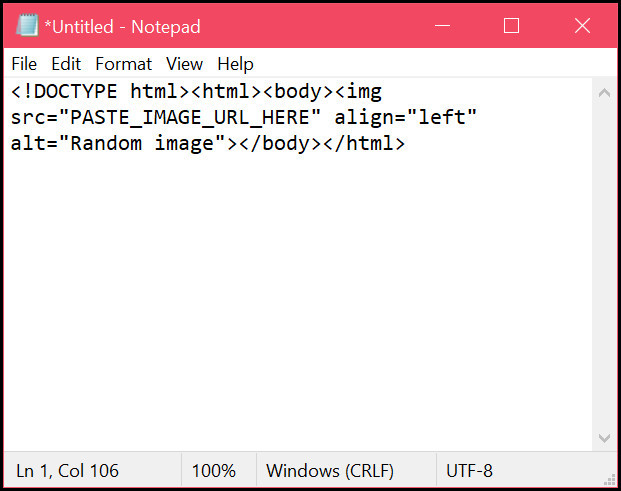
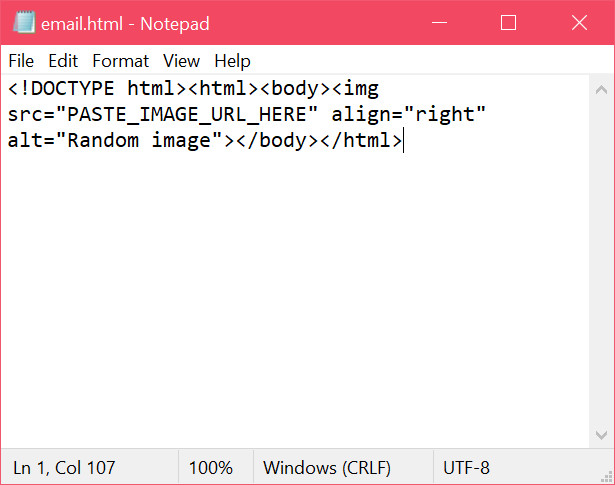
- Open Notepad.
- Paste the following HTML to align the image centered: <!DOCTYPE html><html><body><p style=”text-align: center;”><img src=”PASTE_IMAGE_URL_HERE” style=”text-align: center;” alt=”Random image”></p></body></html>

- Paste the following HTML to align the image to the left: <!DOCTYPE html><html><body><img src=”PASTE_IMAGE_URL_HERE” align=”left” alt=”Random image”></body></html>
- Paste the following HTML to align the image to the right: <!DOCTYPE html><html><body><img src=”PASTE_IMAGE_URL_HERE” align=”right” alt=”Random image”></body></html>
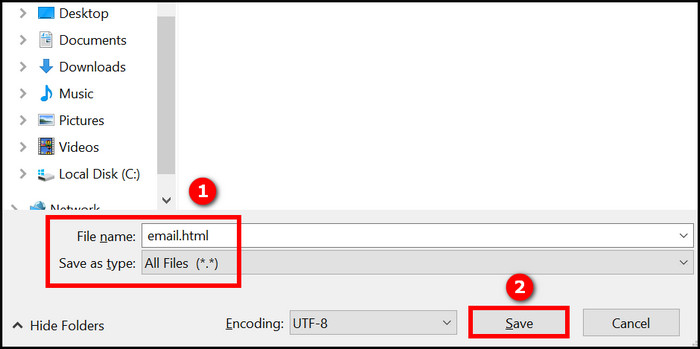
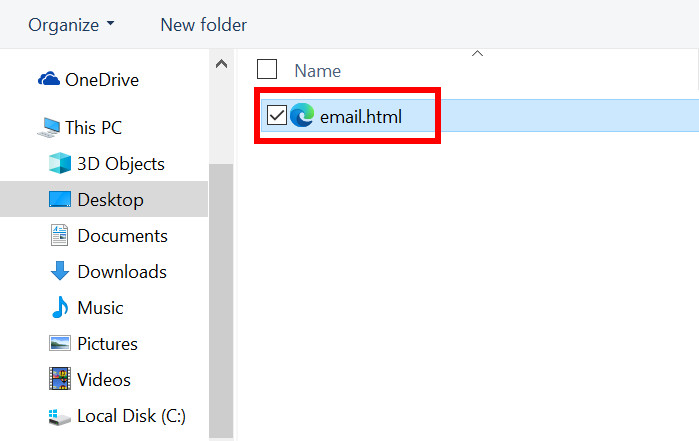
- Press Ctrl+S.
- Change “Save as type” to “All files.”
- Name the file “email.html“
- Click on the Save button to save the HTML file.
- Go back to the Outlook window.
- Go to the Message tab from the top.
- Click on Actions from the top.
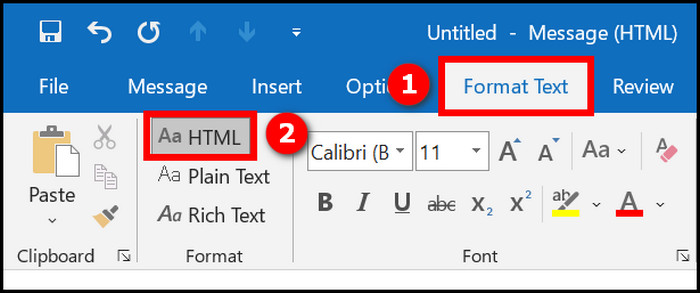
- Select “Edit Message.” You will see the “Format Text” tab appear on the top.

- Go to the “Format Text” tab and click on HTML from the top menu. Now the email is ready to accept HTML code.
- Delete the misaligned image from the email.
- Place the cursor at the position you want to insert the image.
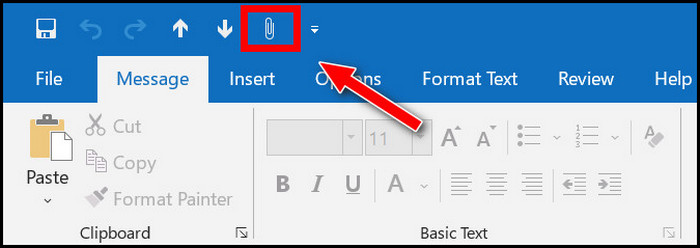
- Select Attach File from the top. A File Explorer window will open.
- Browse and select the HTML file “email.html” created earlier.
- Click on the arrow beside the Insert button at the bottom.
- Select “Insert as Text.”
- Click “Insert as Text” to insert the HTML file into the email.

Now you will see the image aligned as you have defined. Send the email to someone, and the recipient should see the image aligned correctly.
Adding images is more prevalent in the case of Outlook signatures, as people want to add their company logo or a snap of the signature.
Go through the following section to learn about it.
Check out the easiest way to add picture on Outlook email.
How To Align The Image With Text In The Outlook Signature
Everyone wants to have a perfectly formatted signature. It looks professional and helps to engage with people.
People use images along with text in their signatures. But if you have ever inserted an image in the signature editor, you will know there is no option to align the image.
So we must resort to various workarounds and techniques to align the image with text in an Outlook signature.
Follow the methods below to align images with text in the Outlook signature:
1. Use table
Using tables is arguably the best way to align items in Outlook, like bullets or images.
In this method, you will open a new email to create the signature with an aligned image and then save the signature.
Here are the detailed steps:
- Open the Outlook desktop app.
- Create a new email. You will create the new signature with an aligned image here.
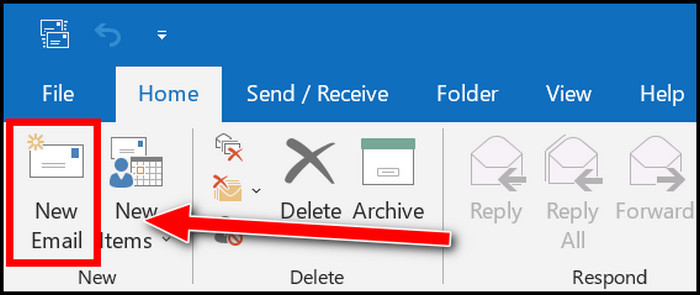
- Go to the Insert tab from the top.
- Click on the Table option from the top menu.
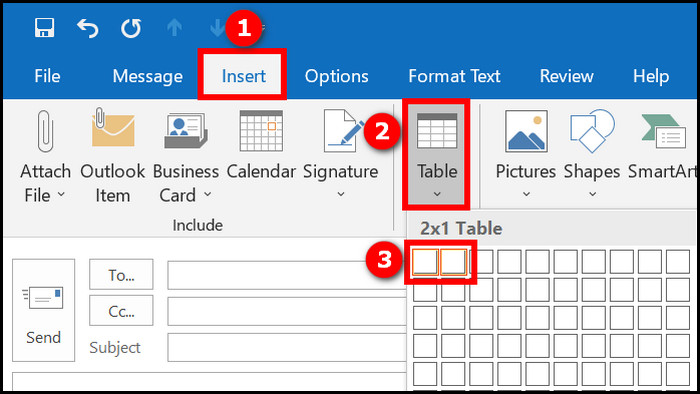
- Select a row with two columns (2×1). It will insert a table with two columns. You will use one column for the image and the other column for the text. If you want two images (both before and after the text), create a table with three columns.
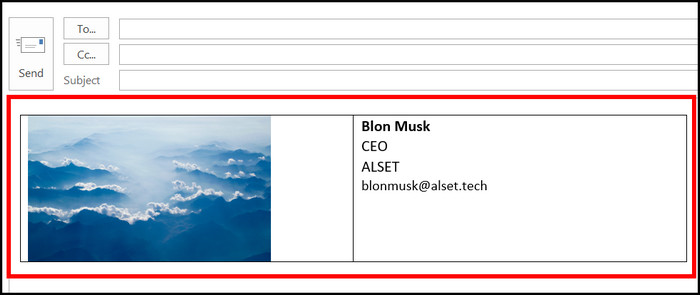
- Type or paste the text (name, surname, contact details, etc.) in any one of the columns. If you want text before the image, do it in the first column; otherwise, in the second column.
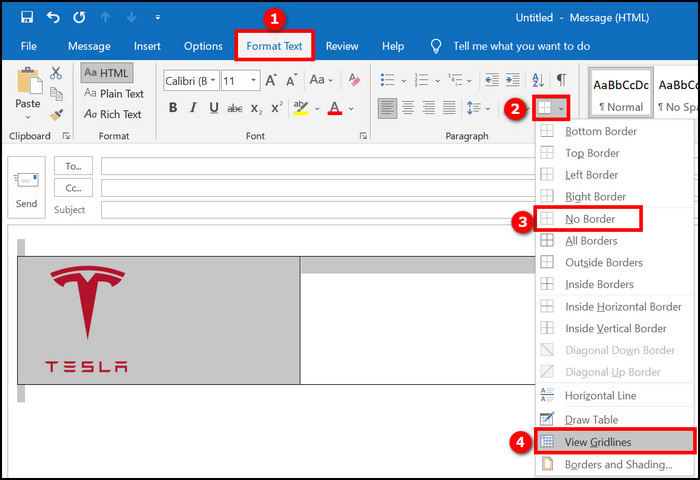
- Insert or paste the image in the other column. Now you need to format the table to remove the borders and gridlines.
- Select the whole table.
- Click on the Format Text tab from the top.
- Click on Borders. The dropdown will appear.
- Disable “View Gridlines” and select “No Border” from the dropdown.
- Select the whole table and right-click.
- Choose AutoFit > AutoFit to Contents from the context menu.
- Copy the email body. It will copy the table with the text and image for the signature. You will paste it into the signature editor.
- Click on the File tab from the top.
- Click on Options from the left menu.
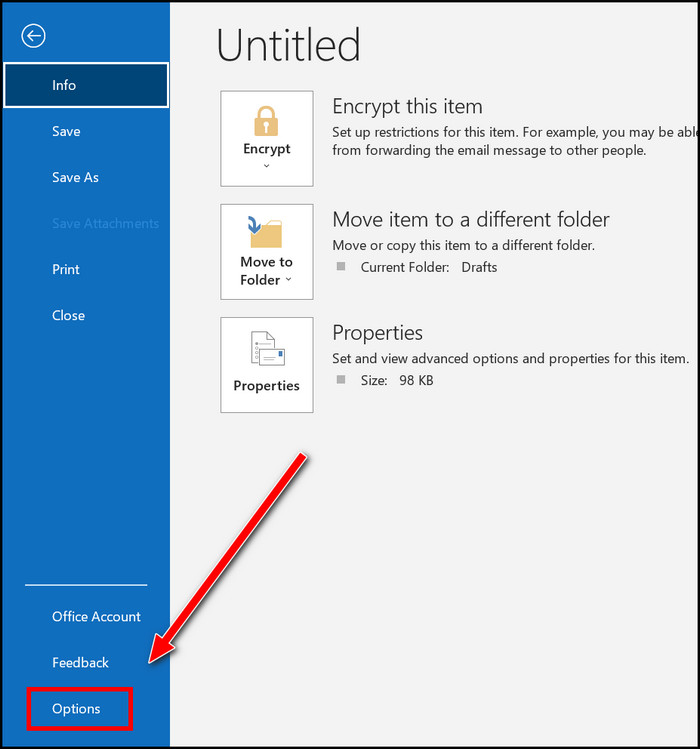
- Click on Mail from the left.
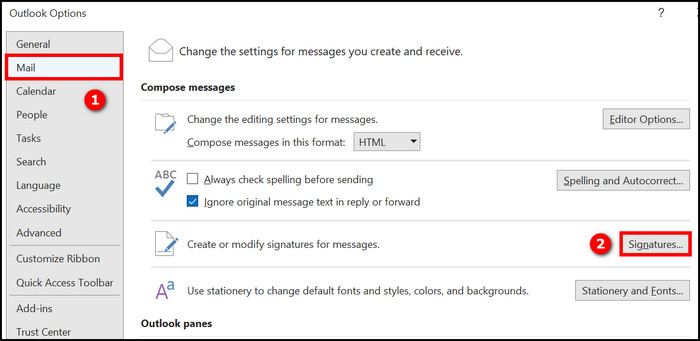
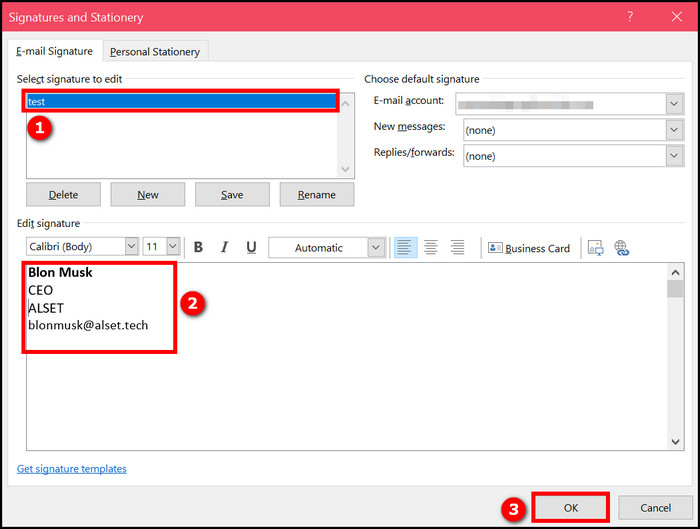
- Select Signatures on the right. The “Signatures and Stationery” window will open, where you will paste the copied signature.
- Click on the New button to add a new signature.
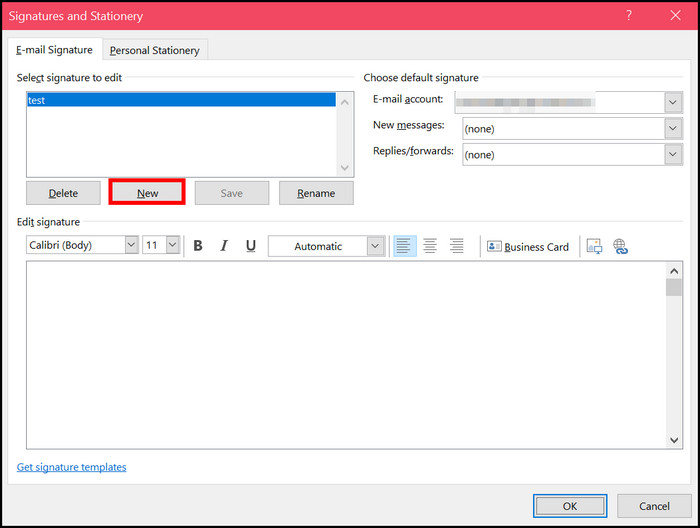
- Paste the copied signature in the “Edit signature” box below. The image might not show up in the box now. But it will appear once you apply the signature to a new mail.
- Click on the OK button below to save the signature.
Now create a new email and apply the signature. The image should appear aligned with the text.
But before that, go through our epic guide on Spam filter in Outlook not blocking Junk Mail.
2. Use Wrap Text
This method will use the Wrap Text option to align images with text.
First, you need to create the signature in Outlook, which will contain the misaligned image. Then you will follow the below steps to fix the alignment.
Here are the steps:
- Open the Outlook desktop app.
- Click on the File tab from the top.
- Click on Options from the left menu.
- Click on Mail from the left.
- Select Signatures on the right. The “Signatures and Stationery” window will open, where you will create the signature by adding text and images. The image will be misaligned here but don’t worry, as you will fix it below.
- Click on OK to save the signature.
- Create a new email.
- Go to the Insert tab.
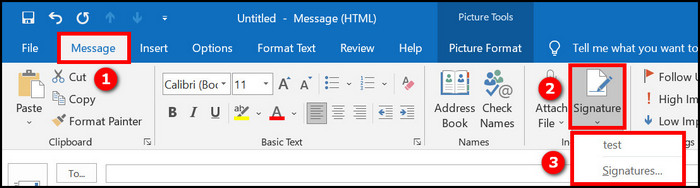
- Click on Signature to open the dropdown list.
- Select the signature containing the misaligned image. The signature will be inserted into the email.
- Right-click on the image in the signature. A context menu will appear.
- Hover the cursor over Wrap Text.
- Select any wrapping style (for example, Behind Text or Square).
- Move the signature text and image until they align perfectly.
- Copy the signature with the aligned image.
- Go to the Insert tab from the top.
- Click on Signature to open the dropdown list.
- Click on “Signatures…” The “Signatures and Stationery” window will open.
- Select the target signature containing the misaligned image from the “Select signature to edit” list.
- Remove the contents in the “Edit signature” box below.
- Paste the copied signature in the “Edit signature” box below. The image might not show up in the box now. But it will appear once you apply the signature to a new mail.
- Click on the OK button below to save the signature.
Now you can apply the signature in a new email, which should have the image aligned perfectly.
Also, check out our separate post on fix Outlook rules not working on Phone.
Final Thoughts
Microsoft Outlook supports adding images to the email body. But aligning the image perfectly seems trickier than it should be.
Luckily, there are different methods to align the image as needed. You can use the Wrap Text option or the HTML code to change alignment. Using Tables is also a viable option.
Most importantly, aligning the image perfectly will let you add the company logo or avatar to the Outlook signature.