The term mouse polling rate and DPI are well-known nowadays. In this modern era, people love gaming on the computer more than an actual game. To ensure smooth gameplay, gamers use highly configurable mice and keyboards.

Using a good mouse is mandatory to increase your performance if you are a gamer or a digital artist. You may need to change your mouse DPI or polling rate for better accuracy and precise mouse movement.
You are in the right place if you want to change your mouse polling rate for better performance while playing your favorite game.
This article will cover how to change the mouse polling rate and other related information. Keep reading till the end to change the mouse polling rate.
Tag Along!
What is Mouse Polling Rate?
The mouse polling rate points to the number of times your mouse sends information to your computer processor to update the mouse cursor position.
The polling rate measures in Hz. If you are using a mouse with 1000 Hz, that indicates that your mouse sends information about its position to your computer processor every 1 millisecond.
A faster polling rate means your mouse can send data faster to the computer processor, which ensures less latency. A higher mouse polling rate will show you a more accurate position of your mouse cursor in real-time.
Check the table below to understand the relation between polling and delay rates.
responsive=”scroll”
| Polling Rates | Delay Rates |
|---|---|
| 125Hz | 8 MS Delay |
| 250Hz | 4 MS Delay |
| 500Hz | 2 MS Delay |
| 1000Hz | 1 MS Delay |
How to Check Mouse Polling Rate
Most branded gaming mice come with the support of different polling rates. If you are unsure about your mouse polling rate, the procedures below will help check the polling rate.
You can check the mouse polling rate online or use third party software, to learn more, keep reading.
Here are the ways to find the mouse polling rate:
Check Online
Without downloading any software from third-party stores, you can quickly check the average polling rate of your mouse online.
There are a ton of websites available to check the mouse polling rate. You can search with the keyword Check Mouse Polling Rate on Google.
Or you can use the clickspeedtester to see the mouse polling rate. Once you open the webpage, you will see a Click to Start button. Clicking on the button will start measuring your mouse polling rate instantly. 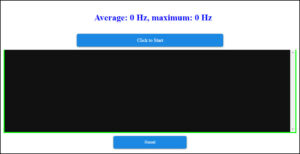
Keep moving your mouse cursor while the test is running. You will see different random numbers depending on your mouse polling setting. After a while, stop the test by clicking on the Click to Stop button.
Use Third-party Software
There are many programs available to measure your mouse polling rate accurately. You can download any application to see the more specific result of mouse polling rates.
You can use the Mouse Rate Checker application. It is very compact in size and easy to use. Download the application on your computer. 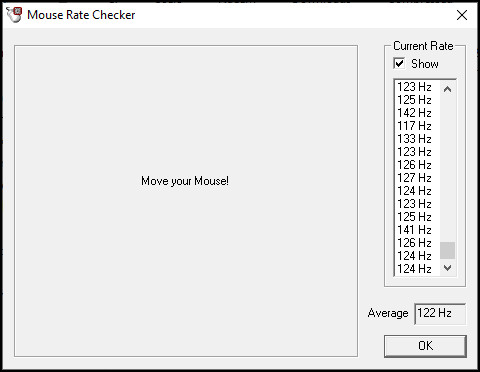
Double-click on the program file to open it. Now move your mouse cursor rapidly, and you can see your mouse’s current and average polling rates.
How to Change Mouse Polling Rate
Changing mouse polling rates is easier on branded mice. They often come with a specific button that allows switching between different polling modes with just a single click. You can also use dedicated software for your mouse to change the settings quickly.
On the other hand, changing the mouse polling rate is a little tricky. You can use the keyboard button combinations to switch polling rates. To learn how you can do that, follow the subsequent processes.
Here are the methods to change the mouse polling rate:
1. Use Mouse Buttons
If you are using a branded gaming mouse, there is an excellent chance that your mouse has a dedicated button to switch the polling rates. 
Mouse manufacturers like Logitech and Zowie provide additional buttons to control the polling rates easily. The button location can be different depending on the model or brand.
You can press the button to switch the mouse report rate in different modes. There are three options to choose from, and they are 155 Hz, 500 Hz, and 1000 Hz.
2. Use Mouse’s Dedicated Software
Approximately all the major mouse brands have companion software to change the mouse settings effortlessly. If you use a mouse from a reputed company, visit your manufacturer’s site and download the companion software.
Though the software UI may vary from brand to brand, you will find similarities in the basic settings to change the mouse polling rate. Follow the below instructions to change the polling rate using the dedicated software.
Here are the steps to change the polling rate using the dedicated software:
- Download and Install the application from the manufacturer’s site.
- Launch the application.
- Go to Performance.
- Locate the polling/ report rate.
- Change the rate according to your need.
Depending on your software, you may find differences in the settings, but it is easy to find the settings for changing the polling rate.
3. Use Keyboard Buttons
You may not be aware of this feature, but almost every mouse supports this technique where you can effortlessly change the polling rate using the keyboard button combination.
Follow the below instructions to change your mouse report rate quickly using your keyboard buttons.
Here are the methods to change the mouse polling rate using keyboard buttons:
- Remove the mouse plug from your computer.
- Press and hold the 4+5 buttons of your keyboard and plug in the mouse. That will change your mouse polling rate to 125 Hz.
- Press and hold the numerical button 4 and plug the mouse to change the polling rate to 500 Hz.
- Press and hold the numerical button 5, and plug in your mouse, which changes the report rate to 1000 Hz.
How to Change the Polling Rate on a Razer Mouse
Razer is one of the best manufacturers that provides the best computer components for gamers. Razer Synapse 3 is the latest software to configure Razer hardware.
You can download the application from the Razer official site. After downloading the application, install it on your device, and follow the instructions to change your Razer mouse polling rate.
Here are the ways to change the polling rate on a Razer mouse:
- Launch the Razer Synapse application.
- Locate your mouse under DEVICES and click on it.
- Navigate to PERFORMANCE.
- Choose your preferred POLLING RATE.
There are two ways to set your polling rate. You can select any option from the presets. On the other hand, you can choose the drop-down menu, which offers more options to change the polling rates.
Check out the easiest way to fix windows 11 logitech mouse not working
How to Change the Polling Rate on a Logitech Mouse
Logitech is well-known worldwide for its best-performing hardware. If you are using a Logitech mouse, you can effortlessly change your mouse using Logitech G Hub or Logitech Gaming Software.
If your mouse uses Logitech G Hub, go through the below procedures to change the polling rate of your mouse.
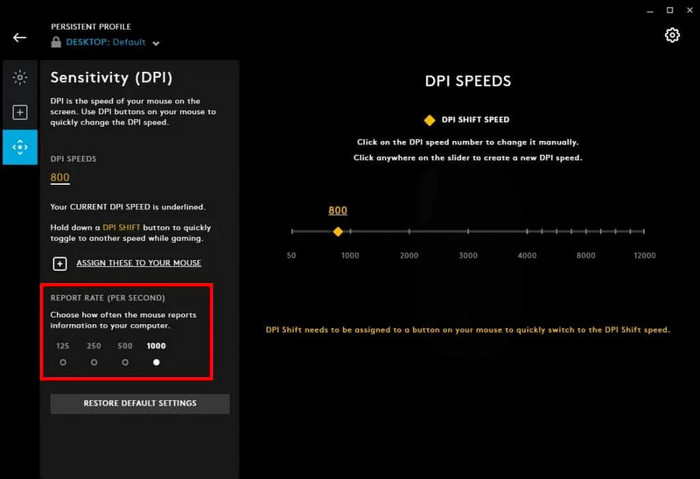
Here are the steps to change the polling rate using Logitech G Hub:
- Download and Install Logitech G Hub on your computer.
- Launch the application.
- Choose your mouse and click on it.
- Click the Sensitivity (DPI) icon.
- Select your preferred polling rate preset under Report Rate (Per Second).
If your mouse uses Logitech Gaming Software, follow the below process to change the polling rate of your mouse.
Here are the methods to change the polling rate using Logitech Gaming Software:
- Download and Install Logitech Gaming Software on your device.
- Open the software.
- Navigate to Pointer Settings.
- Choose a preset polling rate.
You have successfully changed your mouse report rate by following the above methods. Now you can enjoy the best performance of your Logitech mouse.
What is Mouse DPI?
DPI stands for Dots Per Inch, which refers to the measurement of the physical distance covered by a mouse. Though more specifically mouse uses the CPI (Counts Per Click) as the dots are not part of the process.
DPI indicates the speed of a mouse cursor while it moves on the computer screen. To make it more clear, here is an example for better understanding.
If you set your mouse DPI low and then move it just 1 inch, the mouse cursor will travel less distance than it travels with a high DPI.
High DPI helps move your mouse cursor fast, which helps cover more space with a little mouse movement.
When you need a precise measurement for your mouse, find the comfort zone by trying different DPIs. For gamers or designers, a higher DPI is essential. It can change the result of the game or boost your productivity dramatically.
How to change Mouse DPI in Windows 10 & 11
Mouse DPI plays an indispensable role for productive workers and gamers. Using high DPI can be very useful in maximizing your performance.
By default, the mouse DPI is set to a lower range though you can quickly change the DPI according to your need. Keep reading the below procedures to change your mouse DPI.
Here are the steps to change mouse DPI using a button:
- Locate the DPI button next to your mouse wheel.
- Click the button to change DPI.
Usually, the button switches between different presets to change the mouse DPI. You can also use firmware utility software to change the DPI.
If your mouse has no physical button to change the DPI settings, follow the instructions below.
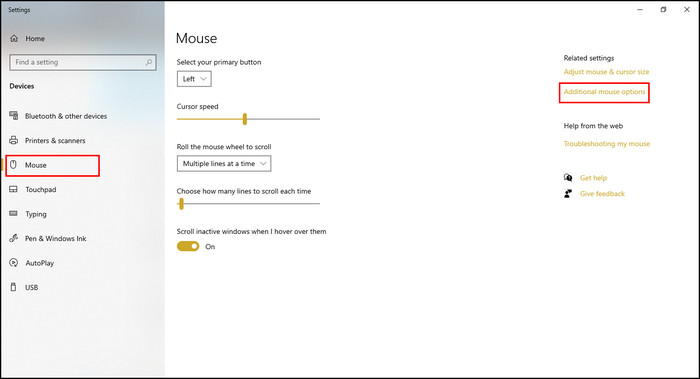
Here are the steps to change mouse DPI in Windows:
- Navigate to Settings > Devices > Mouse.
- Click on the Additional mouse options from the left side.
- Switch to the Pointer Options tab.
- Tweak your pointer speed under the Motion option.
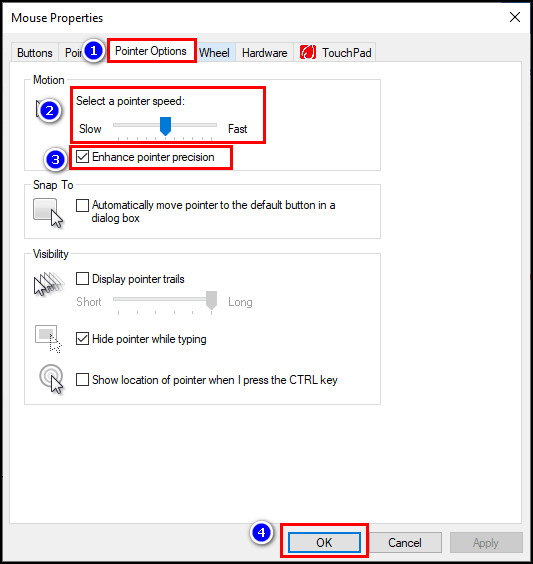
- Check the Enhance pointer precision box to accelerate mouse movement.
- Click OK to save the changes.
Following the above steps will set your mouse DPI to a suitable point. You can also use various firmware utility software to change DPI more precisely.
Frequently Asked Questions
Is 1000Hz polling rate good for a mouse?
1000Hz polling rate means your mouse sends data to the computer processor about its position every 1 millisecond. A higher polling rate allows gamers to accrue speed, precision, and accuracy.
Is 500Hz better than 1000Hz mouse?
Theoretically, using a 1000Hz mouse can perform faster than a 500Hz mouse. However, the time difference is only 1millisecond and not visible to human eyes.
Does the polling rate affect DPI?
The DPI is highly dependent on your game, screen resolution, and the mouse’s use. On the other hand, a higher polling rate is helpful for better accuracy. Though the difference between 500Hz and 1000Hz mouse is not noticeable.
A Final Thought
After completing the entire article, you now know about the mouse polling rate and DPI. Additionally, the changing methods for the mouse polling rate and mouse DPI.
You can change the branded mouse polls with the physical button or use the firmware utility softwares. It is also possible to change the DPI and polling rate for lower-end mice.
If your mouse doesn’t have a physical button to change mouse polls, visit your mouse manufacturer’s site for utility software and use them to change the mouse polling rate.
Do you have any additional queries or confusion on this topic? Just let us know in the comment section below.