Outlook isn’t just a mailing application. It’s an organizing system designed to make your life easier. In addition to email, you get calendars, contacts, journals, notes and task lists. These features keep you in sync with the team and organization. However, you must change Outlook’s email margins when you upgrade to a new wide-screen monitor. Because the lines of text look long on the wide screen and short on the square screen.
But how can you adjust margins in Outlook email?
No need to look further. In this article, I will show you how you can adjust your email margins in Outlook with other relevant information.
So without wasting any time, let’s jump into the article.
You may also like to read about what version of Outlook do i have?
How To Change Margins in Outlook Email 2013
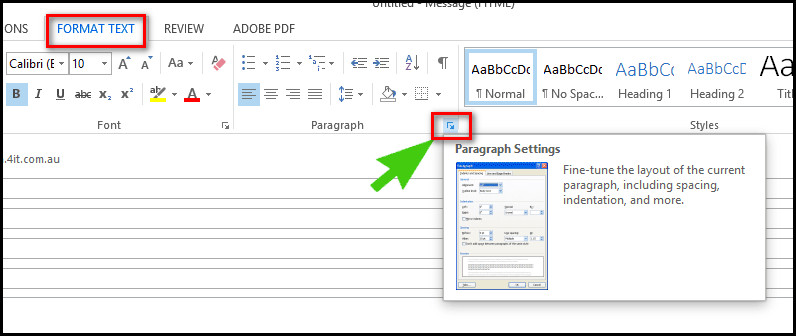
The newer version of Outlook doesn’t have the page setup version. So if you want to change margins in the Outlook application, you need to use Outlook email 2013 or older. Go to the Format Text option, and click the Expander icon to open the Paragraph dialog.
Additionally, you can navigate to the Page Setup option to change margins. In this part, I will show you how to change the margin in Outlook email 2013.
Here are the steps to change margin in Outlook app 2013:
- Open the Outlook application and click on New Email.
- Go to the body of the email.
- Select the Format Text option from the top ribbon and click on the little expander icon under the Paragraph section.
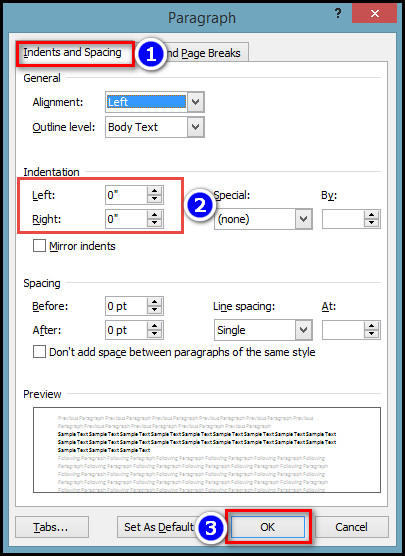
- Change the Margins from the Indentation Settings as per your need.
- Click the Ok button down at the bottom of the dialogue box.
Sometimes, you can use this method in Outlook app 2016 because the menus are similar.
Related content you should read about Outlook junk mail rules not working.
How to Change Email Margins in Outlook 2010
Changing the email margins in Outlook 2010 is quite different from Outlook 2013. You should go to the Paragraph settings to adjust the margins in Outlook 2010. Also, you need to set the Left and Right Indentation to 0. Then click the expander icon in the Format tab to open the Paragraph box.
In this part, I will give a step-by-step guide to changing the email margins in Outlook 2010. Let’s see how to do it effectively.
Here is the guide to changing email margins in Outlook 2010:
- Open the Outlook application.
- Click the Home tab on the ribbon.
- Select the New Email button in the New group.
- Click in the message box. After that, the buttons on the command ribbon will be accessible.
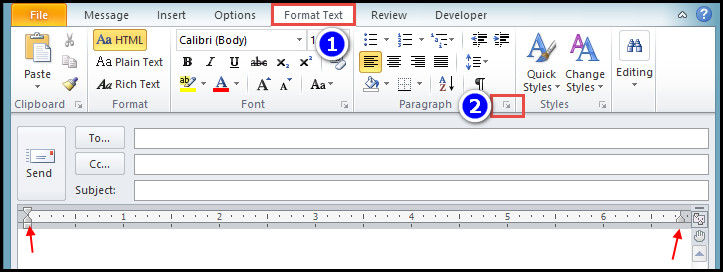
- Select the Format Text tab.
- Click the expander arrow in the bottom right corner of the Paragraph A dialog window opens.
- Choose the Indents and Spacing tab.
- Insert the preferred values for the Indentation controls.
- Select OK.
- Double-click anywhere on the ruler to open the Page Setup dialog.
- Change the Values in the Margins section.
- Select Ok.

After you click Ok, you will see the change margins in your mail body of the Outlook application.
Some more guide on can’t start Microsoft Outlook-invalid XML error.
How to Adjust the Printer Margins in Microsoft Outlook
You can adjust the printer margins by using the Print Preview of Outlook. From there, you can navigate to the Paper tab and set your preferred margins. The option may not be available on the newer version of the Outlook application. So to be safe, you can use Outlook 2016 for this process.
In this part, I will show how you can adjust the printer margins in Outlook. Let’s see how to do it.
Here are the steps to Adjust the Printer Margins in Outlook:
- Go to the Outlook application and open the document you want to print.
- Select Print from the File menu.
- Choose the Print Option from the right side menu.
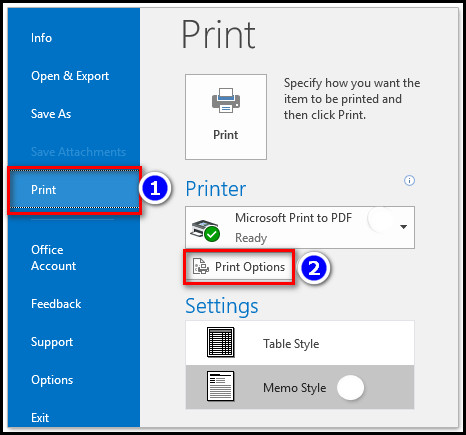
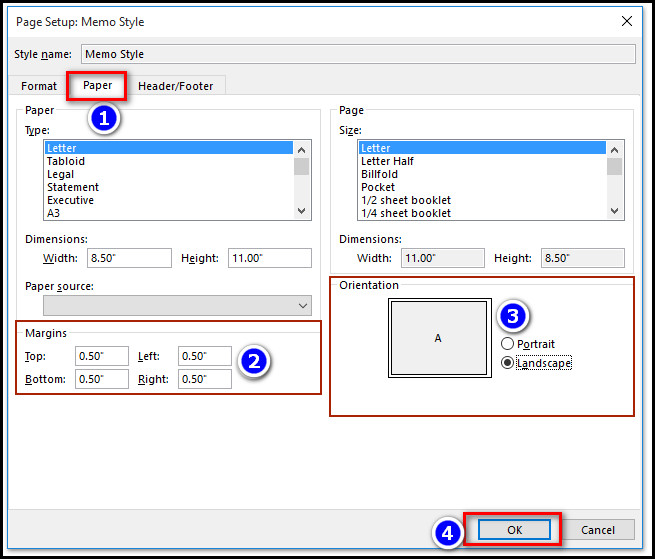
- Click the Page Setup option, then select the Paper tab.
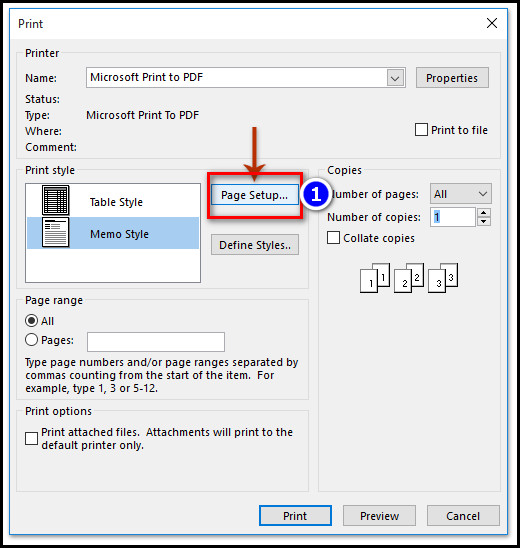
- Change the margin values from the lower left corner of the Page Setup window.
- Select OK to save new printer margin settings.
In this way, you can change the print margin of Outlook.
Check out the easiest way to fix Outlook zoom add-in not working.
How to Add Margins to Outlook Emails Without Any Coding
In the recent versions of Outlook, you won’t see any margins option because Microsoft has removed the margin option from Outlook 2019. But with the help of Microsoft’s table feature, you can add custom margins to Outlook emails without installing any mods or code.
In this article section, I will show you how to add custom margins in the Outlook application without any 3rd party scripts.
Here are the steps to add margins to Outlook emails without any coding:
- Open the Microsoft Word application and create a 3-column table.
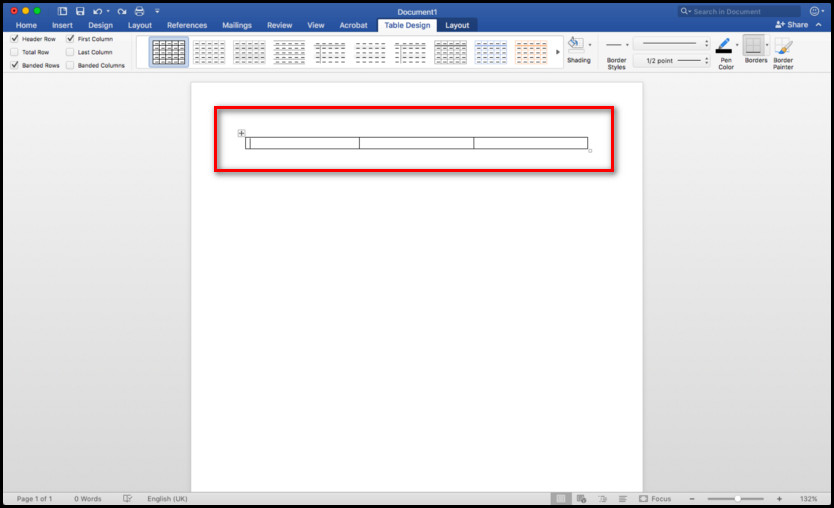
- Write your text in the middle column.
- Adjust the two side columns like your page margin.
- Select the whole table.
- Choose No borders from the Table design section.
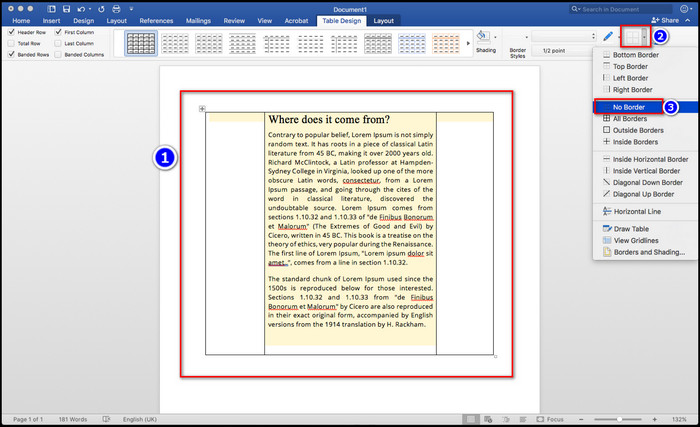
- Copy the whole document (Press CTRL+A then CTRL+C key on your keyboard)
- Paste the writing into the Outlook mail body.
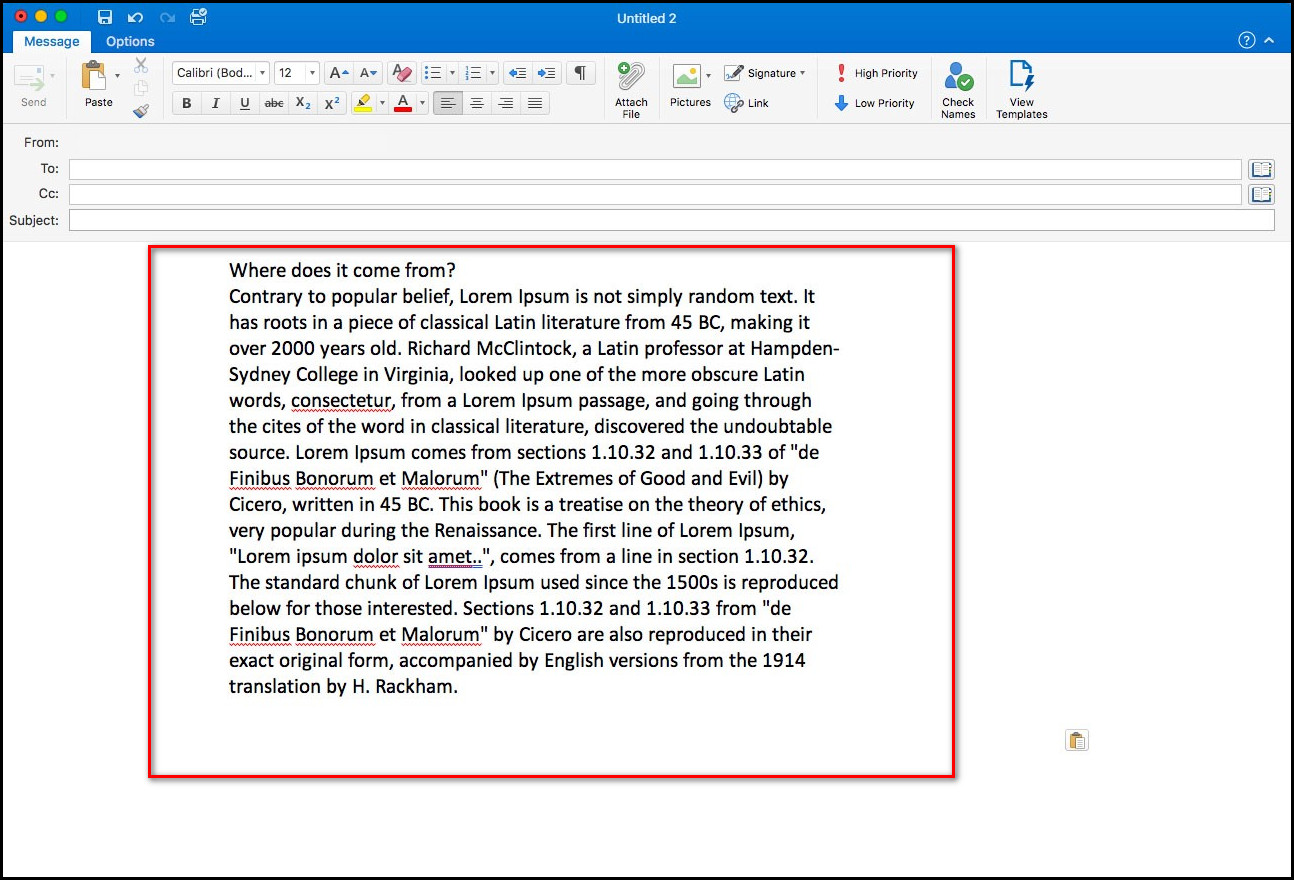
And boom. You will get one nicely formatted email complete with white space in the Mail section of the Outlook application. You can add custom margins to any Outlook application using this method.
Also, check out our separate post on Outlook rules not running automatically on shared mailbox.
FAQs
How can I change margins on email massage?
To change margins on an email message, open the Outlook application and click the Home tab on the ribbon. From there, select the New Email button in the New group. Click in the message box, then Select the Format Text tab. After that, click the expander arrow in the bottom right corner and choose the Indents and Spacing tab. Lastly, insert the preferred values for the Indentation controls.
Why Has my Outlook View Changed in 2022?
Your Outlook view changed because Microsoft updated the interface with a 2022 update. Users will get the update from mid-August 2022 (delayed from mid-July) to late September 2022.
Why Does my Outlook Email Look Different?
Your Outlook email looks different because Outlook has interpreted HTML code differently on your PC.
Why Does my Email Look Weird?
Your email looks weird because your Email application couldn’t render the file correctly.
Conclusion
Long story short, the margin options on Outlook have changed from the MS Office 2019 and later versions. So if you want to change the Outlook margin, you should use the Outlook application 2016 or older. You can change page margins from the Paragraph dialog on those versions.
After reading this article, I’m sure you know how to change the margins on Microsoft Outlook. Comment if you face any problems executing the steps of this article.
And for everything else, stick with 10PCG.