Are you getting tired of hearing you have a terrible video quality while streaming or making a video call in Discord? No need to worry anymore as you have come to the right place.
Recently, I faced similar problems as I was streaming Valorant. Some of my viewers started complaining about the video resolution being too poor, and they could not see me or my gameplay clearly.
I knew I couldn’t let this go on, so I started finding solutions and eventually found some useful ones. You might not need to go through all of them if you are lucky. In this article, I am going to compile them for your convenience in a single place.
Why is Discord Video Quality so low?
Discord video quality might be low because of a built-in low-quality camera, internal settings that force low-resolution to take effects, corrupted cache files, unstable networks, an unclean camera front, or low light.
When you encounter a low-quality video issue, the first thing that comes to mind is a low-resolution camera, right? While some of you are absolutely correct, most of you are not.
The reason being most of the modern devices come with a fairly good quality camera, and they will do the trick unless you own a model that goes about ten to twenty years back.
The most common reason for this problem is incorrect Discord settings, and this can be fixed quite easily.
Quickly check out our separate post on how to find Discord servers.
How To adjust Discord Video Quality
Adjusting Discord video quality is quite easy, and you do not need to be a techie to do the trick. Anyone who can operate a computer can do them as long as the instructions are followed carefully.
Here are the steps to adjust Discord video quality:
1. Clean your Camera
Before making any major changes to your computer or Discord or even spending money on a brand new web camera, it is recommended that you check your existing camera.
By checking, I meant to find the camera hole and see if there were any dust or other particles blocking the camera lens.
If you see any dust or other particles, use a soft cloth to clean it. Now open your Discord and start video calling to see if the problem is solved or not.
2. Upgrade the Network plan
An unstable network sometimes does this prank. Due to an unstable network, the data sent by your PC goes slowly or partially, which causes a breakdown of resolution and makes your video pixelated or blurry.
Upgrading your network plan is a good idea for steaming high-quality in Discord. Remember, the higher resolution you want to stream, the more heavy package you have to upgrade to.
3. Change Discord Settings
This is the change of Discord setting part, and in this fix, most of you will get results immediately.
Follow the steps below to change Discord Settings:
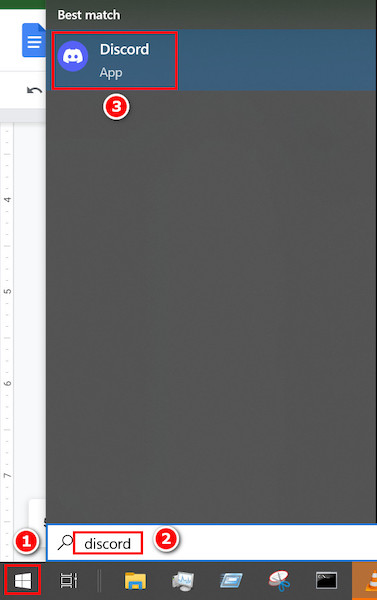
- Click on the Windows icon located at the bottom left corner of your desktop and type Discord.
- Click on the best match. Discord will open shortly.
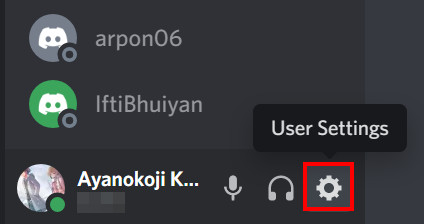
- Locate the Settings icon at the bottom left corner near your Discord profile and click on it. The user settings page will appear.
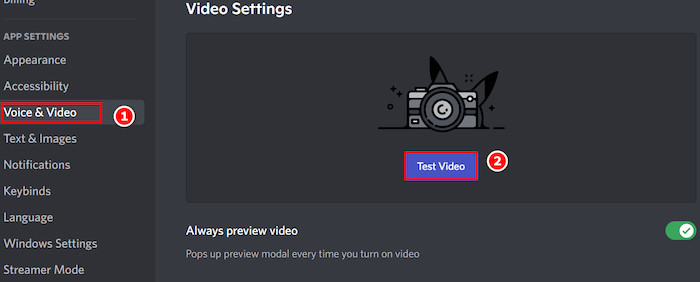
- Go to the left panel and search for Voice & Video under App Settings.
- Click on Voice & Video, and you will see some options appear on the right panel.
- Click on Test Video and see if your video comes as grainy or pixelated. If not, then there is no problem with your camera.
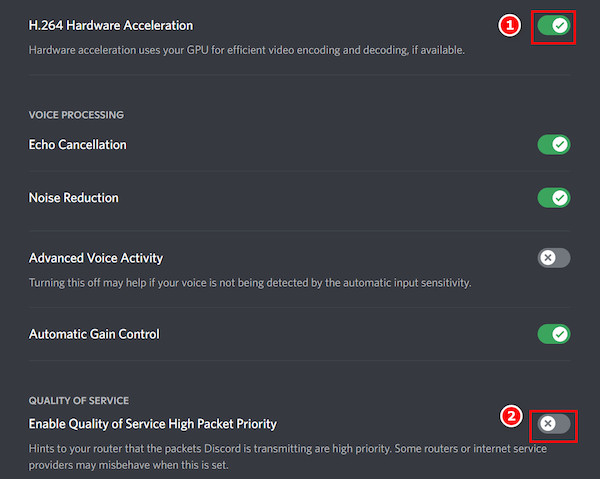
- Look for Hardware acceleration and Quality of service in the right panel and make sure they are both turned on.
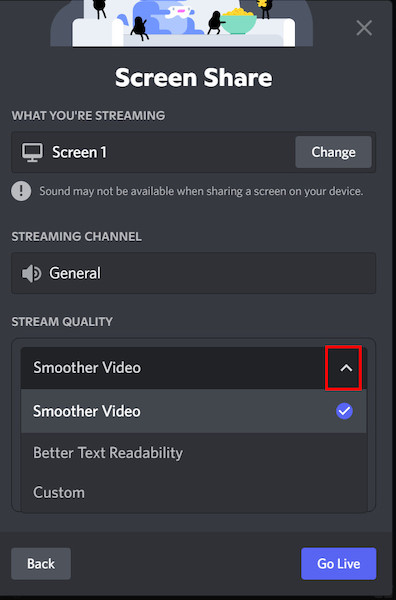
- When sharing a screen or video call, select the Stream quality as needed. If you want smooth play, select Smooth video quality. But if you prefer better text readability, select that option.
Find out how to delete Discord messages.
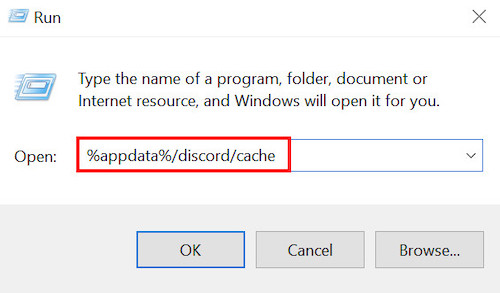
4. Delete corrupted cache files
Deleting corrupted cache files have solved this issue for a lot of users, so it might be worth a try.
Follow the steps below to delete corrupted cache files:
- Press the Windows key + R and Run will open.
- Type %appdata%/discord/cache in the box and press Enter.
- Press Ctrl + A and then press Delete. Confirm the deletion, and your Discord cache will be cleared along with the corrupted cache.
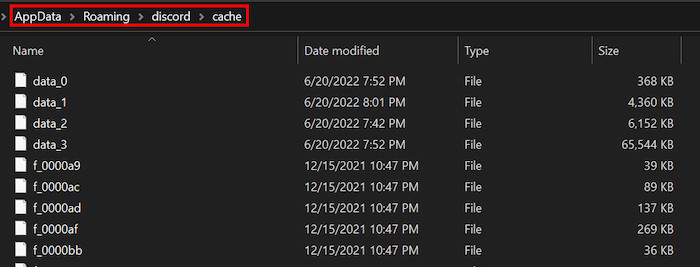
- Open Discord and see if the low video problem still persists or not.
5. Use enough lighting
One of the reasons why your video is pixelated is because of low lighting. It is a fairly common mistake that lots of new streamers do not understand and end up spending a lot on a costly web camera.
Make sure you have enough natural lighting or artificial lighting system where you work or where you stream. Hopefully, it will solve your problem.
6. Update Drivers
Sometimes updating drivers solves some bugs, and your problem might be one of the particular bugs. So updating your drivers seems a good idea nevertheless.
Follow the steps below to update drivers:
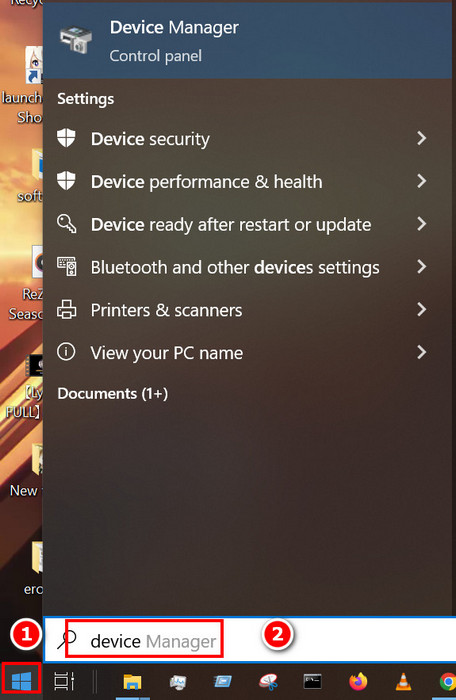
- Click on the Windows icon and type Device Manager.
- Press Enter, and you will be prompted to the Device Manager page.
- Select Camera and click on the option under it.
- Click on the update icon on the top with a green arrow.
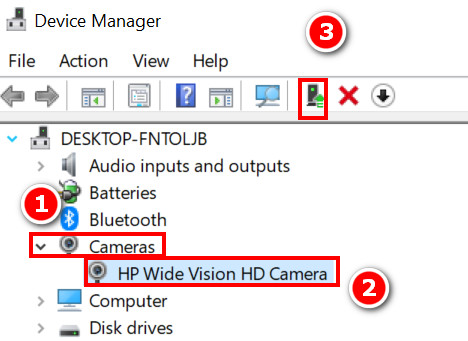
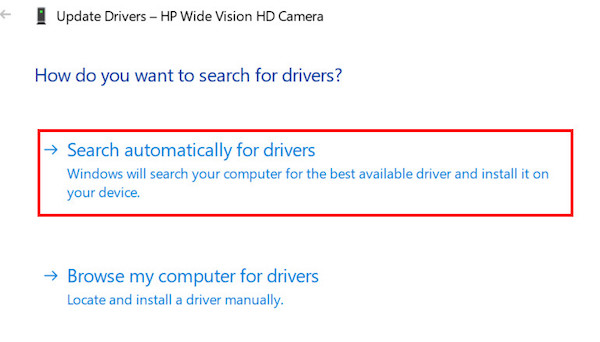
- Select Update automatically, and Windows will search for the best update available. If you are already updated, you will be notified instantly.
Check out the easiest way to change Online Status Discord.
7. End high data-consuming tasks
There are some applications that consume a lot of Data, and so Discord might not be getting enough data for sending high-quality video.
What you have to do is end these tasks one by one from the Task Manager. Press Ctrl + Shift + Esc, and Task Manager will open. Select unnecessary tasks from here and end them.
8. Reinstall Discord
If none of the above works, then there might be a faulty installation at work. To fix this, you are to uninstall Discord and then reinstall it again from a safe source.
The safest source to install Discord is from their official website. Double click on the file once downloaded and followed the on-screen instructions.
9. Upgrade your camera
If none of the above works for you, then, unfortunately, you have to consider spending money to buy a better quality web camera.
There are many kinds of web cameras on the market. Consider the price and your needs. The best ones are of the mid ranges. Do some research about the models best suited for you and available on the market before buying on impulse.
10. Contact Support
Contacting Discord support is the last option you have to solve your problem. Go to Discord’s Support page from here.
Once you are on their support page, provide them with the necessary information and send details of your problems as best as you can. The Discord support team will contact will soon, and hopefully, they will provide you with a surefire way of solving your specific problem.
Follow our guide step-by-step to change Font Discord.
FAQs
1. Why my Discord video is pixelated?
Discord video can be pixelated due to various reasons. One of them might be an unstable network connection. Upgrade your network plan and check if the problem has disappeared or not.
2. In which resolution can I stream in Discord?
If you are a free Discord user without a Nitro subscription, then you can stream up to 720p. But if you have Nitro, then you can stream 1080p; even the source resolution will not be a problem for you anymore.
3. How to test video using Discord?
You can test the video simply from Settings>voice & Video> Test video. If your video is not grainy or pixelated here, it means there are no problems with your camera. So the problem might be your ISP.
Final Thoughts
It is no fun if you are streaming a fun game, but the viewers cannot see the video and complain every once in a while. Who would even want to watch such a stream? So, naturally, your viewers count will go down, and you will be all alone in your stream if you do not take timely actions.
As I listed most of the problems and their solutions, most of your problems will be solved just by following this article step by step. But if you have any particular problem in your PC that you do not know of or a virus or malware causing problems, then these solutions alone might not be enough.