Have you ever wondered how you can build a new Discord bot with similar functionalities to the ones you frequently use in Discord, like Mee6 or Hydra? If the answer is yes, you just clicked on the perfect page.
Yes, you read the title right. You don’t need any coding knowledge to build a fully working and reliable Discord bot that you can use on your Discord server.
This does not mean that you won’t need to write any code for making the bot, it simply means that I am going to guide you through the entire process, and the code you need is going to be very basic.
So, without further ado, let’s get right into it. I suggest you read every section of this article carefully to avoid any confusion and for the best possible understanding.
Can you create your own Bot in Discord?
Yes, you can create your own bot in Discord, similar to other social media platforms. However, the difference is that, in Discord, you can create bots even without years of coding experience. This article is going to outline all the steps needed to achieve this.
While Discord bots can be written and programmed in numerous programming languages, the most popular and simplest languages are Python or Javascript. This guide will also use these languages.
As you go through this article, I want you to keep in mind that the functionality of these bots is going to be limited in one way or the other because this article is specifically targeted at beginners.
If you are hoping to create a more sophisticated Discord bot, you can try the autocode platform, which allows you to make more functional Discord bots with little coding knowledge. Also, check out how to Refresh Discord Custom Hotkey
Requirements to Make a Bot in Discord
Before you can start building your first Discord bot, you need to install a few prerequisites on your PC. These include a javascript runtime environment called Node.js and a reliable text editor program like Notepad++. You also need an active Discord account for creating a bot.
Follow these steps to install the prerequisites:
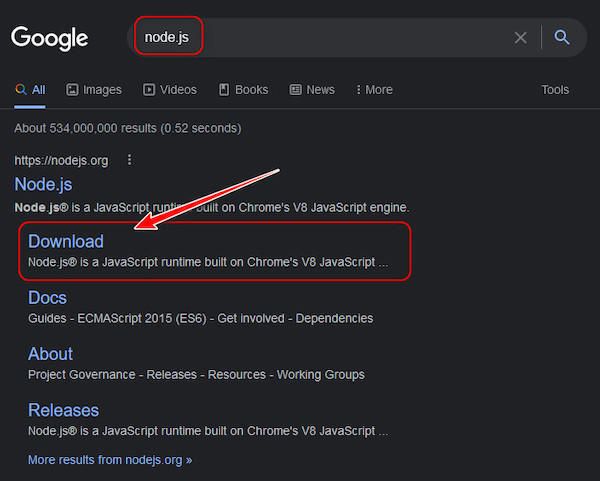
- Launch any web browser on your PC and visit the Google homepage.
- Search ‘node.js’ and click on the Download option below the first result, as shown in the picture.
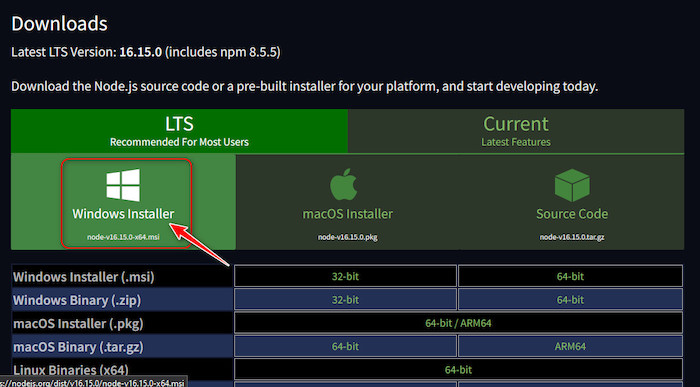
- On the next page, click on the Windows Installer if you are a Windows user or macOS installer if you are a macOS user to start the download.
- Once it finishes downloading, open it and install the runtime environment by following the instructions.
- After the setup completes, go to Start, search for CMD and launch it. Then, type the following commands to ensure Node.js is correctly installed. You are good to go if you get a version number like the image below.
node -v
npm -v
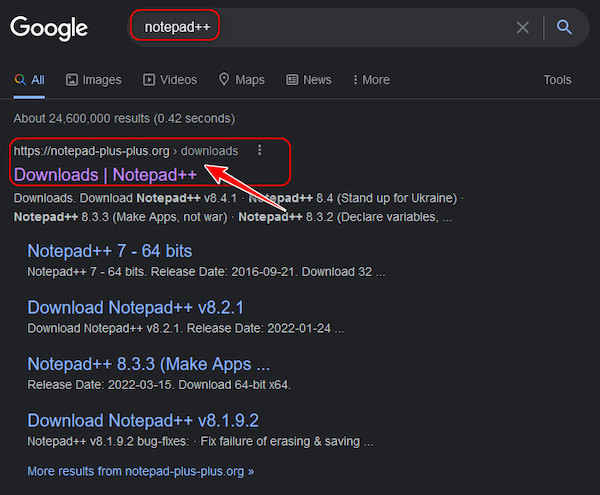
- The next step is to download Notepad++. Search for it in Google and click on the first result.
- Click on the latest Notepad++ version to download it.

- On the next page, scroll a little and click on Installer to save the installer to your Downloads folder.
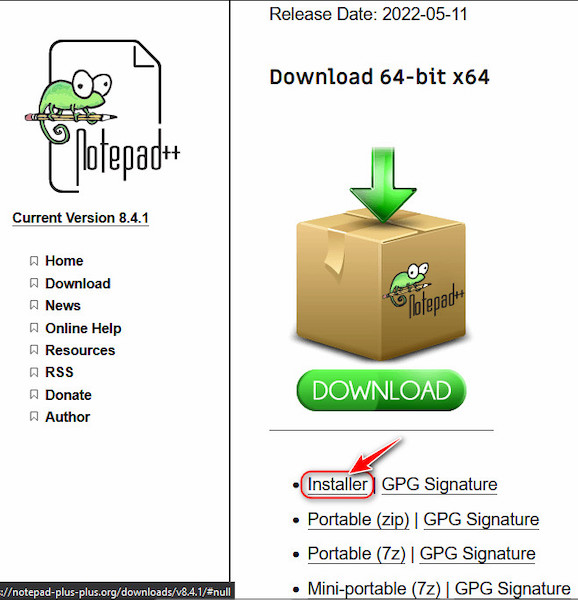
- Run the installer and follow the instructions to install Notepad++.
How To Make A Discord Bot
Now that your PC is all set to create Discord bots using Javascript, you can get started with the process.
Here are the steps to make a Discord bot:
- Launch a browser, and make sure you are signed into Discord on that browser. Go to the Discord homepage and click on the Open Discord button to verify this.
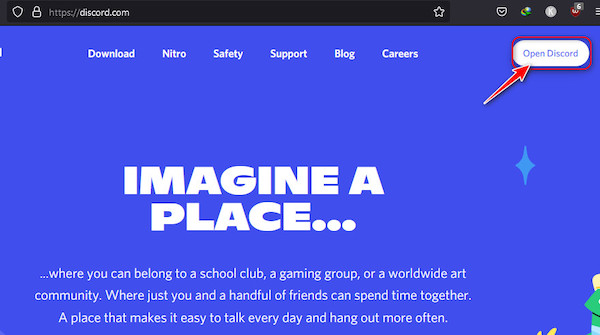
- If the web page redirects to your Discord app, you are fine, but if you see a login window, enter your credentials and click on the Login button.
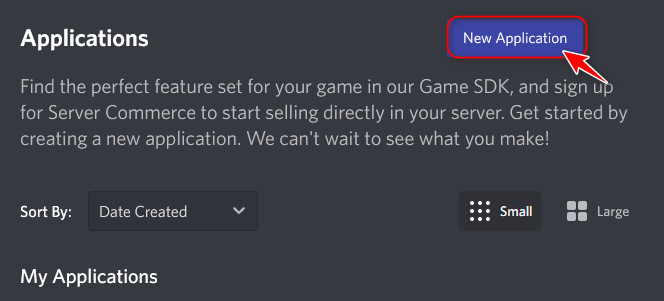
- Once you are logged in, go to the Developer’s option for Discord.
browser-paste-address-bar.jpg
- Click on the New Application button in the top right-hand corner to proceed.
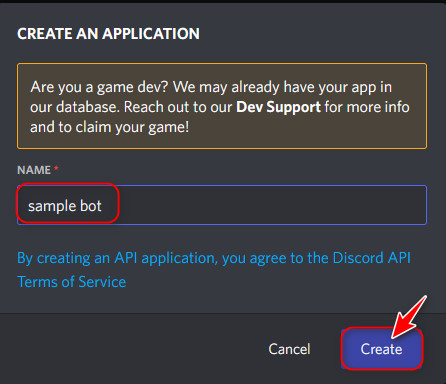
- Enter a name for your bot on the pop-up and click on Create.
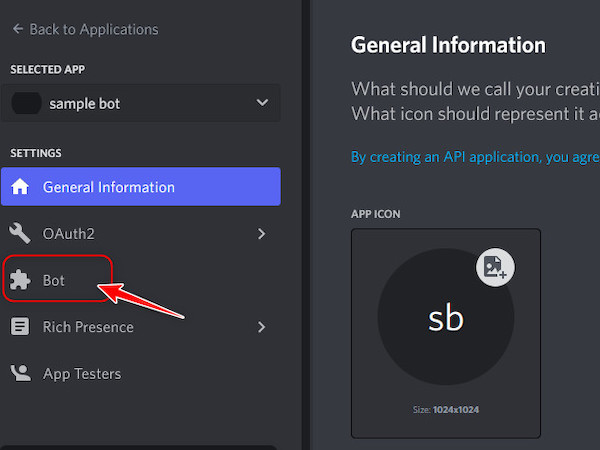
- After that, you will be taken to the newly created application’s settings. Click on the ‘Bot’ option from the left panel.
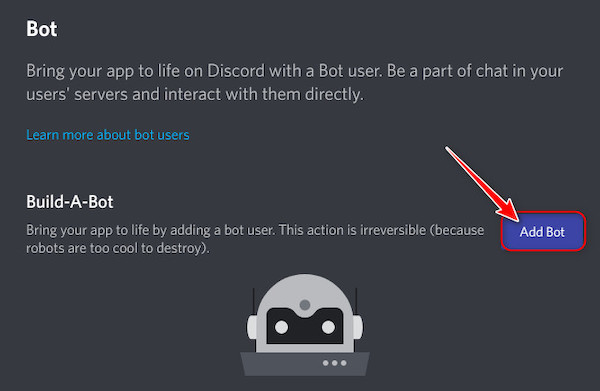
- Click on the Add Bot button in the Build-A-Bot section.
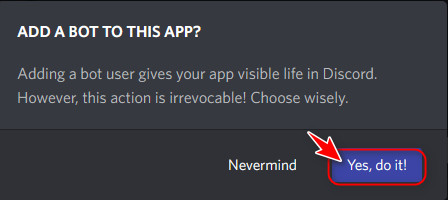
- From the two options in the new pop-up, select Yes! Do it.
- A whole new list of settings will appear in the Build-A-Bot section as soon as you do this. Scroll to the Token section, and look for your token. This will be a string of completely random letters and numbers but remember to keep this private and secure at all times. If someone else gets access to this, they can modify the bot’s code. If you see a Copy button, click on that to copy the token to your clipboard.
Otherwise, click on the Reset button to generate a new Token and make the copy button visible. 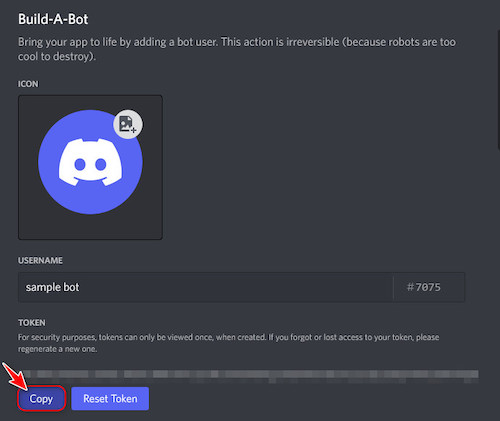
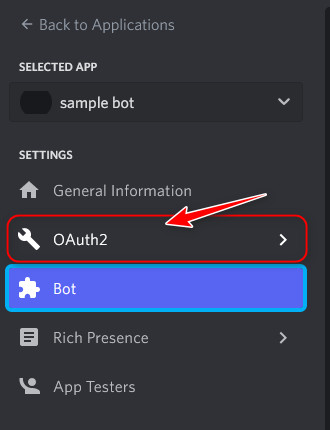
- Once the token is stored somewhere safe, switch to the OAuth2 tab from the left pane.
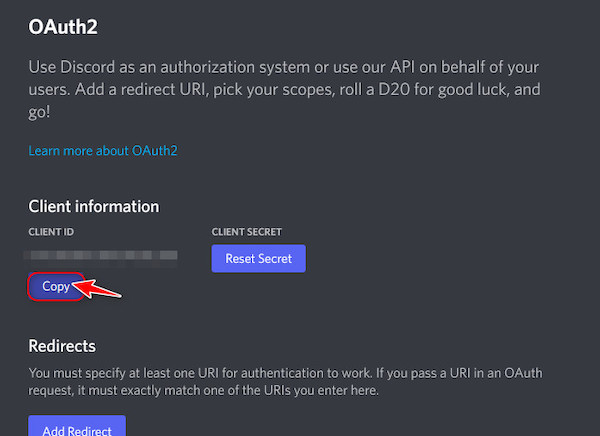
- Click on the Copy button below the Client ID in the Client Information section and save it in a note. Make sure also to keep this hidden from other people.
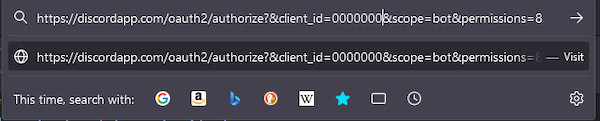
- Go to the Authorize Client Page. discord-paste-url.jpg
- Replace the YOURCLIENTID text of the URL with the Client ID you saved in a note earlier. As an example, if your clientID is 000000000, then the address should be like the image below.
- Press the enter key, you will be taken to a page where you need to select a server where the bot will be added automatically. Expand the drop-down menu and choose one, then click on Continue.
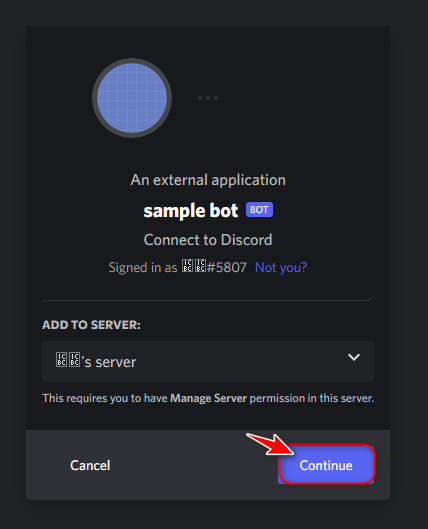
- Click on the Authorize button to allow all permissions.
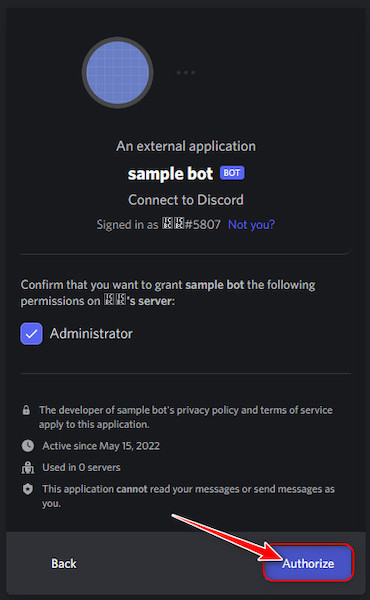
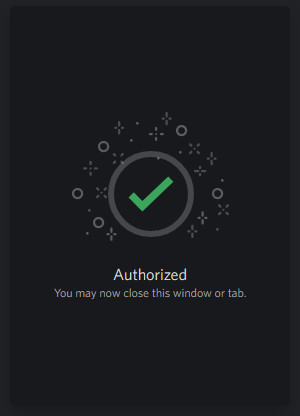
- Verify the following captcha to complete the integration. You should see a message confirming the integration.
- Launch the Windows File Explorer and create a folder to store all your bot files in an easy-to-access and secure location.
- Launch Notepad++ from your Start menu or desktop and copy and paste the following code, including the curly brackets.
{ “token”: “TOKENID” }
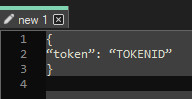
- Replace the TOKENID text with the confidential token ID you copied earlier. Note that the token ID should be inside the quotation marks.
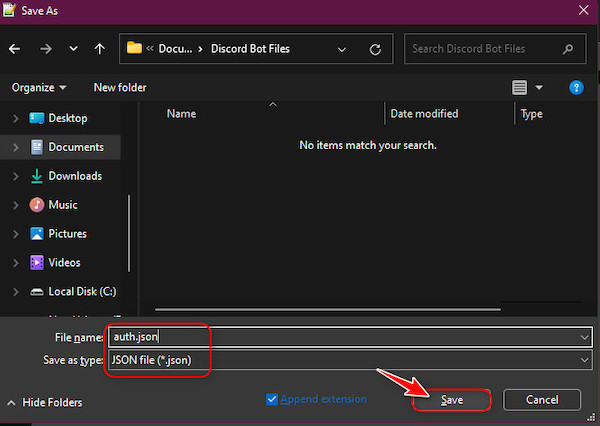
- Press your keyboard’s Ctrl and S keys simultaneously to open a Save dialog window. Then, navigate to the folder you created earlier to save bot files. After that, type auth.json in the File Name text field and select JSON file as the Save as type from the drop-down menu. Then, click on Save.
- Press the Ctrl and N keys simultaneously to create a new text file and then copy and paste the following code into that file.
{ “name”: “first-bot”, “version”: “1.0.0”, “description”: “First Discord Bot”, “main”: “bot.js”, “author”: “Name”, “dependencies”: {} }
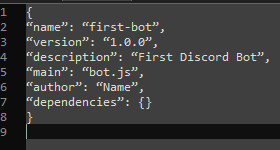
- Replace the Name text next to the author with your own name. You can also change the name of the bot first-bot and the description to your preferences, but I recommend leaving the rest untouched unless you really know what you are doing.
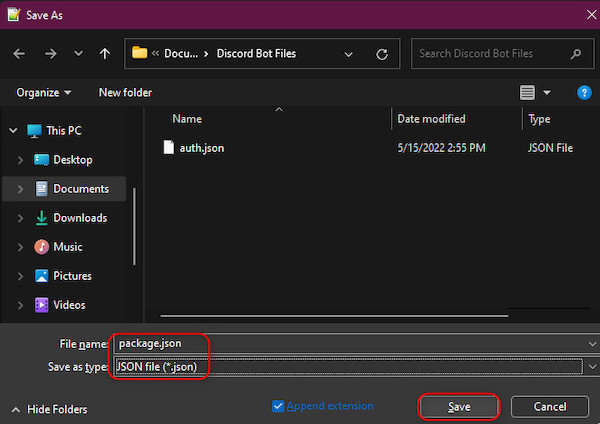
- Press Ctrl+S again, and once you are in the bot files folder, type the file name as package.json and the Save as type as JSON. Finally, click Save.
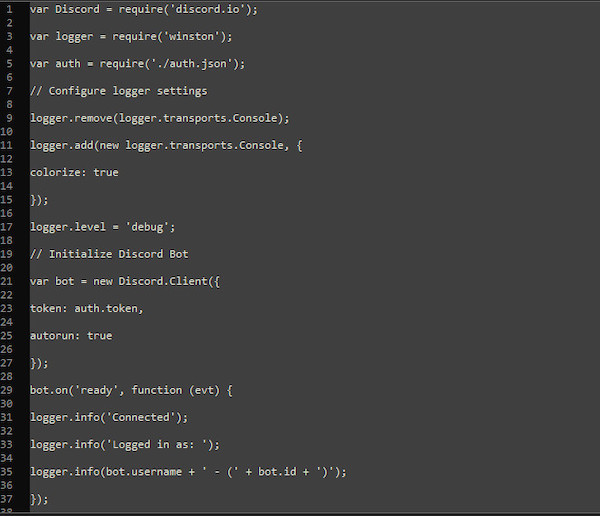
- Press Ctrl+N again. This is where you will enter the main code that will decide what the bot will do in Discord. If you want it to have more advanced functions, you need to learn javascript from YouTube or other platforms. For now, you can copy and paste the sample code below, courtesy of Renemari Padillo, a medium user, to make your bot greet you on the server.
var Discord = require(‘discord.io’); var logger = require(‘winston’); var auth = require(‘./auth.json’); // Configure logger settings logger.remove(logger.transports.Console); logger.add(new logger.transports.Console, { colorize: true }); logger.level = ‘debug’; // Initialize Discord Bot var bot = new Discord.Client({ token: auth.token, autorun: true }); bot.on(‘ready’, function (evt) { logger.info(‘Connected’); logger.info(‘Logged in as: ‘); logger.info(bot.username + ‘ – (‘ + bot.id + ‘)’); }); bot.on(‘message’, function (user, userID, channelID, message, evt) { // Our bot needs to know if it will execute a command // It will listen for messages that will start with `!` if (message.substring(0, 1) == ‘!’) { var args = message.substring(1).split(‘ ‘); var cmd = args[0]; args = args.splice(1); switch(cmd) { // !ping case ‘ping’: bot.sendMessage({ to: channelID, message: ‘Pong!’ }); break; // Just add any case commands if you want to.. } } });
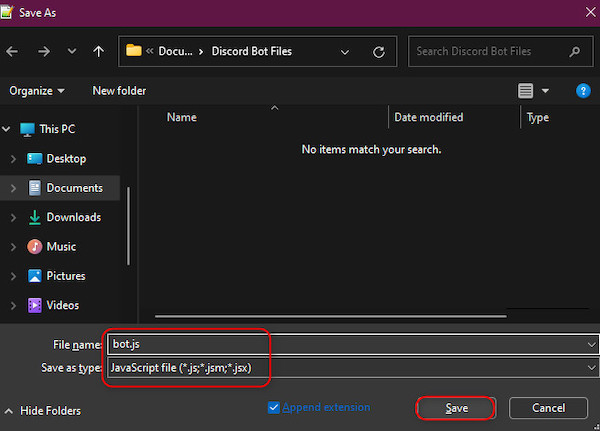
- Press Ctrl+S and navigate to the bot folder. However, here you need to save the filename as bot.js and file type as Javascript.
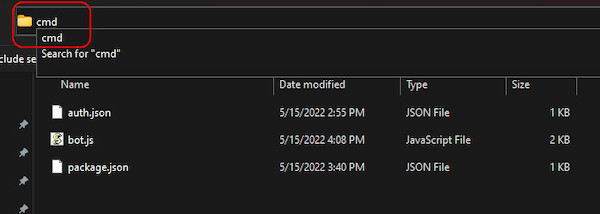
- Exit the notepad window and open a File Explorer window. Navigate to the folder where you saved all 3 files. Click on the address bar, replace all the text with cmd, and hit enter when you are there.
- Type the following commands one by one to install all the additional files required for the bot. Make sure each command is entirely executed before moving on to the next.
Final Thoughts
One of the main reasons Discord is such a popular platform is its extensive bot collection to perform all kinds of tasks, and most of them are entirely free. After reading this article, you can probably guess why there are so many bots; it’s super simple to create one.
Now that you have learned the basics of creating a Discord bot, you can take things to the next level by joining a Javascript class or watching a free YouTube lecture.