Zoom is a tremendous app for video meetings, team chat, VoIP phones, webinars, whiteboards, and contact centers. Now almost every meeting is happening through the Zoom app.
As you know, you can chat while you are in a Zoom meeting. Some might share important files or links in that chat at the time of the meeting. But the problem arises when you can’t access all those chats after the meeting ends.
If you don’t know how to access Zoom chat after the meeting, this article is definitely for you. I will show you how to save zoom chat to access those later. You can save all the chats manually or automatically.
So, let’s begin and jump on how to access Zoom chat when a meeting ends.
Quickly check our epic post on how to add recording timestamp in Zoom.
Can You Access Zoom Chat After Meeting?
You can access Zoom chat after a meeting ends, but you must save the in-meeting chat manually or enable the auto-saving chat feature. When you save any chat manually, you can always access those later. If you turn on auto-saving, you can access those chats by going to the saved location path.
However, Zoom saves all the chats by recording them into the Zoom cloud storage. But you must be a paid subscriber to save all the chats in the Zoom cloud storage. If you are a regular or free subscriber of Zoom, you won’t be able to see the cloud recording option.
You can manually save all the meeting chats or turn on the Auto saving chat feature from the Zoom web portal settings. Zoom sets a default path for saving all the chats in a different folder. All the folders are named with the meeting name, date and time.
So, you must save all the Zoom meeting chats to access them after the meeting.
Also read how to update Zoom.
How to Save Zoom Chat to Access After Meeting
You can access Zoom chats even after the meeting is over. If you save the meeting chat, you can access them later. To do this, select the check box for Allow users to save chats from the meeting from the Chat setting. You can save all the chats locally to your PC after saving them.
But only the account owner can access group messaging archives through the chat history. You can give other users or admins permission to access chat history if you are an account owner. Just add them to the Chat history permission using role-based access control.
Follow the steps below to save Zoom chat to access them after the meeting. You can save meeting chats manually or auto-save them. You can also save chats to the Zoom cloud.
Here are the methods to save Zoom chats for accessing them after the meeting:
1. Save Zoom meeting Chat Manually
First, you can manually save Zoom meeting chats in your local drive. To do so, follow the below steps.
Here are the steps to save Zoom meeting chat manually:
- Start or join a meeting.
- Click Chat while the meeting is on.
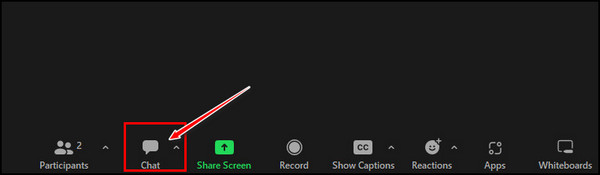
- Select the three vertical dots or ellipses from the bottom of the chat window.
- Click on Save chat.
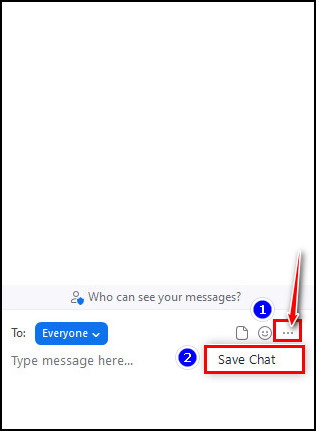
Clicking on the Save chat button will store all the meeting chats on the local drive. The default location for the saved Zoom chat is Documents/ Zoom/ Folder with the meeting name, date, and time.
Here’s a complete guide on Adobe Reader change default Zoom setting.
2. Auto-Save Zoom meeting Chat
You can also enable auto-saving chat to store all the meeting chats in Zoom. The auto-saving feature will start saving all the chats from the beginning to the end of the meeting.
All Zoom users widely use it. Remember, this only works if you are a host of that meeting. So, let’s take a look at the steps to save zoom meeting chat automatically.
Here are the steps to auto-save Zoom meeting chat:
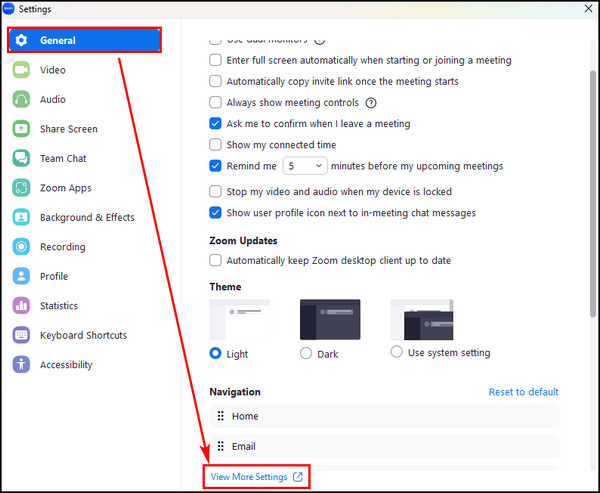
- Click on the Settings icon from the upper right corner beneath the profile icon.

- Select the General tab from the left pane’s listed option.
- Click on the View More Settings link from the bottom, and it will take you to the Zoom web portal.
- Select Settings from the left pane and click on In Meeting (Basic).
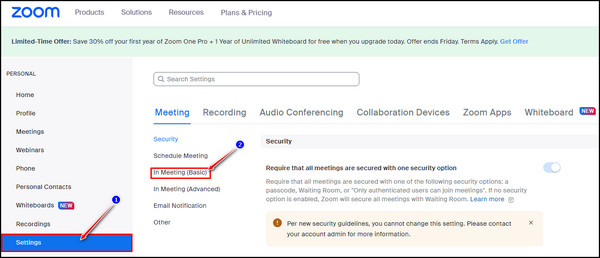
- Toggle the button beside the Auto saving chat option to enable it.
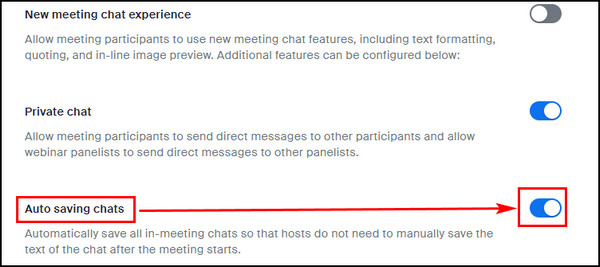
After that, you don’t need to save chats manually; every meeting chat will save automatically from now.
Check out some of the best ways to pause your video on Zoom calls.
3. Save Zoom meeting Chat to the Zoom Cloud
You can save Zoom meeting chats via the Zoom cloud, but you must be a paid subscriber of Zoom. You won’t see the option to save chats in the Zoom cloud in the regular or free account. So, if you are a paid user, follow the below steps.
Here are the steps to save meeting chat to the Zoom cloud:
- Go to the Zoom web portal.
- Login to your Zoom account after that.
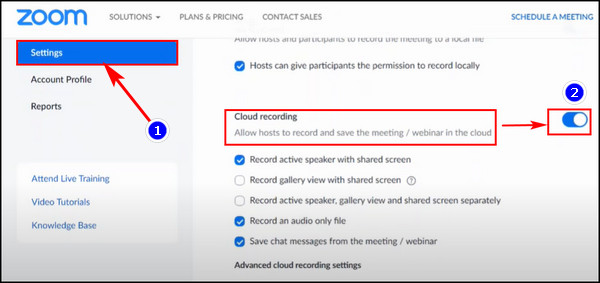
- Click on Settings from the navigation menu.
- Select the Recording tab.
- Toggle the button beside the Cloud recording to enable it.
- Select Enable or Disable to verify the change if a verification dialog displays.
- Select the Save chat messages from the meeting/webinar check box under Cloud recording.
- Go to Advanced cloud recording settings and choose Save panelist chat to the recording check box to allow more files to save from the meeting.
- Click on the Save button.
When the meetings begin, you must start the cloud recording to save the chat, or else you can turn on automatic cloud recording.
Check out our recent article on limit framerate when sharing screen on Zoom.
How to See Zoom Chat After a Meeting
You can view your saved Zoom chat after a meeting from the local drive’s chat recording location from Zoom. If you have turned on the auto-saving chat feature in Zoom, all the chats are saved in your Documents/ Zoom/ Folder with meeting name, date and time.
You can see or access your saved meeting chat in the computer’s default save location. Moreover, you can change the default save location too.
Here are the steps to see Zoom chat after a meeting from the local recording path:
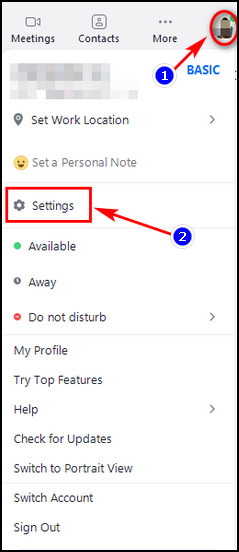
- Launch the Zoom desktop client app and log in to your account.
- Click on the profile picture and select Settings from the context menu.
- Select Recording from the left pane. You can see the recording path in the right pane.
- Click the Open button to open the saved chat in File Explorer.

Now you can see the folder named by the meeting name, date and time. Click on the folder, and there you have it.
You can also change the store recording path by clicking on the Change button beside the Open button. A new window will pop up, and from there, select the desired location for saving all the recorded Zoom chats.
You can also access Zoom recordings if you have saved them on the Zoom cloud. Follow the below steps to access your Zoom chat recording from the Zoom cloud.
Here are the steps to access the Zoom chat recording from Zoom cloud:
- Go to the Zoom web portal from the browser and log in.
- Click on the Recording option from the left pane.
- Select the link which you want to access.
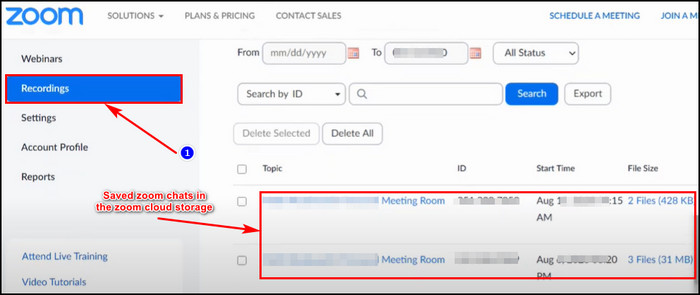
You can see both Cloud and Local Recordings options from the right pane. All the chats saved through cloud recordings are listed below with a link. Click on the link to access all the in-meeting chats.
How to Delete Stored Chats in Zoom
Sometimes, too many recordings can clog the system and hold up lots of drive space. If you have old recordings you don’t need anymore, you can always delete those. Deleting recordings is possible from both local and cloud storage. So, let’s take a look at the steps to delete stored chats in Zoom.
Here are the steps to delete stored chats in Zoom:
Delete Stored Chat From Local Recordings
- Click on the Settings icon.
- Select the Recording from the left pane.
- Click on the Open button from the Store my recording at: section.
- Delete all the older recordings folders and all the folders that you don’t need anymore.
Delete Stored Chat From Cloud Recordings
- Go to the Zoom web portal from the browser and log in to your account.
- Click on the Recording option from the left pane.
- Select or mark all the chat recordings you want to delete from the list.
- Select the Delete button after that.
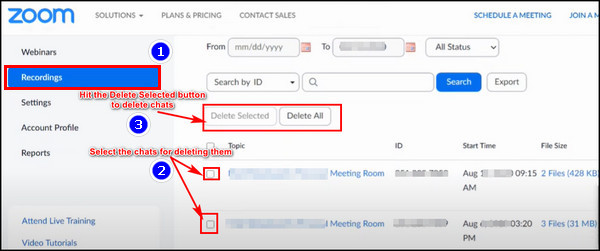
Clicking the Delete button will store all deleted messages in the Trash bin. You can also delete all the chats from there.
FAQs
How long can Zoom store all the recorded chats in the Zoom cloud?
Zoom can store all the recorded chats in the Zoom cloud for up to 10 years.
Why can’t I see the Cloud Recording option in my Zoom?
The Zoom Cloud Recording option is only for paid subscribers. You can’t see the recording option through Zoom Cloud unless you pay for that service.
Is it possible to auto-save Zoom in-meeting chats?
You can auto-save Zoom meeting chat. Go to the Zoom web portal and navigate Settings > In Meeting (Basic). Look for the Auto saving chat option and toggle the button to enable it.
Wrapping Up
Zoom is a widely used meeting app, and students to various professionals use it. You can chat while attending a meeting in Zoom. Some might share useful links while in a meeting.
But the problem arises when you can’t access Zoom chat after the meeting ends. In this article, I have shown how to access zoom chat after a meeting. I hope you have read till the end and already accessed all the important chats.
For further help, knock me in the comment box below. See you at the next one. Peace out!