Links are the most convenient navigation method nowadays. Thus, Microsoft left plenty of options & segments in SharePoint to add, embed, post, or include links.
Redirecting from the SharePoint site to another site, file directory, or any external navigation has become robust and simple if you can manage the links correctly. On top of that, the links require privacy & access control.
In this article, I’ll show each & every possible way to manage SharePoint links with privacy or access control.
Links are the anywhere doors to navigate to any webpage or directory. You can post it, embed it underneath a text or image, create a button, or paste it into a library/document. The primary job of a link is to redirect users from one place to another.
Therefore SharePoint especially focuses on providing lots of options for managing Links. Since there are a lot of possibilities, and functionalities that lie under SharePoint settings, proper Link management is necessary to make a SharePoint Site look good and shape better accessible sites.
In SharePoint, you can put & share your links through the navigation panel, Link post, in a List, embedded with pictures or tiles, in a web part, via Quick links, site logo, and even on the Start page.
So, you must understand where to put which link and how to manage those links before you deal with such extended options.
For example, you can’t put multiple links in the SharePoint logo, and Site Logo hyperlinking is ideal for redirecting to a company’s website rather than an insignificant link.
That is why the management of Links in SharePoint holds significance. As you may want to know every Link management option and the proper utilization, follow the rest of this article to achieve a better understanding.
Since you are already aware of the importance of Link management, you must know all the scopes or options you can share your links in SharePoint. I’ll try to cover each n every possible way you can use link management and the suitable use of each option.
I’ll also try to share my personal experience with honest opinions about those options and some pro tips to level up your link-organizing skills in SharePoint. You can even manage a gigantic database in SharePoint using these.
So let’s get started with some basic link-sharing options and drive through some advanced management settings one by one.
Web Parts
The web part in SharePoint is the function to stick text, documents, news, pictures, videos, buttons, notices, and almost any shareable objects/files on the home page wall. I’ll describe only the options that can inherit any internal or external links in this section.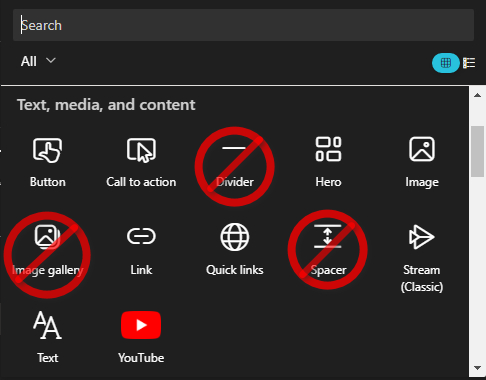 The above picture shows the text, media & content section of web part elements. These elements can hold one or multiple links except a divider, Image gallery & spacer.
To access these elements to add to the site home page, click on the Edit button at the top-right corner of the Home.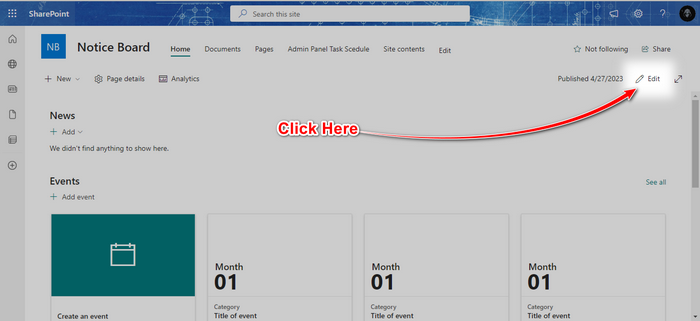
Then hover your mouse at the top or bottom edge of any web part. Click on the appeared plus button to open a floating window.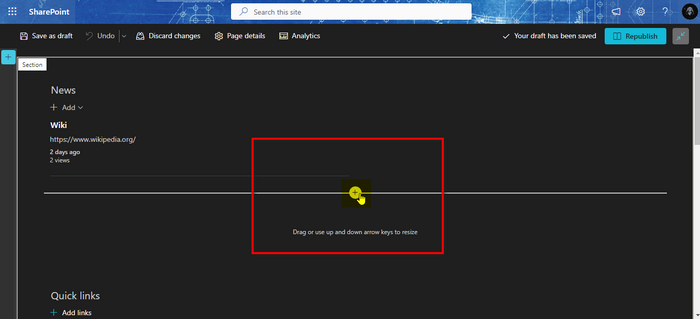
Scroll down a bit to find the text, media & content section. Click on any option you prefer.
The first options are Button & Call to action. Both the options are similar, and the difference is: the Call to Action button has the option to add text to describe the button, and you can add a background in Call to Action.
These two items are useful for linking one internal or external link into the button. For example, you can paste an MS Forms link to trigger a form. You’ll find the setup process in the picture below.
Button Setup: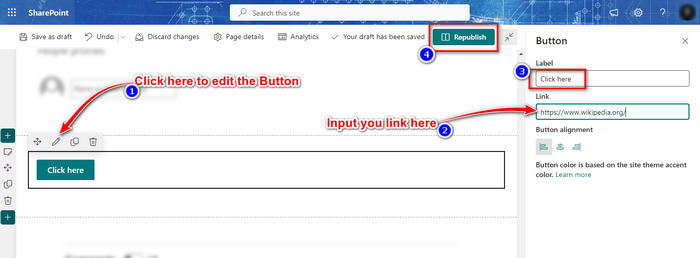
Call to Action Setup: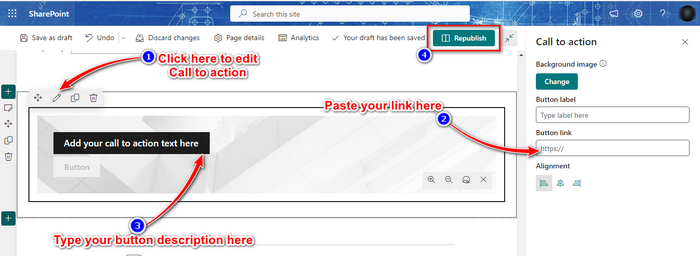
Next, the Hero & Image item shows a picture or picture tile that can embed a link within. Although both have similarities with the image thing, there are differences. The Image button is simple and clickable to redirect. Click anywhere on the image to trigger the embedded link.
Alternatively, the Hero shows an image tile with a clickable text below. The images aren’t clickable though.
Image item setup: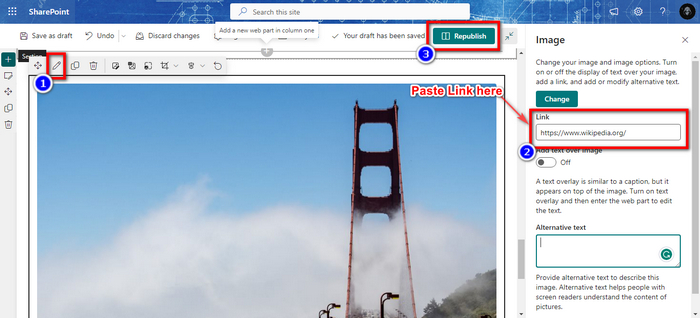
Hero or image tile setup:
First, add an image before embedding a link into the hero web part, AKA image tile. Then you’ll see an edit button at the button-right edge of the picture.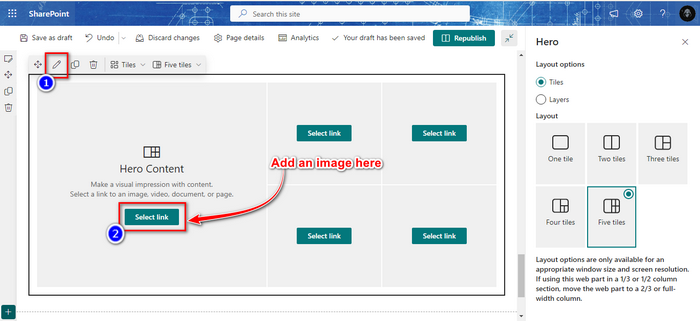
Scroll down the right pane a little and expand the Options. Then paste your link in the call-to-action link box.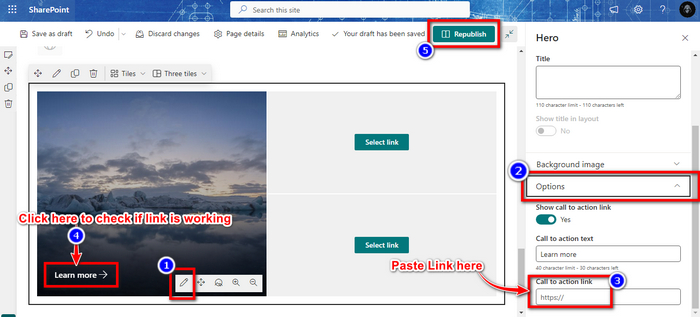
Up next, the Link web part seems obvious with its generic name. You can paste a link into the box, inserting the title and description automatically, but you can edit those if needed. I use this for quick link-sharing purposes, and not ideal for multiple link management.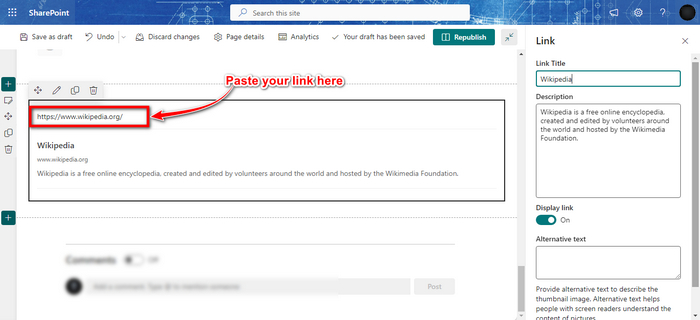
In that case, Quick Links is the best to go. You can add multiple links in this web part, which also looks organized. Plus, you can set custom images or logos with altered text for each link.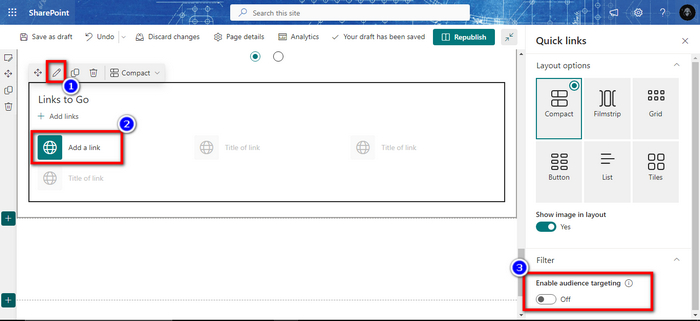
Click on the add link button to paste any internal or external link. You can even upload a file or insert a file directory here.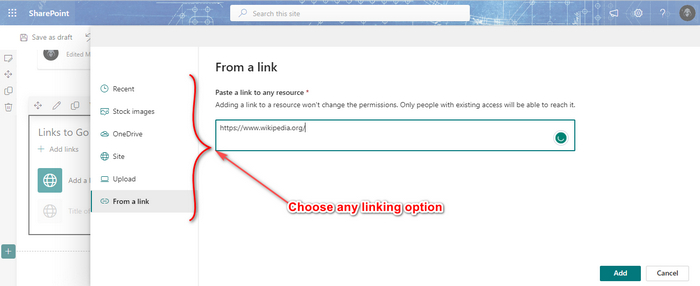
Since this web part can hold multiple items, you can drag items to rearrange, edit each item manually, and a lot more.
Subsequently, the Text web part is quite handy for sharing links by hyperlinking. In this case, you can add multiple links behind a relevant word or sentence.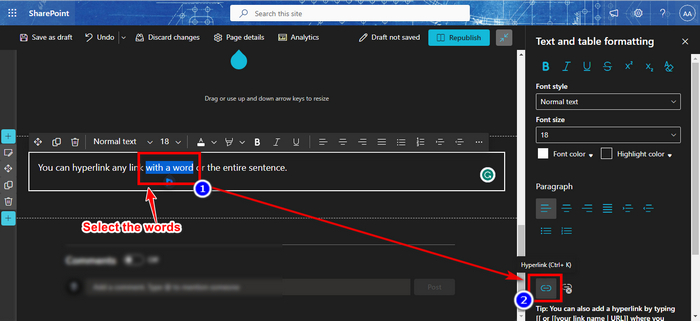
You’ll notice the hyperlinked portion is underlined and in blue font. You can also remove the link from the text by clicking on the hyperlinked part and choosing the remove link button beside the hyperlinking button.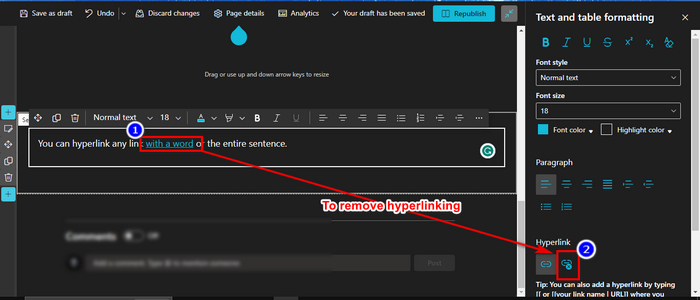
Lastly, the Stream(classic) & YouTube web part is for a particular use case. From the YouTube button, you can clearly understand what it does. And the Stream(classic) web part can stream videos uploaded in Microsoft Stram Classic.
YouTube web part Setup: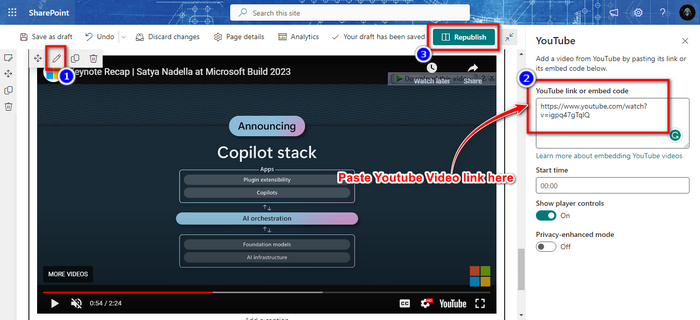
So, here are all the web parts you can use for embedding or hyperlinking. The Embed web part could be a solution but trust me, it’s not for easy use.
Site Logo Link Embedding
A clickable site logo is one of the most common ways to redirect users to a primary site location or an external site. It’s not for itsy-bitsy use, so keep it professional. You should insert a significant link or crucial link because it will appear on every SharePoint site.
The SharePoint site logo leads you to the site’s home by default, but you can easily change that. But you’d require admin access to change the clickable logo.
Here is the process to embed a link into a SharePoint site logo:
Open the Microsoft Admin panel.
Expand the Settings option from the left pane.
Click on Organization settings, and then Organization Profile.
Select Custom Themes.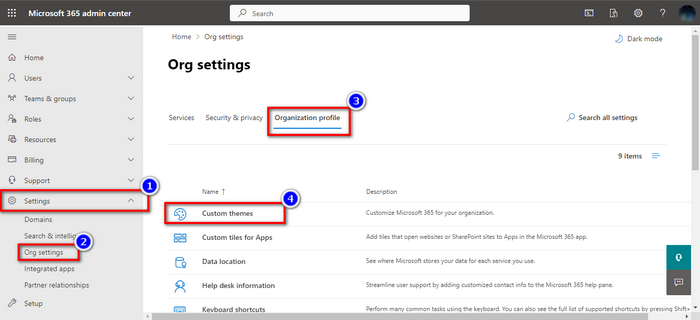
Tick the box saying Prevent users from overriding their themes under the General tab.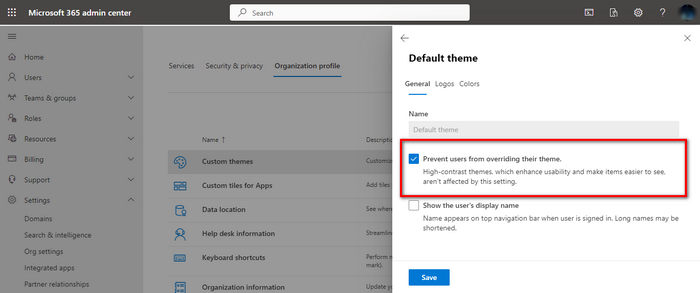
Switch to the logo lab and paste the logo URL.
Insert the preferred link in the One-click Link box.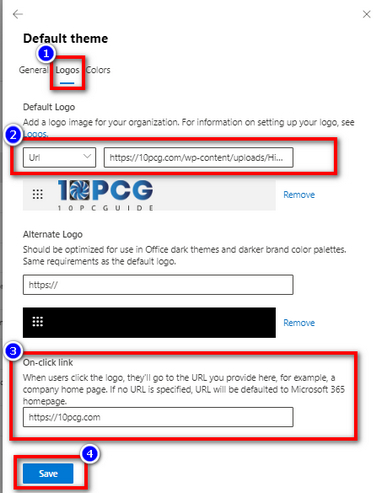
Finish with the save button.
This will change the logo of every site under the organization. Therefore, you’d need admin authority to change these settings.
URL Document
SharePoint allows users to create a file with the extension .url to navigate any user to a distinct web location by clicking on it. It’s like a clickable file that can be redirected to a particular web location.
And it’s pretty simple to create & use too. To create a URL document, head to the document folder of that SharePoint site. Then click on the New button and select Link from the expanded options.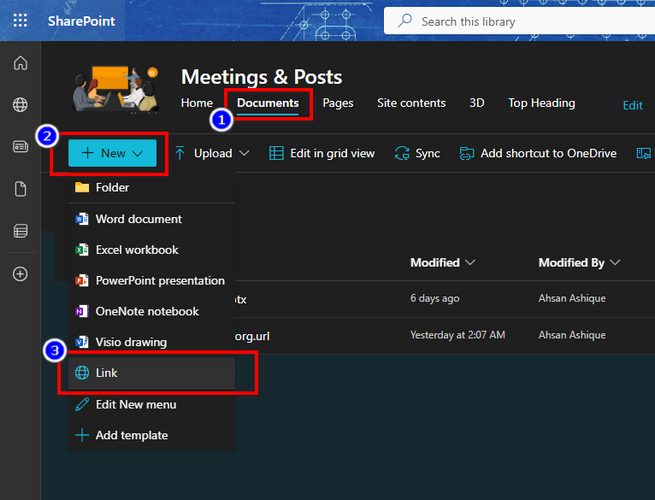
You’ll see a panel arriving from the left. Insert your link under Create Link to, and you can edit the file name below.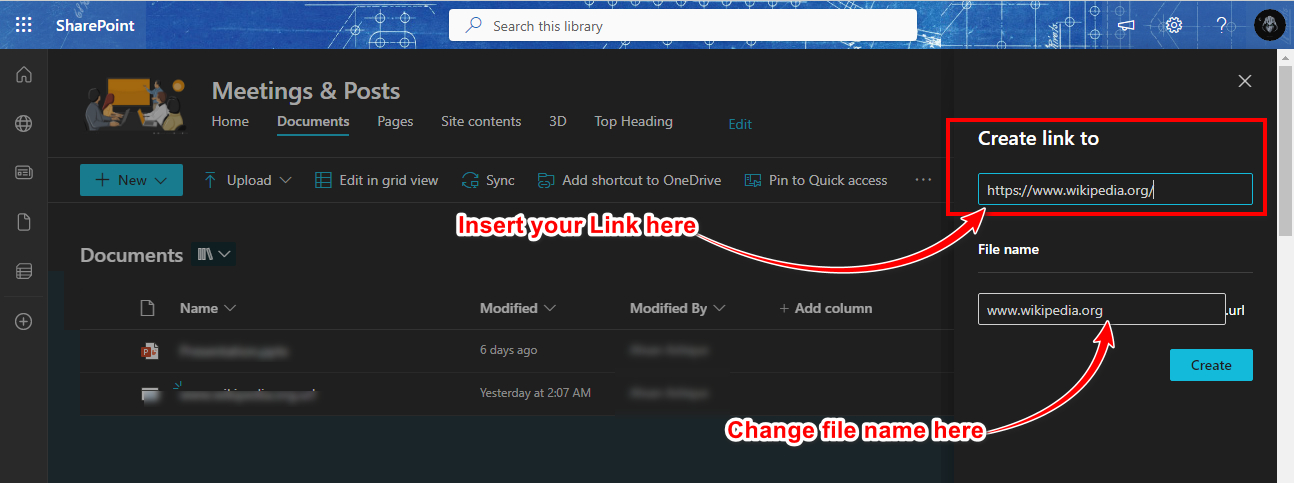
You can insert any link to create a file, but a professional user could be linking a file into it, which you don’t want to provide with directory information or the folder.
News Link & News Post
SharePoint site allows you to add external news links or organic news posts in the news section in the Home. Instead of posting news from actual news feed site, you can insert any link into the News Link option.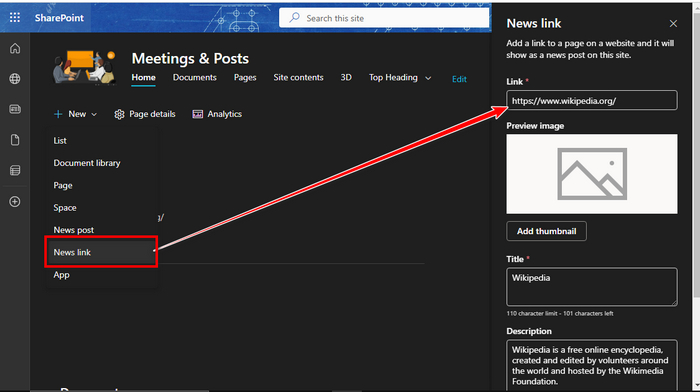
If you can’t see the news you’ve posted in your home, you must add a News web part to make news visible.
Moreover, the News post gives you a mass opportunity with editable texts, where you can hyperlink the words or sentences as much as you need. News Post is proper writing with background and many internal or external link opportunities.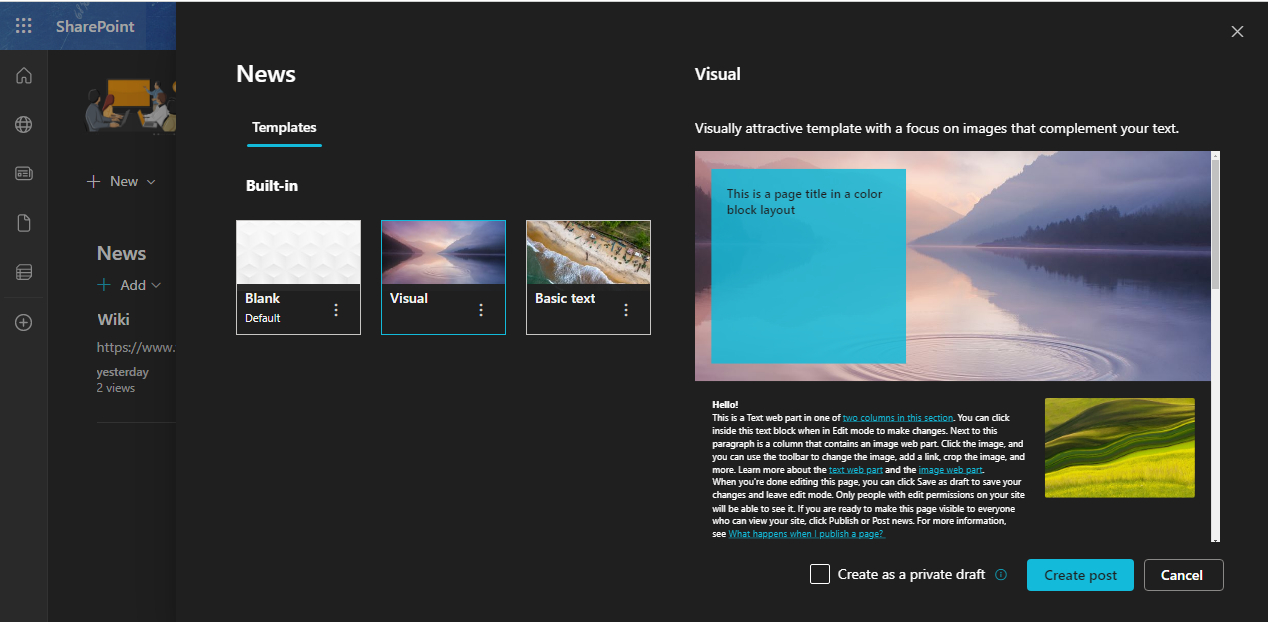
The navigation menu is the most robust segment to manage links in a SharePoint site. The Navigation menu stays in the top section of a communication site or at the side pane of a Team site.
The Navigation menu inherits another two layers under the main section called Navigation Hub. The link management in the navigation panel requires a vast explanation and immense customization tweaks.
To understand navigation management and navigation hub control, you must follow the best practices guide for SharePoint Navigation.
FAQs
Can I put another site’s document link into my site?
You can insert whatever link you want in your SharePoint and even the external links out of the organization.
Does the SharePoint Stream web part allow screen sharing via stream key?
Unfortunately, SharePoint Stream doesn’t allow stream keys from sources like OBS. Instead, it can only stream videos or feeds from the Microsoft Stream library.
Can SharePoint members edit web parts to share links?
The editing capability depends on the provided access limit. If the site owner allows the members, they can edit web parts to share links.
Final Words
Links are everywhere and seem like individual houses for data & information. It’s great that Microsoft pays earnest attention to link management in their Sharepoint service. There are so many functionalities that need proper direction to utilize.
This article is a contribution of such a purpose. So, I look forward to your response about this writing through the comment box.