A SharePoint site is like a whole website on steroids. Since SharePoint offers a lot of functions and controls like an actual website, I have used this to drive my business for quite a long time.
After half a decade of extensive experience, I have created my own customized navigation format for ease of my access. Some handy techniques and ideas that might help you to shape your own navigation in SharePoint.
Let me share my experiences & advice for the SharePoint Navigation best practices through this article.
Almost every website has a navigation panel around the top section of each page. As a SharePoint site operates similarly, the navigation panel is present by default. But the default setting of the Navigation bar is fundamental and needs to be more effective.
The Navigation panel is easy to edit & customize, and you can customize a site in SharePoint to look good with a bit of effort.
Even if you have no visual concerns, customizing the navigation will push your workflow significantly. If you understand navigation’s principles and pro uses, you can rule a site faster and easier. So, expertise in Navigation panel types, positions, and modification is essential for you.
Although the navigation options are usually placed on the top section of the page, you may find the options at the left because the SharePoint site has two categories. One is titled Team Site, with navigation options on the left pane. 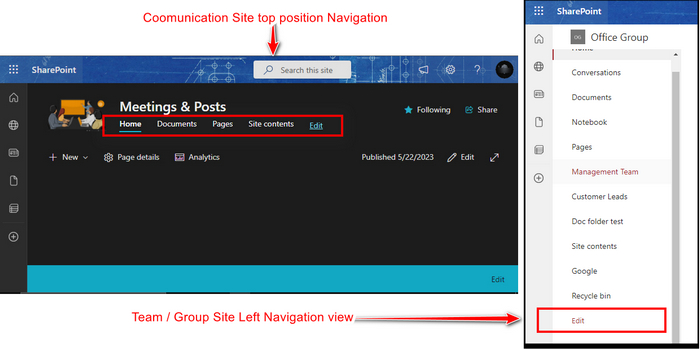
Another is Communication Site, which keeps the Navigation options at the top section as usual. All the other things are identical except for the position of navigation options. Editing, shorting, adding & removing links works similarly.
The Style of a Navigation menu can make a big difference. For instance, there are two different Navigation Menu styles in SharePoint. Those are Mega Menu & Cascading style. 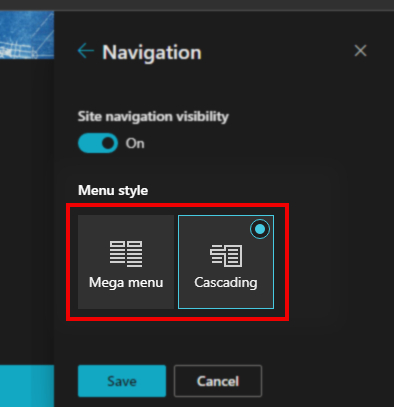
The Mega Menu works similarly according to its name, showing all the Navigation Links & Sub links under the main Heading. 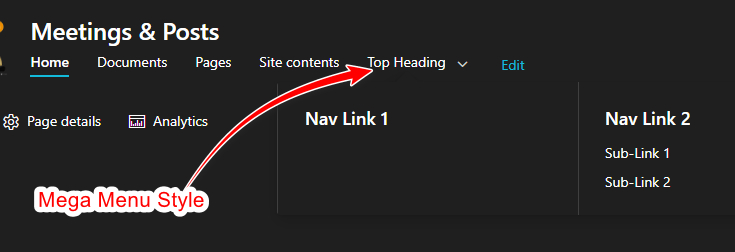
Alternatively, the cascading style shows the Navigation Links under each Heading, then you need to unfold options by hovering over each Navigation Link to view Sub links. 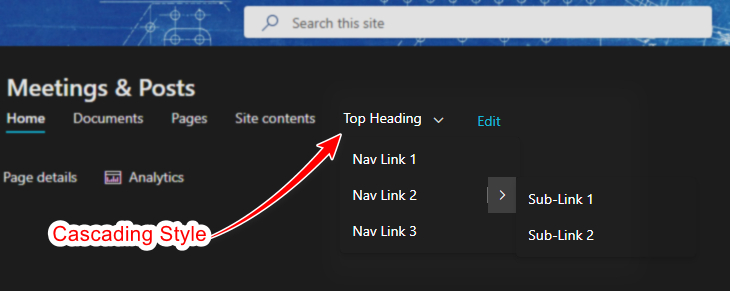
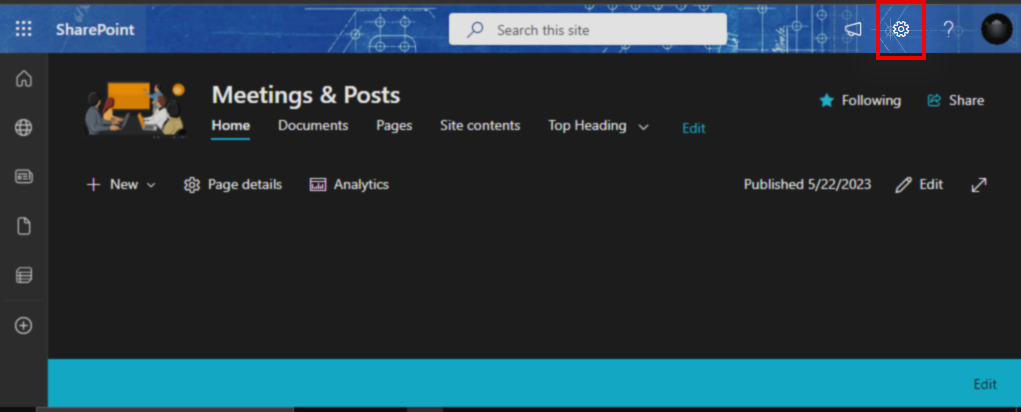
Let me guide you on changing the Menu style with a few clicks. Follow the instruction with the screenshots for easy access.
- Click on the Settings icon at the top right corner.
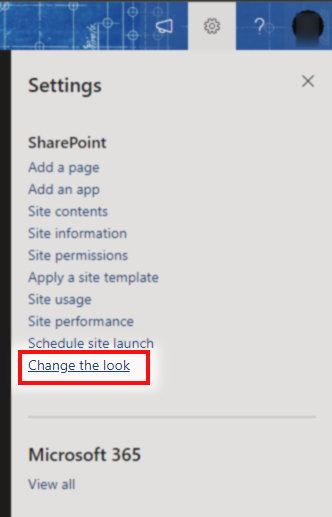
- Choose the last option under SharePoint titled Change the Look.
- Select the Navigation option.
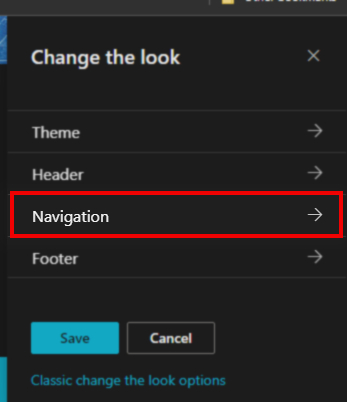
- Pick Mega Menu or Cascading as you prefer from Menu Style.
Warning: You’ll not see any navigation options on your site if you toggle off the Site Navigation Visibility above Menu Style.
If you run into problems like missing the top navigation bar, either your navigation bar is at the left pane if you’ve created a SharePoint Group or accidentally turned off Site Navigation Visibility. Turn on the option by following the exact instruction above. 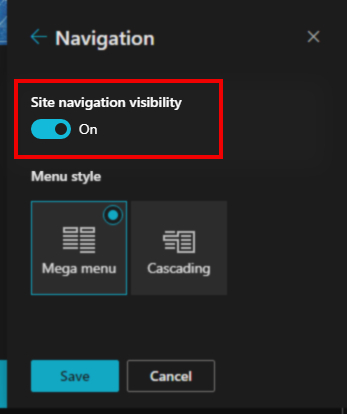
Even though you know how to add or remove links in the Navigation section, you may not utilize the sub-link option to make it simple & organized. Plus, I’m pretty sure you don’t use the Label option for Navigation.
FYI the Label option works like a draft for later implementation. At first glance, I also thought this was a useless option. Next, the sub-linking adds an extra organizing ability, like a well-organized cabinet for files.
You can add sublinks under a Navigation link(heading) up to two levels. Whether you use Group, AKA Team site, or Communication Site, you can insert multiple sublinks under a Primary Navigation Option/Link. Again you can add more Sub-sublinks to those Sublinks. So you have two layers at most. Two layers are enough to organize a usual-size business.
Here is how to add Navigation Links and manage sub-linking with examples:
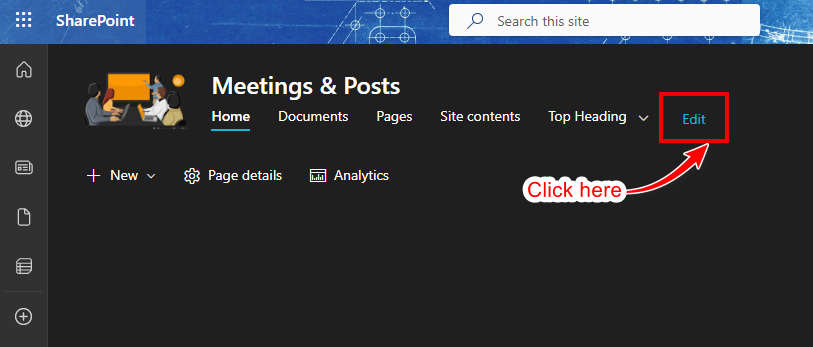
- Click on Edit at the right edge of Navigation Options. (Scroll down to the end of the left pane for Team Site)
- Hover the cursor at the bottom edge of any Heading, and click on the appeared plus sign to add a New Heading item under that.
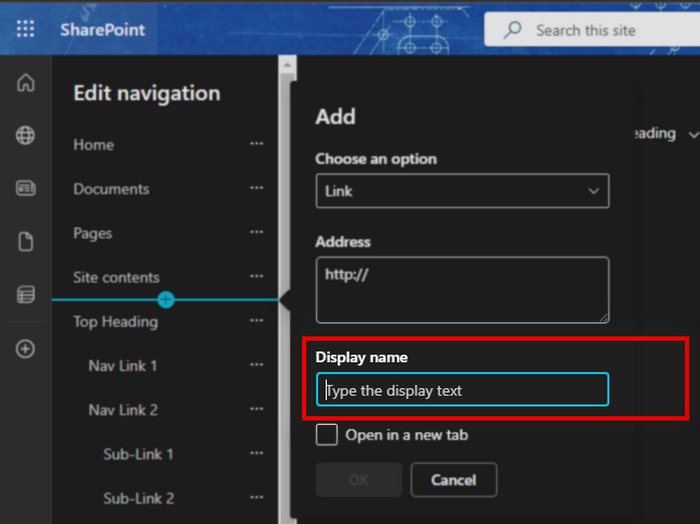
- Select Link to add any link or path, and paste the preferred link in the Address box.

- Type any Heading Name in the Display Name box.
- Check the box Open in a new tab if you want to open the link in a new tab. (Optional)
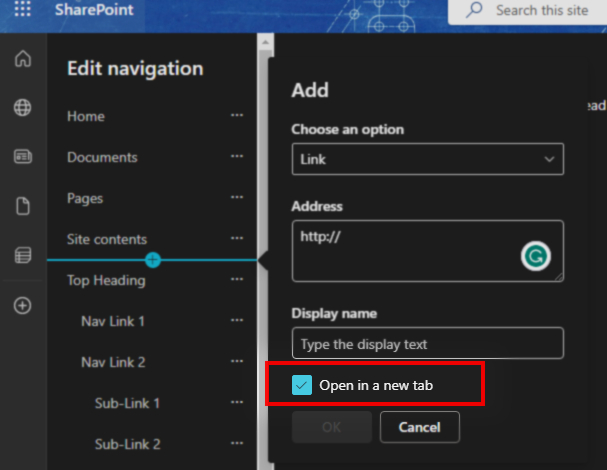
- Finish with the OK button.
It’s pretty easy, right? Now you can sublink any of the added or remaining headings as needed. Sub-linking is an excellent feature for properly organizing a next-level site navigation system. It’s effortless if you follow good instructions with visual examples.
You must understand the levels’ names to organize your Navigation Options on an advanced scale. The first visible Options on the Navigation panel are addressed as Headings. Now the next-level options under the headings are called Navigation Links. And the last level options under Navigation Links are Sub-links.
So, what do we get? 一 Headings > Navigation Links > Sublinks
Here are the steps to modify a Heading to Navigation link & Sub-Links:
- Click on Edit at the right edge of Navigation Options. (Scroll down to the end of the left pane for Team Site)
- Click on three dots of a Heading name.
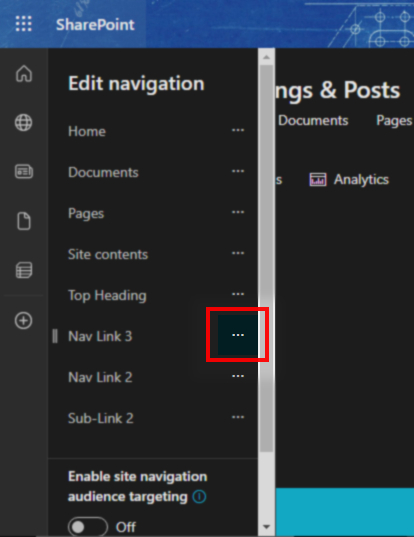
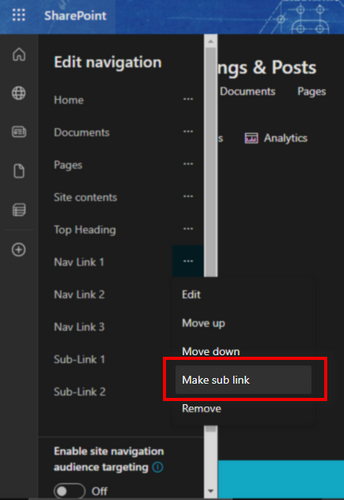
- Select the Make Sub link to change that heading to a Navigation link. The modified Navigation Link will always be like a sub-folder of the above/previous heading.
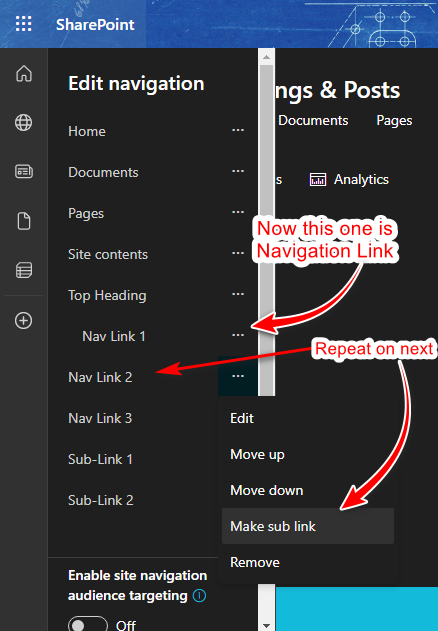
- Repeat this; make Sub link step for the next heading if you want to include that one beside the previous Navigation link. (You must drag those items to maintain the order)
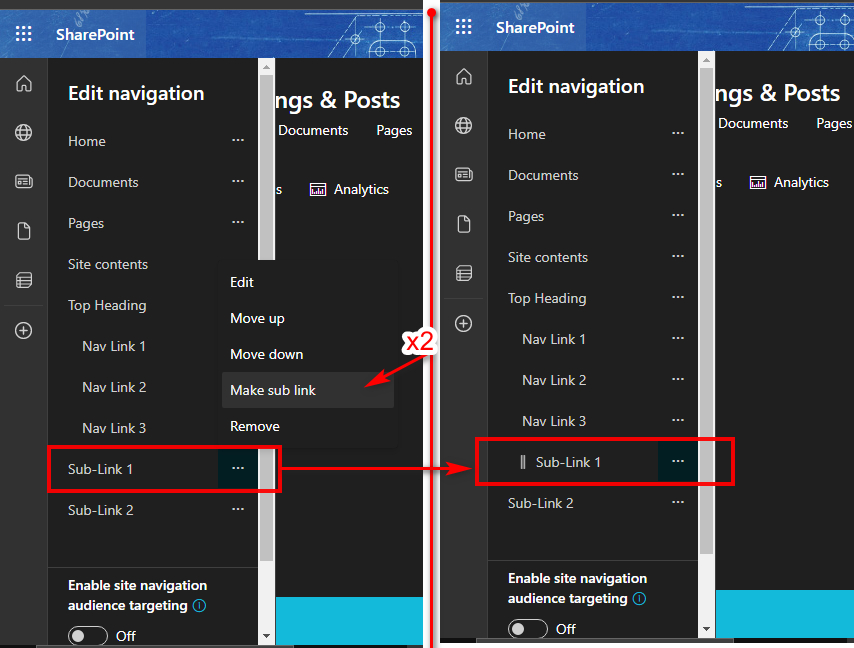
- Repeat the Make Sub link step twice right under a Navigation Link to include that heading as a Sublink under the above Navigation Link. (The “Make Sub link” option won’t show 2nd time until there is no Navigation Link above)
- Click on the Three dots and select the Promot sub-link to elevate a Sublink to Navigation Link or a Navigation link to Heading.

Since the process has some complicated steps, it’s relatively difficult to understand. A demonstration with infographics & screenshots might help you understand in a much better way.
Take my Meeting & Post site for an example. For your better understanding, I’ve created a Heading titled Top Heading. Then added 3 Navigation Links under Top Heading named Nav Link 1, Nav Link 2 & Nav Link 3, and Sub-Link 1 & Sub-Link 2 under Nav Link 2 as sublinks. 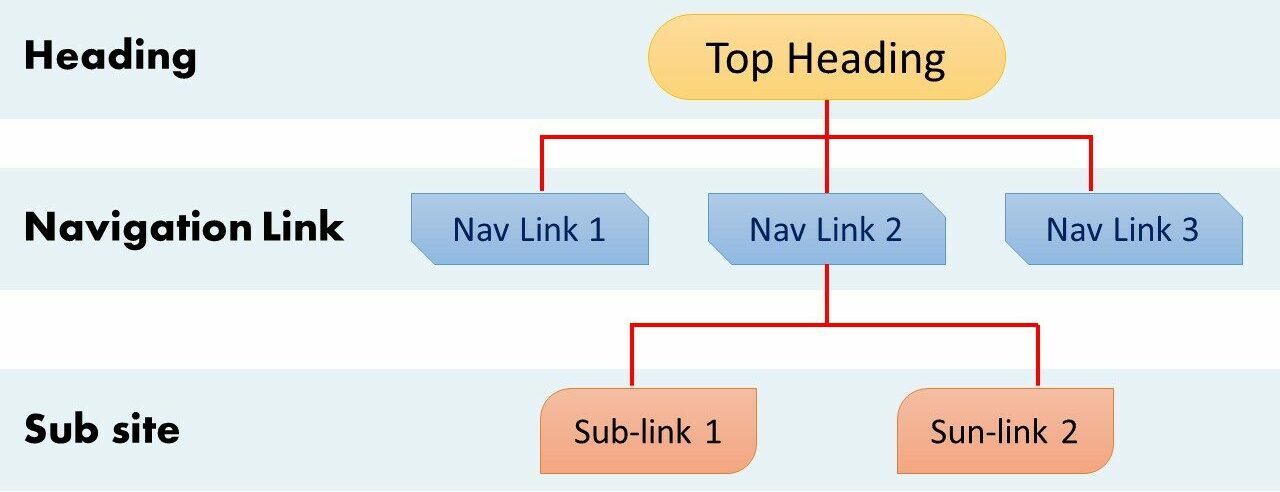
Names are kept as it’s generic ones for to-the-point recognition. But I’ll show you the link elevation first and then how to move those items to their proper place.
Click on the three dots of Sub-Link 2 and choose Promote sub link. Now it has become one of the Navigation Links under Top Heading.
If I repeat Promote sub link for Sub-link 2 again, it will become a Heading & it’s directly visible on-site navigation panel.
Then what if I promote a Navigation Link with some remaining sub-link into it?
I did this to Nav link 2, which contains two sublinks. Nav Link 2 will become a heading now, and Sub-link 1 & Sub-link 2 is currently in the Navigation Link’s position.
Now we have to clear this mess up, right?
So, I’ve promoted all items to the Heading position. Now we’ll re-arrange all the items to their preferred position.
Since I must include Sub-link 1 & Sub-link 2 in Nav Link 2, I must first drag these two items under Nav Link 2.
Note: When using drag & drop, you must drop your item only when you see a color line appearing on your dropping position. Or else, if you drop any item on another Heading or Navigation Link, it will be included as that heading or Navigation Link’s sub-item.
Now, it’s the apparent part, use the Make Sub link option from the three-dot menu to include one item under the above items(Heading & Navigation Link).
In my case, I have to apply the Make Sub link option to Nav Link 1, Nav Link 2, and Nav Link 3. Although these three items are now in their right position as Navigation Link, Sub-link 1 & Sub-link 2 are still in the Heading position.
Now apply the Make Sub link option to Sub-link 1 & Sub-link 2 twice while these two are under Nav Link 2. And it’s done!
Unwise tweaks or customization can create a disastrous site environment, even if you know almost all the possible customizing options and procedures. The next section of this article will help you understand a proper and professional customization plan.
Now that you have the tools and knowledge to shape your own site Navigation, it’s time to learn the better implementations of those. Cause I have seen many outstanding navigation systems and more chaotic ones as well.
There are specific points and obligations you should care about if you want to excel at managing a navigation plan of a site.
Refrain from overdoing anything or adding a hefty amount of headings, Navigation Links, or sub-links. Assess your primary and essential requirements and set priority levels before you start shaping the Navigation system. As I showed in the example:
- Keep things as simple as possible.
- Do not choose very long Labels / Names.
- Add only important & frequent links.
- Only fill up the whole space if needed.
Use Mega Menu for Extra Links
Although the Mega Menu is by default when creating a site, you can choose between two Menu styles. I’ve already explained how this menu style works in the previous section.
So, why I’m recommending the Mega Menu instead of Cascading?
Because the Mega menu shows all the items in one glance, you don’t need to hover over each item to find a link’s location. It’s all about the ease of access, transparency, and fluidity.
Categorize Links With Sublinks
Categorization is one of the most anticipated features in a navigation system that allow the design to be more compact & rich. SharePoint Site allows two-layer categorization, which seems basic, but trust me; it’s perfect from many different angles.
More layers could have created confusion, complication, and dizziness in the eyes. If you can utilize these two layers, it’s more than enough.
Use Specific Labels with Emojis
Labels of Navigation means a lot for navigating in the right direction. But keeping a short length is also important to keep things clean and compressed.
So, emojis can replace some texts to keep a short label understandable. Remember that adding too many or irrelevant emojis can create more confusion than usual navigation. Keep labels short but easily understandable; use emojis only if relevant enough to replace some texts.
Utilize the Audience Targeting Option.
It’s like a wizard that carries the right content to the right audiences so that you have a more responsive and rich flow.
The Audience Targeting option automatically works on its own. All you need to do is turn this thing on while editing the navigation options.
Enable Open in New Tab For Some Links
This option is handy only for specific cases. For example, if you link to another website or any external redirection, then it may seem necessary. It will open that link in a new window instead of replacing the SharePoint site page.
FAQs
Can I paste any internal or external link in SharePoint Navigation?
You can input any kind of link in the navigation options. But if you put an external link, it’s better to tick the Open in a new window box.
What Does the Labels option do in Navigation Heading?
Although the label option does nothing, it’s pretty useful if you want to make a design plan for the navigation. You can add links later by replacing those labels.
Can a Site member edit the Navigation bar?
By default, a site member has no authorization to edit the navigation bar until the admin or the owner changes the access control.
Conclusion
Microsoft is inevitably one of the best software solution developing companies, as most of us use Windows as our regular operating system. Among their advanced services, SharePoint is a blessing for business owners and management workers. The customizable Navigation system adds new charm.
I hope you understood the bigger picture with the fundamental information explained in this article. Let us know your opinion regarding this writing in the comment box below.