You must change the time zone in Outlook if you’ve moved from one place to another. Without modifying the time zone, you might accidentally schedule a meeting with the attendees at 3 AM midnight.
So, changing Outlook’s time zone is a must before sending any mail or scheduling a meeting if you travel a lot. The process is straightforward and doesn’t take long.
And to know the procedure, you must read till the end of this article. Let’s get started!
How to Change Time Zone in Outlook
You can change the time zone in Outlook; it doesn’t matter whether you’re using the app or the web version. In the app version, you’ll find it under Outlook Options. Then go to the Calendar section, where you’ll see Time zones. But in the web version, click on the Settings icon and then General.
Outlook follows the Universal Time Coordinated, in short, UTC. All the items in the Outlook calendar maintain this international time standard, like the Greenwich Mean Time.
Suppose, right now, you’re in Alaska, and your current time zone is UTC – 9. So, when you want to send an Outlook meeting invitation to the attendees in the UK, there is a 9 hours time difference. But, Outlook will show the meeting time in the attendee’s local time.
But changing Outlook’s time zone is mandatory when you’re out of the country and going to stay there for a long. Let me show you how to modify the time zone in Outlook.
1. Using Outlook Desktop App
If you’re running the desktop Outlook app, and the Outlook versions are 2021, 2019, 2016, 2013, 2010, 2007, and Microsoft 365, follow the steps below to change its time zone.
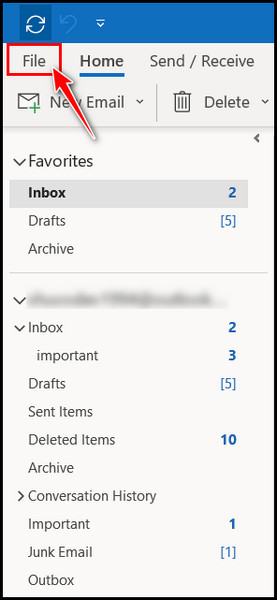
- Click on the File option from the top left side.
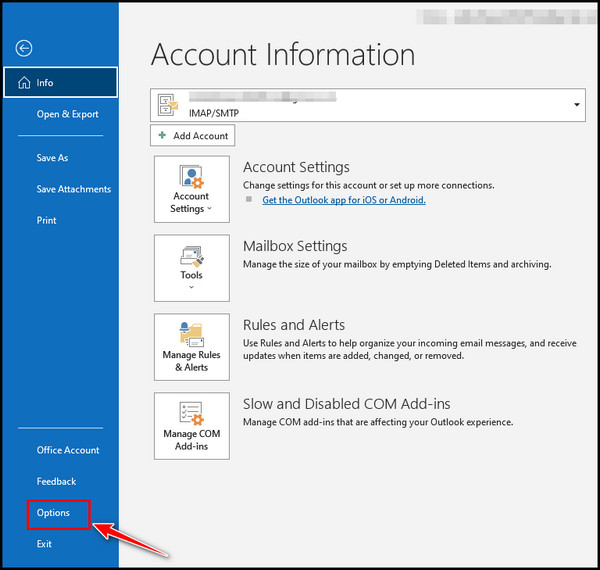
- Select Options from the left pane.
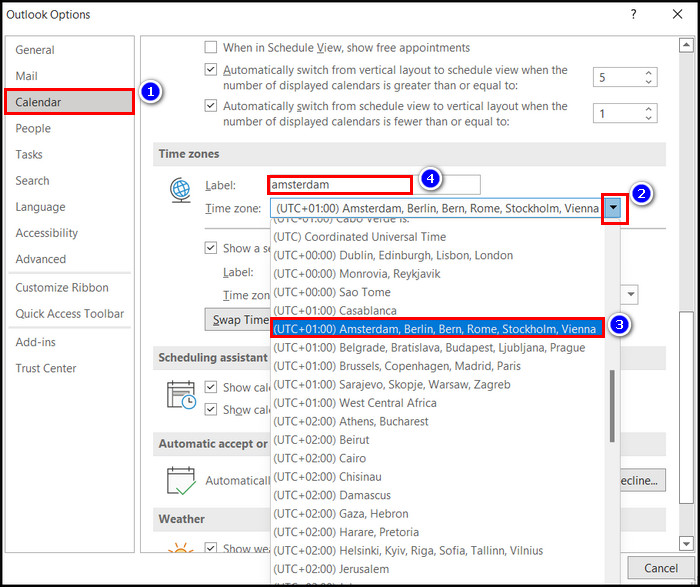
- Choose the Calendar section and look for the Time zones section.
- Click on the Time zone’s down arrow button and select the desired time zone.
- Type in the country’s name in the upper Lebel section.
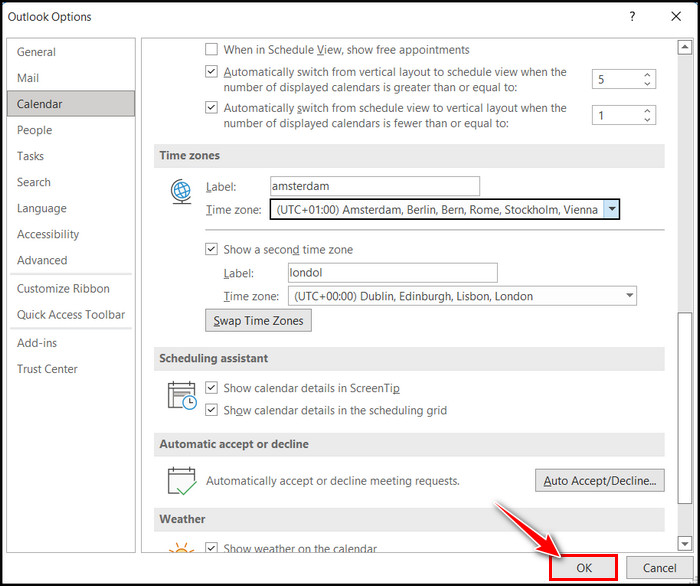
- Click OK to Save changes.
Note: Changing the time zone from the Outlook app will also change the PC’s time zone.
The clock will also adjust when you adjust the time zone that follows daylight saving time. However, you can turn off this adjustment. But it’s not recommended because it will create issues later.
Read more on cancel future recurring meetings in Outlook.
2. Using Outlook Mac App
You can also modify Outlook’s time zone if it’s a macOS version. The process is the same as the Windows app version, but some differences exist. So, let me show you how to set up the different time zone for Outlook using the Mac version.
- Launch the Outlook from your Mac.
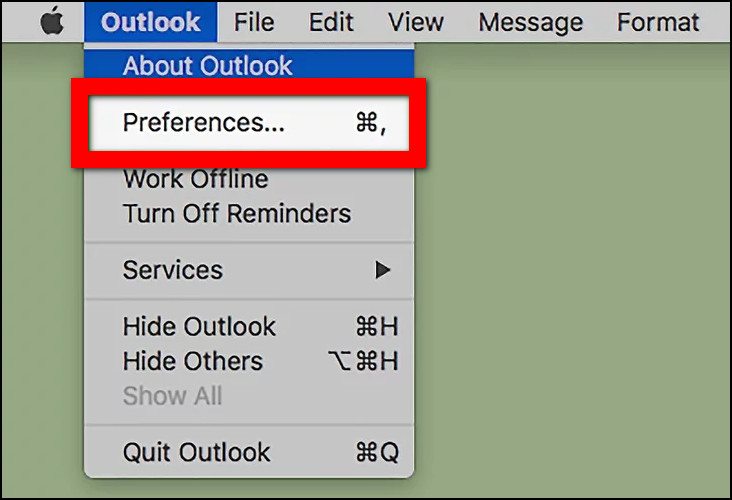
- Select the Outlook tab from the top-left menu bar beside the Apple icon.

- Click on Preferences from the context menu.
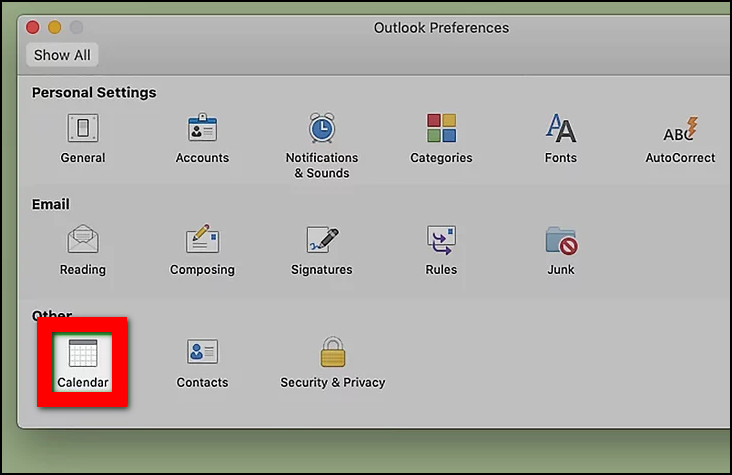
- Select Calendar under the Other category.
- Click on the drop-down icon of Time zones and select the preferred time zone from the list.
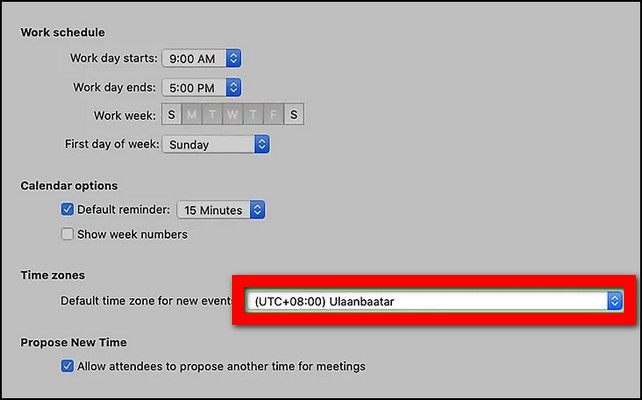
After that, exit from there. All the changes you have made will be saved automatically. Apart from this, when you have multiple calendars in Outlook, you should set the calendar view side by side.
3. Using the Outlook Web App or Outlook 365
There is an Outlook web app version, part of the Microsoft 365 applications. If you’re using the outlook web app or Microsoft Outlook 365, changing the time zone will take a few seconds.
- Log in to your Outlook web app using a browser.
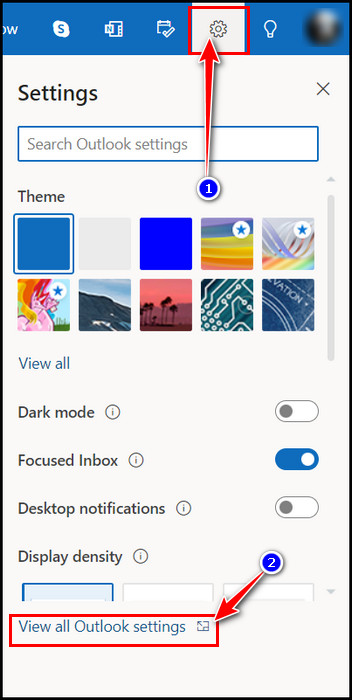
- Click on the gear or Settings icon from the top-right menu bar.
- Select the View all Outlook settings blue link button from the Quick settings panel on the right side.
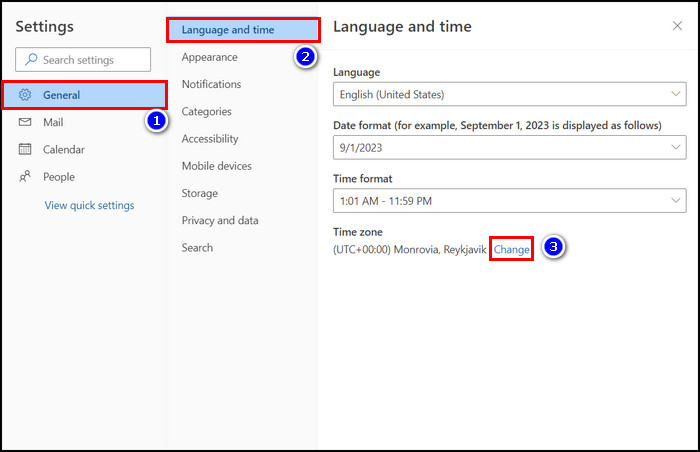
- Go to General > Language and time from the pop-up window.
- Click on the blue colored Change button beside the Time zone.
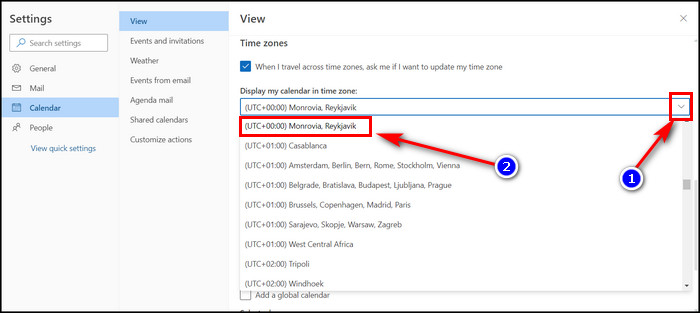
- Select the drop-down icon of Display my calendar in time zone.
- Choose the right time zone from the list.
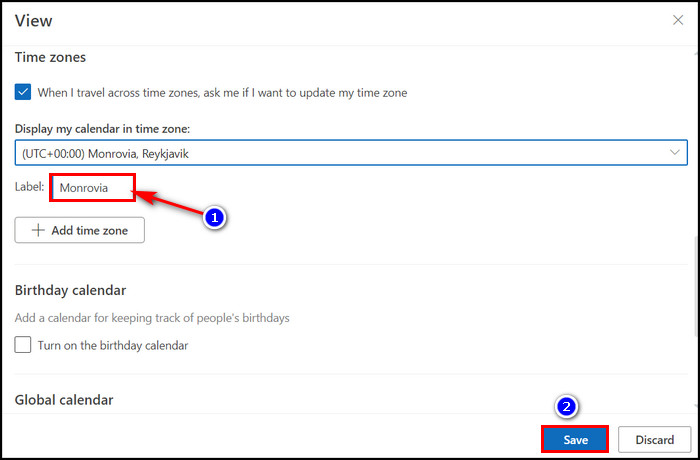
- Give a name to that time zone in the Label section.
- Hit the Save button.
Now, you have changed the time zone using the Outlook web version. Speaking of changing the time zone, if you want to change Outlook’s language, you can do that too.
How to Add, Remove, or Swap Time Zone in Outlook
You might need two different time zones in Outlook for mailing and meeting purposes. Outlook users who often travel to another city with a different time zone need two time zones. That’s why they must set one with local time and the other with roaming time zone.
However, recent Outlook for Office 365 versions support adding multiple time zones. But other versions like Outlook 2021, Outlook 2019, Outlook 2016, Outlook 2013, and Outlook 2010 support displaying two time zones. Let me show you how to do that.
Add a Second Time Zone on the Desktop App
- Select the File option from the menu bar.

- Choose Options from the left pane, which will open a new Outlook Options window.

- Click on the Calendar option from the left pane.
- Go to the Time zones section.
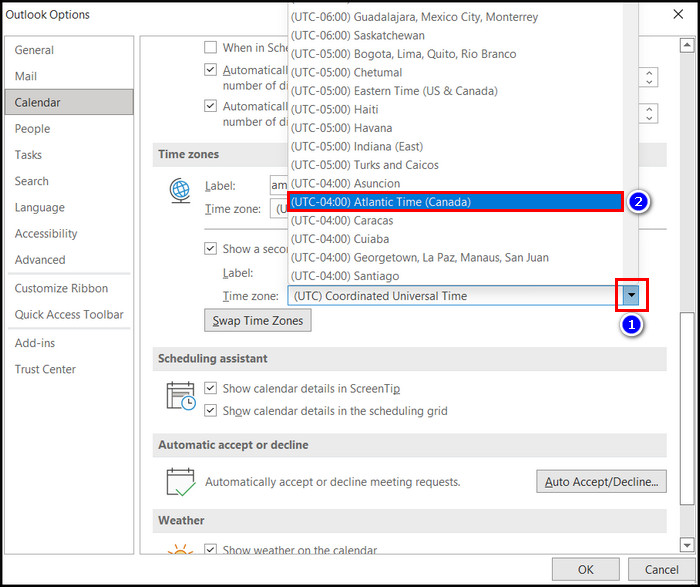
- Check the box for Show a second time zone option.
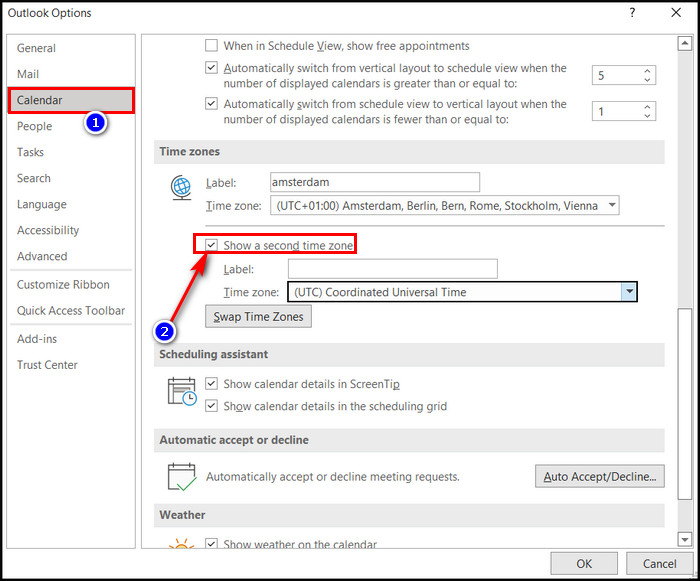
- Click on the Time zone’s drop-down icon and select the second time zone.
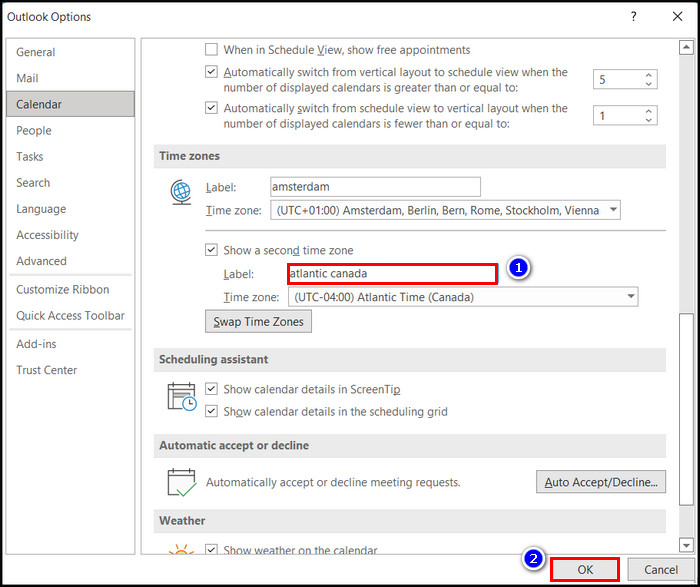
- Give the second time zone a label.
- Hit the OK button.
Add Multiple Time Zones on the Outlook Web App
- Click on the cog icon (Settings) from the top-right menu bar.
- Select the View all Outlook settings blue link button from Quick Settings.

- Go to General > Language and time.
- Click on the blue colored Change button.

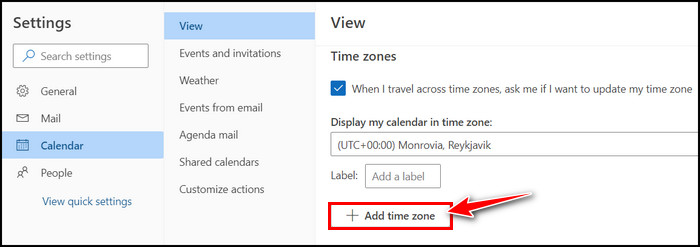
- Select the + Add time zone button.
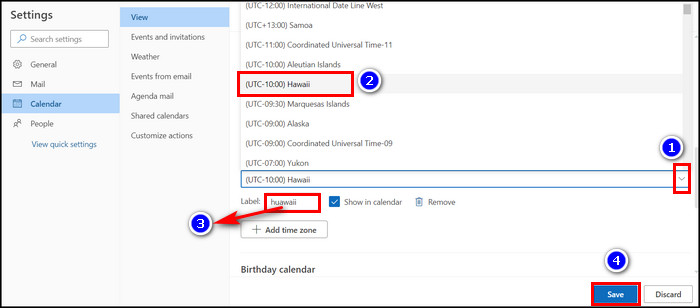
- Click the drop-down button of Other time zones and choose the desired second time zone.
- Give the second time zone a name in the Label section.
- Click the Save button after that.
After adding the second time successfully, you’ll see that + Add time zone button again. You can add another time zone. Outlook web version supports adding up multiple time zones, which is excellent for those who travel a lot for business purposes and need numerous time zones.
However, you can also remove or even swap those time zones if required. Let me show you how to switch time zone real quick.
Also read, use contact categories in Outlook.
Swap Time Zones in Outlook
Swapping time zone is possible from the Outlook desktop app when you have set two time zones. You’ll find a Swap Time Zones feature in Outlook desktop versions. Follow the below steps to swap time zones in Outlook.
- Go to File > Options > Calendar.
- Look for the Time zones section.
- Click on the Swap Time Zones button.
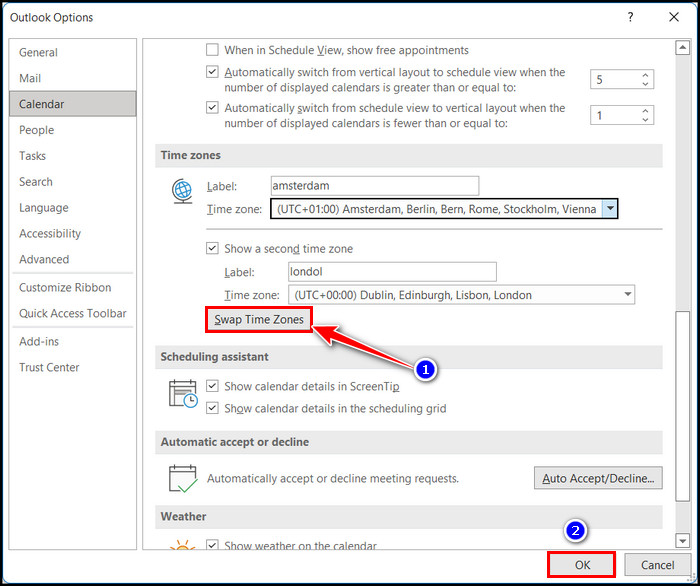
After that, hit the OK button to keep the changes.
Note: Swapping Outlook’s time zone also changes the desktop’s time zone.
Remove Time Zones in Outlook
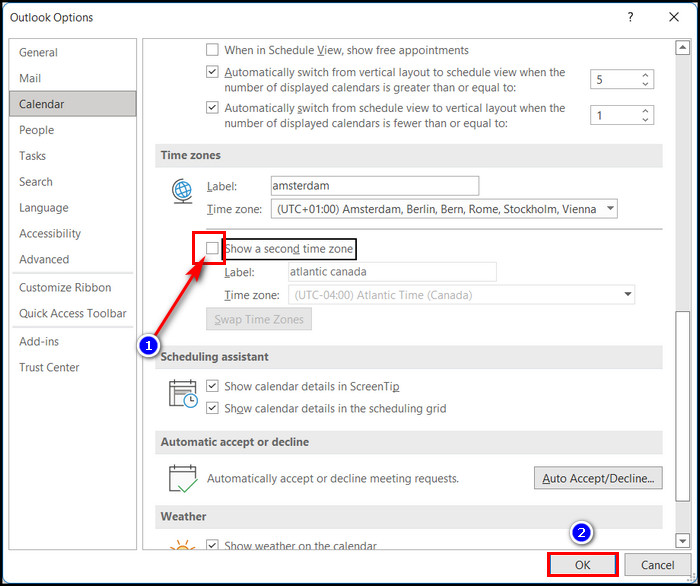
- Go to the Time zones section by navigating File > Options > Calendar.
- Uncheck the box for Show a second time zone option.
- Select OK and exit from Outlook Options.
You’ll see a Remove button in the Outlook Web versions below the Other time zones section. Click on that button to delete the additional time zone. Then click the Save button to keep changes.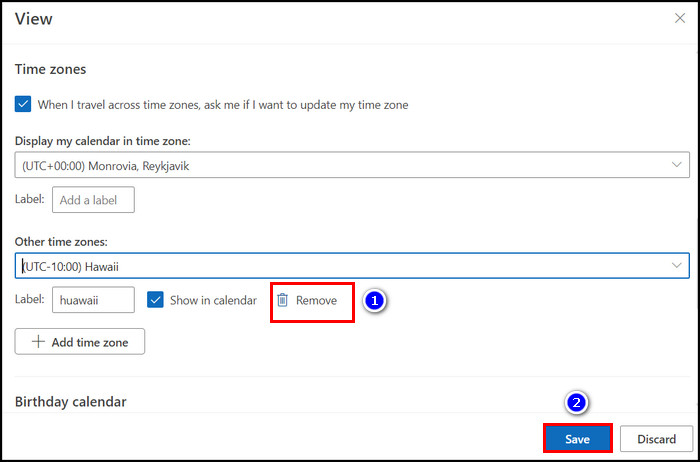 Except that, when you invite people for an Outlook meeting, you must create a meeting in the calendar. For that, creating a shared calendar in Outlook will let the attendees know about the upcoming sessions.
FAQs
How to fix Outlook showing the wrong time zone?
To fix the wrong time zone in Outlook, go to File > Options > Calendar. Navigate to the Time zones section. Click the drop-down icon and choose the right time zone from the list. Click OK to save the changed time zone.
Is there any Time Zone change option in the Outlook mobile app?
Currently, the Outlook mobile app, whether an android or iOS app, has no Time Zone change option.
What is the default Outlook time zone?
By default, Outlook’s time zone is set to Eastern Time (US and Canada) when you access the Outlook first time using the Outlook web app.
Final Words
Outlook is an all-in-one app. With this Microsoft Office app, you can manage emails, arrange meetings, manage calendars, store contacts, etc. People who roam from one country to another for business purposes need an additional time zone or change the current one.
Changing Outlook’s time zone is simple, and I believe you have already changed it. This article taught you how to add, remove or swap time zones in Outlook.