When working on dates in an Excel worksheet, you may want to add months to a date. It’s very useful to calculate expiry dates and maintain a financial model and ledger.
Calculating the dates manually can become a hassle. The stress may become unbearable if the worksheet contains a lot of data.

Fortunately, users can add months to date automatically using an Excel formula. You can easily drag and fill other cells with the procedure to apply them to other cells.
However, many people don’t know the procedures to add months automatically to a date. As a result, it takes a lot of time to complete a datasheet.
This article will explain the most straightforward ways to add months to date in Excel. So, let’s begin.
Download Excel Workbook
Consider downloading the following Excel workbook to take a direct glance at the steps covered in this article.
How to Add Months to Date in Microsoft Excel
By typing a start date and months in the Excel EDATE formula, users can add a month to date. The formula will print a new date adding the months to the provided date.
The process is the same in Microsoft Excel on Windows, Mac, Web and mobile. You’ll find the formula and the process to use it by adding cell numbers from the steps below.
Here are the steps to add months to date in Microsoft Excel:
- Open Microsoft Excel.
- Go to your datasheet.
- Click on a cell.
- Type =EDATE(start_date, months) formula in the box.
- Press the Enter button.
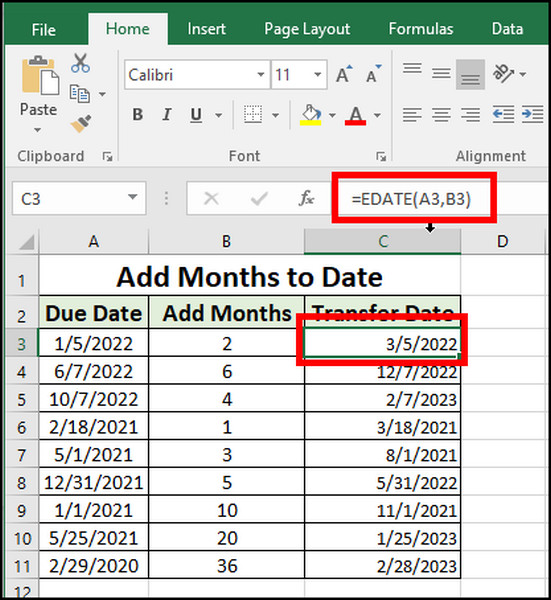
This formula applies when you have a start date and months. You need to put the cell number in start_date and months. Take a close look at the example that start_date is in A3 and months is in B3. So, I’ve put A3 and B3 in the formula.
If you don’t have a start_date or months, you can still calculate them using the following procedures.
Here are the alternate ways to add months to date in MS Excel:
- Open your worksheet from Excel.
- Press on a cell.
- Type =EDATE(“start_date”, months) formula in the cell.
- Click on the Enter button.
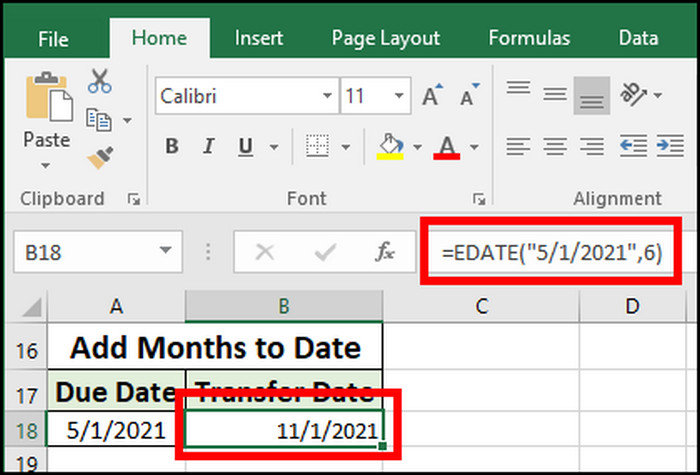
If you don’t have the start date or months, you’ve to type the date inside double quotes (example: “5/1/2022”) and type the months (example: 6) you want to add.
Related content you should read how to make a scatter plot in excel?
How to Add Months to Date in Excel Using Fill Series Option
Applying the Fill Series option in a single or multiple rows and column cell, you can add a consistent number of months to date. It’s useful when you need to increment the months with the same difference.
If you are new to the methods, don’t worry. Follow the instructions carefully below to use the fill series option.
Here are the procedures to add months to date using the file series option in Excel:
- Launch Microsoft Excel.
- Open the workbook.
- Click on the cell where the start date is situated.
- Drag and select multiple cells in a column or row.
- Go to the Home tab from the top ribbon.
- Press on Fill from the Editing.
- Click on Series.
- Choose the radio button beside Month from Date Unit.
- Enter the month number in the Step value.
- Click on OK.
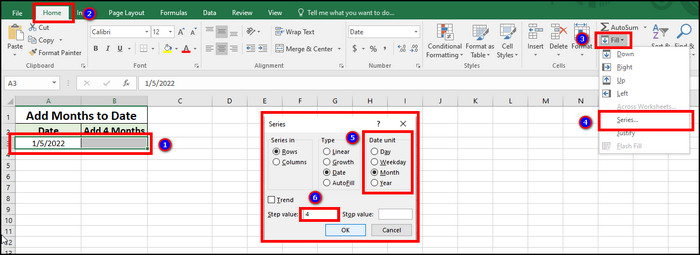
You’ll see a new date added with the months in the selected column or row. Unfortunately, the feature isn’t available in Microsoft on the Web.
Also, after learning the process to add months to date, you may require to add days to date. If you are looking for methods, follow the process from the passage below.
Some more guide on 5 ways to copy format in excel
How to Add Days to Date in Microsoft Excel
By adding days with the starting date, users can get a new date with the added days. Also, if you don’t have a starting date, you can add the days using double quotes.
Additionally, users can add days to date using a fill series feature. Read the process below to learn the ways to add days to date.
Here are the methods to add days to date in MS Excel:
- Launch MS Excel.
- Open your worksheet.
- Press on a cell.
- Type =CellA+CellB formula in the box.
- Click on the Enter button.
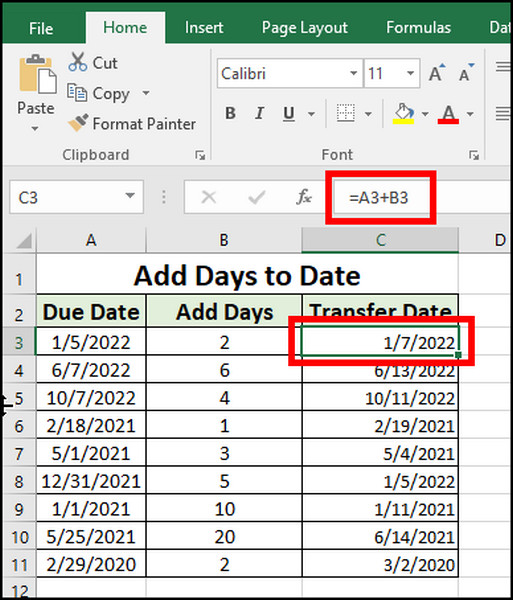
In the steps above, I’ve used A3 as CellA and B3 as CellB. Column A indicates the start date, and column B is the days to add. The C3 cell has provided the result with an added number of days.
However, if you don’t have a start date or days number, you can use the following process to add days to date.
Here is the process of adding days to date in Excel:
- Go to your worksheet from MS Excel.
- Click on a cell.
- Type =”start_date”+days formula in the cell.
- Press the Enter button.
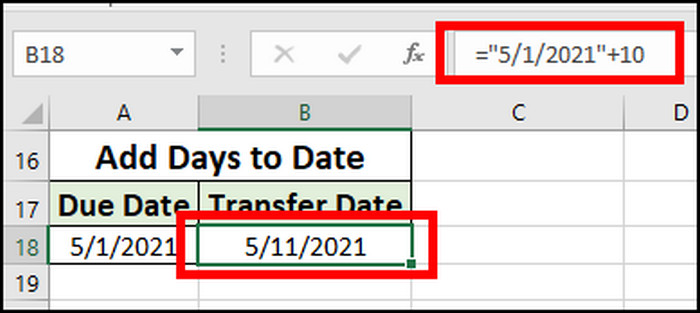
The start date is inside double quotes (Example: “5/1/2021”), and the number of days (Example: 10) is added with it.
There’s an additional way to add days using the File Series feature. Consider reading the steps below to learn about the method.
Here are the steps to add days to date in Excel using the file series option:
- Go to Microsoft Excel.
- Open the workbook.
- Press on the cell where the start date is situated.
- Drag and select multiple cells in a column or row.
- Navigate to the Home tab.
- Click on Fill from the Editing.
- Press on Series.
- Select the radio button beside Day from the Date Unit.
- Enter the day number in the Step value.
- Click on OK.
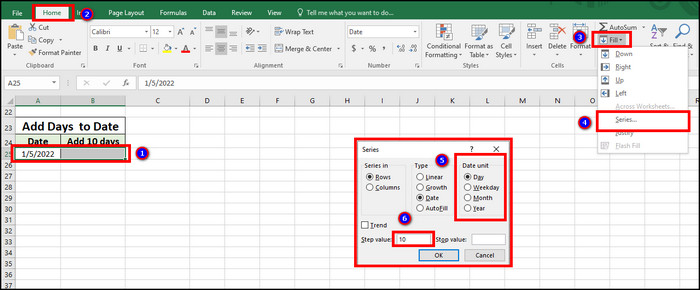
You’ll find the cells in the column or row filled with new dates with an increment of provided days number.
Similarly, if you want to add years to date, follow the procedures from the passage below.
Check out the easiest way how to make a cell bigger in excel?
How to Add Years to Date in MS Excel
Using the DATE formula, you can add years to date in Microsoft Excel. Additionally, users can increment the year with a fixed difference using the Fill Series option.
It’s alright if you are new to the MS Excel formula. Read the instructions carefully below to add a year-to-date.
Here are the steps to add years to date in MS Excel:
- Open the Microsoft Excel application.
- Go to your datasheet.
- Press on a preferred cell.
- Type =DATE(YEAR(start_date_cell_number)+years, MONTH(start_date_cell_number), DAY(start_date_cell_number)) formula in the box.
- Click on the Enter button.
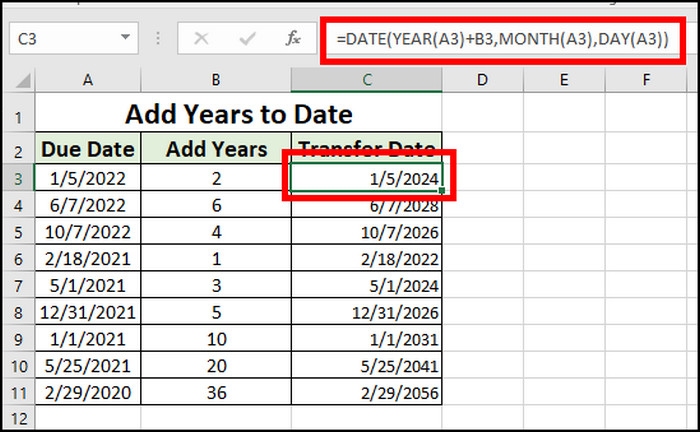
In the formula, start_date_cell_number is A3 and B3 is the number of years to add. The C3 cell provides the new date with added years.
Also, you can add the years to your date using the file series option. Allow me to guide you through the process below.
Here are the steps to add years to date in Excel using the file series option:
- Open the workbook from Microsoft Excel.
- Click on the cell where the start date is situated.
- Drag and select multiple cells in a column or row.
- Go to the Home tab.
- Press on the Fill option from Editing.
- Proceed to Series.
- Choose the radio button beside Year from the Date Unit.
- Enter the year number in the Step value.
- Press on OK.
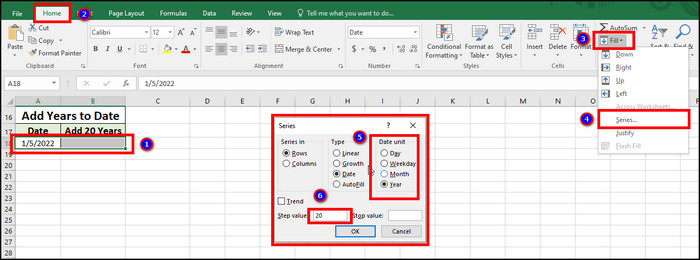
If you are searching for a process to combine the days, months and years to date, consider reading the following passage.
Follow our guide to know how to find variance in excel?
How to Add a Combination of Days, Months & Years to Date in Excel
If you want to add days, months and years to date, users have to combine them. You can accomplish the process using the DATE formula in Excel.
The combination process in the formula may seem complicated. But following the instructions below will help you to understand the steps better.
Here are the steps to add a combination of days, months & years to date:
- Go to Excel.
- Open your Excel datasheet.
- Click on the preferred cell.
- Type =DATE(YEAR(start_date)+years, MONTH(start_date)+month,DAY(start_date)+days) formula in the box.
- Press the Enter button.
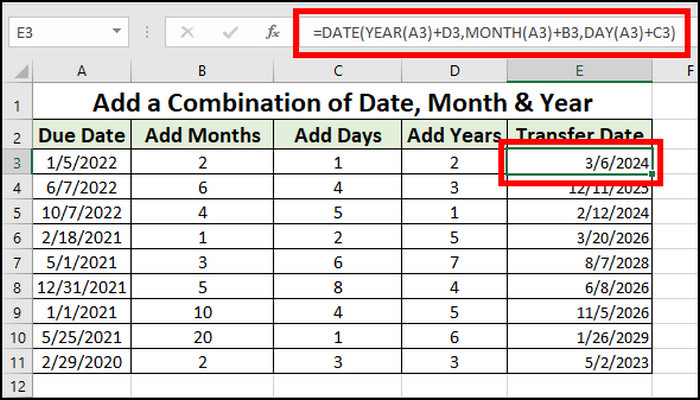
The start_date indicates the initial date. Years, months, and days indicate the cell number from which the data will add.
Additionally, read the following passage carefully if you want to learn about subtracting months, days and years from date.
How to Subtract Months from Date in MS Excel
By using the EDATE formula in Microsoft Excel, users can subtract the months from the start date. To use the subtract method, it’s essential to use a negative value of the month.
If you find them difficult, you don’t need to worry. The following steps will provide an effortless way to subtract months from the date.
Here are the ways to subtract months from the date in Microsoft Excel:
- Launch MS Excel.
- Open your worksheet.
- Press on a cell.
- Type =EDATE(start_date, months) formula in the cell box.
- Click on Enter.
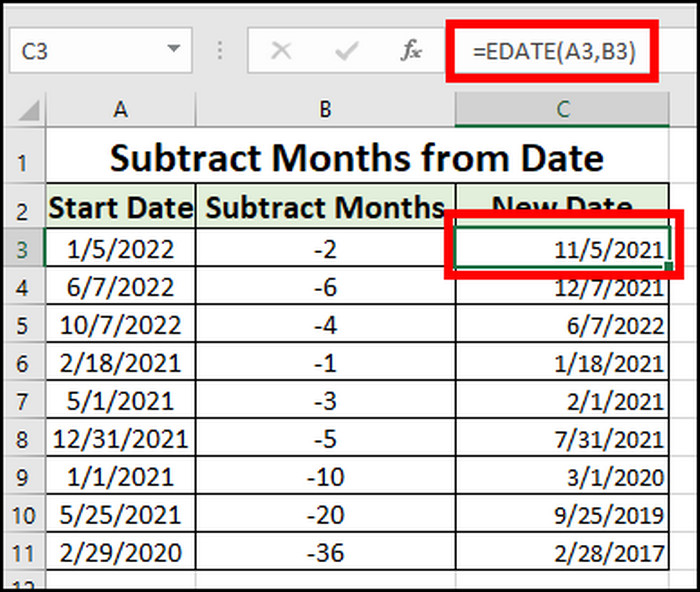
The start_date indicates the initial month, and the cell number is A3 in the picture. B3 provides the number of months to subtract from the start date. The month number is written as a negative value.
Additionally, there’s another method to subtract months from the date. You’ll learn about them below.
Here are the alternate ways to subtract months from the date in MS Excel:
- Go to your worksheet from Microsoft Excel.
- Click on the preferred cell.
- Type =EDATE(“start_date”, – months) formula in the cell.
- Press the Enter button.
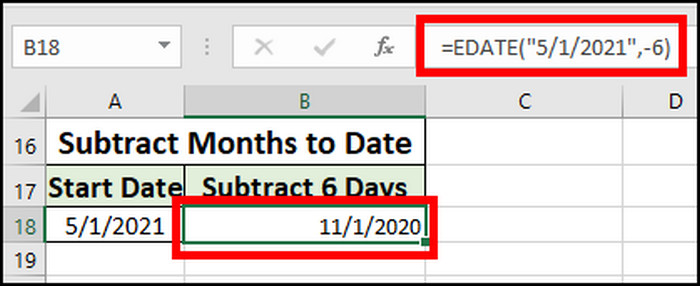
This process will help when there is no start_date or months in another cell. The start date is written inside double quotes, and the month number is in negative format.
If you are looking for the procedures to subtract days from the date, the next passage will help to guide you.
How to Subtract Days from Date in Microsoft Excel
Users can subtract days from the date by using the addition formula between cells and providing a negative value. Additionally, you can deduct the days by subtracting days from a double-quoted date.
The following process will guide you with the ways to subtract days from date without difficulties.
Here is the process of subtracting days from date in MS Excel:
- Open Microsoft Excel.
- Go to your Excel datasheet.
- Click on a cell.
- Type =CellA+CellB formula in the box.
- Press Enter.
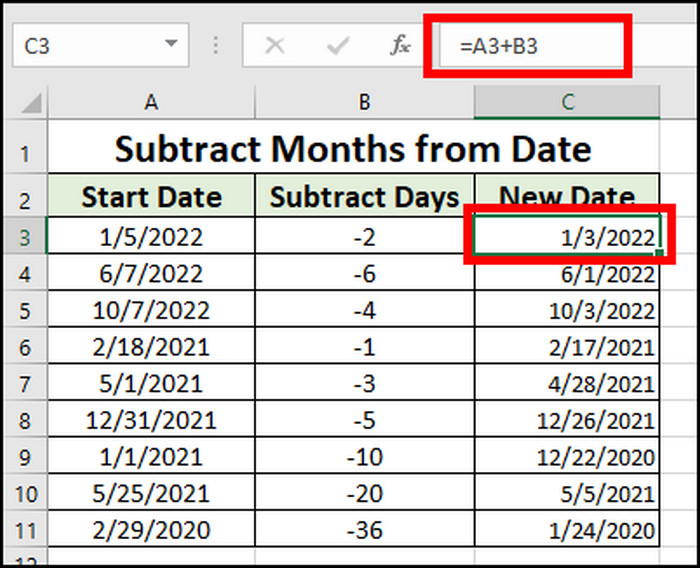
In this example, CellA and CellB point to the start date and days, respectively. The number of days is entered as a negative value.
Also, the datasheet doesn’t have a start date or days in a cell. You can subtract and get a new date by following the methods below.
Here are the steps to add days to date in Excel:
- Open MS Excel.
- Go to your datasheet.
- Press on the preferred cell.
- Type =”start_date” -days formula in the cell.
- Click on the Enter button.
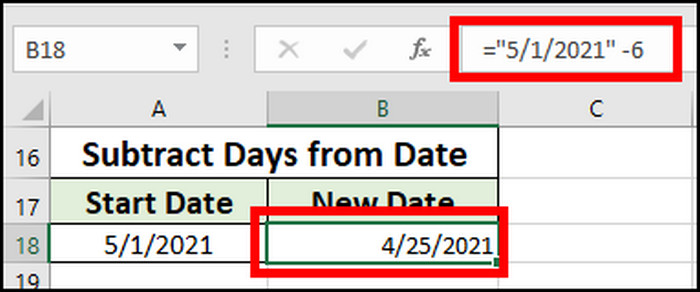
The start date is inside double quotes, and the days are subtracted using a ( – ) sign.
Also read about how to add borders in excel?
How to Subtract Year from Date in Excel
By using the DATE formula and negative year value in Microsoft Excel, you can subtract the year from a start date. The process is the same in Windows, Mac, Web and Mobile.
You will find similarities in this process with adding a year to date. For the complete instructions, consider reading the procedures carefully from below.
Here are the methods to add years to date in MS Excel:
- Launch the Microsoft Excel application.
- Open your datasheet.
- Click on the preferred cell.
- Type =DATE(YEAR(start_date_cell_number)+years, MONTH(start_date_cell_number), DAY(start_date_cell_number)) formula in the cell box.
- Press the Enter button.
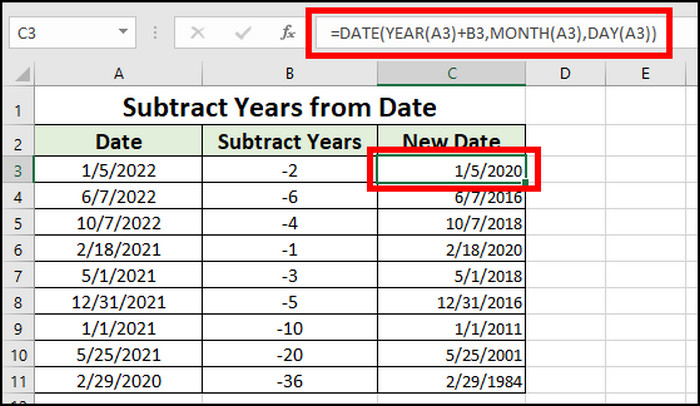
If you look closely, you’ll see the years cell consists of a negative value. By adding the negative number, you can find a new subtracted date.
Frequently Asked Questions
How do you add a month in Excel?
You can add months to a date using the =EDATE(“start_date”,months) formula. Also, if you have cells with start dates and months, you can use the =EDATE(cellA, cellB) formula.
How to add 6 months to a date in Excel?
You can add 6 months to a date using the =EDATE(“start_date”,6) formula in Microsoft Excel.
Why is my date showing as a number in Excel?
If your date is showing as a general number, Click on the Cell > Home > Number > Select Date from the drop-down menu.
Final Thoughts
Adding months to date is very effortless by using an Excel formula. The DATE and EDATE formula can make your work much more manageable. But, many people don’t know the correct process.
In this article, I’ve provided ways to add months to date without difficulties, and I hope you are enjoying the technique.
Share your experience after using the formula in the comment box below.