In June of 2022, Starlink officially launched the mesh node, which allowed the network to spread out and cover a large area with a much higher speed. This device can provide satellite internet at every corner of your house.
But to get the full value out of your Starlink mesh nodes, you need to know how to set them up correctly and exactly where to put them.
Because if you mess up this part, the nodes will be useless.
So, in this article, I’ve described Starlink mesh routers and the process of adding them to the Starlink system. Also, I’ve explained how to find the perfect node installation place.
Let’s begin!
How Do Starlink Mesh Nodes Work?
Mesh nodes are a group of devices connected to each other. These devices or nodes have multiple paths to other nodes. Mesh networks can be both wired and wireless. These networks are made to transfer data efficiently between devices and clients.
A Mesh network creates one giant Wi-Fi network with a single SSID. So if you have a laptop connected to your mesh Wi-Fi, you can move from room to room and still remain connected.
Because as you move to different areas of your home, your laptop will always link to the nearest mesh node. It will disconnect from one node and seamlessly reconnect to another.
Mesh networks use routing or flooding techniques to send data.
In routing, the data hops from node to node to reach its destination. Using self-healing algorithms, the mesh network can reconfigure itself if a path is broken. There can be more than one path between a source and a destination.
The flooding technique distributes data from one node to all other nodes in a network. Each node has a piece of the data.
Related contents you should read can you cancel Starlink internet anytime?
What are the Qualities of Starlink Mesh Router?
Starlink Mesh routers enable you to route data from multiple devices, making client-to-network communication much more robust, steady and efficient. It’s a simple device that upgrades the network by providing internet at every corner of your house.
Let’s go over some features of the Starlink mesh router, its capability and specs.
Here are the factors of the Starlink mesh router:
Specifications
The Starlink mesh node has the same features as the standard Starlink router that comes in the Starlink kit box.
Here are the specifications of the Starlink mesh router:
- IEEE 802.11a/b/g/n/ac standards.
- Dual band 2.4GHz and 5GHz.
- 3×3, MU-MIMO.
- Operating Temperature: -22°F to +122°F (-30°C to +50°C).
- WPA2 and WPA3 security.
- IP54 rated (water resistant), not made for outdoor use.
Features
The Starlink mesh router is easy to install. You just plug it in and pair it using the Starlink app. The mesh node improves the overall speed of your network. It optimizes speed throughout your home, making it a reliable internet connection.
Design
The Starlink Mesh router has an elegant rectangular shape that adds a more luxurious touch. The shell of these routers/nodes is bright plain white.
Ethernet Adapter
The Starlink Mesh router contains Ethernet adapters. So, you can connect your Ethernet devices to the router through a wired connection using the Starlink Ethernet adapter, which will give your internet a significant speed boost.
Capacity
You can add 3 mesh nodes to your Starlink network. It will allow you to connect up to 128 devices to the mesh network.
Check out the easiest way for remotely connect to the Starlink app.
How to Configure a Starlink Mesh Node
Setting up a new mesh node to an already existing Starlink network is super easy and takes no more than 5 minutes. You just have to plug in the mesh router to your outlet and connect it to the main Starlink router wirelessly using the Starlink app.
Here are the steps to configure a Starlink mesh node:
- Check and ensure you are connected to the Starlink WiFi network.
- Plug in your Starlink mesh node to an AC power outlet.
- Launch the Starlink app.
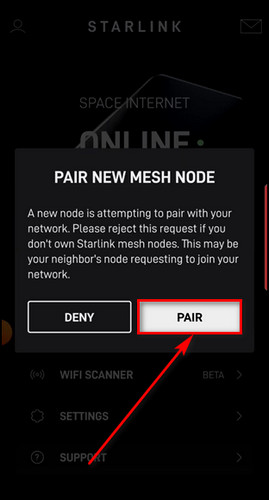
- Wait for 1 to 2 minutes, and a PAIR NEW MESH NODE notification will pop up.
- Tap on the PAIR button.
After these steps, the node will start to connect with the Starlink network. The process might take about 1 to 2 minutes. When the connection is confirmed, the node will appear on the NETWORK screen in the app. 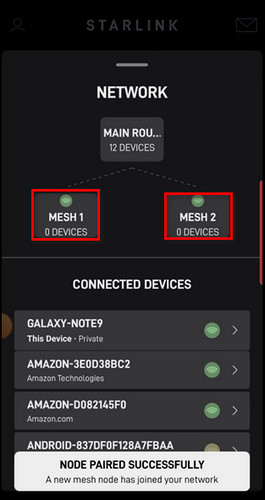
Now that you know how to set up a Starlink mesh router, let’s find the perfect place for the router to greatly improve internet speed.
How to Find the Location of a Starlink Mesh Node
Mesh nodes work best when they’re no more than one to two rooms apart. You need to Make sure the main Starlink router that comes in the Starlink Kit box and mesh nodes are evenly spread out but not too far from each other for reliable Wi-Fi coverage.
You can use the Wi-Fi Scanner feature of the Starlink app. It will help you understand where to place the mesh node.
Here’s how to find the location of a Starlink mesh node:
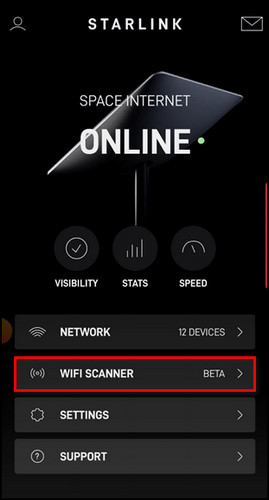
- Open the Starlink app.
- Tap on the WIFI SCANNER.
- Select I’M READY.
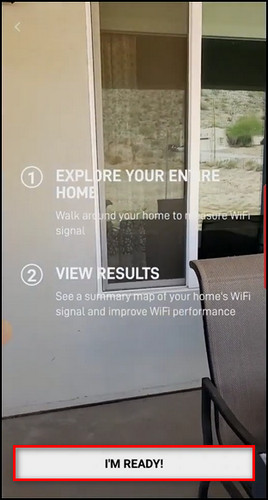
- Walk around your entire house holding the phone.
- Tap on VIEW RESULTS when you are done.
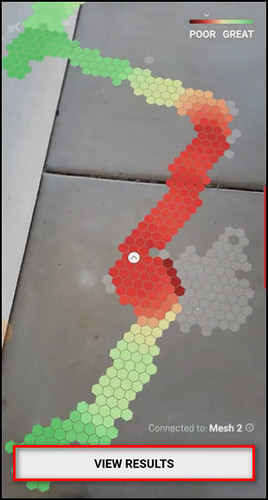
Now, you will see the signal strength of your Starlink network. The green areas have a good signal, so you don’t have to place any mesh nodes there. The yellow areas have medium signal strength.
But the red zones have a very weak signal, and you need to put a mesh node in any of those locations. 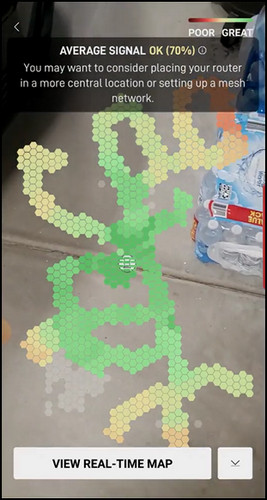
Place the router upright and in an open space. Do not place it near objects that can interfere with the signal, such as a microwave oven. Put it in a raised position, like on a shelf.
Read more on Does Starlink Offer Satellite Phone Service.
How Much Do Starlink Mesh Nodes Improve Internet Speed?
It is no secret that Starlink mesh nodes increase the signal strength of your network. That’s why their demand is so high.
But exactly how much do the mesh nodes improve the internet speed?
To find out, I ran three-speed tests under different conditions.
For my first condition, I disconnected all the mesh nodes and ran the speed test on the device connected only to the primary Starlink router on the other side of the house.
After that, I connected 2 mesh nodes to my Starlink network both wirelessly and using ethernet, ran the speed tests separately and compared the test results.
Here’s what I have found:
| Starlink network with Starlink router only | Starlink network with 2 mesh nodes wireless connection | Starlink network with 2 mesh nodes wired connection | |
|---|---|---|---|
| Speed on Laptop | 100 Mbps | 200 Mbps | 450 Mbps |
| Speed on iPhone | 25 Mbps | 225 Mbps | 500 Mbps |
On the laptop, the speed became 2X faster and on the iPhone, 9X faster when the devices are connected to a mesh router.
Advantages of Starlink Mesh Nodes
The Starlink mesh routers don’t just enhance the internet speed; they also increase signal stability and the network range. They put less stress on the central Starlink router, provide better security and have a much simpler infrastructure.
Here are the advantages of Starlink mesh nodes:
- If one node becomes faulty, the whole network doesn’t just go down. You can still have internet service via the main Starlink router.
- Mesh networks can transfer data over a greater distance, and you can have internet service at every corner of your house, even if you have multiple floors.
- The central router doesn’t have to produce a signal strong enough to reach the device. The signal just has to reach a mesh node between itself and the device.
- Mesh networks do not need as much infrastructure as other network configurations.
Disadvantages of Starlink Mesh Nodes
Although Starlink mesh nodes have some great features, they are not perfect, and many ordinary features are not seen, such as changing the device name on your network and setting bandwidth limits which are available in 3rd party mesh networks.
Here are the disadvantages of Starlink mesh nodes:
- The Starlink mesh router uses Wifi 5 (802.11ac), which is not the latest version.
- The mesh nodes only have a dual radio band with 2.4GHz and 5GHz channels. They don’t have a third channel which many 3rd party mesh routers have.
- Starlink mesh nodes don’t let you set bandwidth limitations or traffic priority for your devices.
- You cannot modify the names of your devices on the Starlink network or view the internet usage of each device.
What are Some Alternatives for Starlink Mesh Nodes?
If you don’t want to pay $130 for a Starlink mesh router that doesn’t even support Wi-Fi 6 and doesn’t have a tri-band channel, you can purchase 3rd party mesh routers. But you should be careful as the Starlink network does not support all routers.
Below I’ve listed the routers that can be used as mesh nodes in the Starlink system.
Here are some alternatives for Starlink mesh nodes:
TP-Link XE75
With this mesh router, I received 150 Mbps, 150 Mbps, and 50 Mbps for three bands when I connected it to my Starlink residential network. The speeds decreased a bit when I moved to the garden and garage, but not enough to lag UHD videos.
The 2×2 MU-MIMO provided a steady rate even after connecting multiple devices at the same time. Also, due to OFDMA, the delay was lowered by 40-90%. It is perfect if you are into online gaming or streaming.
Here are the specifications of the TP-Link XE75:
- Wireless Standard: Wi-Fi 6E (802.11ax)
- 6GHz Speeds: 2402 Mbps
- 5GHz Speeds: 2402 Mbps
- 4GHz Speeds: 574 Mbps
- WiFi Range: Up to 5500 Sq Ft
- Number of Supported Devices: 200
- Chipset:7GHz Quad Core
- RAM: N/A
- Flash Memory: N/A
- App Support: Yes
Asus ZenWiFi XD6
This mesh router with Starlink residential system provided 190 Mbps for the 5GHz band and 60 Mbps for the 2.4GHz band.
It has an adaptive QoS that allows you to pick from multiple profiles to get the most rapid speed, and you can easily stream 4K and UHD videos on Netflix and play games without lag.
Here are the specifications of the Asus ZenWiFi XD6:
- Wireless Standard: Wi-Fi 6 (802.11k/v)
- 4GHz Speeds: 574 Mbps
- 5GHZ Speeds: 4804 Mbps
- WiFi Range: Up to 5400 Sq Ft
- Number of Supported Devices: 50
- Chipset:5GHz Tri-Core
- RAM: 512MB
- Flash Memory: 256MB
- App Support: Yes
Netgear Orbi RBK752
The mesh router delivered 120 Mbps, 70 Mbps, and 30 Mbps, respectively, for two 5GHz and one 2.4GHz band. Moving slightly away from the router, the speeds dropped to 90 Mbps, 40 Mbps, and 20 Mbps for three bands. But there were no delays.
Here are the specifications of the Netgear Orbi RBK752:
- Wireless Standard: Wi-Fi 6 (802.11ax)
- 4GHz Speeds: 600 Mbps
- 5GHz Speeds: 1200 + 2400 Mbps
- WiFi Range: Up to 3750 Sq Ft
- Number of Supported Devices: 40
- Chipset:4GHz Quad-Core
- RAM: 1GB
- Flash Memory: 512MB
- App Support: Yes
FAQs
How do I create a mesh network with Starlink?
To create a mesh network with Starlink, you need to add Starlink mesh nodes to the network. If you use a 3rd party mesh router, You’ll need a Starlink Ethernet adapter to connect the node to the Starlink router.
How do I connect to Starlink mesh node?
If the Starlink mesh node is closer to you and its signal is stronger than the primary router, your device will automatically connect to the mesh node.
Do mesh nodes interfere with each other?
Yes, mesh nodes can interfere with each other if there are many wireless devices on the same channel.
Final Thoughts
Starlink mesh nodes significantly increase internet speed and stability. But the wrong configuration and wrong node placement can make the $130 product worthless.
But if you follow the steps I’ve described here, you have nothing to worry about, and you’ll get the most out of the nodes. And if you want to use mesh routers with more features with your Starlink system, I’ve provided the 3 best routers for you.
Let me know if you have further questions regarding mesh nodes. See you in the comment section.